Saturday, September 21, 2019

Gideon's Bakehouse Chocolate Chip Cookies

Gideon's Bakehouse Chocolate Chip Cookies - made dough September 2, 2019 from Oola
I’ve never heard of Gideon’s Bakehouse or had one of their chocolate chip cookies so I don’t know if this is a faithful copycat or not. But I do know it’s a damn good chocolate chip cookie. 

I was intrigued by this one as it calls for a combination of cake flour and bread flour. Normally you use cake flour for a softer, more tender crumb and bread flour for something more chewy. Combining them together seems like the same as using all-purpose flour to get the best of both worlds. 

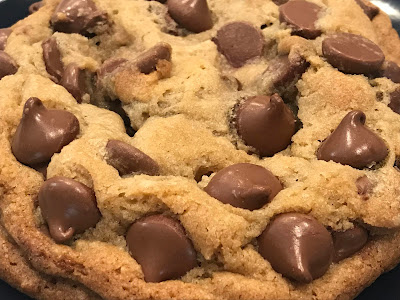
But any excuse to try a new chocolate chip cookie is fine with me so I did. And I’m glad I did as this turned out to be an excellent cookie. Crisp at the edges, chewy in the middle, great caramelized brown sugar flavor. Loved it. 


The hallmark of a Gideon’s Bakehouse chocolate chip cookie is that it’s studded all over with chocolate chips. Think porcupine. I genuinely tried it on the larger-than-life-sized taste test cookie I made but since it did spread a little (but not too much), the cookies studded all over the dough ball spread so the baked cookie wasn’t quite as blanketed with chocolate chips as I think it was supposed to have been. 

I did the same with the smaller, normal-people size cookies and the chocolate chips still spread out as the cookie baked. I think I need to be more aggressive and heavy handed with the chocolate chips next time.


1 cup cold butter, cut into small cubes
1 cup brown sugar
1/2 cup granulated sugar
2 eggs
1 1/2 cups cake flour
1 1/2 cups bread flour
1 teaspoon cornstarch
1 teaspoon baking soda
1 teaspoon salt
6 cups chocolate chips, divided
sea salt flakes, for sprinkling
  1. In the bowl of a stand mixer fitted with the paddle attachment, cream the butter, brown sugar and granulated sugar for approximately 5 minutes. Add eggs one at a time, beating after each addition just until combined.
  2. Sift together the cake flour and bread flour. Add cornstarch, baking soda and salt, whisk to combine. Add to wet ingredients and beat until just combined. Do not overmix.
  3. Fold in 2 cups of chocolate chips. Cover bowl with plastic wrap and chill in the refrigerator for 30 minutes.
  4. Pour 4 cups of chocolate chips in a bowl. Portion chilled cookie dough into large dough balls. Cover the entire surface of each dough ball with the chocolate chips. Chill or freeze briefly while oven preheats.
  5. Preheat oven to 400 degrees F. Line baking sheets with parchment paper.
  6. Evenly space dough balls on prepared sheets. Bake for 9-10 minutes or until golden brown. Rest on baking sheets for several minutes then transfer cookies to wire cooling racks to cool completely. Sprinkle with sea salt and let cool completely.


Wednesday, September 18, 2019

Orange Cream Cookies

Orange Cream Cookies - made dough September 3, 2019 from Cookies Unlimited by Nick Malgieri
I've always liked this cookie book from Nick Malgieri and have had my copy for years. I recently dusted it off and paged through it to look up all the recipes I've been meaning to try, also for years.
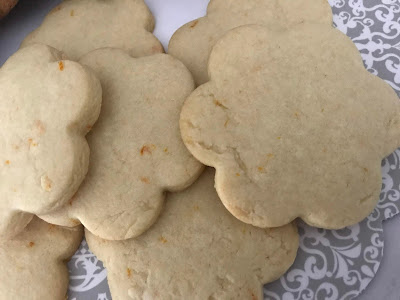
I went with this fairly simple one for Orange Cream Cookies. Don't be put off that it's a "rolled" cookie, meaning you have to roll it out and cut out shapes. You could skip that part and just portion into dough balls if rolling out dough sounds like too much trouble. But it wasn't for this recipe as the dough was really easy to handle and doesn't spread out too much so your cookies will hold their shape.
I didn't roll out the dough too thin as I like my cookies to have a certain degree of thickness. I liked how these turned out.

The cookies are good orange-flavored butter cookies, easily served plain or you can dress them up with a little orange glaze made from powdered sugar and orange juice. Just whisk the two and add one or the other until they’re the consistency you like.

If you want more of a frosting, use more powdered sugar and less orange juice. Vice versa if you want more of a glaze. I served them both ways and both versions were good.

3 1/2 cups all-purpose flour
1 1/2 teaspoons baking powder
1/4 teaspoon salt
16 tablespoons (2 sticks) unsalted butter
1 cup granulated sugar
1 large egg
1 tablespoon finely grated orange zest
1 tablespoon strained orange juice
2 tablespoons heavy whipping cream
  1. In a bowl, combine the flour, baking powder and salt; whisk to mix.
  2. In the bowl of a standing electric mixer fitted with the paddle attachment, beat together the butter and sugar on medium speed until fluffy and light-colored, about 5 minutes. Add the egg and orange zest, beating until smooth.
  3. Lower the mixer speed and beat in half the flour mixture, then all of the orange juice and cream, one at a time. Beat in half the remaining flour. Stop the mixer and work in the remaining flour by hand with a large rubber spatula.
  4. Scrape the dough onto a floured work surface and pat into a rough rectangle of even thickness. Cut the dough into quarters. Wrap three of them and set aside.
  5. Roll out the dough onto a floured surface until it is about 1/8-inch thick. Using a fluted cutter between 2 and 3 inches in diameter, cut the cookies. Place the cookies as they're cut onto baking sheets lined with parchment paper, leaving about an inch of space all around each cookie. Repeat with remaining dough.
  6. Preheat oven to 350 degrees.
  7. Bake cookies for about 15 to 20 minutes or until they first become dry and dull-looking and feel slightly firm when pressed with a finger tip. Do not overbake. Remove to wire racks to finish cooling.

Monday, September 16, 2019

Easy Gluten-Free Pancakes

Easy Gluten-Free Pancakes - made August 30, 2019 from Mama Knows Gluten Free
Still trying to use up my remaining bag of gluten-free flour. I didn't want to try cookies again since, to my mind and taste buds, gluten-free versions just aren't as good as their gluten counterparts. But I did want to try pancakes again since the gluten-free pancakes I'd made before turned out so well.

And so did these. They were different from the other recipe in that the batter was pretty thick. If you don't want thick pancakes that are practically like baked cakes, you might want to use a little more milk. I made the recipe as is and loved the rise and thickness of each pancake. Plus the taste and texture were great. I had to use more maple syrup on these than the other recipe since the fluffiness just seemed to cry "blanket me with syrup" but that added to the flavor and taste, not detracted from it.

Unlike the other gluten-free pancakes though, it's hard to eat more than one before you get full, simply because the pancakes do cook so thick. I made three for the picture and ate a third of it to equal a whole pancake but couldn't finish it and had to eat it as leftovers throughout the day. It was worth it but let's not pretend that helped my diet.
2 tablespoons granulated sugar
2 tablespoons vegetable oil
1 egg
1 teaspoon vanilla extract
1 cup all-purpose gluten-free flour (use a blend with xanthan gum or if it doesn't have it, add 1/4 teaspoon xanthan gum)
1 tablespoon gluten-free baking powder
1/4 teaspoon salt
3/4 cup milk (1-2 tablespoons more if you want thinner pancakes)
  1. Whisk together granulated sugar, oil, egg and vanilla extract. Add flour, baking powder and salt. Whisk in milk, 1/4 cup at a time, until smooth.
  2. Heat frying pan or griddle and spray with nonstick cooking spray. Pour out 1/4 cup of batter and cook over medium low heat until bubbles form in the middle. Flip over and continue cooking for another 2-4 minutes. Repeat with remaining batter. Serve warm.

Saturday, September 14, 2019

Authentic Classic Pad Thai

Authentic Classic Pad Thai - made August 31, 2019, modified from Hot Thai Kitchen
I took some liberties with the original recipe so this probably isn't as authentic as Hot Thai Kitchen intended. But it was more authentic than some of the other recipes I've found in that it uses palm sugar and tamarind concentrate rather than more Westernized ingredients like ketchup, brown sugar, etc. My modifications were more to make it how I customize pad thai when I order it in Thai restaurants.
No surprise, I omitted the bean spouts. Can't stand bean sprouts. They don't taste like anything but they interfere with the texture of the noodles while, when cooked, can look so much like noodles they co-mingle like little noodle imposters but have an annoying crunch I don't like. So no bean sprouts here.
I did genuinely look for tofu in the grocery store to include it but, not being a purchaser of tofu on any regular basis, I couldn't find them. And I didn't want to include them badly enough to track down a store employee to ask where the tofu was. So no tofu. The other ingredients like daikon, garlic chives and peanuts, I also excluded simply because I didn't want them in my version of pad thai. I figure as long as I got the sauce right, that would be good enough.
I did have to make a special trip to the Asian grocery store to find the palm sugar and the tamarind concentrate so if you don't have those handy, you will likely need to find some substitutions, e.g. brown sugar for the palm sugar and ketchup for the tamarind concentrate. Pad thai noodles are more widely available in mainstream grocery stores but I also bought these at the same Asian grocery store since I was already there anyway plus they're always cheaper at the Asian grocery store.

This actually did taste like "real" pad thai. Having the right noodles and the authentic sauce ingredients probably helped. Here's what I did wrong (you know there had to be something) and what I would do better next time: palm sugar doesn't melt like regular sugar in liquid. The palm sugar I bought came in a plastic container of palm sugar pellets that weighed 15 grams per pellet. When I whisked the sauce ingredients together, the pellets didn't dissolve with the addition of the tamarind concentrate, fish sauce or room temperature water. They did gradually shrink over time in the liquid but not nearly enough or fast enough. I would recommend using hot water in the sauce to help with melting the palm sugar.
Second, is I let the rice noodles soak in room temperature water for an hour. That was a good idea as that's one of the blog suggested to prevent the noodles from becoming like mush. After 45 minutes though, the noodles, while pliant, seemed a little coarse and tough to me so I decided it'd be a much more brilliant idea to soak the noodles in boiling hot water for awhile. Fifteen minutes later, you guessed it, pliant mush.

Despite all this though, I still liked how the pad thai turned out. The flavor might've been a little bland but I was okay with that. If you want more spice, add more chili flakes or Thai chilies. I want to try more pad thai recipes now that I (still) have tamarind concentrate and palm sugar to use up but for my first foray, this was pretty good.
Sauce
45 grams palm sugar
1/4 cup tamarind concentrate
2 tablespoons fish sauce
3 tablespoons water

Pad Thai
4 ounces dry rice noodles
8 - 10 shrimp, peeled and deveined
2 cloves garlic, minced
1/2 teaspoon chili flakes
2 eggs, whisked together
3 green onions, green tops sliced into 1" lengths
1 lime
  1. Soak the noodles in room temperature water for 1 hour, until the noodles are very pliable.
  2. Whisk the sauce ingredients together; set aside.
  3. Heat 2 tablespoons of oil over high heat in a wok or large frying pan. Sear the shrimp until just pink. Remove from heat and set aside.
  4. In the same pan, add 1 - 2 tablespoons more oil and saute the garlic until brown. Add chili flakes.
  5. Drain the noodles, add to the pan, add sauce and toss together over medium high heat until noodles have absorbed the sauce.
  6. Once the noodles have absorbed the sauce, push to one side and add eggs to the empty space. Scramble the eggs gently until set halfway. Put the noodles on top of the eggs and let the eggs set another 10 - 15 seconds. Toss mixture together to break up the eggs. Add shrimp, green onions and lime juice; toss together. Serve immediately.

Thursday, September 12, 2019

Chookie Brownies

Chookie Brownies - made August 29, 2019 from Extreme Brownies by Connie Weis
This looks like a very involved recipe but don't let the sheer length discourage you from trying it. Think of it as just making two layers and baking them together. The bottom layer is the chocolate chip layer and you make it as easily as any chocolate chip cookie dough. The original recipe has you separating out some of the dough to bake as individual mini cookies later and that's what I tried to do (we'll get to that). Then you bake the cookie layer for 25-ish minutes, take it out, let it cool then top it with the brownie batter to bake further.
I got a little creative and after the cookie layer had come out of the oven and cooled for a few minutes, I spread it with salted caramel sauce from Trader Joe's. I envisioned a nice separate layer of caramel between the baked chocolate chip cookie layer and the brownie layer. You know how I'm always chasing that separate caramel layer.
And it eluded me once again. I think I have to give up on Trader Joe's caramel sauce for that and stick to melting some Kraft caramels with milk (I keep saying that and not doing it). But I really thought, since the cookie layer was already baked, that the caramel sauce wouldn't seep to the bottom. I was wrong.

But I wasn't completely wrong to try it as the caramel layer did keep the cookie layer moist even though it ended up going back into the oven to bake the brownie layer atop it. The brownies took a little longer than 25 minutes in my oven and I worried that the cookie layer would be overbaked and dry. It wasn't, probably thanks to my errant caramel (non)layer.
I cheated on the semisweet chocolate glaze as I was running low on chocolate chips. So I frosted it with hazelnut spread (Kirkland brand which doesn't use palm oil). For the taste test picture, I did bake one of the "mini" chocolate chip cookies from the reserved cookie dough. Unfortunately, the cookie spread to not only bigger than the mini size I had in mind but it also spread thin. Bummer.

This was a cute concept but in practical reality, the size of the cookie topper makes for a very big piece. I made the dough balls pretty small but since they still spread, they should've been smaller. Or you can leave them out altogether and sprinkle the frosted top with toffee bits, nuts or chocolate chips. Or all three. Whatever it takes to fit your definition of "extreme brownies". Because I used a rich cocoa (Valrhona), the brownie layer was fudgy decadence. This is the kind of over-the-top brownies you want to cut small and let your recipients savor, rather than gorge. They'll thank you later for moderation.
Chocolate Chip Cookie Layer
1 1/2 sticks (6 ounces) unsalted butter, room temperature
1/2 cup (3.5 ounces) granulated sugar
1 packed cup (8 ounces) dark brown sugar
3/4 teaspoon salt
2 large eggs
2 teaspoons pure vanilla extract
1 tablespoon dark corn syrup
2 cups (9 ounces) all-purpose flour
1/2 cup (2 ounces) cake flour
1 teaspoon baking soda
1 12-ounce package chocolate chips

Brownie batter
1 1/2 sticks (6 ounces) unsalted butter
1 cup (6 ounces) 60% cacao bittersweet chocolate chips
3 large eggs
1 1/2 cups (10.5 ounces) granulated sugar
1/2 teaspoon salt
1 teaspoon pure vanilla extract
1/2 cup and 1 1/2 tablespoons (2.5 ounces) cake flour
1/2 cup and 1 tablespoon (2.1 ounces) Dutch-processed unsweetened cocoa powder

Semisweet chocolate glaze
2 1/2 tablespoons canola oil
1 10-ounce package semisweet chocolate chips
  1. Chocolate chip cookie layer: using a stand mixer fitted with the paddle attachment, beat the butter briefly on medium speed to soften. Gradually add the granulated sugar, dark brown sugar and salt; beat on medium speed until lighter in color and creamy, 3-4 minutes.
  2. Increase the mixer speed to medium high and add the eggs, one at a time, beating to incorporate after each addition. Scrape down the sides of the bowl.
  3. Reduce the mixer speed to low and add the vanilla and corn syrup. Increase the mixer speed to medium and beat for 30 seconds.
  4. Whisk together the all-purpose flour, cake flour and baking soda in a small bowl. Add to wet ingredients in 2 additions, mixing after each addition until just combined. Fold in the chocolate chips. Cover the bowl with plastic wrap and refrigerate for at least 30 minutes.
  5. Line a 9 x 13-inch baking pan with foil and spray lightly with nonstick cooking spray.
  6. Remove 1 cup (9 ounces) of the cookie dough and set aside. Spread the remaining cookie dough evenly on the bottom of the foil-lined pan; smooth as much as possible with a small offset spatula. Cover and place the pan in the refrigerator to chill the dough for at least 1 hour.
  7. When ready to bake, preheat oven to 350 degrees F. Bake for 25 minutes, until the top is nicely browned and firm. Transfer the pan to a wire cooling rack. Maintain the oven temperature at 350 degrees F.
  8. While the cookie base is baking, line a half-sheet pan with parchment paper. Using a 1 1/4-inch scoop, form the remaining cookie dough into about 22 dough balls. Stagger them on the lined sheet pan and bake for 7 minutes, turn the pan and bake for an additional 4 to 5 minutes, until the cookies are lightly browned. Transfer the cookies to a wire cooling rack.
  9. Make the brownies: melt the butter and chocolate chips in the top half of a double boiler set over hot water, whisking until smooth and combined.
  10. In a separate bowl, lightly beat the eggs. Whisk sugar and salt into eggs just until incorporated. Briefly whisk the warm chocolate mixture then gradually whisk into the egg mixture until just combined. Briefly whisk in the vanilla.
  11. In a separate bowl, whisk together the flour and cocoa powder. Sift into the batter and stir until just combined. Pour the batter over the cooled cookie layer and spread evenly with a small offset spatula. Bake for 25 minutes, until a toothpick inserted in the center comes out clean or with a few moist crumbs. Transfer the pan to a cooling rack and let cool for at least 15 minutes.
  12. Make the glaze: in the top half of a double boiler set over hot water, combine the oil and chocolate chips. Whisk until chips have melted and mixture is smooth.
  13. Pour the glaze over the brownie slab and use a small offset spatula to spread it evenly. Let sit at room temperature for 1 hour then refrigerate the pan for 7 to 8 hours or overnight. Lift out of pan and cut into even squares. Garnish each square with a chocolate chip cookie.


Tuesday, September 10, 2019

Honey Lime Cilantro Shrimp

Honey Lime Cilantro Shrimp - made August 27, 2019 from Pretty Little Apron 
I'm going to give major props to this recipe. Only a few ingredients, simple to prepare and tastes great. Plus I love the lime-cilantro flavor combination. Oddly, I don't like honey in baking but I seem to prefer it in cooking, especially combined with other flavors like soy sauce or lime and cilantro like this recipe.
I always say I'm not a very good cook and I have a low bar for my own cooking. "Don't give yourself food poisoning" is my mantra and my low bar.
But now that I'm trying to cook a little more, I have to admit I'm enjoying it. I'm (gradually) learning that cooking doesn't have to be a big production, it doesn't have to be gourmet and I can expect a little more from myself than "didn't have to have my stomach pumped".
Granted, it's become much easier now that I work from home and can turn off my computer, take 3 steps into my kitchen and put together something like this in under 10 minutes. Another 5 to do the dishes afterwards as it doesn't make much of a mess either.
Even in my old life where I put in a 12-13 hour day, had an irritating, traffic-laden commute home and would be crabby and tired, this dish would've met my criteria and abilities to put together a quick weeknight meal that also tasted good.
 You'll notice I also added rice. Yeah, my low carbing days are over for now. This dish made it worth it.
3 tablespoons butter
2 cloves garlic
2 pounds shrimp, peeled and deveined
1/4 teaspoon salt
adobo and cumin to taste
1/4 cup honey
Juice and zest from 1 lime
1/2 cup cilantro, chopped
  1. In a large skillet, melt butter and add garlic.Saute until cooked and fragrant. 
  2. Add shrimp and sprinkle with salt, adobo and cumin to taste. Cook shrimp through until just no longer grey.
  3. Add honey, lime and cilantro. If sauce is too thick, add 1 tablespoon of butter. Serve warm.


Saturday, September 7, 2019

Copycat Levain Bakery Chocolate Chip Cookies (Savor the Best)

Copycat Levain Bakery Chocolate Chip Cookies - made dough August 9, 2019 from Savor the Best
Yes, another Levain Bakery copycat chocolate chip cookie. Yes, another that isn't really like Levain Bakery's but still a good chocolate chip cookie recipe nonetheless. Honestly, I think I've given up on actually finding a true Levain copycat but along the way, I've collected some very good chocolate chip cookie recipes so it's still a win.

This copycat had crisp edges and it had great caramelized brown sugar flavor and a wonderful chewy texture. Levain's cookies have a crispness to the outside of the whole cookie, not just the edges and the flavor wasn't quite as brown buttery as this one was.

It stayed thick and didn't spread much, partly because, as usual, I baked it from frozen dough. Also, as usual, I made the test cookie really big so that big chunk of dough ball didn't have time to spread very much before it baked.

If you make this normal-people-size, it will still stay somewhat thick and not spread too thin, which always makes it a good chocolate chip cookie recipe in my book.
2 cups all-purpose flour (240 grams)
2 cups bread flour (240 grams)
1 1/4 teaspoons salt
1 teaspoon baking powder
1 teaspoon baking soda
1 1/2 cups butter (3 sticks), melted
2 cups brown sugar (420 grams)
1 cup granulated sugar (200 grams)
2 eggs
2 egg yolks
1 tablespoon vanilla extract
3 1/4 cups chocolate chips (553 grams)
1 1/2 cups toasted, chopped walnuts, optional
  1. Preheat the oven to 350 degrees F. Line a baking sheet with parchment paper.
  2. Mix all-purpose flour, bread flour, salt, baking powder and baking soda in a medium bowl; set aside.
  3. Using an electric mixer, cream the butter, brown sugar and granulated sugar until combined, about 2 minutes. Beat in the eggs, egg yolks and vanilla extract
  4. Stir in the flour mixture by hand or on the lowest setting of the mixer until just combined; do not overmix.
  5. Fold in the chocolate chips and walnuts with a wooden spoon. Portion the dough into 6 ounces balls. Chill or freeze for at least 30 minutes, several hours or overnight.
  6. When ready to bake, preheat oven to 350 degrees F. Line baking sheets with parchment paper.
  7. Evenly space the dough balls on the baking sheet. Bake for 15 to 18 minutes or until edges are set and middles no longer look raw. Do not overbake.