Friday, January 26, 2018

Bakery Review: Manresa Bread

Manresa Bread - visited January 7, 2018
One of the things I love to do - and don't do enough of - is travel. And only another foodie would understand that part of my travel plans are governed by what food my destination is known for, what famous bakeries or restaurants I can go visit while I'm there and, to be perfectly candid, sometimes I decide to go somewhere simply because of a well-renowned bakery or restaurant (usually a bakery, because, hello, it's me) at that location. Yes, my travel plans are governed by my taste buds, stomach and gluttony. What? That's also why I workout 6 days a week.
I even do some serious research. Meaning me and Google spend some time together while I plug in search terms like "top bakeries in the US" or "best cupcakes in (insert geographic area I've thought about visiting)". I go on a virtual gastronomic tour for extended periods of time. I compiled a list of places I wanted to try. Fortunately, it also occurred to me to research what's in my own backyard.
Which led me to stumble on Manresa Bread. You might have heard of David Kinch's Michelin 3-star Manresa restaurant. Yes, Manresa Bread is of that Manresa. I've never been to the restaurant (on my culinary bucket list) but I didn't see why I couldn't just pop on over to Manresa Bread as soon as I discovered its existence.

And pop on over I did, on an early Sunday morning on my way to church. I figured I couldn't finish off a load of bread during its peak freshness period but Manresa Bread offered a host of other choices to drool over.

I ended up getting the individual-sized Monkey Bread, kouign amann (my new favorite ever since I had one from Dominique Ansel Bakery in Soho), a pain au chocolat and a whole wheat cookie. Before your eyebrows raise at that plethora of riches, I did share with my parents after church. If I couldn't eat a whole load of bread, I certainly couldn't eat all that but I could try a little of each, right?

Although, true confessions, I did eat the pain au chocolat myself as my breakfast that morning. A pain au chocolat, if you're never had one, is made of croissant dough so it has the same flakiness, shaped as a rectangle and filled with a stick of chocolate. That would be the good chocolate, mind you.


Pain au Chocolat
Manresa's pain au chocolat was delicious. The main drawback was it was almost too flaky. As in totally messy to eat. I think I was half-covered in pastry flakes before I had made my way halfway through it. While the earmark of a good croissant/pain au chocolat is that flakiness, I think I prefer something just slightly less flaky, not just for less mess but I don't like pastry that's too airy. But that's me.

Monkey Bread
The triangle of monkey bread that I sampled was good as well, just a little heavier. I think it tastes better warm.
Kouign Amann

Inside the monkey bread
The kouign amann was, not surprisingly, my favorite. There's something about that caramelized crunchy outer crust that's just spectacular. Next time I'd probably skip the monkey bread, more because I'd already tried it, not that it wasn't good, but I'd double down on the kouign amann.
Inside the kouign amann
The whole wheat cookie was the surprise in that I ended up liking it more than I expected. I'm very, very spoiled when it comes to cookies since I have the luxury of usually eating them while they're still warm from the oven. Manresa's whole wheat cookie not only tasted good but I liked the texture. Not too heavy or dense but satisfyingly chewy.
Whole Wheat Cookies
Overall, Manresa Bread is a highly recommend and I'd go back again. As soon as I work out a lot more.

Saturday, January 20, 2018

Sweet Potato Cheeseburger Casserole

Sweet Potato Cheeseburger Casserole - made December 30, 2017 from Paleo Hacks
By now, you might have realized the past few recipes I’ve been posting all have sweet potatoes in them. This is no exception. You can safely take that as a sign that I bought a bag of sweet potatoes from Costco. Even so, I had to give half the bag to my parents as there was no way I could consume them all in time, even with making different recipes and putting most of them in the freezer for later consumption.


This was another fairly easy recipe to put together, made even easier by not having to slice and dice the meat since it’s just ground beef you have to break up while you’re browning it. Also fairly healthy since it’s tomato-based rather than cream-based. My only issue, which wasn’t really an issue, is, despite the name, there is no actual cheese in this cheeseburger casserole. But, ironically, it did taste like what I imagined a cheeseburger casserole should taste like. The spices (Penzey’s, of course) were just right and gave it a good flavor. I still have spiralizing issues but that didn’t detract from the taste.

You’ll notice I left out a few ingredients than what the recipe decreed. Yeah, if I don’t eat it, I don’t add it to my cooking. If you want to make it cheesy, simply top with cheddar cheese at the end and let it melt over the dish.
3 medium sweet potatoes, spiralized
1 tablespoon extra virgin olive oil
1 medium onion, finely chopped
1 medium carrot, chopped (I left it out)
1 celery stalk, chopped (I left it out)
1 pound grass-fed ground beef
1 teaspoon dried oregano
1/2 teaspoon garlic powder
1 teaspoon smoked paprika
1/2 teaspoon chili powder
1 1/2 cups chicken stock
1 cup crushed tomatoes (I left it out)
chopped tomatoes and green onion for garnish
salt and pepper to taste
  1. Heat extra virgin olive oil in a large skillet over medium-high heat; add onion, carrot and celery. Cook for 3 minutes until onion is translucent and veggies are softened.
  2. Increase heat to high and add ground beef. Cook for 5 minutes, breaking meat up as it cooks, until beef is browned and no longer pink. Add oregano, garlic powder, smoked paprika and chili powder. Season with salt and pepper to taste.
  3. Stir in the chicken stock and crushed tomatoes. Reduce heat to medium-low and bring to a simmer; add spiralized sweet potatoes and cook for another 10 minutes until sweet potatoes are slightly softened and sauce is reduced. Remove from heat and top with chopped tomatoes and green onions. Serve warm.

Saturday, January 13, 2018

Sweet Potato Mac and Cheese

Sweet Potato Mac and Cheese - made December 27, 2017 from Tastefully GF
I think I did this recipe wrong. It was meant to be gluten-free but I didn’t have the gluten-free flour suggested in the recipe so I just used regular flour. But I didn’t brown it – I know, I went rogue. It thickened up considerably more than I expected so I ended up adding more milk than was called for. It still made for a thick consistency though and I ended up with more “sauce” than sweet potato. Calling it sauce might be a stretch. “Paste” might be more accurate.

My other angst is with my spiralizing of the sweet potato. I think I’m spiralizing-impaired. I swear I’m using the spiralizer correctly but mine don’t come out as long spirals that look like noodles. They look like short bits of sweet potato. How do other people do it?? All the pictures on pinterest look good enough to seem like real noodles. Mine end up looking like stunted potato bits. Hmph.
So I can’t say this recipe was a rousing success. The taste itself was good but I did everything wrong from the spiralizing to the sauce-paste. Too bad since I like “mac and cheese”. I just can’t seem to make it well, at least not this time.
1 medium-sized sweet potato, peeled
2 teaspoons olive oil
3 tablespoons gluten-free all purpose flour (I used regular all-purpose flour)
3/4 cup milk
1/4 cup shredded cheddar cheese
1 tablespoon nutritional yeast (optional)
For protein, I added a cup of cubed chicken thighs

  1. Make the sweet potato noodles using a mandolin, spiralizer, julienne peeler. 
  2. Heat the olive oil in a skillet over medium high heat. When the oil is warm, add the sweet potato. Cook the sweet potato, stirring frequently, until the “noodles” have softened. It takes about 5 minutes, depending on the thickness of the noodles. Set the cooked noodles aside.
  3. Add the flour to a small saucepan and turn the burner onto medium. Stir the flour continuously. Watch closely for the color of the flour to change. The flour will darken in color and resemble sand. It goes from white to sandy quickly, so don’t look away for long! When you see this color change, add the milk and whisk to get out any lumps.
  4. Add the cheese and the nutritional yeast, and stir until melted.
  5. When the sauce is smooth, stir the cooked sweet potato into the cheese sauce. Season with salt and pepper, if desired.
  6. Serve warm. This mac & cheese is best fresh.

Monday, January 8, 2018

Sausage Pizza Twice-Baked Sweet Potatoes

Sausage Pizza Twice-Baked Sweet Potatoes - made December 27, 2017 from Paleo Running Momma
When I was in college, about a millennia ago, my freshman year college roommate made twice-baked potatoes. Having grown up in an Asian household where rice was the main carb staple, I’d never had such a thing before. I have nothing against potatoes, particularly French fries *cough*, and I actually like baked potatoes but only if they’re cooked well. As in not underdone. There’s little risk of that with twice-baked potatoes since you literally bake them twice.
I prefer sweet potatoes over white potatoes so I was looking forward to trying out this recipe. Mine didn’t come out anywhere nearly as picturesque as the original blog I got the recipe from so don’t go by my pictures. 
This was a fairly healthy, tasty dish. The only issue is sweet potatoes bake up much softer than white potatoes so leaving some sweet potato around the potato skin was tricky because the skin wants to come off. 
They also didn’t crisp up like white potatoes would, at least not when I baked them the second time. The sausages started to darken before any crisping happened so I took them out before the filling burned. They didn’t look anything like the beautiful twice-baked potatoes of my freshman year college roommate but they tasted good nonetheless.
4 small/medium sweet potatoes
3/4 pound sweet Italian sausage
2 teaspoons olive oil
1/3 cup chopped sun-dried tomatoes (I left out)
1/2 small onion, chopped
3-4 garlic cloves, chopped
large pinch or more crush red pepper flakes
salt to taste
1 1/2 teaspoons dried Italian seasoning
  1. Preheat oven to 400 degrees. Coat sweet potatoes lightly with coconut oil or bacon fat; sprinkle with salt if desired. Bake on a foil-lined sheet 1 to 1 1/2 hours until soft on the inside. 
  2. Heat a large skillet over medium heat and add 2 teaspoons cooking fat. Crumble the sausage into the skillet and sprinkle with red pepper flakes; stir and cook until the sausage begins to brown.
  3. Add the onions to the skillet; stir and cook until translucent, then add the garlic, sundried tomatoes and Italian seasoning. Continue to cook until the mixture is soft and toasty, about 2 minutes, then remove from heat.
  4. Cut each baked sweet potato in half, scoop out inside, leaving a very thin layer, then mix with cooked sausage pizza mixture. Add salt to taste.
  5. Scoop the sweet potato-sausage mixture back into baked potato skins and bake in 400-degree oven for 15-20 minutes or until browned on top and skin starts to crisp. Serve hot.

Wednesday, January 3, 2018

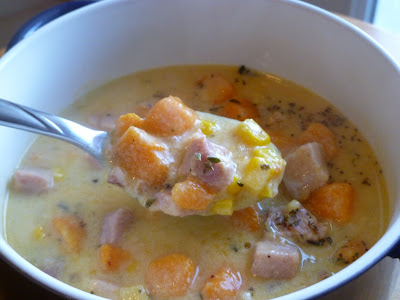
Sweet Potato, Ham and Corn Chowder

Sweet Potato, Ham and Corn Chowder - made December 26, 2017 from Cooking Classy
This is the time of year when I temporarily switch my blog away from desserts and focus on “real food”. Not always necessarily “healthier” food but considering I normally live on takeout and easy-to-prepare (i.e. “microwave”) food, anything I cook myself that’s edible is a step up.

I’m happy to say this recipe is not only edible but is surprisingly delicious. The surprise is more that I cooked it, not that I expected the recipe to be bad. It has all the elements I love in a chowder: creamy soup base, sweet potato, ham and corn. And it’s easy to make! You know that’s important for the cooking-impaired like myself.
The hardest part, which wasn’t hard at all, was prepping the ingredients. Dice the onions, slice and cube the ham and the sweet potatoes, follow the rest of the recipe as is. Super easy. This is best served and eaten within a day or two of making it. I ended up portioning most of it into Ziploc containers and freezing them. When I did thaw one to eat at a later date, the water separated a bit but just heat it up and stir back to a more even consistency and you’re fine.
1 1/2 tablespoons olive oil
1 1/4 cups chopped yellow onion
1 cup peeled and diced carrots (I left it out)
1 cup diced celery (I left it out)
1 cup chopped bell pepper (I left it out)
1 tablespoon minced garlic (3 cloves)
2 15-ounce cans low-sodium chicken broth
3 cups 1/2-inch peeled and diced sweet potatoes, about 1 large
1 teaspoon dried basil
1/2 teaspoon dried thyme
salt and freshly ground black pepper
5 tablespoons unsalted butter, diced into 1-tablespoon pieces
1/3 cup all-purpose flour
3 cups whole milk
1 1/2 cups diced cooked hickory smoked ham
1 1/2 cups frozen corn
1/2 cup shredded sharp cheddar cheese
3 tablespoons chopped fresh parsley
  1. Heat olive oil in a large pot over medium-high heat. Add in onions, carrots and celery; saute 4 minutes.
  2. Add in bell pepper and garlic; saute 1 minute longer.
  3. Add in chicken broth, sweet potatoes, basil and thyme; season with salt and pepper to taste.
  4. Bring mixture to a boil then reduce heat to medium-low and simmer until sweet potatoes and vegetables are tender, about 15-20 minutes.
  5. Meanwhile, melt butter in a medium saucepan over medium heat. Add in flour and cook, whisking constantly, 1 minute.
  6. Pour milk into flour mixture, stirring constantly, and bring mixture to a light boil; remove from heat.
  7. Stir ham and corn into soup once veggies are tender and heat through, about 2 minutes. Stir milk mixture into soup. Stir in cheddar cheese and parsley. Serve warm.

Thursday, December 28, 2017

2017 Holiday Dessert Party #2

Holiday Dessert Party #2 - hosted December 17, 2017
With the holiday season winding down, my almost-final tally is over 50 dozen cookies and brownies baked this season. Normally I don't keep track but I was asked about it in an interview for a story for the Christian Science Monitor so I did a quick tally, going through what I had baked for my first dessert party for my friends, what I baked for the benefit for the domestic violence shelter, what I baked as gifts for friends, coworkers, people at church and what I baked for my second holiday dessert party, this one for family.
Apple Cobbler aka Apple Crumble Bars
You'll recognize some of what I'd done for the first dessert party because they're perennial favorites with almost everyone but I also mixed it up a little with some specific family requests and favorites. Apple cobbler is always a family favorite and this one disappeared quickly.
Bakery-Style Chocolate Chip Cookies
Two of my nephews like chocolate chip cookies so I had to bake one of my favorite recipes for them. For my other nephew, Vanilla King, it was Snickerdoodles.
Soft and Thick Snickerdoodles
My cousin Christine liked these butter cookies from her goodie bag last Christmas so I made them again for her.
Diamond-Edged Melt-in-Your-Mouth Butter Cookies
My niece always likes peanut butter cookies so I made one of my favorite peanut butter cookies.
"Best Ever" Peanut Butter Cookies
 Plus a repeat of what I made for her birthday earlier - Kahlua Cake.
Kahlua Cake
My cousin Elinor requested lemon bars. These had the added advantage of being made with lemons from her mom's lemon tree.
Lemon Bars

Peanut Butter & Milk Chocolate Kiss Cookies
My cousin Miriam was supposed to come but she had a conflict with a birthday party her oldest son wanted to go to. Nevertheless, I baked these white chocolate macadamia cookies, her favorites.
White Chocolate Macadamia Cookies
So it ended up being something for everyone. Click on the caption under each picture for the recipes.

Saturday, December 23, 2017

Soft and Chewy Gingersnaps

Soft and Chewy Gingersnaps - made dough December 10, 2017, modified from Baker by Nature
The original recipe called for browning the butter, chilling to solid state, softening then mixing it to make the cookie dough. To be honest, I didn't have that kind of time. I needed to make cookie dough for the benefit for our local domestic violence shelter, I had to drop off the cookies on a Friday which meant I had to bake over 5-6 dozen cookies the night before and I was making cookie dough leading up to baking night. No time to mess with browned butter melting, chilling, mixing. I also didn't know if I would like orange flavor mixed with ginger and molasses (I have very simple taste buds) so I left out the zest in the original recipe as well.

Fortunately, these cookies turned out pretty well despite my simplifications. I do wonder if they would've been even better with browned butter but they were pretty good even without browning the butter so my rush job didn't hurt it. I also made a batch to bring into work and they went over really well. The kind of well where people stopped by my desk, stopped me in the hall and instant-messaged me that they liked it. That's my unofficial gauge of whether a recipe turned out.
I liked the Ginger Krinkles I posted earlier but surprisingly, I liked this one even better. I say surprisingly because I usually am not big on ginger molasses cookies. I know they're popular this time of year but I've never been a fan. Yet there was something about these cookies I really liked. Texture was good and so was the flavor. Not too spicy, not overly spiced and not heavy on the molasses. This might be another cookie that goes on the permanent holiday baking roster.
3/4 cup unsalted butter
3 cups all-purpose flour
2 1/2 teaspoons ground ginger
1 teaspoon ground cinnamon
1/4 teaspoon ground cloves
1 teaspoon baking soda
1/2 teaspoon salt
1 cup granulated sugar
1/2 cup light brown sugar, packed
1 teaspoon vanilla extract
2 large eggs
1/4 cup mild molasses

Sugar coating: 1/2 cup granulated sugar

  1. In a large mixing bowl, whisk together flour, ginger, cinnamon, ground cloves, baking soda and salt; set aside.
  2. In the bowl of a stand mixer fitted with the paddle attachment, beat butter until smooth, about 1 minute. Add in granulated sugar and brown sugar; continue beating until and fluffy, about 3 minutes. Beat in vanilla.
  3. Add eggs, one at a time, beating after each addition just until combined, scraping down the sides of the bowl as needed. Add the molasses and beat until combined. 
  4. Reduce mixer speed to low and gradually add in dry ingredients, beating until just combined. Portion into dough balls, cover and chill or freeze for several hours or overnight.
  5. When ready to bake, preheat oven to 350 degrees F. Line baking sheets with parchment paper. 
  6. Roll frozen dough balls in granulated sugar, coating completely. Evenly space on parchment-lined baking sheets and bake cookies, one baking sheet at a time, for 9-10 minutes or until the cookies are puffed and lightly golden. Do not overbake. Cool on baking sheet for 10 minutes before removing to wire racks to cool completely.