Thursday, December 21, 2017

White Chocolate Coconut Macadamia Cookies

White Chocolate Coconut Macadamia Cookies - made dough December 10, 2017 from Delightful E Made
One thing I'm always mindful of, especially around the holidays, is to look for ways to give back. It may sound sappy but I feel fortunate to have achieved what I've achieved and I'm very much aware that I didn't do it on my own. Yes, I worked hard for it but I also had opportunities that opened up because of the support from others. That's something I'll never forget. So in the spirit of giving back, I was delighted when my friend Hildy made me aware of an opportunity to help support a local domestic violence shelter. They were holding a benefit for the shelter and needed dozens of cookies to serve at their benefit.
The cookies had to be dropped off between 9 am - 5 pm on a certain Friday. That posed some logistical difficulties for me because that meant I had to get home early enough on Thursday night to have time to bake dozens of cookies, cool them, package them up and I had to find time during the work day Friday to leave work long enough to deliver them to the drop off site, about 10 miles from my office. That may not sound like a big deal but I'm still working 13-14 hours a day and oftentimes meetings come up that I have to attend so it isn't easy to get away from the office, even for half an hour at lunch.
M&M Cookies

Soft and Chewy Gingersnaps (recipe to follow)
BUT, you make time for what's important and this was important to me. I spent the weekend before the drop off making the cookie dough to park in my freezer: my new gingersnap recipe (recipe to follow), M&M cookies, snickerdoodles, and this recipe I wanted to try for White Chocolate Coconut Macadamia Cookies.
Soft and Chewy Snickerdoodles

White Chocolate Coconut Macadamia Cookies
The dough for this ended up being rather soft, which worried me a bit since soft dough usually means the cookies spread thin, even when baked from frozen dough. Fortunately, in this case, the softness of the dough was attributable to the cream cheese in the dough and for whatever scientific reason I can't explain, that also helped the cookies retain their shape and remain fairly thick.
I love coconut and macadamia nuts so this was almost guaranteed to be a winner with my taste buds. And so it was. Brown sugar caramel overtones paired nicely with the sweetness of the white chocolate and coconut and the macadamia nuts added a nice crunch and contrast. The recipe made more than 2 dozen cookies. I ate one and baked the rest for the shelter. I stayed up late that Thursday night to bake 4 kinds of cookies but that's the kind of late night I like to put in: cookies for a cause.
1/2 cup (1 stick) butter
8 ounces cream cheese
1 cup brown sugar
1/2 cup granulated sugar
2 eggs
1 teaspoon vanilla
1/2 teaspoon coconut extract (I used vanilla)
1/2 teaspoon salt
1 teaspoon baking soda
2 1/2 cups flour
1 1/2 cups white chocolate chips
1 cup sweetened flaked coconut
1/2 cup macadamia nuts, lightly toasted, roughly chopped
  1. In a mixing bowl, cream together the butter, cream cheese, brown sugar and granulated sugar until fluffy. Add the eggs, vanilla extract and coconut extract (if using); mix until combined.
  2. In a separate bowl, combine flour, salt and baking soda. Gradually add the dry ingredients to the wet ingredients, mixing until just combined. Do not overmix. Fold in the chocolate chips, coconut and macadamia nuts.
  3. Portion into golf-ball size dough balls, cover and chill or freeze for several hours or overnight. When ready to bake, preheat oven to 350 degrees F. Line baking sheets with parchment paper.
  4. Evenly space dough balls on baking sheets and bake for 11-12 minutes or until cookies are golden brown at the edges and no longer look raw in the middle. Do not overbake. Remove from oven and let cool for 2-3 minutes before transferring cookies to wire racks to cool completely.

Saturday, December 16, 2017

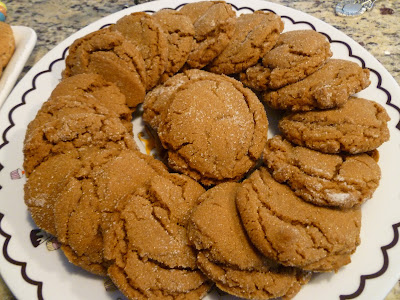
Ginger Krinkles

Ginger Krinkles - made dough October 28, 2017 from Hildy's friend
This is one of the cookies I served at my dessert party. While I'm not normally the biggest fan of ginger snaps (why are they called "snaps" when they don't "snap"? They're not a crisp cookie that snaps. They're a chewy cookie. It's a puzzler but it did prompt me to buy the "Oh Snap" sign at Michaels, not just because it had a cute gingerbread man "snapping" (now that's a snap!) but "oh snap" is something my millennial nieces always say so it reminded me of them. But I digress.
I got this recipe from my friend Hildy, who got it from her friend. I don't know who that was but I credit this recipe to Hildy's friend. It also came with resounding endorsements from Hildy and her kids, who she said don't usually like ginger molasses cookies but that they fought over these. Well, that's enough for me to make them.
I thought it would be fitting to make them for my holiday dessert party, not only because they were seasonally appropriate but also because Hildy was coming and I thought I should present the recipe she was kind enough to send my way.
These were good, chewy (rather than "snappy"), and baked up beautifully. They made for a nice presentation too. Thanks, Hildy (and friend)!

2/3 cup vegetable oil
1 cup granulated sugar
1 egg
4 tablespoons molasses
2 cups all-purpose flour
1 teaspoon cinnamon
1 teaspoon ginger
1 teaspoon salt
2 teaspoons baking soda
1 teaspoon cream of tartar
  1. Mix oil, sugar and egg until combined. Add molasses.
  2. In a separate bowl, whisk together dry ingredients. Add to creamed mixture. Portion into walnut-sized dough balls, cover and chill or freeze for several hours or overnight.
  3. Preheat oven to 350 degrees. Line baking pans with parchment paper. Roll dough balls into granulated sugar and space evenly on prepared baking sheets. Bake for 9-10 minutes. Rap the pan on the counter after removing from oven. Cool cookies in baking sheet for several minutes before transferring to wire cooling racks to cool completely.

Wednesday, December 13, 2017

Brownie-Stuffed Chocolate Chip Cookies

Brownie-Stuffed Chocolate Chip Cookies - made dough November 26, 2017 from The Food Charlatan

You know I can't resist trying out new recipes for chocolate chip cookies but I've made so many of them that I tend to be a little jaded. Only something truly different piques my interest. Such as this concept of "stuffing" a brownie inside of a chocolate chip cookie.
Now I've stuffed nutella inside of a chocolate chip cookie, I've stuffed Hershey kisses in there, and I've layered chocolate chip cookie dough with Nutella, all for something a little different. But for this one, you baked a brownie inside the cookie. First you bake the brownies separately and let them cool completely. Second, you cut them into small-ish squares, wrap the cookie dough around the brownie, encasing it completely, freeze (I always freeze the dough first) then bake. Wow. That's just genius.

The original recipe used a boxed brownie mix. You know my eyes glazed at that point. This baking snob does not do brownie mixes. Fortunately, I had also recently made the Chocolate Cream Cheese Brownies and I knew, with such little flour in the recipe, this would be a good brownie to use. You don't want one that could easily be overbaked since you're baking these twice; the first as the actual brownies and the second inside the cookies. This baked up moist and fudgy enough that I wasn't too concerned about overbaking them or the brownies becoming dry inside.
I recommend using mini chocolate chips for these. The brownie center is creamy-fudgy and I think the mini chocolate chips work better than the regular size or big hulking chocolate chunks. But that's a texture thing with me.
Make the brownie-stuffed chocolate chip cookie dough balls as compact and round as possible. The cookies don't spread much but you still want them to be domed, like little mounds of chocolate chip and brownie goodness. This ended up being one of the biggest hits at my holiday dessert party and I've put it on the permanent roster to make again.
Cream Cheese Chocolate Brownies - make the brownies only, not the frosting, and underbake slightly.

Chocolate Chip Cookies
1 cup (2 sticks) butter, softened
1/2 cup sugar
1 cup dark brown sugar
2 teaspoons vanilla extract
2 large eggs
1 1/4 teaspoons baking soda
1 teaspoon salt
3 cups flour, spooned and leveled
2 cups mini chocolate chips
  1. In a large bowl of a stand mixer, cream together butter and sugars. Beat for about 2 minutes until light and fluffy. Add in vanilla and eggs; beat to combine.
  2. Whisk together baking soda, salt and flour. Add to creamed mixture in 3 additions, beating until just combined after each addition. Do not overmix. Fold in mini chocolate chips.
  3. To assemble: scoop out 2 separate balls of cookie dough, about 1 1/2 tablespoons each. Flatten each ball into a thin disk with your hands. 
  4. Place a small brownie square on top of one piece of cookie dough and top with the other cookie dough disc. Pinch the dough together around the brownie square, sealing the ends to enclose the brownie completely. Repeat with all dough and brownie squares. Cover and chill or freeze for several hours or overnight.
  5. When ready to bake, preheat oven to 350 degrees F. Line baking sheets with parchment paper and evenly space cookies. Bake for 13-15 minutes or until golden brown at the edges. Let cool on the pan for 5 minutes then remove to a wire rack to cool completely.

Sunday, December 10, 2017

Chocolate Swig Cookies

Chocolate Swig Cookies - made dough October 28, 2017 from A Bountiful Kitchen
I originally thought I would make these for my holiday dessert party but when I tried the taste test cookie, decided against it and brought them to work instead. That's probably not the best lead in to get you to try these cookies, oops.
It isn't that they were bad because they weren't. If you like chocolate shortbread or "bread-y" type cookies, this could be a good choice. I tend to prefer my chocolate cookies to be more in the baked-fudge category and these weren't quite that. They're a little heavy in texture and while not dry, was not quite fudgy either.
I believe the thing with "swig cookies" is the frosting but, not being a frosting person, that didn't do it for me either. I liked the swig cookies I've made before but think I prefer the vanilla or lemon versions of these.
I

Still, these provided a nice background for the Christmas sprinkles I bought for decoration and looked pretty on the plate. I advise making these a bit on the small side since they're so dense.
1/2 cup butter
1/2 cup shortening
1 1/2 cups sugar
1 cup sour cream
2 teaspoon vanilla extract
3/4 cup plus 2 tablespoons unsweetened cocoa powder
3 1/2 cups flour
1 teaspoon baking powder
1 teaspoon salt

1/4 cup granulated sugar for pressing top of cookies

Sour cream frosting
1/2 cup butter, room temperature
2 tablespoons sour cream
3 1/2 cups powdered sugar
2/3 cup unsweetened cocoa powder
1 teaspoon vanilla
dash of salt
2-3 tablespoons milk, to thin to desired consistency
  1. Cream butter, shortening and sugar until smooth and creamy. Add sour cream and vanilla extract.
  2. Whisk together cocoa powder, flour, baking powder and salt. Gradually add to the butter mixture and mix on low speed until just combined. Do not overmix.
  3. Using a 2-inch scoop, portion the dough onto baking sheets lined with parchment paper. Lightly spray the flat bottom of a round glass with nonstick cooking spray then dip into 1/4 cup granulated sugar to coat the bottom of the glass. Press glass bottom over cookie dough balls and flatten slightly. Re-coat glass bottom and dip in granulated sugar as needed to flatten all cookies. Cover and chill or freeze at least an hour.
  4. When ready to bake, preheat oven to 350 degrees. Space the cookies evenly on baking sheets lined with parchment paper. Sprinkle lightly with granulated sugar. Bake for 10-12 minutes. The cookies should be barely firm on top. Do not over bake. Let cool completely. Frost when cool.
  5. Make frosting: Cream butter and sour cream until smooth and well blended. Whisk together cocoa, powdered sugar and salt. Add to butter mixture and beat. Add vanilla and enough milk until desired consistency is achieved.

Thursday, December 7, 2017

2017 Holiday Dessert Party #1

Holiday Dessert Party round up - hosted on December 2, 2017

I typically decorate big for Christmas every other year. Anyone who's known me for any length of time knows I'm a Christmas nut. Thanksgiving is my favorite holiday but decorating for Christmas is where my freak flag lives. And flies high.

Triple Layer Chocolate Cake with Fudge Frosting
It's usually a 2-3 month-long process, starting with the first month where I clean my house from top to bottom. You can't put decorations on dusty surfaces. Plus bookshelves must be cleared, every conceivable surface swept, vacuumed, mopped or dusted, furniture cleared away, the year-round pictures on the walls tucked away to be replaced by Christmas wall hangings, extraneous "stuff" donated to charity and so on.
Peanut Butter and Chocolate Kisses

Then month 2 is the structural framework. Artificial trees have to be put up, sometimes a new tree (or two *cough*) ordered, display planning needs to be done. The last month (this would be November since my goal is always to be done by Thanksgiving weekend) is about hanging the ornaments on the trees, putting up the wreaths on nearly every internal door in the house, hanging whatever needs to be hung on the walls, decorating the mantle, filling up the bookshelves with little vignettes of Christmas display pieces, lining the stairs with plush snowmen, and the list goes on.

Soft and Thick Snickerdoodles
This year, it took me a little longer since I could only work on it during weekends. I came home too late at night during the week to do it then. But I crammed a lot of decorating into those weekends so I met my goal of being done by Thanksgiving. Although, to be honest, I didn't actually finish all of my decorating plans. But I'd done enough that by Thanksgiving weekend, when it started to feel like a chore to keep putting more decorations up, I declared myself done. When I'm not enjoying it anymore, I stop. I don't believe in stressing for the holidays.
Almond Butter and Nutella Swirl Cookies

This year, I was motivated to declare myself done because I was out of time and needed to switch my energy from decorating to baking. Because I was going to hold my not-always-annual holiday dessert party this year. Several weekends before the party, I started making cookie dough to store in my freezer. What I made partially depended on who was coming as I know some of my friends' personal favorites and partially on any new recipes since the last party that I thought had turned out well and I wanted to make for them.

Ginger Krinkles
But ultimately it also depended on the practical realities of what could be made ahead of time and baked off at the last minute. Because you know I'm all about freshness and only serve baked goods that I could bake on the same day or the day before. Brownies are the only exception since they freeze well, can be made ahead of time, frozen (well wrapped) then thawed and cut right before serving.

Brownie-Stuffed Chocolate Chip Cookies
For what I was serving, I made only the toffee butter crunch shortbread and the triple layer chocolate cake the night before since both would be fine the next day. I knew the caneles would take the longest not only to bake but because I had to build in some buffer time for the canele copper molds to cool before I used them again.
Buttery Tea Balls
 
On the day of the party, I woke up at 5 am, brushed my teeth, washed my face, and turned on my oven by 5:05 am. I baked all the frozen cookie dough and canele batter steadily throughout the day. I didn't turn my oven off until 1:58 pm; the party was slated to start at 2. Made it just in the nick of time.
Cream Cheese Chocolate Brownies without the frosting

Essence of Chocolate Squares
So here's the holiday round up with links of the stuff I've made in the past. The new entrants to the holiday baking lineup will be posted later this month. Hopefully.
Caneles

Toasted Hazelnut Slice n Bake Cookies sandwiched with Nutella

Diamond-Edged, Melt-in-Your-Mouth Butter Cookies

Butter Toffee Crunch Shortbread

Sunday, December 3, 2017

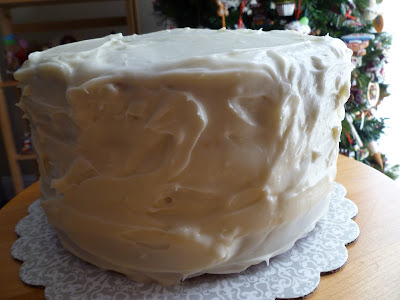
Pumpkin Spice Cake with Cream Cheese Frosting

Pumpkin Spice Cake with Cream Cheese Frosting - made November 19, 2017, adapted from Divas Can Cook 
Okay, yeah, I'm going a little longer between posts again. I'll spare you the details of working a lot and trying to do my regular holiday stuff and doing non-holiday stuff. It's all getting done but I'm not sleeping much. Or blogging much either.
I made this cake last month. If you see the inside, you might mistake it for a carrot cake like one of my coworkers did. Nope, it's a triple layer pumpkin spice cake. It'd make a great dessert for Thanksgiving but I didn't get it up in time to share with anyone for Thanksgiving. Bookmark it for next year or make it any time year-round because it's really good.
I'm having a thing with triple layer cakes. As in, I've now made two three-layer cakes (remember the Most Amazing Chocolate Cake?) that have turned out and I'm getting a little bold and sassy. Two-layer cakes seem kinda wimpy. Go three layers or go home.
I did make a couple of modifications to this recipe. Instead of 1 tablespoon of pumpkin pie spice, I used 2 teaspoons instead plus 1 teaspoon of Penzey's Vietnamese cinnamon. Because you know me and Penzey's Vietnamese Cinnamon. We can't be parted for long.
I also skipped the heavy cream and cinnamon in the frosting because I wanted a straight up cream cheese frosting to go with this cake. My cake layers didn't come out as fluffy as on the original blog, Divas Can Cook, as I think I should've left the cake in the oven just 1-2 minutes longer. But still, this was a delicious cake. It doesn't have a strong pumpkin flavor and I'm glad I subbed in a little cinnamon. Because Penzey's cinnamon....

3 cups all-purpose flour
1 1/2 teaspoons baking soda
1/4 teaspoon salt
2 teaspoons pumpkin pie spice
1 teaspoon cinnamon
1 cup dark brown sugar, packed
1 1/3 cups granulated sugar
3/4 cup butter, softened
3 eggs
2 teaspoons vanilla extract
1 1/2 cups buttermilk
1 15-ounce can pumpkin puree (not pumpkin pie filling)

Cinnamon Cream Cheese Frosting
Two 8-ounce packages cream cheese, softened
1/2 cup butter, softened
1 teaspoon heavy cream
4 cups powdered sugar
1 teaspoon vanilla extract
cinnamon to taste
  1. Preheat oven to 3590 degrees F. Grease and flour 3 round 9" cake pans. Line bottoms with parchment rounds. Set aside.
  2. In a large bowl, whisk together flour, baking soda, salt, pumpkin pie spice, and cinnamon; set aside.
  3. In a large bowl, cram together butter and sugars.
  4. Beat in egg, one at a time. Fold in vanilla. Alternately add dry and wet ingredients. Fold in pure pumpkin. Pour batter evenly into prepared cake pans.
  5. Bake for 30-35 minutes or until toothpick inserted in the center comes out with a few crumbs. Do not overbake. Let cool for 5 minutes then overturn onto plates lined with wax paper. Let cool completely before frosting and assembling.
  6. Frosting: Cream together cream cheese, butter and heavy cream. Mix in powdered sugar, a cup at a time, beating until smooth and creamy. Add vanilla and cinnamon to taste, mixing completely. Frost and assemble cake layers.