Friday, April 7, 2017

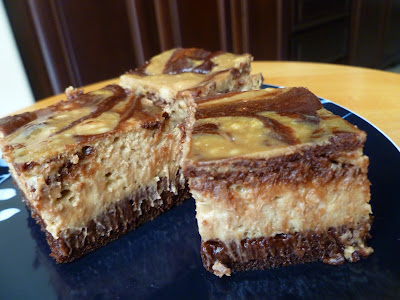
Mocha Cream Cheese Brownies

Mocha Cream Cheese Brownies - made March 26, 2017 from The Fearless Baker by Emily Luchetti
I need to rename these Mocha Cheesecake Bars because that’s what they are. Calling them cream cheese brownies implies there’s cream cheese swirling through the brownie like a supporting cast member. Instead, there’s enough cream cheese batter to warrant top billing and it’s more like a cheesecake with a bit of brownie along for the ride.

If you’re a cheesecake lover, that’s good news. If you’re like me and don’t care for cheesecake, it’s a bit of an “oops” moment. Although I did suspect that’s how it would turn out given the amount of cream cheese I saw in the recipe before I started making it. But I had bought that Costco pack of cream cheese because I needed 8 ounces for the coconut cake recipe and I had to figure out something else to do with the remaining 40 ounces that the pack came with. Honestly, that’s how I end up trying most of the recipes I make; I have too much of an ingredient and I need to use it up somehow.
As cheesecake brownies go, this one was fairly decent, especially if you’re a coffee or mocha lover. I still can’t get into cheesecake so this wouldn’t make my top 10 brownie list but it’s rich and decadent if you’re a cheesecake lover. I didn’t do a very good job of swirling the two batters together so mine came out more like a brownie layer on the bottom, a cheesecake layer on top and a swirly pattern overlay attempt. If you want more of a true swirl, rather than spreading into separate layers and then swirling, I would drop alternate dollops of each batter into the pan then run a knife through the dollops to make big swirls.

You can see bits of cream cheese that didn’t fully incorporate into the cheesecake layer because the cheesecake mixture was too liquid to blend them all in. Plus my cream cheese was probably too cool and I couldn’t get it more uniform without beating the batter too much. When it comes to cheesecake, you don’t want to overbeat the batter or you’ll aerate it and you won’t get that dense cheesecake texture. I don’t bake cheesecake-y things enough to get good at it so my amateur status is apparent in this brownie/cheesecake bar. Fortunately, it tastes better than it looks.
9 ounces bittersweet chocolate, coarsely chopped
10 tablespoons (1 1/4 sticks) unsalted butter
1 cup granulated sugar
3 large eggs
3/4 cup unbleached all-purpose flour
large pinch of kosher salt

Coffee-Cream Cheese Layer
2 8-ounce packages of cream cheese, softened
1/2 cup granulated sugar
2 large eggs
2 teaspoons instant coffee granules
1 teaspoon vanilla extract
  1. Preheat oven to 350 degrees. Line a 9" square baking pan with foil and lightly spray with nonstick cooking spray.
  2. Brownie: Melt the chocolate and butter in the top half of a double boiler set over barely simmering water. Stir and scrape sides of bowl until mixture is melted and smooth. Set aside and let cool.
  3. In a medium bowl, whisk the sugar and eggs until smooth. Stir in the melted chocolate then the flour and salt; mix until well blended. Turn the batter into the prepared pan and spread evenly with a spatula.
  4. Cream Cheese Layer: In another bowl, mix the cream cheese with the sugar until smooth. Add the eggs and stir until combined. Scrape down the side of the bowl with a rubber spatula. Stir in the instant coffee and vanilla until combined.
  5. Using the rubber spatula, spread the cream cheese mixture on top of the chocolate layer, then run a table knife through the cream cheese to swirl it into large white ribbons throughout the brownie batter.
  6. Bake, until a toothpick inserted near the center comes out with a few moist crumbs, 30 to 35 minutes. Let cool to room temperature before cutting and serving.

Wednesday, April 5, 2017

Peanut Butter Chocolate Chip Cookies

Peanut Butter Chocolate Chip Cookies - made dough March 19, 2017 from Averie Cooks
This is what I would consider a staple cookie. The dough is easy to make, portion into dough balls and keep on hand in the freezer, ready to bake at a moment’s notice whenever you need a cookie fix or to gift someone with a goodie bag.

I had a peanut butter lover at work I had promised “anything peanut butter” to so I whipped up these cookies one day and baked off a batch the night before I saw her. I like this kind of cookie because, not only does it taste good (according to my peanut butter-loving coworker) but it also stays thick and doesn’t spread much. That’s all I ask for from a cookie.


1 large egg
1/2 cup unsalted butter
1/2 cup brown sugar, packed
1/4 cup granulated sugar
heaping 3/4 cup of creamy or crunchy peanut butter (not natural peanut butter)
2 teaspoons vanilla extract
1 1/4 cups all-purpose flour
1/2 teaspoon baking soda
1/2 teaspoon salt
1 1/2 cups chocolate chips
  1. In the bowl of a stand mixer fitted with the paddle attachment, cream the egg, butter, brown sugar and granulated sugar on medium-high speed until light and fluffy, about 3 to 4 minutes.
  2. Scrape down sides of the bowl and add the peanut butter and vanilla. Mix on medium-high speed until combined, about 1 minute.
  3. Add the flour, baking soda and salt; mix on low speed until just combined; do not overmix.
  4. Fold in the chocolate chips.
  5. Portion into golf-ball size dough balls, cover and chill or freeze for several hours or overnight.
  6. When ready to bake, preheat oven to 350 degrees F. Line baking sheets with parchment paper and evenly space chilled or frozen dough balls on baking sheets.
  7. Bake for 10-11 minutes or until edges have set and middles are no longer raw. Do not overbake. Remove to wire rack to cool completely.


Monday, April 3, 2017

Chocolate Chocolate Chunk Muffins

Chocolate Chocolate Chunk Muffins - made March 20, 2017 from Baking From My Home to Yours by Dorie Greenspan
I was rereading Kerry Greenwood’s Corinna Chapman series recently. Corinna Chapman is an accountant-turned-bread-baker in Melbourne who takes on a 15-year-old recovering heroin addict named Jason as an apprentice. Turns out Jason has quite the talent for baking, especially with making incredible muffins that are better than Corinna’s herself. Whenever I read this series, I feel the urge to try and be a Jason (the muffin baker, not the recovering heroin addict). You’ll probably find a muffin recipe on my blog that makes the same reference from the last time I read the series.
I’ve tasted some seriously amazing muffins in my time. What makes a good muffin to me is, of course, a crisp but not hard muffin top and a velvety crumb interior that’s more firm than a cake but not dense or hard. Don’t tell but I used to live on the Costco lemon poppyseed muffins 20 pounds ago. Yum. So I thought I would give it a go and channel my latent Jason to try and make good muffins. The key to a good muffin and getting that velvety texture is the lightness of the batter. Which means not overmixing it and getting the batter together quickly and evenly with the barest of strokes. Otherwise you end up with a tough interior, not a soft one.
Alas, just like the last time, Jason was so latent in my muffin-making abilities that I’m forced to acknowledge and remember, this fictional character exists nowhere in my baking DNA. That’s my fancy way of saying I can’t make very good muffins. Try as I might, I can’t mix it right. I err on the side of undermixing and end up with flour pockets. Not small ones either. Laughably big ones, as a matter of fact. So then I have to mix a little more and before you know it, I’m sure my batter is overmixed.
Not that these turned out tough in texture. They were actually almost cupcake like. But missing that soft tender crumb of a good muffin. The muffin top wasn’t crisp either but had nearly the same texture as a soft cupcake top. I think I’ll stick to reading about muffins then.
3/4 stick (6 tablespoons) unsalted butter
4 ounces bittersweet chocolate, coarsely chopped
2 cups all-purpose flour
2/3 cup sugar
1/3 cup unsweetened cocoa powder, sifted
1 tablespoon baking powder
1/2 teaspoon baking soda
1/2 teaspoon salt
1 1/4 cups buttermilk
1 large egg
1 teaspoon pure vanilla extract
  1. Preheat oven to 375 degrees F. Line the 12 cup molds in a regular-size muffin pan with cupcake or muffin liners.
  2. Melt the butter and 2 ounces of the chopped bittersweet chocolate in the top half of a double boiler over barely simmering water. Remove from heat.
  3. In a large bowl, whisk together the flour, sugar, cocoa, baking powder, baking soda and salt. In another mixing bowl, whisk the buttermilk, egg, and vanilla extract together until well combined. 
  4. Pour the liquid ingredients and the melted butter-chocolate mixture over the dry ingredients and, with a whisk or rubber spatula, gently but quickly stir to blend. A few lumps are okay; do not overmix. Fold in remaining chocolate chunks. Divide batter evenly among the muffin cups.
  5. Bake for about 20 minutes or until a toothpick inserted into the center of the muffins come out clean. Transfer the pan to a rack and let cool for 5 minutes before removing each muffin from its mold.

Friday, March 31, 2017

Chocolate Chocolate Chip Cookies - Levain Bakery copycat #5 from Knewton

Chocolate Chocolate Chip Cookies - Levain Bakery copycat #5, made dough on March 18, 2017, adapted from Knewton
This is my 5th attempt to try and replicate Levain Bakery’s double chocolate chip cookies. And after tasting it, it may be my last because I don’t think I need to keep trying. This one is so close and got the texture I was aiming for. Exciting, right?
I’m not sure why this appears to be the magic combo as I’m not enough of a scientist to be able to tell you how the different ingredients worked together. A few things can explain it: use of baking soda and no baking powder. Baking soda is triggered when it comes into contact with liquid and can aerate the dough upon activation. But once it’s triggered, i.e. in mixing into the dough, it doesn’t keep aerating the cookie during baking. It’s spent its gunpowder, so to speak. Baking powder is activated by both liquid AND heat during baking and that would make for a lighter cookie. I didn’t want a lighter, aerated cookie, I wanted a baked fudge texture so baking soda only works for me.
You don’t want to beat this dough too much either as beating it aerates the batter and adds more air pockets which again, would give you a lighter texture. No, no air, want fudgy, no.
This was also a relatively stiff dough so it didn’t spread very much, especially since I baked it from frozen dough like I almost always do with cookie dough. The high heat called for in the baking temp contributes to “setting” the outside of the cookie faster before the inside can fully bake. Remember, you don’t want to fully bake a chocolate cookie if you want a fudgy interior.
Baking at high heat is always tricky when you’re using chocolate chips or chunks though. They will burn at anything above 360 degrees or so. Double chocolate cookies are one of the cookies that uses chocolate chips/chunks where I don’t advocate having a lot of the chips or chunks on the outside of the cookie. Tuck them inside the cookie dough ball to prevent burning of the chocolate. I compromise by preheating my oven to 400 degrees and when it’s hot enough to reach 350, I pop the cookie sheet in, let it continue heating to 400, drop the temp down to 375 and take it out 10-11 minutes after I put it in. The oven loses heat whenever you open the oven door so when you open it to put the cookie sheet in, you still want the oven to keep on heating, hence why you want to put it in while it’s still “preheating”. I know that goes against the grain of most recipes who warn about fully preheating the oven before using. But that’s the best technique I’ve found with double chocolate cookies. The oven is still on its way to heating itself up to the full 400 degrees so it’s hot enough to start setting the outside of the cookie but it doesn’t stay at 400 long enough to burn the chocolate chips too much or hardly at all before you bring the oven temp down.
I don’t bring it all the way back down to 350 because that’s not hot enough to bake the outside in a short enough time to prevent the inside from fully baking. It might seem like a bother since you can’t just pop the cookies into the oven and walk away but trust me, it’s worth it. Let the cookies cool and set completely (this is important if you want the right texture). When you try it several hours later, the outside still has a little crispness to the outer shell but the inside is baked-fudge texture perfection. 
The outside does soften later but the interior was so close to Levain Bakery that I’ve given up on perfecting that outside shell. That’s one battle I’m fine losing because this wins the war of the inside texture.
I collaged the original Levain cookie with the cookie from this recipe and although the lighting makes it difficult to get a good comparison between the two cookies, hopefully you can see the dense, fudgy textures are close. Copycat job done!
Levain original on top, copycat on the bottom
1 1/2 cups all-purpose flour
1 cup bread flour
5/8 cup cocoa powder
5/8 teaspoon baking soda
5/8 teaspoon salt
1 3/4 sticks (14 tablespoons) unsalted butter, cold, cut into tablespoons
1 cup packed brown sugar
1/4 cup granulated sugar
1 1/4 teaspoons vanilla extract
1 large egg + 1 large egg yolk
2 cups chocolate chunks
  1. Sift flours, cocoa powder, baking soda and salt together.
  2. Beat cold butter until creamy, 1-2 minutes. Add sugars and beat until combined. Add vanilla, egg and egg yolk until just combined. Add dry ingredients and beat until just combined. Do not overmix. Fold in chocolate chunks.
  3. Portion the dough into 4-ounce dough balls. Separate each ball into halves and combine the smooth halves together, leaving the "ripped" edges on the outside. Cover and chill or freeze for several hours or overnight.
  4. When ready to bake, preheat oven to 375 degrees F. Line baking sheets with parchment paper and evenly space dough balls. Bake for 17-18 minutes or until middles are set.  Cool completely on wire racks.

Tuesday, March 28, 2017

Coconut Cake with Cream Cheese Frosting

Coconut Cake with Cream Cheese Frosting - made March 18, 2017, adapted from Gonna Want Seconds
I’ve blogged before about my favorite coconut cake recipes. I have two – the Mrs. Fields one when I want the fancy two-layer cake and the coconut sheet cake when I need something fast and simple. I like both so much that I don’t really try a bunch of different coconut cake recipes as there’s no need to find something “better”. And the other ones I’ve tried haven’t really measured up to my top 2 favorites. Until now. Now I have a Top 3 favorite for coconut cakes.
The funny part is, there isn’t any coconut in the cake itself. Sure, there’s cream of coconut but the only coconut is actually part of the garnish covering the frosting. At least, if you follow the original recipe to the letter. I almost didn’t follow it exactly because who makes a coconut cake without coconut in the cake? But I resisted the impulse to improvise because I wanted to see what it was like as the original blogger had posted it.
Turns out, it was actually quite fabulous. I loved the cake itself. It was more dense than a cakey-cake (my highly scientific baking term for cake texture you can get from a box mix) but not quite as dense as a pound cake. Instead it was a nice in-between with a perfect, tender, moist crumb. Plus the flavor was fantastic. The coconut cream added to the texture and moistness of the cake but didn’t add a strong coconut flavor so even people who hate coconut (I don’t understand those people but I know they’re out there somewhere) may enjoy this cake. If you wanted to be really nice – and deceptive - to their coconut-hating taste buds (who are these people??), you can leave off the coconut garnish entirely and just serve what would seem like a great vanilla cake with cream cheese frosting.

I happen to love coconut so I had no compunction about adding coconut with abandon. I frosted the bottom layer with a thin layer of cream cheese icing then sprinkled it generously with coconut before I topped it with the second layer. Then I covered the whole thing with the rest of the frosting. Note: I did adjust the frosting recipe from the original. I cut back on the cream cheese by half and cut the coconut cream in half as well so as not to make the frosting too runny. You might want to experiment here and see what you like best in terms of flavor and consistency. The recipe below reflects my changes.
To make it easier to blanket your cake with coconut, put it on a cardboard circle that’s the same size as your cake layer(s). You can get these at places like Michaels – don’t forget to use their 40% off coupon. Once you have it fully frosted, grab handfuls of coconut and, holding the cake in one hand over a large bowl, press the coconut over the sides and top, letting the excess fall into the bowl beneath. Rotate it as you cover in coconut. It may get messy but it’s the easiest way to cover the cake in coconut.

It was hard for me to get a decent picture of the cake (I really need to take some kind of food photography class) but this was an amazing cake, not that hard to make and tastes even better than it looks. Depending on my mood, this may have even unseated the Mrs. Fields coconut cake recipe that I’ve sworn by for years.
A few additional baker notes: the original recipe says to bake this in 9-inch cake pans. I only have 8-inch cake pans because I like to have thicker layers but I also leave enough batter to bake in a small ramekin. That ends up being my taste test so I can see how the cake tastes without having to slice a frosted, filled, two-layer cake. Tacky to show up somewhere with a cake that has a slice missing and lamely explain you had to taste it first before bringing it.
If you don’t normally buy or bake with cream of coconut, you can find it either in the Asian aisle of most grocery stores, including Target’s grocery section, or at any Asian grocery store like 99 Ranch. The original blog used Coco Lopez but I used an Asian brand from 99 Ranch. One 15-ounce can was sufficient for my needs and was less than a couple of dollars. Just stir it when you first open it as most of the coconut solids will have drifted to the bottom and you want it an even consistency when you add it to the cake batter and frosting. 
I also left out the coconut extract and substituted extra vanilla extract instead. Much as I love coconut, I despise it in extract form. Taste too artificial and metallic. I have equally negative feelings towards almond extract yet I love almonds. No, only vanilla extract will do for me.
I brought most of this cake into work and several people stopped me in the hall or came to my desk to thank me and tell me how much they liked it. It was gone before lunchtime. Apparently I have a lot of coconut-loving coworkers – yay.

2 3/4 cups all-purpose flour
1 teaspoon baking powder
1/2 teaspoon baking soda
1/2 teaspoon salt
1 3/4 cups sugar
1 cup (2 sticks) unsalted butter
1 cup sweetened cream of coconut (like Coco Lopez)
4 large eggs, separated
1 teaspoon vanilla extract
1/2 teaspoon coconut extract (I left it out and added extra vanilla extract instead)
1 cup buttermilk

Frosting (modified)
1 8-ounce packages cream cheese, room temperature
1/2 cup (1 stick) unsalted butter, room temperature
2-3 cups powdered sugar
1/4 cup sweetened cream of coconut
1 teaspoon vanilla extract
1/2 teaspoon coconut extract (I left it out and substituted vanilla bean paste instead)
  1. Preheat oven to 350 degrees F. Spray two 9" round cake pans with nonstick baking spray and line bottoms with parchment rounds.
  2. In a medium bowl, combine flour, baking powder, baking soda and 1/2 teaspoon salt; whisk and set aside.
  3. In the large bowl of a freestanding mixer with the paddle attachment, beat sugar, butter and sweetened cream of coconut until fluffy, about 3 minutes. Beat in egg yolks, one at a time. Add vanilla and coconut extracts. With mixer on low speed, beat in dry ingredients, alternating with buttermilk, until just combined.
  4. In another bowl, using the whisk attachment, beat egg whites with a pinch of salt until they are stiff but not dry. Gently fold egg whites into cake batter.
  5. Evenly divide batter between prepared pans. Beat for 45 minutes or until toothpick inserted into the center comes out clean. Cool in pans for 10 minutes then turn cakes out onto racks to cool completely.
  6. Meanwhile, make the frosting: using an electric mixer, beat cream cheese and butter together until just combined and creamy. Add cream of coconut, vanilla and coconut extracts; beat until just combined. Add 2 cups of powdered sugar and beat until all ingredients are just combined and smooth,. Add more powdered sugar if necessary to achieve desired consistency. Frost cooled cake and sprinkle coconut generously over tops and sides.

Saturday, March 25, 2017

Salted Caramel Swirl Brownies topped with Nutella and Toffee Bits

Salted Caramel Swirl Brownies - made March 11, 2017, adapted from The Merchant Baker
Do you see the salted caramel swirling through these dark chocolate brownies? Ribbons of rich caramel peeking through the fudgy goodness? Yeah, me neither.

The original recipe called for using dulce de leche but I was out of dulce de leche and only had a jar of salted caramel on hand. Past experience has taught me that if I just swirled the caramel in with the brownie batter, during baking, the caramel would sink to the bottom and I'd be left with struggling to cut clean pieces and picking the foil off the bottom of each piece because the caramel sank to the bottom and clung to the foil. I usually go around this difficulty by spreading half the batter, baking the bottom layer just long enough to firm up and be able to hold the caramel, pour the caramel layer over that partially baked bottom layer and top with the remaining batter before baking the whole thing.
It's a good plan in theory but my execution left something to be desired this time. Mainly because I didn't bake the bottom layer long enough to actually firm up enough to hold up the weight of the caramel. I didn't want to bake it for long because it would have to bake even further after I added the caramel and the top layer and I had visions of a dry bottom brownie. So, instead, my method made it worse because the batter warmed up enough to be even more liquid and the heavy caramel promptly sank to the bottom since the layer wasn't baked enough. I knew it too as I was spreading the caramel that I should let the bottom layer bake for longer but I have such an aversion to overbaked brownies that I was physically incapable of letting that bottom layer bake long enough before adding the caramel layer.
It would probably be hard to spot the caramel anyway since, thanks to the cocoa I used, the brownie came out really dark. But I won't be apologizing for that because I use Pernigotti cocoa and refuse to use any other cocoa. Not if I want dark, rich, chocolatey goodness in my brownies. And I do.
To cut some of the dark chocolate richness from the Pernigotti cocoa, I defaulted to the lazy baker's frosting, i.e. Nutella, which I spread on top of the slightly cooled but still hotter than warm brownie about 5 minutes after I took it out of the oven. When it had cooled to lukewarm, I sprinkled the top generously with toffee bits and mini chocolate chips for a prettier presentation and to add a little more sweetness and crunch to complement the dark rich fudginess of the brownie.
2/3 cup dutch process cocoa
1 1/2 cups sugar
1/2 cup confectioners' sugar
3/4 teaspoon salt
1 cup all-purpose or bread flour
1/2 teaspoon baking powder
1/2 teaspoon espresso powder
3 large eggs
1/2 cup vegetable oil
2 tablespoons water
2 teaspoons vanilla
Salted caramel
Nutella
Toffee bits
  1. Preheat oven to 350 degrees. Line an 8" square baking pan with foil and lightly spray with nonstick cooking spray.
  2. Whisk together cocoa, granulated sugar, confectioners' sugar, flour, baking powder and espresso powder in a large bowl.
  3. Add the eggs, oil, water and vanilla; mix until smooth and combined.
  4. Spread a little more than half of the batter into the prepared pan. Bake for 10 minutes.
  5. Remove pan from oven and drop dollops of salted caramel over partially baked layer. Top with remaining batter and return to oven.
  6. Bake another 30-35 minutes or until toothpick inserted near the center comes out with moist crumbs. Cool for 5-10 minutes before spreading with a layer of Nutella. Sprinkle with toffee bits. Let cool completely before cutting. For the cleanest cuts, refrigerate for a few hours before cutting with a sharp knife.

Thursday, March 23, 2017

Baked Carbonara

Baked Carbonara - made January 30, 2017 from Off the Shelf by Donna Hay
One of my guilty pleasures is Spaghetti Carbonara. It's totally bad for you and horrific with calories so I don't eat it often. If I do, I double up on my workouts before and after. I'm not a bacon lover and, if confronted with a choice of breakfast meats, will go for sausage or ham before I'll eat bacon. But when it comes to carbonara, bacon is my protein of choice. Because all that heavy cream and pasta just cry out for crunchy bacon to go with them and really harden up your arteries in a team effort. In a for a penny, in for an extra couple of pounds.
As with almost all Donna Hay recipes, this is easy to make. Seriously easy. Traditional carbonara calls for mixing the egg and cream mixture then tossing it with hot pasta just drained from a pot of boiling water. It's the heat of the pasta that cooks the egg and thickens the mixture. A carbonara made well is worth every calorie as nothing beats that creamy sauce coating each strand of pasta. Your noodles need to be hot enough to cook the eggs in your liquid mixture just enough to thicken but not so hot that it literally cooks your eggs or you'll have bits of scrambled egg instead of a creamy sauce.
This version is baked so you don't have to worry about the temperature of your pasta. There will seem to be a lot of sauce but remember you're baking the pasta and it'll absorb a lot of the liquid. The risk with baking a carbonara sauce though is your sauce may get too hot and bake some of the egg into scrambled eggs. If you're worried, try baking at a slightly lower temperature like 325 degrees and covering with foil for the first 10-15 minutes. Leave uncovered for the last 15 minutes though to make sure the bacon stays crisp.
This is rich, no doubt about it, and consequently, is a "sometimes" meal. But it can't be beat for how easy it is to put together.
14 ounces pasta
1 pack of bacon
4 eggs
2 cups heavy cream
1 1/2 cups milk
1/2 cup grated Parmesan cheese
  1. Preheat oven to 350 degrees.
  2. Boil pasta until al dente. Drain.
  3. Fry bacon until crisp, drain on paper towels and chop into pieces.
  4. Whisk together eggs, cream, milk and Parmesan cheese.
  5. Place pasta in an 8-cup (4-pint) ovenproof dish and pour egg-milk-cream mixture over it. Top with bacon and mix with pasta. Bake for 30 minutes or until set.