Saturday, December 26, 2015

Toffee Butter Icebox Cookies

Toffee Butter Icebox Cookies - made dough December 13, 2015 from Mom on Timeout
I’ve confessed before that I’m a hoarder of baking ingredients, right? I can declutter clothes, shoes and dust-catching knickknacks with the best of them but when it comes to baking ingredients, I buy extras like Armageddon is coming and all the survivors are going to gather at my house for a baking marathon before the world ends. Why else would I have 4 ½ packages of Heath toffee baking bits? Although, in my defense, the plain toffee baking bits, as opposed to the milk chocolate toffee baking bits, are harder to come by so a friend gave me two and when I was in a grocery store I don’t normally go to and found them there, I bought a few more. And we should ignore the fact that I haven’t used them since.
Until now. Normally I buy the harder-to-find ingredients because I have a recipe that uses them and I go seeking them out. Then after all that trouble, I try to pick them up so I don’t have to search for them again next time I need them for another recipe. Sadly, for the toffee bits, I haven’t had cause to use them for any particular recipe. Fortunately, there’s pinterest and you can go seeking for recipes that use the ingredient(s) you want to use. Which is how I found this recipe for Toffee Butter Cookies.
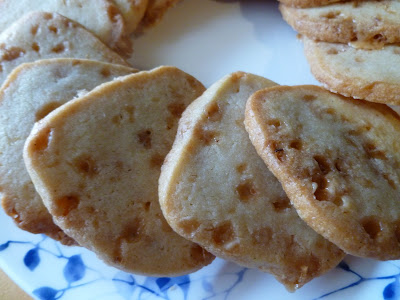
What I love about this recipe is the simplicity. The dough is easy to mix together and handles easily, meaning not too sticky or soft and also not hard or crumbly. It obligingly pats into a log which make it easy to roll up in wax paper and stick in the freezer. When you’re ready to bake them, let the dough logs thaw for about 10-15 minutes before slicing them. You don’t want to cut them when they’re frozen solid as that’s when they might crumble but you also don’t want the dough to soften to room temperature as it’s harder to cut cleanly and keep their shape.
This is not a soft and chewy cookie and, for once, I don’t recommend underbaking. You’ll know you’ve underbaked it when it doesn’t have the “snap” like a good shortbread and instead of chewy but not a good chewy. Bake until the edges are golden brown and the tops also have browned slightly. You don’t want to overbake it either or the toffee will burn. This also defies my normal cookie-eating recommendation of eating while warm or lukewarm. Instead, I recommend you let it cool completely before taking a bite. When baked and cooled properly, this is a nicely crisp butter cookie with the added sweetness and crunch from the toffee.

1 cup butter, softened
1 cup sugar
1 teaspoon vanilla extract
1 large egg
2 1/2 cups all-purpose flour
1 cup Heath toffee bits
  1. Cream butter and sugar together.
  2. Add in the egg and vanilla extract; mix until well combined.
  3. Stir in flour, mixing just until incorporated.
  4. Fold in Heath toffee bits.
  5. Divide dough in half and place on top of a sheet of plastic wrap. Form the dough into a log about 6" long and 1.5" in diameter. Wrap each log with the plastic wrap and refrigerate dough logs for 1-2 hours or until firm.
  6. Preheat oven to 375 degrees F. Line baking sheets with parchment paper.
  7. Remove plastic wrap from rolls and cut into 1/4" slices. Place slices about 2" apart on baking sheets. Bake for 8-10 minutes or until lightly browned.

Thursday, December 24, 2015

Oreo Cookies and Cream Cookies

Oreo Cookies and Cream Cookies - made dough December 19, 2015 from My Kitchen Escapades
The main impetus for trying out this recipe is I wanted to use up the cookies and cream instant pudding mix I had bought in a pack of 4 from the last time I made a similar recipe. They don’t sell this flavor in my local stores so I had to buy the 4-pack from amazon because that’s the only size they came in. I also wanted to use up my snack packs of mini Oreos that I had bought to try out another earlier recipe. You see the pattern here? I’m on this revolving cycle of buying ingredients to try out certain recipes then trying out more recipes to use up the rest of the ingredients I had bought for the previous recipes.
Which would be all well and good if the cycle was perpetual as my baking has in the past. But since I was trying to end date my baking spurts for awhile, I had to keep using them up without replenishing them. It’s harder than you think. Fortunately, making this cookie dough was easy. Unfortunately I got a little lazy with chopping up the mini Oreos which would entail washing another knife and chopping board. After making 5 cookie doughs in a row, I didn’t have it in me to take what I deemed unnecessary steps. That might’ve been a mistake because it did make for some serious chunkiness in the cookies since the mini Oreos were mostly whole. But that was okay as they did provide a nice crunch when you bit into the cookie without needing nuts for crunchiness.
If you’re a cookies and cream fan, these are good cookies. I added both semisweet and white chocolate chips as well as the mini Oreos so these cookies have a lot going on. But the flavors all complement each other and make the cookie a little more fun. I was packaging them up in for foodie gifts to give out at work and wanted something a little different. Keep an eye on these when you’re baking them. The edges appear to brown fairly quickly but the middles still looked raw and shiny. You know I despise an overbaked cookie so I erred on the side of taking them out sooner rather than later. If I hadn’t, I think these would have a more cakey texture. And I simply don’t do cakey when it comes to cookies.
1 cup butter
3/4 cup brown sugar
1/4 cup sugar
4.2-ounce package instant Oreo pudding mix
2 eggs
1 teaspoon vanilla
1/4 teaspoon salt
2 1/4 cups flour
1 teaspoon baking soda
2 cups chocolate chips
1 cup white chocolate chips
1 cup mini Oreos, roughly chopped

  1. Cream together the butter and both sugars until light and fluffy. Beat in the dry pudding mix until combined. Add the eggs, one at a time, beating until incorporated. Add the vanilla and mix to combine.
  2. Add the salt, flour and baking soda; mix until combined. Add the chocolate chips and Oreo pieces until combined. Portion into golf-ball-sized dough balls, cover and chill or freeze until firm, several hours or overnight.
  3. Preheat oven to 350 degrees F. Line baking sheets with parchment paper. Evenly space frozen dough balls on baking sheets and bake cookies 9-10 minutes until just set. Do not overbake. Remove to wire cooling rack to cool completely.

Wednesday, December 23, 2015

Brown Butter White Chocolate Macadamia Nut Cookies

Brown Butter White Chocolate Macadamia Nut Cookies - made dough December 19, 2015 from Mom on Timeout
I have a whole host of cookie recipes to post and I’m trying to get them up before the new year when everyone goes on a diet and stops baking. Oh wait, is that just me? In any case, remember how I said I don’t usually try out new recipes during the holiday season because I can’t afford to have baking failures with all the baked gifts I need to make? And also remember how I was cutting back on baking? Well, those two mantras collided the weekend before Christmas.
It’s true that I’ve cut back drastically on baking in recent months. A year ago I was having a baking marathon every weekend between Thanksgiving and Christmas – I baked for dessert parties, coworkers, get togethers with friends, church folks, care packages and so on. By the time Christmas rolled around, I was ready to pick up a cake from my favorite bakery and call it Christmas dessert because I was so burned out on baking.
This year is a little different. For one thing, I didn’t host a dessert party this year so no day off from work to bake all day. I was down with a cold for the first half of December so I skipped out on a lot of parties and get togethers. The days went by too fast for me to catch all of my coworkers before they left for year-end holidays. Oops. But I did have enough need for baked goods gifts to do one marathon baking session this past weekend. And because I hadn’t really been baking much, I decided to take a risk and explore all new recipes for them.
Of course, it was a very calculated risk since I wasn’t stupid and knew there still wasn’t a lot of margin for error in baking failures. So I went with recipes that I could tell at a glance and from the pictures on their original blog posts that they had a high likelihood of turning out. And I stayed with some traditional flavors since now was not the time to do a lot of risky experiments.
Case in point, the  classic white chocolate and macadamia combination for these cookies. The main difference from some of the other recipes I’ve tried was the browned butter element. But browned butter is an almost no-fail option when it comes to cookies. Seriously. I also chose this recipe because it would use up the last of my macadamia nuts in the freezer and the last bag of white chocolate chips in my pantry. If I was going on baking hiatus in January, it was best to clear out my remaining baking ingredients. This turned out to be a good choice as I liked this recipe. It’s a classic combination, the cookies didn’t spread too much and I love the brown sugar overtones of the cookie that paired so well with the white chocolate chips and the macadamia nuts.  Yum.

1 cup unsalted butter
1 cup brown sugar
1/2 cup granulated sugar
2 teaspoons vanilla extract
2 eggs
2 1/2 cups flour
2 teaspoons cornstarch
1 teaspoon salt
1 teaspoon baking soda
1 cup white chocolate chips
1 cup chopped macadamia nuts
  1. Melt the butter in a small saucepan over medium heat. Cook, stirring occasionally as butter foams then starts browning. When you can smell the nutty aroma and see the browned particles, it's done. Remove from heat and cool for 15 minutes.
  2. Cream the butter and sugars together. Add vanilla extract and eggs, mixing until combined.
  3. Whisk together flour, cornstarch, salt and baking soda in medium bowl. Gradually add to butter mixture, mixing until just combined,
  4. Fold in white chocolate chips and macadamia nuts. Portion into golf-ball-size dough balls, cover, and chill or freeze for several hours until firm.
  5. Preheat oven to 325 degrees F. Line a cookie sheet with parchment paper and evenly space out the frozen dough balls.
  6. Bake for 11-13 minutes or until edges are golden brown and middles no longer look raw. Let sit on hot cookie sheet for 10 minutes before transferring to cooling rack to cool completely.


Monday, December 21, 2015

Fudgy Toffee Brownies

Fudgy Toffee Brownies - made December 13, 2015 from Handle the Heat
This was the second thing I made for the bake sale fundraiser. I was sitting on my couch last Sunday, lazing away when I received an email from my cousin. Her son's school was holding a bake sale and the proceeds would be donated for relief efforts for the flood victims in Chennai.
I already had the M&M cookie dough in my freezer which I baked off but wanted to add more so I checked my pinterest board for a brownie recipe I stilll needed to try and came up with this one.
Easiest thing to mix together while the cookies were baking and it conveniently used some of the toffee bits I was trying to clear out of my pantry. Actually I'm trying to clear out a lot of baking ingredients from my pantry in anticipation of my drastic cutback in baking in January. Better to use now when they can do some good.
I only had the barest taste test of these brownies since I needed the whole thing for the bake sale. But it was enough of a sliver from the edge to assure you that the brownies were as moist and fudgy as they look in these pictures. I love when my brownies turn out like this - all chewy, fudgy goodness that says "here's what baked fudge tastes like; give 'em a try." No cakey brownies here.

1 cup semisweet chocolate chips
1 1/2 sticks (6 ounces) unsalted butter, cut into pieces
4 ounces unsweetened chocolate, chopped
1 1/2 cups granulated sugar
4 large eggs
3/4 cup all-purpose flour
1 cup toffee bits (such as Heath)
  1. Preheat oven to 350 degrees F. Line an 8 x 8" baking pan with foil and lightly spray with nonstick cooking spray.
  2. In the top half of a double boiler set over hot, barely simmering water, combine the chocolate chips, butter and unsweetened chocolate. Whisk until melted and smooth. Cool slightly.
  3. Stir in the sugar. Stir in the eggs, one at a time, beating until incorporated. Add flour, mixing until just combined. Add toffee bits and stir to combine.
  4. Pour batter into prepared baking pan. Bake for 35-40 minutes, until a toothpick inserted near the center comes out with moist crumbs, not raw batter. Do not overbake. Let cool completely before cutting.

Sunday, December 20, 2015

Secret Ingredient Bakery-Style Chocolate Chip Cookies

Secret Ingredient Bakery-Style Chocolate Chip Cookies - made dough December 12, 2015 from Chelsea's Messy Apron
These cookies almost look the same as the ones I just posted but that's mostly because I used the red and green M&M baking bits again to make them seasonally representative. But they're a different chocolate chip cookie - they're made bigger, spread a bit more (but still stay reasonably thick) and have a bit more crunch at the edges to them.
I'm always intrigued by trying out new variations in chocolate chip cookies to see what would really make a difference. This one called for beating the egg white separately with the cream of tartar and, similar to other recipes I've tried, includes cornstarch to help make the cookies chewy.
I've known about and used the cornstarch trick before but not the egg white-cream of tartar thing. I'm not sure if it added anything different to the cookie, maybe a bit more crispness? But I couldn't tell you why,
Still this was a good cookie and so easy to make. I'd had these in my freezer for the next time I needed cookies, figuring I could bake them off for gifts but then my cousin let me know about a bake sale at her son's school with the proceeds going to help the flood victims of Chennai and I thought that was a better purpose for them. They turned out pretty well. One baking tip: to make them festive, reserve some of the baking bits for pressing on the outside of the cookie dough balls before you bake them. Otherwise, if you mix them all into the dough, not that many baking bits will appear and you want them flaunting their holiday glory after they're baked.

3/4 cup butter
3/4 cup brown sugar
6 tablespoons granulated sugar
2 large egg yolks
1 large egg white
1/2 teaspoon cream of tartar
2 teaspoons vanilla extract
1/4 teaspoon salt
1 teaspoon baking soda
2 1/4 cups all-purpose flour
2 tablespoons oat flour (grind oats finely in a blender then measure out 2 tablespoons)
1 1/2 cups chocolate chips
1/2 cup miniature chocolate chips or chocolate chunks
1/2 cup M&Ms
  1. In a large bowl, beat together butter, brown sugar, and granulated sugar until light and fluffy, about 2 minutes.
  2. Beat the egg yolks into the sugar-butter mixture. 
  3. In a separate bowl, beat 1 egg white with the cream of tartar for several minutes.
  4. Beat the vanilla extract and then the egg white mixture into the butter-sugar mixture.
  5. In another bowl, mix together the salt, baking soda, flour and oat flour. Stir until combined.
  6. Combine the dry and wet ingredients and stir just until combined. Stir in the chocolate chips, mini chocolate chips and M&Ms. 
  7. Portion into golf-ball-size dough balls, cover and chill or freeze for several hours or overnight until firm.
  8. Preheat oven to 350 degrees F. Line baking sheets with parchment paper. Evenly space frozen dough balls on baking sheets.
  9. Bake for 10-12 minutes or until the edges are golden brown and the middles no longer look raw. Remove from oven and let cool on cookie sheets for several minutes before transferring cookies to wire racks and cool completely.

Saturday, December 19, 2015

"The Best" M&M Cookies

M&M Cookies - made dough December 6, 2015 from Cookies and Cups
It's no secret that I love chocolate chip cookies and make them pretty much year round. Although this is the season of fancy holiday cookies, I'll take a good chocolate chip cookie over the fancy every time.
But you can also dress up your favorite chocolate chip cookie recipe and make them holiday appropriate by adding red and green M&Ms if you celebrate Christmas or, if you have the patience, pick out the blue and white ones from a 4th of July M&M bag if you want to align them more with Hanukkah. Either way, these will taste great.
I like using the mini M&M baking bits rather than the full size M&Ms as I made these cookies small and chubby. The regular size M&Ms might've taken over the cookies but the baking bits were just the right size, especially paired with mini chocolate chips like I did with these.
Similar to other cookie recipes that use vanilla pudding mix, these have a wonderfully chewy texture when they're just slightly underbaked with crisp edges. The M&M bits add a nice crunch and chocolate punch along with the mini chocolate chips. They don't spread much so you don't have to worry about thin cookies but I still recommend portioning into dough balls and freezing first before baking.
¾ cup butter, room temperature
1 cup light brown sugar, packed
1 egg
1 teaspoon vanilla
1 (3.4 oz) box instant vanilla pudding mix
¾ teaspoon baking soda
1 teaspoon salt
2 cups flour
1½ cup Mini M&Ms, plus ¼ cup more for garnish
  1. In the bowl of a stand mixer, combine butter and brown sugar, beating until combined.
  2. Add in egg and vanilla; continue mixing until smooth, scraping sides as necessary. Mix in vanilla pudding mix, baking soda and salt.
  3. Add in the flour and beat just until combined. Stir in the M&Ms with a wooden spoon,
  4. Portion dough into golf-ball-sized balls, cover and chill or freeze for several hours or overnight until firm.
  5. Preheat oven to 350 degrees F. Line 2 baking sheets with parchment paper and space frozen dough balls evenly on each sheet.
  6. Bake for 9-11 minutes until edges are golden and middles no longer look raw. Cook for 3-4 minutes on baking sheet, remove to wire cooling racks and let cool completely.

Friday, December 18, 2015

Red Velvet Kiss Cookies

Red Velvet Kiss Cookies - made December 12, 2015 from The Cafe Sucre Farine
I'm blogging out of order but I want to get the more Christmas-themed treats up first or else, at the rate I'm going, I'll be blogging about Christmas cookies well into March, I'm hopelessly behind. I actually have been baking, nowhere near the level of holiday baking I normally do, but baking nonetheless.
The funny thing is, much as I (used to) bake, I don't actually make a lot of traditional Christmas cookies. I've already laid bare my deficiencies at cookie decorating so no fancy snowflake cookies will emerge from my kitchen and I don't really like the more traditional holiday flavors so I don't have any special holiday cookies I make for the season.
 I'm indifferent to gingerbread or ginger molasses cookies, I don't like eggnog anything, and we shall not speak of fruitcake...ever. I like peppermint but only by itself, like in gum. Never with chocolate. That's just wrong.
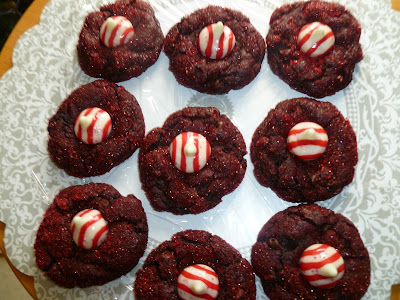
But I did give in to self-imposed peer pressure to have somewhat of a holiday-themed cookie with these red velvet kiss cookies. I'd made a version of these last year that were more in line with Peanut Butter Kiss Cookies but colored red. This time, these were "real" red velvet, meaning chocolate sugar cookies rolled in red sanding sugar and pressed with a candy cane Hershey's kiss.
Candy cane kisses. Shudder. I'm not a big fan of white chocolate either much less white chocolate combined with peppermint. But I figure I wasn't actually going to be eating more than one of these cookies and they did look festive, not to mention holiday appropriate. So sometimes my baking soul has to make compromises in the name of aesthetics.
As for flavor, I did like the cookie itself as a red velvet cookie with a moist, fudgy interior. Surprisingly, I wasn't repelled by the candy cane kiss either. High praise, I know. In any case, I do think these are pretty to bring to a holiday cookie swap or for giving away as a holiday food gift. The cookies look aesthetically pleasing without taking up any decorating time in your busy holiday baking schedule.
14 tablespoons butter
1 3/4 cups (219 grams) all-purpose flour
3/4 cup (88 grams) cocoa powder
1/2 teaspoon baking soda
1/4 teaspoon baking powder
1/2 teaspoon salt
1 3/4 cups (350 grams) brown sugar, packed
1 large egg plus 1 egg yolk
1 tablespoon vanilla
1 tablespoon req liquid food coloring
1 cup (175 grams) mini semisweet chocolate chips
1/2 cup red sanding sugar
1 12-ounce bag Hershey's Hugs for topping
  1. Preheat the oven to 350 degrees F. Line 2 sheet pans with parchment paper.
  2. In a large bowl, melt 10 tablespoons butter. Cut the remaining 4 tablespoons butter into 6-8 pieces, add to the melted butter and stir; set aside.
  3. In a medium bowl, whisk together the flour, cocoa, baking soda and baking powder. 
  4. Add the brown sugar, vanilla, red food coloring and salt to the melted butter. Stir well to combine. Add the egg and egg yolk; stir until smooth.
  5. Add the flour mixture and stir with a wooden spoon just until combined and flour is incorporated. Add chocolate chips and mix just until incorporated.
  6. Put red sanding sugar in a shallow bowl. Roll the dough into balls, about 1 1/2 tablespoons for each cookie. Roll the balls in the sanding sugar until well coated and place on prepared baking sheets.
  7. Bake the cookies, one sheet at a time, until they have puffed and have cracked running through the top, about 12-14 minutes; do not overbake.
  8. Upon removing cookies from the oven, immediately place a Hershey's Hug in the center of each cookie, pressing down to adhere the candy into the cookie. Transfer the cookies to a wire rack and cool completely.

Monday, December 14, 2015

Nutella Brownies

Nutella Brownies - made November 25, 2015 from Handle the Heat
Still trying to use up my Nutella. Unlike the NutellaFudge Brownies, instead of a layer of Nutella fudge on top of the brownie, this incorporated Nutella in the batter. Previous experience has taught me the Nutella flavor would get lost in the brownie batter and would probably be there more for moistness than actually providing Nutella flavor. 

Never fear; an easy way to get around that is to add dollops of Nutella as you spread the brownie batter. I spread half the batter on the bottom of the pan, dolloped Nutella generously over it then covered it all with the rest of the brownie batter. The result? A thick fudgy, chocolate brownie with surprise Nutella lava goodness in almost every bite.

I do suggest letting these cool to room temperature before consuming. If you can wait that long, the texture is more like baked fudge and the Nutella flavor is more pronounced. If you eat it while it’s too warm, it’ll be more mushy than fudgy. Trust me, fudgy is better.

1 cup (6 ounces) semisweet chocolate chips
1 1/2 sticks (6 ounces) unsalted butter, cut into pieces
4 ounces unsweetened chocolate, chopped
1 1/4 cups granulated sugar`
1/2 cup Nutella
3 large eggs plus 1 egg yolk
1 teaspoon vanilla extract
3/4 cup (3.4 ounces) all-purpose flour
1/4 cup unsweetened cocoa powder
1/4 teaspoon fine sea salt
  1. Preheat the oven to 350°F. Line an 8×8-inch baking pan with foil and spray with nonstick cooking spray.
  2. In a large microwave-safe bowl, combine the chocolate chips, butter, and unsweetened chocolate. Heat in the microwave for 1 minute then stir. Continue heating in 30-second bursts, stirring between each burst, until the mixture is melted and smooth but not scorched. Remove from the microwave and let cool slightly. Stir in the Nutella. 
  3. In a large bowl, use an electric mixer to beat the eggs and sugar on medium-high speed until light and thick, about 3 minutes. Beat in the vanilla extract. 
  4. Stir in the cooled chocolate mixture with a rubber spatula. 
  5. Add the flour, cocoa, and salt, folding gently until combined. Pour the batter into the prepared baking pan. 
  6. Bake until a tester comes out with moist crumbs still attached, 35 to 40. Do not overbake.

Saturday, December 12, 2015

Cream Cheese Chocolate Chip Cookies

Cream Cheese Chocolate Chip Cookies - made dough November 21, 2015 from American Heritage Cooking
Blogging out of order and still catching up on what I made during Thanksgiving week when I had some vacation time. I had a request from one of my nieces for her to take down chocolate chip cookies to her Thanksgiving gathering. Out come recipes I’ve pinned and I picked this one for Cream Cheese Chocolate Chip Cookies  because I had purchased a multi-pack of cream cheese blocks from Costco that I wanted to use. I don’t even like cream cheese so don’t ask why I bought so much of it. Because I can’t explain it either.

Despite my cream cheese prejudices, I thought this cookie turned out pretty well. Meaning it didn’t spread too much, it stayed thick and it was chewy like a good chocolate chip cookie should be. You can taste the tang of the cream cheese but it isn’t overwhelming and I would guess if someone didn’t know this contained cream cheese, they might not know what it is.

This is the rare, maybe only, time I’m going to say this was better when it had fully cooled so it could be eaten at room temperature. When it was still warm, which is normally when I advocate eating a chocolate chip cookie, it was just a little too mushy. Not the good kind of mushy either. But when it was at room temperature, the texture was much better. My cookies didn’t turn out as pretty as the one from the original blog I got the recipe from but I thought it was still a good cookie. My niece assured me when she got back from her Thanksgiving travels that her boyfriend’s family enjoyed them. That’s all I ask.


1/2 cup unsalted butter, softened
1/4 cup cream cheese, softened
3/4 cup brown sugar, packed
1/4 cup granulated sugar
1 large egg
2 teaspoons vanilla extract
2 1/4 cups all-purpose flour
2 teaspoons cornstarch
1 teaspoon baking soda
1/4 teaspoon salt
2 cups chocolate chips

  1. Whisk together in a medium bowl the flour, cornstarch, baking soda and salt; set aside.
  2. Cream butter, cream cheese, sugars, egg and vanilla together on medium-high speed until light and fluffy. 
  3. Reduce the speed to low and slowly add the flour mixture. After each addition mix until just incorporated.
  4. Add the chocolate chips and mix briefly to distribute. Scoop into golf-ball-size dough balls, cover and chill or freeze for several hours or overnight.
  5. Preheat the oven to 350° and line baking sheets with parchment paper. Space dough balls evenly on baking sheets. 
  6. Bake 11-12 minutes until edges are golden and middles no longer look raw or shiny. Let them cool 5 minutes on the baking sheet and then move to a wire rack to cool completely.