Saturday, October 30, 2021

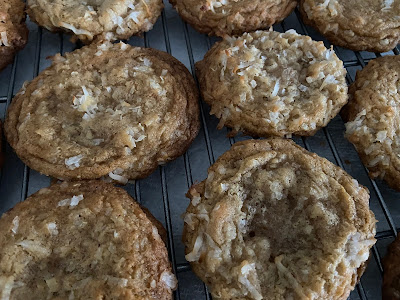
Soft and Chewy Coconut Cookies

Soft and Chewy Coconut Cookies - made dough October 2, 2021 from The Almond Eater 
1/2 cup unsalted butter, softened
3/4 cup light brown sugar, packed
1 egg
1 teaspoon vanilla extract
1 1/4 cups all-purpose flour
1 teaspoon baking soda
1/2 teaspoon salt
1 cup sweetened flaked coconut
  1. Cream butter and sugar together until combined and fluffy. Add egg and vanilla; stir to combine.
  2. In a separate bowl, whisk together flour, baking soda, salt and 1/2 cup of the coconut. Add to wet ingredients and beat together until combined. Stir in the remaining coconut. Portion into golf-ball size dough balls. Cover and chill for 1 hour or overnight.
  3. Preheat oven to 350 degrees F. Line baking sheets with parchment paper and evenly space dough balls. Bake for 10-12 minutes or until edges are set.
I love me a good coconut cookie. They're almost always brown-sugar based so there's a caramel flavor overtone that complements the chewy sweetness of the coconut.
This is a simple, basic and easy cookie to make. The dough is easy to handle and portion out and the cookies don't spread too much. 

If you like coconut, this a good-tasting, quick and easy cookie to make.


Friday, October 29, 2021

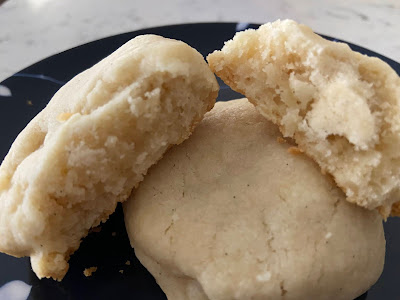
Vanilla Shortbread Cookies

Vanilla Shortbread Cookies - made dough October 2, 2021 from The Semisweet Sisters 
2 cups all-purpose flour
1 cup (2 sticks) butter, softened
1/2 cup confectioners' sugar
2 teaspoons vanilla
  1. Cream together butter, powdered sugar and vanilla. Stir in flour and beat until just combined. Do not overmix. Cover and chill dough for 20-30 minutes.
  2. Preheat oven to 350 degrees F. Line baking sheet with parchment paper.
  3. Scoop dough into balls. Flatten with the bottom of a glass to about 1/2" thick. Evenly space on baking sheets. Bake 12-15 minutes.
Here's a cookie for the purists among you. I like to make these kinds of cookies not only for their simplicity (4 ingredients) but they're also pretty sturdy for mailing.

Now that cooler temps are in the places I ship military care packages to, I have no qualms not just baking with butter but making recipes where butter is the star. Like with shortbread cookies.
These aren't crisp or crumbly since I made them thick and didn't bake them for too long but they're also not meant to be chewy like a chocolate chip cookie or a snickerdoodle. Instead, they're somewhere in between. Be sure to use real vanilla extract, not imitation, and fresh butter, not some lonely stick that's been sitting in your fridge for months. For these cookies to shine, it's all about the butter.


Wednesday, October 27, 2021

Cheesy Sausage Tortellini

Cheesy Sausage Tortellini - made October 2, 2021, adapted from Jennifer Meyering 
1 tablespoon olive oil
12 ounces pork sausage
1 teaspoon garlic powder
1 teaspoon Italian seasoning
1 teaspoon salt
1/2 teaspoon ground black pepper
1 14.5-ounce can diced tomatoes
1/3 cup heavy cream
16 ounces fresh tortellini
1 cup shredded smoked gouda cheese, divided
  1. In a large skillet, heat olive oil over medium-high heat. Add sausage, garlic, Italian seasoning, salt and pepper. Cook through, about 5-7 minutes. Drain grease and return sausage to pan.
  2. Reduce heat to medium and mix in tomatoes, heavy cream and tortellini. Cook until tortellini is done, about 5-6 minutes.
  3. Stir in 1/2 cup gouda cheese and cook until just melted. Top with remaining 1/2 cup cheese, let melt; serve immediately.
We interrupt the sugar in your (my) veins for this savory recipe. This is the kind of dish I like to prepare. Super easy, one pot and takes very little prep or cooking time.
Seriously, this is super easy and, as a non-cook, that means it's even easier for actual cooks. It helps, of course, that I had fresh tortellini and sausage from Costco so it's not like I made my own pasta or sausage. That would just be a bridge too far. 
Not only was this easy to make but it was also pretty tasty. It's hard to go wrong with tortellini and sausage. Plus cheese. Don't forget the gouda.


Monday, October 25, 2021

Biscoff Shortbread Bars

Biscoff Shortbread Bars - made September 30, 2021 from Homemade Italian Cooking
1 cup (2 sticks) butter, room temperature
1/2 cup granulated sugar
3/4 cup confectioners' sugar
1 tablespoon vanilla extract
2 cups all-purpose flour
1 14.1-ounce jar cookie butter
  1. Preheat oven to 325 degrees F. Line a 9 x 9-inch baking pan with foil and lightly spray with nonstick cooking spray.
  2. In the bowl of a stand mixer fitted with the paddle attachment, on medium-high speed, cream together butter, granulated sugar and confectioners' sugar until light and fluffy, about 2 minutes. Add vanilla extract and flour; mix on low speed until a soft dough forms. Do not overbeat.
  3. With your hands, press half of the dough into the prepared pan. Wrap the remaining dough in plastic wrap and refrigerate until needed. Bake the bottom crust for 12 minutes, until puffy and just starting to color. 
  4. Remove from oven and let cool for 15 minutes. Once cooled, spread the cookie butter evenly over the bottom crust. With your hands, crumble the remaining dough over the top of the entire cookie butter layer. Bake for 20-25 minutes until puffy, lightly golden and slightly firm to the touch.
  5. Let cool then chill in the refrigerator for at least 2 hours or overnight before removing from pan.
Since it's fall now and hopefully cooler temps are also prevailing in the Middle East where most of my care packages for deployed military service members end up going, I thought it was safe to send these (all butter) shortbread bars without worrying that the 2-3 week mailing time was going to spoil the butter since (presumably) they're not experiencing triple digit temps.
The bottom crust can be pushed into place with your fingers and that's what the first picture shows. I'm not a fan of fingerprints on baked goods, even if you literally won't be able to see it in the finished product so I used a small roller (pictured below) to make a more even crust. Yeah, probably a bit picky of me but that's how I - haha - roll.

I took one liberty with the original recipe and added broken pieces of Biscoff cookies over the cookie butter layer for a bit of added crunch and contrasting texture to the shortbread and cookie butter. Not to mention to amp up the Biscoff flavor because you can never have too much cookie butter, in whatever form.

The shortbread doesn't really spread much so you want to pinch off small pieces to spread them around the top layer. I couldn't completely cover the top but that's okay as it doesn't hurt the Biscoff cookies or the cookie butter to be slightly exposed.

I only ate a sliver for a taste test but these seemed like they turned out pretty well. Butter shortbread and cookie butter are always a good combination, amped up by the Biscoff cookies in the middle. You can omit them if you wish but I liked having them in the middle. 


Saturday, October 23, 2021

Snickerdoodle Cake

Snickerdoodle Cake - made September 28, 2021 from One Sweet Appetite 
3 cups flour
1 tablespoon baking powder
1 teaspoon salt
1 teaspoon nutmeg
1 cup butter, softened
2 cups granulated sugar
5 eggs, room temperature
1 teaspoon vanilla
1 1/4 cups buttermilk

Coating
8 tablespoons butter, melted
1 cup granulated sugar
1 teaspoon cinnamon
  1. Preheat your oven to 325 degrees. Spray a muffin tin or 2 mini bundt pans with cooking spray. Set aside.
  2. Shift together the flour, baking powder, salt, and nutmeg. Set aside.
  3. Whisk together 2 cups of sugar and butter until light and fluffy. Add the eggs, one at a time, followed by the vanilla. Add the dry ingredients alternating with the buttermilk. Mix until fully incorporated. Divide between your prepared pan and cook for 20-30 minutes (baking time will vary depending on which pan you decide to use).
  4. Remove the cakes from the pan while they are hot. Brush with butter and roll in 1 cup of sugar mixed with 1 teaspoon of cinnamon.
I love bundtlette pans. They're a pain in both butt cheeks to clean so I don't tend to bake with them often but I still love the look, as long as you can get them out of the pan cavities intact.
I used two different ones from Nordic Ware, both made in the USA, which is why I like buying Nordic Ware products. They're always high quality and last forever.
The only thing I was fussed about with this recipe is you can see the holes in the design of the baked cakes. That wasn't from beating too much air in the cake batter (although I guess it could have been) but partly from the cooking spray and flour I liberally used in the bundtlette cavities to ensure the cakes would come out intact. Those pesky bubbles then show up in the finished cakes. But you can't not oil and flour the cake cavities or the cakes might not come out without breaking apart. A First World conundrum, indeed.

I'll live with the air holes though so (most of) the cakes can come out with the design they were intended to have.


The snickerdoodle name of the cake comes because after the cakes are baked, you brush them with melted butter then coat them in cinnamon sugar. Yum.
This is the kind of cake you want to serve immediately or very shortly after coating them while the cinnamon sugar hasn't absorbed into the moisture of the cake. For the most part, I liked this cake. I'm not a fan of nutmeg though and that flavor came through in the cake. Next time, I might just omit the nutmeg and substitute more cinnamon instead.


Friday, October 22, 2021

Cinnamon Roll Cake (sort of)

Cinnamon Roll Cake - made September 28, 2021 from Crunchy Creamy Sweet
1 1/2 cups all-purpose flour
1/4 teaspoon salt
1/2 cup granulated sugar
1 1/2 teaspoons baking powder
1/2 teaspoon baking soda
3/4 cup buttermilk
1 large egg
1 teaspoon pure vanilla extract
1/4 cup vegetable oil

Filling
1/4 cup butter, melted
1/4 cup brown sugar, packed
2 teaspoons all-purpose flour
2 teaspoons ground cinnamon
1/2 teaspoon pure vanilla extract

Glaze
3 ounces cream cheese, softened
1/2 cup powdered sugar
1 teaspoon pure vanilla extract
2 tablespoons milk
  1. Preheat oven to350 degrees F. Line a 9" round cake pan with parchment and lightly spray with nonstick cooking spray.
  2. In a large mixing bowl, whisk together flour, salt, sugar, baking powder and baking soda.
  3. In another mixing bowl, whisk together egg, buttermilk, vanilla and oil.
  4. Add the wet ingredients to the dry ingredients and mix together until combined and smooth. Spread batter into prepared pan, smoothing top. Set aside.
  5. Make the filling: in a small mixing bowl, whisk together melted butter, sugar, cinnamon, flour and vanilla. Using a small spoon, drizzle half the filling over the batter in a circular motion to create circles, starting from the outside. 
  6. Bake the cake for 28-30 minutes or until a toothpick inserted near the center comes out clean.
  7. Remove the cake from the oven and set on a wooden cutting board. Drizzle the remaining filling over the filling crevices that were created during baking. Let the cake cool while you make the glaze.
  8. Make the glaze: in a medium mixing bowl, whisk beat together cream cheese, milk and vanilla. Add powdered sugar until frosting reaches a thick yet drizzling consistency. 
  9. Using the back of a spoon or an offset spatula, spread the glaze over the warm cake in a circular motion. Cool to room temperature.
You'll have to click on the post title to go to the original recipe of this cake and see how it was supposed to come out looking like a giant cinnamon roll, baked in a round cake pan with the traditional cinnamon swirl. Mine doesn't look like that because I deliberately made it in a square baking pan. I was giving most of this away and knew it would be easier to portion into squares than to try and give out round pieces.
Although I didn't bother with trying to make a round cinnamon swirl either since I wasn't trying to make it look like a giant cinnamon roll, I think it's a clever idea. If you are going to make this as a round cake, you might want to try it as originally intended. 

This was a really good vanilla cinnamon cake. Light, fluffy, moist with the classic cinnamon flavor profile. I just made a simple vanilla glaze with powdered sugar, vanilla and milk and skipped the cream cheese. I'm sure that would've made it closer to a cinnamon roll look and flavor but since I'd already gone rogue with the square shape, I had no compunction in skipping the cream cheese, mostly because I didn't have any.
But regardless of my not following directions very well, this still turned out to be a really good cake.