Bibingka, the sticky kind, again - made September 28, 2015
I did a spot of baking a couple of weekends ago, mostly to use up the pint of milk I had bought for the
Chocolate Caramel Oatmeal Bars recipe. As you know, I'm still trying not to bake a lot since I don't have much time and I'm trying to cut back on sweets. And I really have cut back drastically. But I'm not dead either so I do get my hand in once in awhile.
I've been sitting on a frozen package of grated cassava for awhile, from the last time I had wanted to make bibingka and never got around to it. Plus, from my previous baking stockpiling period, I had a couple of packages of coconut flakes still in my freezer. It seemed like a good time to chip away at my stockpile and also use up the milk before it expired. Plus I had a craving for bibingka. My mom makes it often enough that I rarely make it myself but the last time she made it, it was for my parents' anniversary party and it was so popular, it was gobbled up by the other guests before I was able to get a piece. Nothing like being thwarted to make me want something.
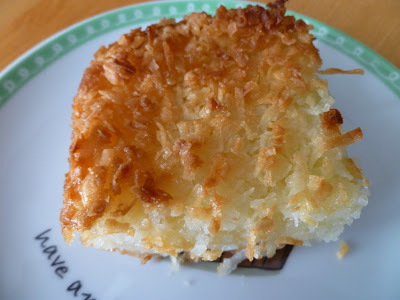


So I made my own. This is my mom's recipe and super easy to make. Really, it is, even for the novice baker. It's also gluten free for anyone trying to avoid wheat since it uses rice flour. This time I baked it for nearly an hour and the texture was perfect. Chewy without being mushy or hard-chewy. Just perfect chewy. Plus I love coconut so anything with coconut browned on top is a good thing.
1 cup sweet rice flour (also known as Mochiko, can be found in the Asian aisle of most grocery stores)
1 teaspoon baking powder
16 ozs of grated cassava (can be purchased in 16-oz packages at Asian grocery stores like 99 Ranch)
2 cups milk
2 eggs
scant 1 cup sugar
1/4 cup butter
Sweetened coconut flakes, enough to cover the top of the batter in an even layer
- Melt butter in 9" square baking pan in preheating oven as it heats to 350 degrees F. Meanwhile, beat eggs until lightly scrambled. Add in rice flour and baking powder and make a paste. Gradually add in milk, mixing with a fork to keep the batter smooth and free of lumps, then add sugar and cassava until well blended. Do not overmix - you don't want a light or cakey texture. Pour into pan, mixing well with melted butter. Batter should be somewhat liquidy but not so thin that it can't hold the coconut topping.
- Generously top mixture with coconut flakes. Bake until coconut topping is golden brown and edges look crisp, about 45 to 55 minutes. You can't rely on the toothpick test for this one so go by appearance. The middle should be firm enough not to jiggle when you shake the pan gently. Don't bake for more than an hour even if the coconut isn't brown all over the top.


No comments:
Post a Comment