Friday, January 25, 2013

New Orleans, Day 1 - Bananas Foster

I just got back from a short culinary tour of New Orleans.  I've always wanted to go to New Orleans and my main criteria was timing: I knew I didn't want to go during Mardi Gras, Superbowl Week, jazz festival or hurricane season (either too crowded or too risky, weather-wise).  So when I saw this trip advertised in the Sur La Table catalog as Tasting New Orleans and that they were offering the 4-day, 3-night tour in January, the timing was perfect and I jumped at it.

It was actually more like a 2.5 day tour.  Our first event was Monday night as a meet and greet at St. Marie Hotel's Vacherie Restaurant.  We got a horse-drawn carriage ride around the French Quarter from our hotel on Bourbon St to Vacherie where Elizabeth Pearce, a culinary historian who gives culinary and cocktail walking tours of New Orleans, told us about the official cocktail of New Orleans, the Sazerac.  I don't drink but always find culinary history interesting and Elizabeth did a great job making the story come alive.  We all got tastings of the sazerac.  I took a sip just to try it and that was more than enough for me.  I'd really come on the trip for the food.
A tasting of the Sazerac and spicy pecans
After that initial cocktail hour, we were on our own for the evening.  I had already arranged to meet a friend I had gotten to know from my old online fitness board.  Jen lived in New Orleans and was the perfect person to give me the inside "locals" scoop on where to go and what to eat.  Plus, from our exchanges online over the years, I also knew I'd love to meet her in person and knew I'd like her in person as much as I did online (and I was right).  I had emailed her a list of foods I had to try (mostly desserts, of course) while I was in New Orleans and one of them was Bananas Foster.  Her husband suggested Palace Cafe which was owned by Brennan's, the restaurant that invented Bananas Foster in 1951. How could we go wrong?
My steak and shrimp entree
Jen's rotisserie chicken entree 
Turns out we couldn't.  We met at Palace Cafe on Canal St and got a front table by the window overlooking the street.  Later on, we saw some of the Mardi Gras floats being transported in preparation for the upcoming parade.  I got a steak and shrimp entree but truthfully I was looking forward to dessert.  It didn't disappoint.  The waiter prepared the Bananas Foster table-side - heat the skillet, melt the butter and brown sugar, add the banana liqueur then the bananas until they caramelize but are still firm.  Of course, the whole point of getting Bananas Foster is setting the dessert on fire once you add the rum.  Although alcohol's not my thing, I have no problem with it being set aflame for a cool-looking dessert.  The Bananas Foster was amazingly yummy.  It was a great way to start off a culinary adventure.
Our waiter was used to getting photographed by tourists
  
Melting down the butter and brown sugar

Add bananas and caramelize
Add rum and set on fire
Eat and savor every bite
 Jen was also kind enough to bring me some treats from my must-eat list from Gambino's Bakery, where a former boss once gave me their red velvet cake for Christmas.  She brought me a slice of King Cake, doberge torte petit fours in caramel and lemon and an almond white chocolate and a chocolate petit fours.  Stay tuned as I write up the rest of the trip in all its delicious, worth-every-calorie detail.

Recipe from Brennan's
  • ¼ cup (½ stick) butter
  • 1 cup brown sugar
  • ½ teaspoon cinnamon
  • ¼ cup banana liqueur
  • 4 bananas, cut in half
    lengthwise, then halved
  • ¼ cup dark rum
  • 4 scoops vanilla ice cream

    Combine the butter, sugar, and cinnamon in a flambé pan or skillet. Place the pan over low heat either on an alcohol burner or on top of the stove, and cook, stirring, until the sugar dissolves. Stir in the banana liqueur, then place the bananas in the pan. When the banana sections soften Bananas Fosterand begin to brown, carefully add the rum. Continue to cook the sauce until the rum is hot, then tip the pan slightly to ignite the rum. When the flames subside, lift the bananas out of the pan and place four pieces over each portion of ice cream. Generously spoon warm sauce over the top of the ice cream and serve immediately.

Tuesday, January 22, 2013

German Chocolate Cake Bars

German Chocolate Cake Bars - made January 16, 2013, recipe adapted from Six Sisters' Stuff

Although I'm not a fan of box cake mixes, I am a fan of German Chocolate Cake or any version thereof.  So I put my snobbery aside for this recipe.  You just can't go wrong with chocolate and a gooey coconut topping.  Plus this was super easy to make and is perfect when you're short on time and need a decent number of servings.  I needed something for both dinner with my friends and a team lunch and there was enough of these bars to go around for everyone's goodie bags.

They turned out okay although I think I inadvertently overbaked them so mine didn't look as good as the picture from Six Sisters' Stuff.  Plus, my snobby taste buds kicked in and I could taste the cake mix.  The topping was good but next time I think I would go with my snobby inclinations and bake a German chocolate cake base from scratch.

Crust:
1 box devil's food cake mix (not the kind with pudding added)
1/2 cup (1 stick) unsalted butter, melted
1 large egg

Filling:
1 (14 oz) can sweetened condensed milk
1 teaspoon vanilla extract
1 large egg
1 cup chopped pecans (toast them first to bring out their flavor)
1 cup shredded coconut (I used sweetened coconut)
1/2 cup milk chocolate chips
  1. Preheat the oven to 350 degrees. Line a 9x13 inch baking pan with foil and spray lightly with nonstick cooking spray.
  2. In a medium bowl, mix together the cake mix, butter and egg, and press into the bottom of the prepared pan. The crust should not come up the sides. Bake for 7 minutes and remove from the oven. The crust will not look done.
  3. While the crust is baking, mix together the sweetened condensed milk, vanilla, egg, pecans and coconut. Pour evenly over the warm crust and sprinkle evenly with the chocolate chips. Bake for 24-30 minutes, until the top is a light golden brown. Remove from the oven and cool completely before cutting into squares.

Sunday, January 20, 2013

Black Gold Cookies - in honor of the 49ers, the NFC Champs

Black Gold Cookies - made January 19, 2013 from Hugs & Cookies

I'm blogging a little out of order as I had decided on these cookies yesterday, the day before the NFC Championship game.  I adapted them from Hugs & Cookies but added Milky Way Caramels and am re-naming them Black Gold Cookies in honor of the NFC Champs, the San Francisco 49ers.  I've been a 49er fan since the 1982 NFC Championship game, 49ers vs the Cowboys, when Joe Montana threw the winning touchdown to Dwight Clark, aka The Catch.  I've hung in there with the Niners over the years through thick (Montana, Clark, Jerry Rice, Roger Craig, Ronnie Lott, Steve Young, Coach Bill Walsh) and thin....and thin and emaciation (we won't name names for these periods).  We're getting back into "thick" territory again with a trip to the Superbowl in 2 weeks!  So cookies in their honor seem apropos.

Why black gold?  Because that's what chocolate is, of course.  At least to me.  But to make it more color literal, I added the Milky Way Caramels and you can just see liquid gold peeking out from this cookie.  This is a pretty rich cookie - we're talking 5-mile run kind of cookie.  As with most chocolate cookies, I actually prefer these at room temperature when the chocolate has a chance to set.  Try to cover the caramels with the cookie dough as much as feasible so the caramel doesn't leak out too much during baking.  A little peeking out looks pretty, a lot makes for overly chewy caramel once it's baked.  The dough is rather soft but does become more firm as the melted chocolate chips cool in the batter.  You want to scoop these out fairly soon after mixing the dough so it doesn't become too difficult to portion them out into dough balls.

1 cup + 1 tablespoon all-purpose flour
1/4 cup unsweetened cocoa powder
1 teaspoon baking powder
1/4 teaspoon salt
8 ounces semi-sweet chocolate chips
2 eggs
1 tsp vanilla extract
5 tablespoon unsalted butter, softened to room temperature
3/4 cup light brown sugar
1/4 cup sugar
1/2 cup Milky Way Caramels, chopped
1/2 cup milk chocolate chips
1 cup semisweet chocolate chips

  1. Sift together flour, cocoa powder, baking powder and salt in a medium bowl. Set aside.
  2. Melt the 8 ounces of chocolate chips in the microwave or in a double boiler over hot water until smooth.  Let cool slightly.
  3. In a small bowl, whisk the eggs and vanilla. Set aside. With an electric mixer, beat the butter until smooth and creamy, about 1 minute.  Beat in the sugars. 
  4. Mix in the beaten egg/vanilla until incorporated.  Add the melted chocolate and beat until combined.  Add the dry ingredients on slow speed.  Fold in the chocolate chips and Milky Way Caramels.
  5. Scoop into dough balls and chill for at least 30 minutes. Preheat oven to 350 degrees F.
  6. Bake for about 10 minutes, or until the cookies have just begun to set with the centers still appearing very soft.  They will firm up as they cool.
  7. Allow cookies to cool on baking sheet for at least 5 minutes before transferring to a wire rack to cool completely.

Saturday, January 19, 2013

Stuffed Peanut Butter Cookies

Stuffed Peanut Butter Cookies - made January 12, 2012, recipe adapted from Crazy for Crust
One of the blogs I like to follow is Dorothy's Crazy for Crust blog.  Partly because I think she and I share the same taste buds and like a lot of the same sweets.  And partly because she always seems to put yummy stuff on her blog.  And despite my indifference to peanut butter, I like making peanut butter cookies for no other reason than I like using a meat mallet to make the cute little indentations in the cookie rather than using a fork to make the traditional cross hatches. I got the meat mallet idea from my friend Annie the Baker.  Annie was one of my CIA classmates and after culinary school, she did the pastry chef thing for a few years then started her cookie business.  Every time I go to her website, I crave cookies because hers look so good (I dare you not to get hit with the same craving when you look at her chubby cookies in all flavors).  When I came across this recipe from Crazy for Crust, I had to make it with the meat mallet impressions ala Annie the Baker but instead of rolos, I stuffed each cookie with a peanut butter cup.
I was really pleased with how this turned out because the cookies stayed thick and didn't spread too much so I could keep the little indentations, the better to hold sprinkles of sugar before baking.  While I never eat peanut butter cups by themselves, they made a nice addition to the cookie.  You can also stuff it with Rolos like Dorothy did or a piece of Snickers bar or a small handful of chocolate chips and/or peanut butter chips.  The sky's the limit.  Oh, and in case you want to be prepared, January 24 is National Peanut Butter Day.  That's as good an excuse as any to make these cookies.

½ cup softened butter
¾ cup peanut butter 
1 ¼ cups firmly packed brown sugar
3 tablespoons milk
1 tablespoon vanilla
1 egg
2 cups flour
¾ teaspoon baking soda
About 24-30 peanut butter cups, unwrapped
  1. Preheat oven to 350° (unless you're freezing the dough first). Line cookie sheets with parchment.
  2. Mix butter, peanut butter, brown sugar, milk, and vanilla with a stand or hand-held mixer until just blended. Add egg and beat until incorporated.
  3. Whisk baking soda and flour in a medium bowl. Add to wet ingredients and mix just until blended.
  4. Scoop 2 tablespoon sized balls of dough. Place a peanut butter cup in the center of each and roll so that the peanut butter cup is in the center of the dough and does not show. Place 2” apart on baking sheet. Use the pointy side of a meat mallet to make the pattern on each cookie (dip the mallet in granulated sugar to help prevent dough sticking to it).  You can freeze cookies in freezer bags at this point to bake for later.
  5. When ready to bake, sprinkle tops lightly with granulated sugar and bake in preheated 350-degree oven about 8-9 minutes just until set. Bottoms will slightly brown and centers may still look a little under baked. Let cool on cookie sheet for about 2 minutes, then remove to cooling rack to cool completely.

Thursday, January 17, 2013

Coconut Pound Cake

Coconut Pound Cake - made January 12, 2013 from Dramatic Pancake

Still on a mission to use up some milk plus I love coconut so this was a perfect recipe to try out, especially since the picture was so tempting on Dramatic Pancake's blog (love that name).  This cake was really, really good.  I'm partial to coconut so it already had the halo effect to start with and it didn't disappoint.  It's a good butter cake with the added chewiness of the coconut.  While the cake is good as a standalone, don't skip the glaze and the coconut sprinkled on top as that adds to the overall taste and texture of the cake.

The only tricky thing is to make sure you don't underbake it - says the Queen of Underbaking.  The high butter content ensures its moistness and it's hard to overbake this cake.  The original directions say to bake it for an hour but I ended up baking mine for 1 hour 20 minutes.  Unheard of, right?  But at an hour, while the toothpick looked deceptively clean, I noticed it did have a wet sheen to it.  It didn't have raw batter on it but I know when I've taken cakes out before at that stage, they've been underbaked.  So I left it in until the cake was firm to the touch and the toothpick met a little more resistance when I poked it into the cake.  And even then, I didn't achieve the fluffy-looking texture Dramatic Pancake did - mine was still a pound-cake butter-moist texture.  So perhaps I could've baked it longer but it was good enough for me.
2 cups all-purpose flour
1½ teaspoons baking powder
1/2 tsp salt
1 cup unsalted butter (at room temperature)
2 cups sugar
5 eggs (at room temperature)
1 cup whole (or low-fat) milk
1 teaspoon coconut extract (I used vanilla extract)
3½ oz Angel Flake sweetened, shredded coconut

Glaze
2 tbsp unsweetened coconut milk (or regular milk)
1/2 teaspoon coconut extract (I used vanilla extract)
1/2 – 1 cup confectioners’ sugar
  1. Preheat oven to 325°F. Grease and lightly flour a 9- or 10-inch tube pan. This cake is delicate so I wouldn’t recommend using a bundt pan.
  2. In a large bowl, whisk together flour, baking powder and salt.
  3. In a separate bowl, use an electric mixer (on medium speed) to cream the butter and sugar until fluffy (about 3 minutes). Add in eggs, one at a time, and mix well. Stir in the milk, coconut (or vanilla) extract and shredded coconut. Finally, add the flour, baking powder and salt mixture, and stir to combine. Pour batter into prepared pan and bake until golden brown, about 1 hour.
  4. Meanwhile, prepare the glaze. Whisk together the coconut milk (or milk), coconut (or vanilla) extract and confectioner’s sugar until smooth, adding more sugar as needed to thicken the glaze (or more milk if you want to thin it out).
  5. Cool cake in pan for 5-10 minutes before removing. Drizzle with glaze while cake is still warm.

Tuesday, January 15, 2013

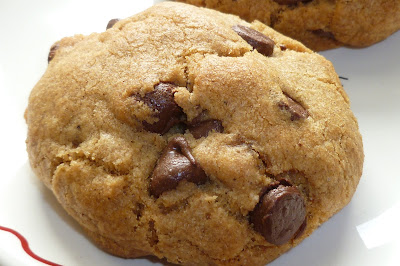
Fat and Chewy Chocolate Chip Cookies

Fat and Chewy Chocolate Chip Cookies - made dough January 11, 2013 from Stay at Home Foodie

I don't really do New Year's Resolutions anymore but if I did one, it should probably be that I have to make all the recipes I've pinned on pinterest before I add anymore to my  recipe pin boards.  My "Baking Recipes I Need to Try" board has 161 pins on it (after I deleted some in an effort to bring myself under control).  The board with real food recipes has 72 pins.  To be fair, the "Pinned Recipes I've Already Made" board has 92 pins on it so I really have been chipping away at it.  Still, I'm losing (or winning?) the battle of pinning more than I can bake or cook.  But it's good to have goals and I think mine will be to work through my pin board before the end of the year.  Really.

In heading towards that goal, I'm trying out this chocolate chip cookie recipe - the only time I like "fat" in any title.  I'm all about the chubby.....in cookies.  Plus, you guessed it, I have dinner plans with my friend Todd again so I have to trot out a chocolate chip cookie recipe in his honor.  Assuming we actually follow through with dinner this time.  If not, don't worry, Todd, I have more chocolate chip cookie recipes to try out beyond this one.  But you're going to miss out on a good cookie with this one if we don't meet.  I love how it stayed thick and chunky yet was chewy, rather than cakey.  The recipe called for melting the butter so I took it a further step and browned the butter before using it in the dough.  I really liked the flavor and how the texture turned out.  Then again, there aren't many chocolate chip cookies I don't like.

3/4 cup butter, melted
1/2 cup white sugar
1 cup brown sugar
3/4 teaspoon salt
3/4 teaspoon baking soda
2 teaspoons vanilla
1 egg
1 egg yolk
2 1/4 cups flour
2 cups chocolate chips
  1. In a medium size bowl, combine salt, baking soda and flour. Set aside.
  2. In a stand mixer, combine melted butter and sugars. Beat well.
  3. Add vanilla, egg and egg yolk. Mix well.
  4. Slowly add the dry ingredients, being sure to scrape down the sides of the bowl. Mix until well combined.
  5. Add chocolate chips and mix until just combined.
  6. Using a ice cream scoop, scoop out cookie dough balls onto a baking sheet lined with parchment paper. You don't need to worry about spacing... just squeeze them all on.
  7. Refrigerate for AT LEAST 1 hour.
  8. After the cookie dough balls are cold, prepare them for baking.
  9. Take each cookie dough ball and using both hands pull it apart until it separates in half.
  10. Rotate your hands so that the broken sides are facing up.
  11. Mash the two halves together.
  12. Place on the baking sheet 2-3 inches away from any other ready-to-bake cookie dough ball.
  13. Bake at 450 degrees for 4 minutes.
  14. Reduce heat to 325 degrees and bake for 10 minutes more, or until just golden around the edges and still pale {although cooked} in the center.

Sunday, January 13, 2013

Rich Marble Pound Cake with Chocolate Glaze

Rich Marble Pound Cake with Chocolate Glaze - made January 9, 2013 from Chocolatier magazine, October 2006 edition

This is another recipe I've had for years that I've never made before but filed away in case I ever needed to use up milk one day.  The day came so I finally made this.  It's a standard marble bundt cake and it came out pretty well.  The cake is moist and has the hearty denseness of a typical pound cake without being overly heavy.  The glaze in the original Chocolatier recipe was a ganache (heavy cream, chocolate and a little vanilla) but I don't care for ganache so I made up my own glaze.  It sets well so you don't have  to worry about sticky frosting.  Use the best quality cocoa you have for both the cake and the glaze as that's what determines the chocolate flavor.  I used my regular standby of Pernigotti cocoa from Williams Sonoma for that dark cocoa taste.

I ate a thin slice for the taste test piece and brought the rest into work.  I'm temporarily in a new office building while my old floor gets renovated.  On my old floor, I could put a cake like this out and it'd gradually get eaten throughout the day but there might be a few pieces left by the end of the day.  In my new office building, there are either a lot more people on my floor or a lot more people with a sweet tooth.  I put this out in the communal kitchen when I got into the office at 8 am and an hour later, I was pleasantly surprised to find there were only 4 pieces left. Glaze marble pound cake - apparently it was what's for breakfast.

Marble pound cake
3 cups cake flour
2 teaspoons baking powder
½ teaspoon salt
2 ½ cups granulated sugar, divided
½ cup natural (not Dutch-processed) cocoa powder
6 tablespoons water
1 ½ cups (3 sticks) unsalted butter, softened
1 teaspoon vanilla
5 large eggs
½ cup whole milk

Chocolate glaze
1/3 cup unsweetened cocoa, sifted
1 cup confectioners' sugar
2-3 tablespoons of milk, adjust based on desired consistency

1.     Make cake; Position rack in center of oven and preheat oven to 325 F.  Grease inside of a 10” Bundt pan.  Dust pan with flour.
2.     Sift together flour, baking powder and salt into medium bowl.  Set aside.
3.     In a medium bowl, whisk together ½ cup sugar, cocoa powder, and water until smooth; set aside.
4.     In bowl of electric mixer, using paddle attachment, beat butter at medium speed until very creamy, about 2 minutes.  Gradually beat in remaining 2 cups sugar.  Increase speed to medium-high and beat until mixture is well blended and light, about 4 minutes.  At medium speed, beat in vanilla, then beat in eggs one at a time, mixing well after each addition and scraping down the sides of the bowl as necessary.  At low speed, add dry ingredients in three additions, alternating with milk in two additions and mixing just until blended.
5.     Add 3 cups of batter to cocoa mixture and stir until blended.  Spoon one-third of remaining plain batter into prepared pan and smooth into an even layer.  Spoon one-third of chocolate batter over plain batter and smooth into an even layer.  Spoon over another third of plain batter, then another third of chocolate batter, smoothing both layers.  Repeat with remaining batters, ending with chocolate batter.
6.     Bake cake for 60 to 70 minutes, until cake tester inserted into center comes out clean.  Cool cake in pan on wire rack for 15 minutes.
7.     Invert cake onto rack and cool completely.
8.     Make glaze: Whisk cocoa and confectioners' sugar.  Add milk, 1 tablespoon at a time, whisking smooth, until desired consistency.  Pour over lukewarm or cooled cake.