Tuesday, July 3, 2018

Christopher Elbow Artisanal Chocolate, Kansas City, MO

Christopher Elbow Artisanal Chocolate, Kansas City, MO - visited June 2, 2018
This is going to be one of those posts that is very picture-heavy. One glance through the pictures and you'll understand why. The good news is viewing them doesn't actually make you gain weight. Just have a kleenex handy to catch any drool.

Still eating our way through Kansas City. Saturday night, we had dinner plans to go to a Spanish tapas place (next post) but we left a little early so we had time to go to Mel’s favorite chocolatier, Christopher Elbow. She had bought a box of dark chocolate sea salt turtles to spoil us with when we arrived but we all wanted to go to the shop ourselves and buy gifts to bring home. Okay, and more chocolate for ourselves.


I was a little familiar with Christopher Elbow Chocolates since Mel had given me a box of artisanal chocolates when I had last visited but this was my first time in the actual shop. It’s definitely worth seeing in person and I’m so glad I got the opportunity to do so. The chocolates were literally a work of art, every single piece. I had to snap pictures of nearly every display as they were so beautiful. I’m in awe of the vision to create each kind of chocolate; they were quite artistic.


Some of the flavors were also rather exotic. This is where my plain taste buds don’t necessarily come up to scratch to the artistry and more sophisticated palate probably needed to fully appreciate artisanal chocolate but I found enough to satisfy not just my eyes but also my taste buds.


You can buy the chocolates by the piece and either go for a 4-box, 9-box or 16-box. Or, if you don’t want chocolates in those numbers, you can buy any amount you wish to put in a bag but then you end up paying the individual chocolate price, $4 each. It’s slightly cheaper to buy the pre-fixed amounts in the different-size boxes.


I liked the turtles Mel had us try at her house but I went for a box of the milk chocolate ones instead of the dark chocolate. I’m a milk chocolate imbiber. Then I had to get 4 of the pretty chocolates because you know, chocolate. My “impulse” purchase was a milk chocolate hazelnut praline from a display of individually wrapped ones conveniently near the cash register, meant to target weak-willed chocoholics like me. I obliged.


If you want to know prices, the box of 6 milk chocolate fleur de sel pecan turtles was $22, the 4-box chocolates were $10, and the milk chocolate hazelnut patty were $4. So it was not a cheap indulgence but worth it.


I managed to keep myself from eating any of it until I was on my way home the next morning. The milk chocolate hazelnut patty ended up being my breakfast as I caught a 6 am flight out of Kansas City the next day. I held out until we were landing for my connecting flight. Took one bite and cursed myself for only getting one of these. It was freaking amazingly delicious. WHY did I only get one?? What was I thinking??


By the second bite, I was already thinking I needed to go to the Christopher Elbow shop that the Kansas City folks told me was in San Francisco. San Francisco! Not close but not as far as KC. Seriously, the praline patty was amazing. I had thought it would be hard like a chocolate-covered toffee but it wasn’t. It was slightly more firm than the chewy caramel of the sea salt turtle but not hard like toffee. I can’t describe it very well. I think I need to go get another one to refresh my memory and be more descriptive.

Best Hazelnut Praline Ever


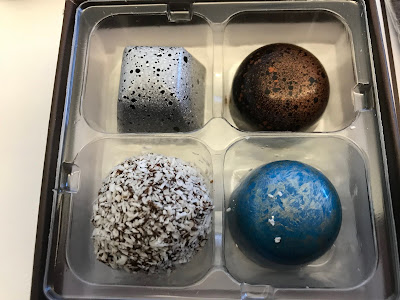
For the 4 individual chocolates, I got a variation of a caramel flavor for each one. The insides were the soft, flowy caramel, my favorite kind. I don’t mind the chewy caramel but the flowy, oozy kind is best. After you bring yourself to break through the gorgeous chocolate shell, you encounter the smoothness of the best caramel. Each flavor was subtle with just the right balance of flavor and sweetness. If you’re a chocolate connoisseur, you have to give Christopher Elbow chocolates a try.

Coconut Caramel


Vanilla Bean Caramel


Milk Chocolate Turtle with Sea Salt


Sunday, July 1, 2018

LaMars Donuts, Kansas City, MO

LaMar's Donuts, Kansas City, MO - June 2, 2018
As part of our weekend of eating, I mean, getting together, Mel had donuts from LaMars waiting for us when we arrived on Friday afternoon and evening, in addition to the red velvet cake from Donnell Chambers and the planned dinner on Friday night at Thai Spice. While we each had a piece of the red velvet close to midnight on that Friday night (given we were already full from dinner, ha), we didn’t get to the donuts until the next day.

Glazed Doughnut
We had an impromptu donut tasting party on Saturday morning after we returned from the dance class at Mel’s gym that she had pre-arranged with her favorite instructor, Angie. Had to work off some calories in advance before we ate some more, ha.
Red Velvet Cake Doughnut

Chocolate Cake Doughnut
As everyone knows, donuts tend to have a short shelf life. Mel had gotten us a variety of cake and raised donuts in different flavors. There were red velvet cake and chocolate cake donuts, original raised/glazed donuts, boston cream pie donuts and raspberry (?) raised donuts.
Raspberry-filled raised doughnut
I’m sure the donuts would’ve been more delicious had we eaten them shortly after purchase. As it was, a day later, the cake donuts didn’t fare well to survive the next day. The flavor was there but they were a little dry to my finicky taste buds. The raised donuts were fine though and fared better. The Boston cream pie was the overall favorite, both because it retained the most freshness and because the cream inside, which helped with the freshness factor, was also delicious. 
Boston Cream Pie Doughnut

Since I’m not a donut person, I’m probably not the best judge and I also have local loyalties to Stan’s Donuts but I can appreciate how LaMars Donuts has withstood the test of time in the Kansas City area and am impressed by their longevity in the business. Next time I go back, I’d love to visit their shop in person.

Friday, June 29, 2018

Restaurant Review: Thai Spice, Kansas City (Lee's Summit), MO

Restaurant Review: Thai Spice, Kansas City, MO (Lee's Summit location) - dinner on June 1, 2018
For our first night dinner in Kansas City, Mel chose a Thai restaurant in her neighborhood. It was an excellent choice. While not exactly a chain, she said the owners did so well with their first restaurant that they were able to open two more. After tasting their food, I can see why.
Pot Stickers
We started off with appetizers, crispy-wrappered dumplings, mini egg rolls and fresh spring rolls. The spring rolls had just slightly too much roughage for me but that’s mostly because I’m not a roughage person. The noodles inside were good though.

As always, when trying a new Thai restaurant, my go-to order is the pad thai. That’s my control base from which to assess how good the restaurant is. My standard order is “pad thai, no bean sprouts”. I dislike bean sprouts. They have very little flavor and their crunch gets in the way of the texture I want to enjoy in the noodles. Yes, I have bean sprout prejudice.

Pad Thai
The flavor on my pad thai was really good and I loved the noodles. Only drawback is I didn’t realize the cabbage strips would be mixed in with the noodles, as opposed to sitting primly on the side, there to be ignored by yours truly. Mixed in, they’re harder to ignore and required a little effort on my part to pick out. But I like to enjoy my food the way I like to enjoy my food so I have the patience of Job (not to mention the expertise) to pick out what I don’t want in any dish. Thus the cabbage strips painstakingly had to be separated and designated to a section on my plate that my chopsticks didn’t enter.
Drunk Noodles

Soy Sauce Noodles
The restaurant itself was a decent size, not too small but not that large. The staff was kept busy as the place was popular, despite the relatively late hour of 7 pm-ish when we arrived. Hallmark of a good restaurant when it has a lot of customers, right? Everyone was friendly and hustled to serve us. Thumbs up all around for Thai Spice.


Wednesday, June 27, 2018

Review: Chambers Cookies and Cakes: Red Velvet Cake, Kansas City, MO

Chambers Cookies and Cakes: Red Velvet Cake - June 1, 2018
I recently flew to Kansas City, MO for a girls’ weekend. Two of my friends live in the KC area, another flew in from San Antonio and the fourth flew in from New Orleans. My friend, Mel, who was hosting us, had been telling us about a local baker named Donnell Chambers whose cakes Mel is a fan of. Mel, who doesn’t really like sweets, liking the cakes from this baker. My Pavlovian response was “me wants”. So Mel graciously bought a red velvet cake from Chambers Cookies and Cakes as a treat for our weekend visit. You know we were going to eat.
The cake was elegant simplicity itself. As you know, I am a cake purist. Nothing but carrots in my carrot cake. Red velvet cake – all I expect is red velvet cake layers sandwiched and frosted with cream cheese frosting. Donnell was a little extra with a light garnish of pecans but Mel assured me that was the only way traditional Southern red velvet can be made and served. Fine.
Actually, I don’t mind pecans as long as they’re on top of the cake and not baked inside it. Nuts soften and steam when baked inside something and lose their crunch. Hence I am diametrically opposed to nuts in most desserts. But garnishing on top, okay, fine.
It was a good cake too – three layers of red velvet cake goodness. I use that sketchy term “moist” again to describe the texture. Turns out my friend Jen, also there for the weekend merriment, doesn’t like that word either. But honest to goodness, googling synonyms for “moist” only yields “damp”, “awash” and “moisture”. I’m not describing a perfectly good cake as “damp”. It might be awash with moisture but really, saying “moist” is faster. So y’all might just have to suck that one up.
Thank you, Mel, and thank you, Donnell Chambers, for an excellent cake. He does ship so now that I’m back from Kansas City, MO, I might have to look into ordering his coconut cake. I hope it’s moist.

Saturday, June 23, 2018

Chocolate Bundt Cake

Chocolate Bundt Cake - made May 28, 2018 from Inquiring Chef
After sheet cakes, bundt cakes are the next easiest type of cake to make. They’re generally not very fussy, the batter can be mixed in one bowl and you just bake, invert and let cool. Added fancy if you want to frost or glaze it but it’s so down-home-y that you don’t have to fuss that much – or at all – on how smooth or even the frosting is, you don’t have to align it with any cake layers or worry about fillings. Most glazes or frostings for bundt cakes tend to be one-bowl mixing and easy pouring.
This was no exception. The only tricky thing sometimes with bundt cakes is getting them out of the pan intact. Some cakes come out smoothly, others cling to the sides and won’t let go like a 5-year-old being dropped off for the first day of kindergarten. Fortunately, this cake came out fine on its own.

With bundt cakes and pourable frostings, you don’t have to wait until it’s completely cool. Lukewarm is okay before you pour on the frosting. The frosting might melt a little but that just makes it better. This recipe made just a little too much frosting for my taste but that’s because I only like the bare minimum of frosting.
I liked the texture on this cake. Very moist. Yes, I know there are people out there who hate the word “moist” but there are no comparable synonyms to use as a description of cake texture that I can find (I really did look). Flavor and texture were on point. I could have only made or used half the frosting recipe as well and been just fine. The only cautionary note was the batter is a bit thin so when you add the dry ingredients, watch out for flour lumps that can form. I didn’t quite beat them all out so my finished cake had a few little flour lumps in it. How embarrassing.
1 1/4 cups + 1 tablespoon brewed coffee
3/4 cup Dutch process cocoa powder
2 1/4 cups sugar
1 1/4 teaspoons salt
2 1/2 teaspoons baking soda
2 eggs
1 egg yolk
1 1/4 cups + 1 tablespoon buttermilk
1 cup + 2 tablespoons canola oil
1 1/2 teaspoons vanilla extract
2 1/2 cups + 2 tablespoons all-purpose flour, sifted

Chocolate Glaze
3 ounces unsweetened chocolate, roughly chopped
6 tablespoons unsalted butter
1 1/2 cups powdered sugar
1/4 cup sour cream
1/8 cup brewed coffee, at room temperature

  1. Preheat oven to 350 degrees F. Spray a 10-inch Bundt pan with nonstick cooking spray and sprinkle the inside with flour.
  2. Combine brewed coffee and cocoa powder in a small saucepan and bring to a boil, whisking frequently. Remove from heat and let cool to room temperature, about 30 minutes.
  3. When the coffee mixture is nearly cool, combine sugar, salt, baking soda, eggs and egg yolk in the bowl of a standing mixer fitted with the whisk attachment. Mix on low until evenly combined, about 1 minute.
  4. Add buttermilk, oil and vanilla extract and mix on low for 1 minute. Add flour and mix on medium for 2 minutes. Add cooled coffee mixture and mix on medium for 3 minutes.
  5. Pour into bundt pan and bake until a toothpick inserted near the middle comes out clean, about 60 minutes.
  6. Cool cake in pan for 5-10 minutes before inverting onto a plate and letting cool completely.
  7. Make the glaze: melt chopped chocolate and butter in the top half of a double boiler set over hot water. Whisk until smooth and melted. Remove from heat.
  8. Sift in half the powdered sugar. Add sour cream and whisk to combine. Sift in the remaining powdered sugar and whisk until smooth. 
  9. Add coffee and whisk to create a glossy glaze. Thin with a little hot water if glaze is too thick. Pour glaze over cake, letting it drip down the sides and middle.


Wednesday, June 20, 2018

Brown Sugar Cookies

Brown Sugar Cookies - made dough May 28, 2918 from The Perfect Cookie from America's Test Kitchen
The base recipe for these brown sugar cookies is almost exactly the same as the one for the Perfect Chocolate Chip Cookies from the same book so I figured it would turn out equally well. I was right. Love when that happens (it doesn't happen often so I have to make the most of it when it does).

The technique is the same in that you brown some of the butter first then add the rest to melt into the hot, browned butter. Mix, portion into dough balls, freeze (if you’re me) and bake when ready. I really liked the flavor of the chocolate chip cookies from the same book so I fully expected to like these cookies since they were very similar in ingredients and methodology, just without the chocolate chips. I was right again.


The only thing I would change next time though is to not roll them in the brown sugar-granulated sugar mixture. They don’t need the added sweetness and the coating put them almost over the top on the sweetness scale. The cookies are perfectly fine baked without it.

14 tablespoons unsalted butter, divided
2 cups plus 2 tablespoons (10 2/3 ounces) all-purpose flour
1/2 teaspoon baking soda
1/4 teaspoon baking powder
1 3/4 cups packed (12 1/4 ounces) dark brown sugar, plus 1/4 cup for rolling
1/2 teaspoon salt
1 large egg plus 1 large yolk
1 tablespoon vanilla extract
1/4 cup granulated sugar, for rolling

  1. Melt 10 tablespoons butter in a 10-inch skillet over medium-high heat. Cook, stirring constantly, until butter is dark golden brown and has nutty aroma, 1 to 3 minutes. Transfer browned butter to a large bowl and stir in remaining 4 tablespoons butter until melted; let cool for 15 minutes.
  2. Whisk flour, baking soda, and baking powder together in separate bowl.
  3. Whisk 1 3/4 cups brown sugar and salt into cooled brown butter until smooth. Whisk in egg, egg yolk and vanilla until combined. Using a rubber spatula, stir in flour mixture until just combined. Do not overmix. Portion dough into golf-ball-size dough balls, cover and chill or freeze for several hours or overnight.
  4. When ready to bake, combine 1/4 cup brown sugar and 1/4 cup granulated sugar; this is optional, skip if you don't want the cookies to be as sweet.
  5. Preheat oven to 350 degrees. Line baking sheets with parchment paper. Roll dough balls into sugar mixture, coating completely, and evenly space on prepared baking sheets. Bake until edges have begun to set but centers are still soft, puffy and cracked, 12 to 14 minutes. Let cookies cool on sheet for 5 minutes then transfer to wire rack to cool completely.

Sunday, June 17, 2018

Fudgy Brownies

Fudgy Brownies - made May 27, 2018 from The Perfect Cookie from America's Test Kitchen
Sometimes you just need a good brownie. Sooooo......here you go. If you’ve read any part of my blog for a little while, you’ll know how opposed I am to box mixes. Brownies from scratch are so easy and taste so much better that I can’t even consider using a boxed brownie mix. Yes, I’m a brownie snob and you can be too.
If time is an issue for you and that’s why you default to a mix, here’s an easy tip: when you have 2 minutes (literally, it doesn’t even take that long), measure out and combine the dry ingredients then pour and seal into a Ziploc bag until you’re ready to bake. If you have an extra minute, line your brownie pan with foil and set it aside with the bag of dry ingredients. Both can sit there until you’re ready to bake brownies.
Then when you’re ready to make your brownies, you can do all the measuring and mixing in the time it takes for your oven to preheat. Heck, you’d even have time to wash and dry your utensils and put them away before your oven is ready. I’ve tested out this scenario so I know of what I speak.
This is a good, basic, fudgy brownie recipe. My usual tips for brownies apply: don’t overbake it, take it out of the oven when the toothpick poked in a corner comes out clean AND a toothpick inserted near the middle comes out with a few moist crumbs but not raw batter. Let the brownies cool completely. Unless you like your brownies to be mush. I like mine cooled so that the fudgy texture is apparent. If it’s too warm, it’ll be mushy rather than fudgy. Oh, and as always, use the good chocolate. 
5 ounces bittersweet chocolate, chopped
2 ounces unsweetened chocolate, chopped
8 tablespoons unsalted butter, cut into 4 pieces
3 tablespoons unsweetened cocoa powder
1 1/4 cups (8 3/4 ounces) granulated sugar
3 large eggs
2 teaspoons vanilla extract
1/2 teaspoon salt
1 cup (5 ounces) all-purpose flour
  1. Preheat oven to 350 degrees F. Line an 8-inch square baking pan with aluminum foil and lightly spray with nonstick cooking spray.
  2. Combine bittersweet chocolate, unsweetened chocolate and butter in the top half of a double boiler set over hot water over low heat. Whisk until melted and smooth. Whisk in cocoa and let mixture cool slightly.
  3. Whisk sugar, eggs, vanilla and salt in large bowl until combined. Whisk chocolate mixture into sugar mixture until smooth. Using a rubber spatula, stir in flour until just combined. Transfer batter to prepared pan and smooth top.
  4. Bake until toothpick inserted near the center comes out with a few moist crumbs, 35 to 40 minutes. Let brownies cool completely in pan on wire rack before removing from pan, cutting and serving.