Tuesday, March 17, 2015

Red Velvet Sheet Cake

Red Velvet Sheet Cake with Cream Cheese Frosting - made March 8, 2015, adapted from Taste and Tell
Considering how much I love the simplicity of sheet cakes and the flavor of red velvet cake, it’s almost surprising that I haven’t made a red velvet sheet cake until now. But let me make that up to myself with this recipe from Taste and Tell.

As truth in advertising regarding sheet cakes, this is very easy to mix up. I used a red food gel from amazon instead of my usual Schilling red food color and got a beautiful dark red from the gel, even using less than 2 tablespoons as the recipe calls for. Huh. I may never go back to Schilling again.
Messy knife cut
The original recipe called for adding oreo cookie chunks into the cream cheese frosting but I decided to skip that add-on and keep it a pure cream cheese frosting. There are times when I like a texture contrast which I know the oreo cookie chunks would’ve provided. But this didn’t seem to be one of those times. For sheet cakes, I want nothing to interfere with my mainlining, er, eating the cake. I loved the smoothness of this cake with the smooth creaminess of the frosting so I’m glad I went with my baking instincts on this one.
Cleaner knife cut - wipe the blade clean before each cut
I did modify the recipe to increase the cocoa powder for more chocolate flavor. I was afraid using only 1 tablespoon of cocoa wouldn’t be enough chocolate punch and I’d just be left with a red-colored cake. So I increased the cocoa powder by 2 tablespoons and decreased the flour by 2 tablespoons to keep the amount of dry ingredients the same. Cocoa powder tends to be an “I’m gonna suck moisture out of anything you add me to” ingredient so I went a little more generous on the buttermilk to ensure I wouldn’t get a dry cake. You know how I sneer at dry cakes.
This is a good cake for a crowd if you need something simple and easy to make. The only painful thing with cutting a red velvet sheet cake topped with pale cream cheese frosting is the red crumbs can get everywhere and make knife cuts look sloppy. I’m somewhat on the uptight side (ha, my friends just fell out of their chairs laughing) and like things to look decently presentable so with every cut of the knife, I scraped the crumbs and frosting off the knife and wiped it down with a wet paper towel so I could make another clean cut. If you don’t, the red cake crumbs from the previous knife cut will just spread themselves with abandon as you cut the rest of the cake. Sloppy. It took way too many paper towels to keep wiping the knife to make clean cuts but the cut cake slices looked better so it was worth the little extra effort.
1 cup butter
1 generous cup buttermilk
1 7/8 cups flour
3 tablespoon unsweetened cocoa
2 cups sugar
2 eggs, lightly beaten
½ cup sour cream
2 tablespoons red food coloring
1 teaspoon vanilla
1 teaspoon baking soda
1 teaspoon salt


Frosting
8 ounces cream cheese
4 ounces butter
2½ cups powdered sugar
  1. Preheat the oven to 375ºF. Line a 9x13-inch baking pan with foil and lightly spray with nonstick cooking spray..
  2. In a saucepan, combine the butter and the buttermilk and bring to a boil. Meanwhile, in a large bowl, combine the flour and cocoa. Stir in the sugar. Add in the eggs, sour cream, red food coloring, vanilla, baking soda and salt. Mix to combine.
  3. Pour the boiling butter/buttermilk mixture into the flour mixture, a little at a time, stirring constantly. The batter will be very thin. Pour the batter into the prepared pan.
  4. Bake the cake for 25-28 minutes, or until a tester inserted in the center comes out clean.
  5. To make the frosting, beat together the cream cheese and butter until fluffy. Add in the powdered sugar a little at a time. Beat for 2-3 minutes. Frost the cake. Cut into slices to serve.

Saturday, March 14, 2015

Loaded Oatmeal Chocolate Chip Cookies

Loaded Oatmeal Chocolate Chip Cookies - made dough February 28, 2015 from Averie Cooks
Another recipe from Averie’s blog and one of the few where I have to admit I couldn’t get mine to turn out looking like hers. Which is too bad as how they looked on her blog is what sucked me into making them. They were nicely rounded and chubby not to mention moist looking.
I baked off a test batch to put into treat bags for some friends I was meeting for dinner one night. Halfway through baking, they were flattening at an alarming rate even though I had my oven on its convection setting. At the recommended baking time of 8-10 minutes, they were still raw in the middle and definitely flat. Erk. I left them in for a few extra minutes but then they browned more than I wanted before I rescued them. I had just enough for the cookie bags so I broke a cardinal rule and put them all in the bags without taste testing them. It was a minimal risk since Averie’s recipes are usually gold.
I did bake off one of the cookie dough balls later for my own taste test. This time I cranked up my oven to preheat to 375 degrees on the convection setting instead of 350. After baking for 5 minutes at the higher temp, I lowered the temp down to 350 and baked for another 5 minutes. It still looked too moist/wet but not raw so I took it out as I didn’t want it to get overly brown again.  When it cooled, the near-wet middle patches now just looked moist. Still not as rounded and chubby as Averie’s but, as I had hoped, it was delicious. Oatmeal cookies are naturally chewy but the addition of the coconut made it both moist and chewy, giving it really nice texture. Sometimes oatmeal cookies can be dry but the coconut added a nice chewy touch for moisture.
So now I’ve learned the trick with these cookies is to bake them at the initially high temperature for the first few minutes so the outside will set before the cookie spreads, lower the temp, take them out at 10 minutes no matter what they look like, and let them cool completely. Then enjoy.
1 large egg
1/2 cup (1 stick) unsalted butter
1/2 cup light brown sugar, packed
1/4 cup granulated sugar
1 tablespoon vanilla extract
1 cup old-fashioned whole rolled oats
1 cup all-purpose flour
1/2 cup sweetened shredded coconut
1/2 teaspoon baking soda
1/4 teaspoon salt
1 heaping cup chocolate chips
  1. To the bowl of a stand mixer fitted with the paddle attachment, combine egg, butter, sugars and vanilla; beat on medium-high speed until creamed and well combined.
  2. Scrape down the sides of the bowl and add the oats, flour, coconut, baking soda and salt; beat on low speed until just combined, about 1 minute.
  3. Scrape down the sides of the bowl to keep the batter even textured and add chocolate chips. Mix just until incorporated, about 30 seconds.
  4. Scoop out golf-ball-sized cookie dough balls, wrap in plastic and freeze for several hours or overnight.
  5. Preheat oven to 375 degrees. Line a baking sheet with parchment paper or a Silpat. Place dough mounds on prepared baking sheet, evenly spaced apart. Bake at 375 degrees for 5 minutes, lower your oven temperature to 350 degrees and bake another 4-5 minutes. Remove from oven and allow to cool on a wire rack.

Wednesday, March 11, 2015

Cookie Butter Chocolate Chip Cookies

Cookie Butter Chocolate Chip Cookies - made dough February 28, 2015 from Knead to Cook
I think I was in my cookie butter phase when I initially pinned these. They had such tantalizing promise when I first saw them on pinterest. It seemed like the best of both worlds, chocolate chip cookies and cookie butter. That was before I decided that cookie butter and chocolate don’t marry as well as I would like. It was also before I made the Speculoos Cookie Sandwiches and had a taste of what the homemade real thing is like.

To be fair, this wasn’t meant to be like the speculoos cookie sandwiches and was more about adding a different slant to chocolate chip cookies. It was good but I think I’m conflicted as I prefer more of a straightforward cookie butter flavor or a full-on chocolate chip cookie. If you like both, this is a good version to try as it is crisp at the edges and chewy in the middle. It even looks like a regular chocolate chip cookie so when you spring it on your unsuspecting friends without explanation of what it is *cough*, they might wonder at first “what’s different about this?”
1 stick (1/2 cup) butter, slightly cooler than room temperature
3/4 cup light brown sugar
1/4 cup granulated sugar
1/2 cup cookie butter
1 1/2 teaspoons vanilla extract
1 egg, room temperature
1 1/2 cups all-purpose flour
1 teaspoon baking soda
1/4 teaspoon salt
1 cup chocolate chips, more if desired
  1. In the bowl of a stand mixer, beat butter and sugars until fluffy. Scrape down the sides, add cookie butter, egg and vanilla. Mix until just combined.
  2. In a separate bowl, whisk together flour, baking soda and salt. Add to butter mixture and beat for 1 minutes. Add and stir, by hand, chocolate chips. Scoop into dough balls and chill or freeze for several hours or overnight.
  3. When ready to bake, preheat oven to 350 degrees F. Line cookie sheets with parchment paper and space cookie dough balls evenly, leaving about 2 inches in between. Bake for 10-11 minutes or until golden around the edges.

Sunday, March 8, 2015

Caramelized Banana Cream Pie

Caramelized Banana Cream Pie - made March 7, 2015, original recipe
March 14 or 3.14 is Pi Day! Normally Pi(e) Day whizzes past me or I ignore it because I don't make pies very often or when I do, it's always my favorite standby of apple pie. This year, after binge watching one DVR'd episode of Cupcake Wars after another a little too often, just like the contestants make up their own cupcake combinations, I was inspired to make my own creation for Pi Day.
There's nothing new about banana cream pie but most recipes call for banana pudding as the filling of the cream pie. Since I am forever in love with the pastry cream recipe from the Culinary Institute of America, I knew that was the only filling I wanted in any kind of cream pie. I also knew I didn't want to fool around with a traditional pie crust and worry about getting the right amount of flakiness. Plus, for cream pies, I prefer a more hearty crust so I went with a graham cracker base.

For the banana part of the pie, I simply caramelized 2 firm, ripe but not overripe bananas with a little butter and brown sugar. Don't heat the banana-caramel mixture at too high of a heat or cook them too long. You don't want the butter to separate which can happen if you work with too high a heat and you don't want the bananas to get mushy. Saute them in the brown sugar caramel just enough to coat them and soften slightly but are still more firm than mushy. I sliced the bananas thickly so they would take longer to cook, long enough for them to caramelize slightly but not get overly soft.

Although this pie has several components, each component is really easy to make and come together nicely. As I had hoped, the flavors worked together. The graham cracker crust served as a good base for the pie, the caramelized bananas provided delicious flavor, the pastry cream - ah, the pastry cream - brought the creamy component, the toasted coconut was a nice texture contrast to the creaminess of the pie and the salted caramel balanced out the sweetness of the rest of the pie.
If you don't want too firm of a cream filling, cut back slightly on the cornstarch when you make the pastry cream or, if you refrigerate it first after you fill the pie, bring closer to room temperature before serving. This is best made and served on the same day for optimal flavor and texture.
I may not invent my own recipe and flavor combinations very often but I'm really happy with this one. Happy Pi Day.
Crust
1 1/2 cups graham cracker crumbs
1/4 cup sugar
1/2 cup butter, melted

Caramelized Bananas
2 large bananas, sliced into thick rounds
2 tablespoons butter
1/4 cup brown sugar

1/2 recipe of pastry cream
Toasted coconut and caramel sauce for garnish
  1. Crust: Whisk graham cracker crumbs and sugar together. Mix in melted butter. Press mixture firmly to cover the bottom and sides of a 9" pie pan. Bake 8-10 minutes at 350 degrees and let cool completely.
  2. Caramelized Bananas: Melt butter over medium heat in a large saucepan. Whisk in brown sugar until combined and melted with the butter. Place sliced bananas into mixture and cook gently over low heat, turning carefully until coated with caramel but not mushy. Remove from heat and arrange over graham cracker crust. Pour any excess sauce over the bananas. Let cool.
  3. Make half recipe of pastry cream. Let cool to room temperature but do not chill. Spread over cooled banana layer, smoothing top. Sprinkle top generously with toasted coconut and drizzle with caramel sauce. Chill before cutting and serving.

Saturday, March 7, 2015

Pistachio Cake for St Patrick's Day

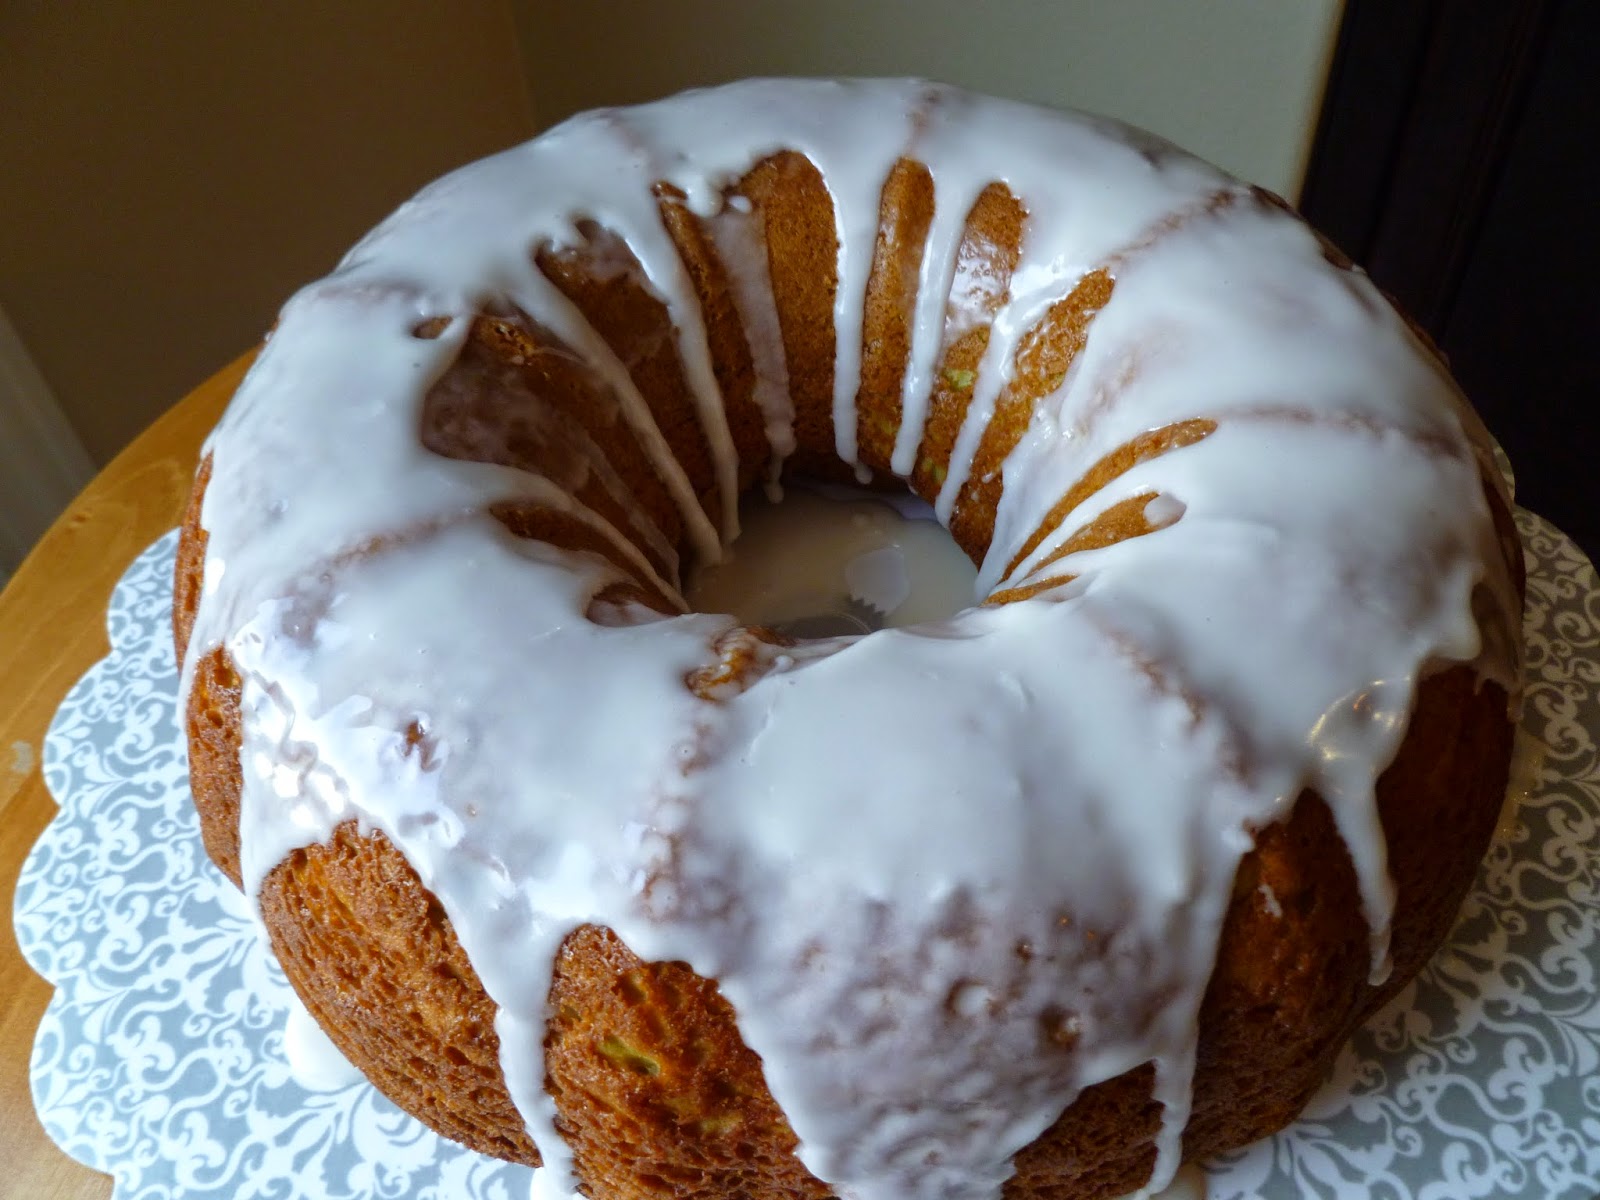
Pistachio Cake - made March 1, 2015, recipe adapted from Tasty Kitchen
It’s March. Why is it March? Where did February go? I know it only has 28 days this year but c’mon, it should’ve lasted longer than a blink of an eye. But since I blinked and February is now gone, I’m trying to get ahead of March. St Patrick’s Day is coming up and while I’m not a believer in green food (my almost daily salad notwithstanding), or at least green desserts, I did look around for something befitting the occasion. I don’t drink so anything alcohol-based was mostly out, especially after my last and only debacle in purchasing beer.
This cake is a total cheat for St Patrick’s Day but since I’m not Irish and I don’t drink, I figure there’s no way I can be an authentic St Patrick’s Day celebrant anyway. I also abandoned my no-cake-mix principles and sold out simply because this produced a (mint)green-colored cake and that’s what I wanted. The green comes from the pistachio pudding mix in the batter. Everything else is standard cake mix doctored up in an attempt to make it not taste like cake mix.


Texture-wise I thought it was fine, nice and fluffy. I can’t say this was all that flavored with pistachio though so at most, I had a light green vanilla cake with good texture. To bring out more of the pistachio flavor, I recommend sprinkling toasted, chopped pistachios over the glaze. To make it even more befitting St Patrick’s Day, you can also tint some of the glaze with a little green food color. Lay down a white glaze first then drizzle stripes of green glaze on top of it to make the green stand out. 

1 18.25-ounc package yellow cake mix
1 3.4-ounce package instant pistachio pudding mix
4 eggs
1 1/2 cups water
1/4 cup vegetable oil
1/2 teaspoon vanilla extract
  1. Preheat oven to 350 degrees F. Grease and flour a 10-inch tube pan or Bundt pan
  2. In a large bowl, mix together cake mix and pudding mix. Make a well in the center and pour in the eggs, water, oil and vanilla extract,
  3. Blend ingredients and beat for 2 minutes at medium speed until smooth.
  4. Pour into prepared pan. Bake for 50-55 minutes or until cake springs back when lightly pressed. Cool in the pan for 15 minutes. Turn out onto a wire rack and cool completely.
Glaze
1 1/2 cups powdered sugar, sifted
enough whole milk to achieve runny consistency
  1. Add milk tablespoon by tablespoon to powdered sugar until desired consistency is achieved. Pour over cooled cake. Let set and serve.

Friday, March 6, 2015

Recchiuti Confections

Recchiuti Confections - Pop Up Shop February 11, 2015
I mentioned awhile back that at work we have this marvelous institution called “pop-up shop” at work where (usually) local, small businesses display their wares for purchase. It’s a tremendously convenient way to be exposed to various products and local businesses and it’s from the pop-up shops that I’ve discovered Three Babes Bakeshop, Bootleg Creamery and now Recchiuti Chocolates, an artisan chocolatier from San Francisco.

I knew of Recchiuti Chocolates from years ago because its proprietor, Michael Recchiuti was the graduation speaker at the Culinary Institute of America in St Helena when I graduated with my certification in Baking and Pastry Arts. They were well known locally for their homemade marshmallows but I’ve never tried them since I don’t like marshmallows. Since then, however, they appear to have expanded their product line tremendously and they’re just as well known for high end chocolates. I’ve visited their store at the Ferry Building in San Francisco although I don’t remember buying anything then. Strange as this might sound, considering I probably have chocolate running through my veins, I don’t often indulge in high end chocolate.  One little piece typically packs more calorie punch than, say, a comparable-size brownie. Given the choice, I probably consume the same amount of calories but in a large portion in the form of a brownie. Yeah, I’m greedy like that. 

For this pop-up shop visit though, when I wandered in, one of the women manning the shop patiently answered all of my questions as I snapped pictures of their displays, mostly boxes of chocolates since it was so close to Valentine’s Day. They had the smaller boxes of 9 chocolates each ($26 a box) and larger boxes (forgot their price but much more expensive). She gave me a burnt caramel enrobed in dark chocolate to try and confided the women go for the smaller boxes while the guys buy the larger boxes. I surmised the women were buying for themselves (enforced portion control) and the guys were buying for the women (you can make a much grander gesture with a big box of chocolates over a small one). Smart guys. 
The burnt caramel sample she gave me was pretty good but I confess my palate isn’t so refined that I went into chocolate stratosphere. I can tell the difference between bad chocolate, good chocolate and even better chocolate. But whether I can taste the difference between great chocolate and spectacular chocolate is hit or miss, especially when it comes to dark chocolate since I’m more of a milk chocolate aficionado. Regardless, I bought their milk chocolate assortment in the 9-piece box (Sepia); no grand gestures needed for myself when I just wanted to try it.

Whenever I have a box of chocolate, whether I receive it as a gift or buy one for myself, I typically just go for the flavors I like and disregard/give away the rest. Based on the descriptions the lady gave me, I figured I would only like about 4-5 chocolates in the 9-piece box since the others were tea-flavored and I don’t like tea.  But I was committed to all 9 pieces so I could properly evaluate the Sepia box. Which is another reason there’s some time between when I first bought the box and when I finished it. I had a dietary budget of no more than 1 chocolate per day so it took 9 days to evaluate all of the Sepia. I was originally committed to writing detailed notes about what I thought about each flavor. Now that I've finished them all (it took more than 9 days since I forgot to eat one every day), I'm backing off from that because, in all honesty, my taste buds are not that refined when it comes to high end chocolate. I know, I'm disappointed in me too. But my tastes are very simple and some of the different infusions did nothing for me and even the ones I liked I don't know that I thought were uber-special, more from the lack of refinement in my chocolate palate than anything to do with the high end chocolates themselves. I liked the caramel and the hazelnut the best. I liked the tea-infused ones the least. And that's about all I can say.
Sesame Nougat
Sesame Nougat: milk chocolate caramel ganache atop a crunch sesame nougat disk
Honeycomb Malt
Honeycomb Malt: toasted barley malt infusion blended in a white chocolate ganache highlighted with house-made honeycomb
Peanut Butter Puck
Peanut Butter Puck: creamy peanut butter blended with milk chocolate and flecked with fleur de sel
Lavender Vanilla
Lavender Vanilla: 70% dark chocolate ganache infused with locally grown lavender buds and whole vanilla beans
Spring Jasmine Tea
Spring Jasmine Tea: delicate jasmine blossoms and green tea infusion blended with pure dark chocolate
Bergamot Tea
Bergamot Tea: 70% dark chocolate blended with a Ceylon tea and bergamot oil infusion

Butterscotch Caramel
Butterscotch Caramel: dark brown sugar enhances the deeply cooked caramel, giving way to "scotch-ness" baptized with a salty shower of fleur de sel

Star Anise and Pink Peppercorn
Star Anise & Pink Peppercorn: star anise and pink peppercorn infusion blended with milk and dark chocolate
Piedmont Hazelnut
Piedmont Hazelnut: A whole toasted hazelnut cast in a milk chocolate gianduja (chocolate and hazelnut paste)

Wednesday, March 4, 2015

Speculoos Cookie Sandwiches

Speculoos Cookie Sandwiches - made dough February 21, 2015 from Love and Olive Oil
I love Biscoff cookies. Which is funny because I only discovered them when I was traveling for work and they’re what was served to us on the airplane. How many airplane snacks can you say you got hooked on? Me? One. I don’t see them in grocery stores that much but discovered the Speculoos version of them at Trader Joe’s last year. I buy a box once in a blue moon but, because I have a tendency to want to eat them all, once in a blue moon means every 6 months or so.
I was intrigued by this recipe that promised to be the homemade version of Biscoff or Speculoos cookies. I’m not gonna lie – I was skeptical. Really? But the picture on the original blog was pretty so I fell for it. It doesn’t hurt to try it, right? If it fails, my 6 months were coming up and I was due to buy another box of Speculoos anyway.
One thing that made me leery was the number of spices in this cookie dough. Which is counterintuitive because Biscoff cookies are basically a spice cookie so yes, they have to have spices in them. But you’re talking to someone who thinks a recipe using cinnamon and nutmeg is already spiced enough. This one also had ginger and cloves and pepper and lions and tigers and bears, oh my. But I dutifully went with it because that’s what good recipe lemmings do. I will admit I did skip the black pepper though, not because I was being rebellious (sort of) but because the only black pepper I had was the kind you coarse grind with a pepper mill and I didn’t want chunky pepper in my cookies.
The lure of the original Biscoff cookie for me isn’t just the taste, however. It’s also the crisp, crunchy texture. Those as well as Oreos are two of the rare cookies that I like crisp rather than chewy (shortbread being a close third). I knew I had to make these fairly thin and bake fully to achieve a crisp texture. You don’t know how twitchy I got in not underbaking these but I held back and baked them for as long as I dared without burning them. I did time these (also a rarity) because you can’t go by the color since the cookie dough itself is dark colored.

These came out larger than I expected because they spread a bit and, disappointingly, they also lost some of their shape. When they went into the oven, they had distinct flower-scallop shapes that would have made cute little flower sandwich cookies. When they came out, the “flower” part was lost and they were vaguely round shapes with blunted scallop ends. Martha Stewart fail. Oh well, it’s not the first time something I’ve made doesn’t look the way I wanted it to. We just dust off our First World problems and soldier on.
The original recipe called for a chocolate cream filling (click on the post title to go to the original recipe if you want that filling) but I’ve mentioned before that I don’t like to combine cookie butter with chocolate as they’re two dominant flavors that compete more than they complement each other, at least to my picky taste buds. Just like when you have some friends you enjoy spending time with separately but together they make for a headache-inducing gathering, chocolate and cookie butter need to stay apart. Instead, I sandwiched the cookies with – tada – cookie butter! What better way to emphasize the Biscoff cookie flavor than with the cookie butter they’ve spawned?
This is another one of those times where I set all baking modesty aside and say, holy smokies, that was a brilliant move. I love these cookies. I love the filling in these cookies. I love the cookies sandwiched with the filling. They really do taste like honest-to-goodness Biscoff cookies, crispy-crunchy and all. The flavor was there, the texture was there – what more could I ask for? Plus it smelled delicious. I had a taste test cookie but, in a fit of virtue, took the rest into work without snagging a second cookie. My resolve weakened as the morning progressed but I waited too long to return to the cookie plate and by the time I gave into my inner cookie monster, the cookies were gone. Sigh. Time to make another batch.
1/2 cup butter, cold, cut into 1/2-inch cubes
1/3 cup granulated sugar
3/4 cup light brown sugar
1 teaspoon molasses
1/2 teaspoon fine sea salt
1/4 teaspoon baking soda
2 1/2 teaspoons ground cinnamon
1/4 teaspoon ground nutmeg
1/2 teaspoon ground ginger
1/4 teaspoon ground cloves
1/4 teaspoon finely ground black pepper, optional
1 teaspoon vanilla extract
1 large egg
1 3/4 cups all-purpose flour


Cookie butter for filling
  1. Place butter cubes in a large mixing bowl or the bowl of a standing mixer fitted with a paddle attachment. Add the sugar, brown sugar, baking soda, salt, and spices and beat on medium speed for 30 seconds or until evenly incorporated. Add vanilla and egg and beat on medium speed until combined, scraping down the sides of the bowl as needed. Add flour and beat on medium speed until all the dry flour has been incorporated.
  2. Press the dough together into a ball and flatten slightly into a disk shape. Wrap tightly with plastic wrap and refrigerate for at least 30 minutes or overnight.
  3. Preheat oven to 375 degrees F.
  4. On a lightly floured surface, roll the dough out to 1/4-inch thick. Cut out cookies with desired shape cutter and arrange on parchment or silicone mat-lined baking sheets, leaving about an inch of space between cookies. 
  5. Bake for 8 to 10 minutes or until the cookies just start to darken around the edges. Let cool on the baking sheet for 10 minutes, then transfer to a wire rack to cool completely.
  6. Frost the bottom halves of half the cookies with cookie butter and place the other halves on top (bottom side of the cookies facing the frosting) to sandwich the cookies together. Store airtight.