Sunday, September 5, 2021

Lemon Shortbread Cookies

Lemon Shortbread Cookies - made dough August 22, 2021 from Julie Blanner 
2 cups butter, room temperature
1 cup brown sugar, packed
3 1/2 cups all-purpose flour
1 teaspoon lemon extract
zest of 1 lemon
  1. Whip butter until smooth and light in color. Mix in brown sugar until combined. Add lemon extract and lemon zest, mixing until combined.
  2. Add flour in three additions, beating after each addition until just combined. Dough should not be sticky. Roll into a ball, flatten slightly, wrap in plastic wrap and refrigerate for 30 minutes.
  3. Preheat oven to 325 degrees F. Line baking sheets with parchment paper. Pinch off bits of dough to form small balls. Evenly space on baking sheets. Bake 10-12 minutes or until edges are golden brown and middles no longer look raw. Remove from oven and immediately stamp cookies with sugared cookie stamps. Cut out with round cookie cutters for evenly-sized cookies.
I'm back with cookie stamping again. Except this time, I got the idea from my team leader on the baking team for Soldiers Angels to bake the cookies first then stamp them.
Huh. I'm not sure I would've thought of that on my own. Which is why it's good to learn from others and see how they do things, no matter how many (thousands of) cookies I've baked. You can always learn something new and I love learning from other bakers.

With this trick, you bake the cookies first without stamping then as soon as you take them out of the oven, you stamp them. I dipped my cookie stamp into granulated sugar to prevent sticking. Because of the high butter content in shortbread cookies, these are a bit fragile and you don't want the cookies to tear or fall apart from being "hot stamped" or to stick to the cookie stamp.
To take care of the uneven edges, use a round cookie cutter almost the size of the cookies and cut them out as soon as you stamp them. Yes, while the cookies are still hot; otherwise the shortbread edges might not cut as easily and again, could break the whole cookie if cut when cool. Cutting them out with the round cookie cutter is easier when the cookies are still hot and soft.

They do firm up as they cool. Depending how long you bake them, they can be crisp if you bake them a trifle longer or more chewy if you underbake them. Shortbread is the rare cookie I prefer not to underbake as I do like my shortbread more firm and crisp. 
These make a good tea cookie, crisp, delicate, nice lemon flavor. If you want them to be dainty, make smaller dough balls to bake smaller cookies and use a small round cookie cutter to even out the edges. Because you don't stamp the cookies until after they're baked, the impressions definitely keep.


Saturday, September 4, 2021

Simple Cinnamon Cake

Simple Cinnamon Cake - made August 24, 2021 from Belly Full
2 cups all-purpose flour
1 tablespoon baking powder
1 tablespoon cinnamon
3/4 teaspoon salt
1 1/3 cups granulated sugar
2/3 cup unsalted butter, softened
2 teaspoons vanilla
3 large eggs
2/3 cup whole milk

Cinnamon Syrup Glaze
1/2 cup granulated sugar
1/3 cup water
6 tablespoons unsalted butter
1 teaspoon vanilla
3/4 teaspoon cinnamon
  1. Preheat oven to 350 degrees F. Generously grease and lightly flour a 10-inch Bundt pan.
  2. In a medium bowl, whisk together flour, baking powder, cinnamon and salt; set aside.
  3. In the mixing bowl of a stand mixer fitted with the paddle attachment, cream together granulated sugar and butter until well combined and fluffy, 2-3 minutes. Add vanilla and eggs, one at a time, beating after each addition until just combined. Alternately add milk in 2 additions and the dry ingredients in 3 additions, beginning and ending with the dry ingredients, mixing after each addition until just combined. Scrape down sides of mixing bowl to keep batter even textured.
  4. Pour batter into prepared Bundt pan. Bake for 40-45 minutes or until toothpick inserted in thickest part of cake comes out with a few moist crumps. Remove from oven and let cool for 5 minutes. Run a small spatula along sides of cake to loosen cake from pan. Invert onto serving plate and let cool another 10 minutes.
  5. While the cake cools, make the glaze: in a small saucepan, combine the sugar, water, butter, vanilla and cinnamon. Heat over medium heat until sugar is dissolved and mixture is slightly thickened.
  6. Poke holes all over warm cake with a toothpick. Drizzle with glaze.
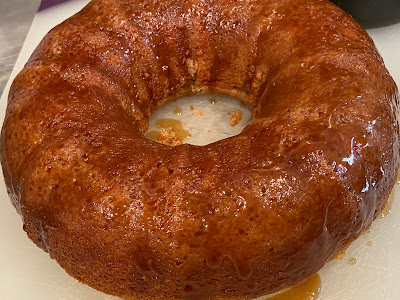
I've been having hit or miss experiences with cakes lately. The good news is I'm making steady progress clearing my pinterest board of various baking recipes to try. The so-so news is some of them turn out really well and some just turn out okay. 

This was in the okay camp. I'm not sure why, other then I've been doing a lot of baking lately which means a lot of taste testing and my sweet tooth may just be crying uncle. Which sometimes happens.

It may have happened here. Don't get me wrong, this was a good cake. Not sure I would consider it a great cake or something I need to make again. 
I think it's because the texture was somewhere between that dense pound cake texture which I really like and that fluffy soft cakey texture like in the Brown Butter Texas Sheet Cake that I also really like. This wasn't either.
The glaze was also more of a soaking syrup than a typical glaze because it was sticky so it soaked a little into the cake which made the part where it soaked in seem a little wet in texture while the part where it didn't soak in had a more normal cake texture. Not sure if I did it wrong or if that's really how it was supposed to be. 


Friday, September 3, 2021

Peanut Butter Blondies

Peanut Butter Blondies - made August 26, 2021 from Gal on a Mission 
1/2 cup (1 stick) unsalted butter, melted
1 cup light brown sugar
1 large egg
1 teaspoon vanilla extract
1/2 cup peanut butter
1/4 teaspoon salt
1 cup all-purpose flour
  1. Preheat oven to 350 degrees F. Line an 8 x8-inch baking pan with foil and lightly spray with nonstick cooking spray.
  2. In a large bowl, combine melted butter and light brown sugar. Stir until well combined. Add in egg and vanilla extract; stir to combine.
  3. Add peanut butter and mix until thoroughly combined. Add salt and flour; mix until just combined and no flour streaks remain. Pour batter into prepared pan and smooth top. Bake for 20-25 minutes or until a toothpick inserted near the middle comes out clean.
Another blondie recipe, this time made with peanut butter. I was lured by the picture on the original blog I got the recipe from so be sure to click on the post title so you can see for yourself how good it looked.
But then you'll also be able to see that mine didn't come out looking that moist. These weren't dry and they were perfectly fine. But they don't look as good as Gal on a Mission's version. Since I'm not that into peanut butter, I just had a sliver to verify they tasted good then packaged them up and included them in my military care packages.


Thursday, September 2, 2021

Outrageous Cookies and Cream Cookies

Outrageous Cookies and Cream Cookies - made August 3, 2021, recipe modified very slightly from Cookies and Cups 
1 cup butter, room temperature
3/4 cup light brown sugar
1/4 cup granulated sugar
1 4.2-ounce instant Oreo pudding mix
2 eggs
2 teaspoons vanilla
1 teaspoon baking soda
1/2 teaspoon salt
2 1/4 cups flour
1 cup white chocolate chips
1 1/2 cups semisweet chocolate chips
24 Double Stuff Oreos
  1. In a small bowl, whisk together four, baking soda and salt; set aside.
  2. In the bowl of a stand mixer fitted with the paddle attachment, cream together butter, brown sugar and granulated sugar until well combined and creamy, 2-3 minutes. Add pudding mix and beat until combined.
  3. Add eggs, one at a time, then vanilla, mixing briefly after each addition.
  4. Add flour mixture in 2 additions, mixing until just combined after each addition. Fold in white chocolate chips and semisweet chocolate chips.
  5. Portion dough into golf-ball-size dough balls and flatten very slightly. Twist Oreos into halves very carefully. If any break, use those for the bottoms. If you have extra halves, reserve for placing on the top of the cookie. Place each dough ball on top of each Oreo half. Cover and chill or freeze for several hours or overnight.
  6. When ready to bake, preheat oven to 350 degrees F. Line baking sheets with parchment paper and evenly space dough balls. Bake 10-12 minutes or until edges are set and middles no longer look raw. Remove from oven and immediately place another Oreo half in the center of each baked cookie. Press gently into the cookie to adhere and let the filling melt over the hot cookie. Remove to wire rack to cool completely.
This is another cookie idea that makes me wish I was more creative and that I could think of concepts like this myself. Sandwich an Oreo cookie with a cookies and cream cookie? How creative and brilliant is that? Hint: very. 
But I'm not one of those people who can be given a blank piece of paper and a pen and can create brilliance. My strength is more as an editor, not a writer. Meaning I can take something and modify it to make it better (to me) and work for me. Which is what I unintentionally did.
I say unintentionally because I did follow the directions exactly the first time. Pry apart the Oreos, place a cookie dough ball on top of one half and top it with the other half and bake. 
Exhibit A below of how that worked out for me.
Never mind, I picked off the broken baked Oreo half, topped it with a pristine half, took a bite then took a picture. Exhibits B and C below. Fecking delicious.


So with the next batch, I made a slight change and baked the cookies with just the bottom half. As soon as the cookies came out of the oven, I pressed the top half over them. Voila, pristine Oreo tops.
I do recommend using Oreo Double Stuff for these. I typically don't like Double Stuff because I'm more about the sandwich cookie than the filling but Double Stuff Oreos work better for this. When I used the original Oreos, the cookies tended to break apart more easily when I tried to pry the halves apart. I didn't have that issue with the Double Stuff Oreos and the cookie halves remained unbroken.

In any case, this was delicious. Brilliant concept and delicious.

Wednesday, September 1, 2021

One-Bowl Biscoff Blondies from Sweetest Menu

Biscoff Blondies - made August 26, 2021 from Sweetest Menu 
1/2 cup (1 stick) butter, melted
1 cup (180 grams) brown sugar
1/2 cup Biscoff cookie spread, divided
1 large egg
1 egg yolk
1 1/4 cups (175 grams) all-purpose flour
1/2 teaspoon baking powder
pinch of salt
2/3 cup white chocolate, coarsely chopped
8 Lotus Biscoff cookies, broken into pieces
  1. Preheat oven to 350 degrees F. Line an 8 x 8" baking pan with foil and lightly spray with nonstick cooking spray.
  2. In a large mixing bowl, combine melted butter, brown sugar and 1/4 cup Biscoff cookie spread. Mix until well combined.
  3. Add egg and egg yolk; mix to combine. Stir in flour, baking powder and salt, mixing until combined and no flour streaks remain. Fold in white chocolate chunks.
  4. Spread batter evenly into prepared pan. Dollop remaining 1/4 cup Biscoff cookie spread over top and place broken Biscoff cookies all over top.
  5. Bake blondies for 25-30 minutes or until golden at the edges and center is set. Do not overbake.

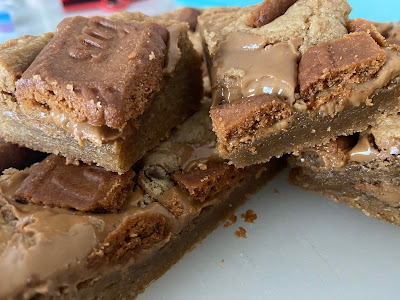
You know I'm a cookie butter fan so these will get an almost automatic thumbs up from me. I'm one of those people who don't like cookie butter combined with chocolate as the two flavors compete rather than complement each other, according to my jaded taste buds. 
But cookie butter works perfectly with a brown sugar blondie as the blondie sets a nice backdrop for the cookie butter to shine. And shine it does in this bar cookie with a triple shot of cookie butter: mixed into the blondie batter itself, swirled as straight cookie butter into the blondie and with the topping of Lotus (cookie butter) cookies to crown it all.
The only tricky thing with this is it's hard to tell when it's actually done or even just underdone enough. The toothpick test is suspect because even if you could poke the toothpick into the part of the blondie that doesn't have pure cookie butter in it, it's one of those blondies that can have the toothpick come out "clean" but that just means raw batter isn't clinging to it but it's still not baked enough. 
Mine could've used a few more minutes in the oven but that didn't detract from the taste. Cookie butter glory. The only thing I might do differently next time is to not top with the Lotus biscoff cookies until right after I take them out of the oven. Topping with the cookies and having them bake along with the blondie made the cookies more brown. It didn't affect the flavor but I would prefer the original Lotus cookies not being double baked.

Tuesday, August 31, 2021

Cookies and Cream Pound Cake

Cookies and Cream Pound Cake - made August 10, 2021 from Let's Dish 
1 1/4 cups butter, room temperature
3 cups granulated sugar
6 eggs
1 teaspoon vanilla
1/2 teaspoon salt
3 cups all-purpose flour
1 cup heavy whipping cream

13 crushed Oreos

Glaze
2 cups powdered sugar
3 tablespoons milk, more if necessary for desired consistency
1/2 teaspoon vanilla
  1. Preheat oven to 350 degrees F. Liberally spray a Bundt pan with nonstick cooking spray; set aside.
  2. In the bowl of a stand mixer fitted with the paddle attachment, beat butter until smooth and free of lumps. Add granulated sugar in a steady stream while mixer is on low speed and beat until well combined. 
  3. Add eggs, one at a time, beating after each addition until just incorporated. Beat in vanilla and salt.
  4. Add 1 cup of flour, then 1/2 cup of whipping cream, the second  cup of flour, the remaining 1/2 cup of whipping cream and ending with the third cup of flour, beating just until combined.
  5. Pour half of the batter into the prepared Bundt pan. Sprinkle with half of the crushed Oreos. Cover with remaining batter then sprinkle the rest of the crushed Oreos. Run a table knife through the batter to lightly swirl the Oreos crumbs into the batter.
  6. Bake for 60-70 minutes or until a toothpick inserted in the thickest part of the cake comes out with a few moist crumbs. Let rest in pan for several minutes then loosen the sides of the cake from the pan. Turn over onto a platter and let cool completely.
  7. Glaze: in a small bowl, whisk together powdered sugar, 3 tablespoons milk and vanilla until smooth and combined. Add additional milk or powdered sugar until desired consistency is achieved.
This pound cake illustrates that I have very poor swirling skills. The crushed Oreos were supposed to be a bit more prominent and evenly distributed. Oops. Fortunately that didn't affect the taste. The pound cake itself was delicious. Although, much as I like Oreos in their original state, I'm not an equally big fan of them crushed about and scattered in a cake. If you like the cookies and cream vibe, this is a good option. For me, I might just make the pound cake plain.

Monday, August 30, 2021

Brown Butter Texas Sheet Cake

1 1/4 cups unsalted butter
2 cups all-purpose flour
1 1/2 cups granulated sugar
1/2 cup packed light brown sugar
3/4 teaspoon salt
1/2 teaspoon baking powder
1/2 teaspoon baking soda
1 cup water
1/2 cup buttermilk
1 teaspoon vanilla extract
2 large eggs

Frosting
1/2 cup unsalted butter, softened
3 cups confectioners' sugar, sifted
6 to 8 tablespoons sour cream
  1. Melt the butter in a medium saucepan, stirring until butter melts and foams and brown bits form on the bottom. Stir to prevent burning. Cool slightly.
  2. Preheat oven to 350 degrees F. Line a 9 x 13 pan (or a 15" x 10" jelly roll pan for thinner cake) with foil and lightly spray with nonstick cooking spray.
  3. In a large bowl, combine flour, granulated sugar, brown sugar, salt, baking powder and baking soda.
  4. Add the cooled brown butter, water, buttermilk, vanilla and eggs. Stir until smooth.
  5. Spread batter evenly in prepared pan. Bake 25-30 minutes for 9 x 13 pan or 15-18 minutes for jelly roll pan or until a toothpick inserted near the center comes out clean.
  6. Frosting: Using an electric mixer on medium speed, beat butter until creamy. Gradually add confectioners' sugar and 6 tablespoons sour cream. Beat until smooth. Add the remaining sour cream, one tablespoon at a time, if necessary, to achieve desired spreadable consistency.
  7. Spread frosting evenly over cake. 
I've been having trouble sleeping lately. Actually, I can fall asleep and I can sleep but it's been a challenge lately to stay asleep. Meaning it isn't unheard of for me to wake up at 1:30 am or 2 am, despite only having been asleep for 3-4 hours. I make a futile attempt to go back to sleep but my brain decides it wants to get active and think a whole bunch of stuff, all in an effort to prevent me from falling asleep again. My brain can be an ass.
I usually lose all hope of falling asleep again after an hour or two. By 4 am, I've given into the inevitable, get out of bed and start my day. Even if I have an 8 am meeting, hey, that's a whole 4 hours ahead of me. Exercising, showering and getting ready for that long commute between my kitchen to my desk off the kitchen only takes a little more than an hour.
So of course I fill the time by baking. And, in the case of this Texas sheet cake, it was pre-dawn, sleep-deprived time well spent. OMG, this cake was delicious. Fluffy, light, amazing. And I ate two pieces to prove how good it is. Usually I can get by with one taste test piece, sometimes even just a taste test sliver. Nope. Two pieces. Sorry, waistband, but it was worth it.

My better angel did prevail (eventually) and I packaged up the rest of the cake and put them in my freezer as part of the week's donation to the food distribution to the local houseless population. I hope they enjoyed it as much as I did.