Wednesday, April 7, 2021

Cookie Butter Snickerdoodles

Cookie Butter Snickerdoodles - made dough March 27, 2021 from Bake or Break 
I'm a snickerdoodle purist. Meaning, I don't go for a lot of fancy flavors for snickerdoodles. The original, plain versions are fine for me. But every once in awhile, I'll play around and try something new. Partly because I'm often not baking for myself anyway and partly for the fun of trying a new recipe.
For once, I wasn't baking these to put in military care packages for Soldiers Angels. This time, I was baking them to put in lunch bags that were going to be distributed to homeless and hungry people for Easter Sunday.
Have you heard of mutual aid groups? I hadn't until the ice storms hit Texas back in February and I was looking at which organizations in Texas to donate to that would reach the Texans in need. I discovered the Austin mutual aid group and donated there. But it got me thinking on about mutual aid groups in general and I researched my local area. Sure enough, my town had a mutual aid Facebook group. I joined and learned that, while not an official 501(c)3 nonprofit, it literally provides mutual aid for people in my local community. Some people post needs like needing a ride to a vaccine appointment or a ride home from a late night work shift because their car broke down and they can't afford to get it fixed until payday. Other, more heartbreaking needs are requests for ready-to-eat foods for someone (or more than 1 person) living in their car and not being able to buy food or get a place to stay until payday. There are also posts from people offering used clothes or household items for anyone who needed them, rides to vaccine or doctor's appointments and so on. It's literally a group providing mutual aid to each other.
One of the posts last week was of a man who was distributing bagged lunches to people in need around town. I felt compelled to offer to bake cookies and brownies for the lunches. He accepted and we arranged a drop off time and location so he could include them in his lunch distribution that week.
I made these cookie butter snickerdoodles to put in the lunches. He distributes 80-100 lunches a week and while he assured me I didn't have to bake for all of them and that he would be glad to take whatever I did make, of course I was going to bake for all of them. Which I did. And these cookies were part of the distribution. They were sturdy (it's important not to have cookies that are too fragile when they're being put into lunch bags), baked up thick and tasted good. 
One batch of this recipe makes less than 2 dozen, given the size I made them so I made other recipes to come up with enough for at least each lunch bag to get a cookie or a brownie. Those recipes to follow.
3 cups (360 g) all-purpose flour
1 teaspoon baking soda
1/2 teaspoon cream of tartar
1/2 teaspoon ground cinnamon
1/2 teaspoon salt
3/4 cup unsalted butter, softened
3/4 cup (150 g) firmly packed brown sugar
1/2 cup (100 g) granulated sugar
1/2 cup (140 g) cookie butter
2 large eggs
1 teaspoon vanilla extract
Cinnamon sugar for rolling (combine 1/4 cup granulated sugar with 3 teaspoons cinnamon)
  1. Whisk together the flour, baking soda, cream of tartar, cinnamon and salt; set aside.
  2. In the bowl of a stand mixer fitted with the paddle attachment, cream together butter, brown sugar, granulated sugar and cookie butter until smooth and combined.
  3. Add eggs, one at a time, mixing well after each addition. Mix in vanilla.
  4. With the mixer on low speed, add flour mixture in 3 additions, mixing briefly after each addition until just combined and no flour streaks remain. Do not overmix.
  5. Portion into golf-ball-size dough balls, cover and chill or freeze for several hours or overnight.
  6. When ready to bake, preheat oven to 350 degrees F. Line baking sheets with parchment paper. Roll dough balls in the cinnamon sugar mixture until completely covered and evenly space the dough balls onto the prepared sheets.
  7. Bake 8-10 minutes or until edges are set and middles no longer look raw. Cool on the pans for 5 minutes then transfer cookies to wire rack to cool completely.

Sunday, April 4, 2021

Stamped Shortbread Cookies (recipe 4)

Stamped Shortbread Cookies - made March 26, 2021, modified from Lord Byron's Kitchen
So I might be just a tad obsessed with mooncake molds now. Especially since I found a set that included two Hello Kitty designs. Yes, I'm an adult and no, I'm not stunted in my emotional growth (most of the time). But they're still cute....

And let's face it, it's fun to stamp out the designs. Even if it does look like I've jumped the shark with these (youngsters, for reference, google "Happy Days, the Fonz and shark").


I mean, cute, right??

This kept the designs decently well after baking, although this is another of those recipes that probably don't do as well with more detailed designs.


From a taste perspective, this was a good butter shortbread. Not too sweet, a bit buttery (obvi) and rich but will do well with smaller stamps since you don't want the cookies to be too big. 

But as with all stamped cookies, you get the best results if you stamp the dough when it's slightly chilled (but not too firm or the stamps won't make good impressions), freeze the stamped cookies first before baking then baking the frozen cookies at high heat
1 cup butter, softened
1/2 cup confectioners' sugar
2 cups all-purpose flour
  1. Cream butter and confectioners' sugar together until combined. Add flour in 2 additions, mixing briefly until just combined after each addition. Dough will look dry at first but slowly keep beating until dough comes together. Do not overmix.
  2. Scrape dough onto piece of parchment, cover with another piece of parchment and roll out to desired thickness.
  3. Transfer to refrigerator and chill for at least one hour.
  4. Stamp chilled dough with cookie stamps and/or embossed rolling pin and cut out into desired shapes. Cover and chill again another 15 - 30 minutes.
  5. Preheat oven to 350 degrees F. Line baking sheets with parchment paper. Evenly space stamped cookies on baking sheet. Bake for 12-15 minutes or until edges are light golden brown. Remove from oven, let cookies rest for 2-3 minutes on baking sheet then remove to wire cooling rack to cool completely.

Friday, April 2, 2021

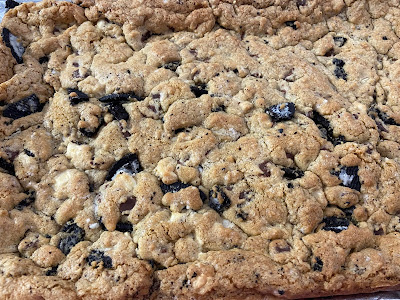
Ultimate Cookies and Cream Blondies

Ultimate Cookies & Cream Blondies - made March 7, 2021, adapted from Baker by Nature
I just posted a similar recipe for Oreo Blondies from Six Sisters' Stuff. The only reason I'm posting a similar recipe so soon after the last one is there were still Oreos left in the package and I was afraid I was going to eat them all. Which I shouldn't do (I think) so I tried out this recipe from Baker by Nature to use up the rest of the Oreos.
This one was a good blondie bar as well. I can't tell you if it was better than the other one because I only had a sliver of each. Because, let's be honest, I was only it in for the Oreos and I ate that "straight".
Still, for cookies and cream fans, any kind of Oreo blondie has to be good, right? Just don't overbake them. And don't skimp on the Oreos.

2 1/8 cups all-purpose flour
3/4 teaspoon salt
1/2 teaspoon baking soda
1 1/2 sticks (6 ounces) unsalted butter, melted
1 cup granulated sugar
1/2 cup packed brown sugar
2 large eggs
1 teaspoon vanilla extract
1/2 cup chocolate chips
1/2 cup white chocolate chunks
1 cup Oreos, roughly chopped 
  1. Preheat oven to 350 degrees F. Line a 9 x 13 pan with foil and lightly spray with nonstick cooking spray.
  2. In a medium bowl, whisk together flour, salt and baking soda.
  3. In a mixing bowl, beat together melted butter, granulated sugar and brown sugar. Add eggs and vanilla; mix to combine. Add dry ingredients and mix just until combined. 
  4. Fold in chocolate chips, white chocolate chunks and chopped Oreos. Spread evenly in prepared pan. Beat for 25-30 minutes or until edges are golden brown and middle is set. Cool completely and cut into squares.

Thursday, April 1, 2021

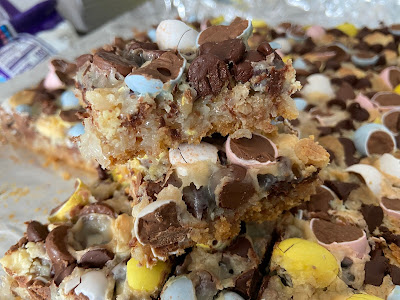
Cadbury Mini Eggs 7-Layer Magic Bars

Just in time for Easter or, more importantly, for the after-Easter sales on Cadbury mini eggs, here's a springtime way to dress up the traditional Magic Cookie Bar recipe: chop up those pastel eggs of milk chocolate goodness and layer them on top of any traditional magic cookie bar.

I love these things; they're my favorite Easter candy. Never come near me with anything from the Peeps family and I will side-eye jelly beans any day of the week. But wave this magical bag of Cadbury mini eggs at me and you're my new best friend. At least while the mini eggs last.

The "hardest" part is cutting the eggs in 2. Notice that I didn't say "in half" because there's no way to cut them exactly in half so don't even try. The point is just to cut them into smaller pieces than the full-on mini egg. Not only does that provide more coverage of mini egg goodness on top of the magic cookie bar but it's also more visually interesting to see the inside milk chocolate and the outside pastel shells mixed up on top.

It's also easier to eat that way but let's face it, eating this was never going to be a problem for me. If you like magic cookie bars, try this version any time of the year. Just don't forget to stock up the day after Easter Sunday and grab whatever bags are left on sale.

1/2 cup (1 stick) melted butter
1 1/2 cups graham cracker crumbs
1 cup shredded coconut
1/2 cup chopped pecans, lightly toasted
1 can (14 ounces) sweetened condensed milk
1/2 cup milk chocolate chips
1/2 cup semisweet chocolate chips
1/2 cup white chocolate chips
1 1/2 cups chopped Cadbury mini eggs
  1. Preheat oven to 350 degrees F. Line a 9 x 13 baking pan with foil and lightly spray with nonstick cooking spray.
  2. Combine melted butter and graham cracker crumbs in a bowl. Mix until well combined. Press into prepared pan in an even layer.
  3. Sprinkle coconut and pecans over the crust.
  4. Drizzle the sweetened condensed milk over it. Top with chocolate chips and chopped Cadbury eggs. Gently press top on the top to adhere to the crust.
  5. Bake for 20-25 minutes or until the edges are golden brown. Cool completely before cutting.

Tuesday, March 30, 2021

Cookies & Cream Oreo Blondies

We take a slight break from the cookie stamping posts to bring you this recipe for Cookies & Cream Oreo Blondies, the first of two recipes I tried because I wanted to mix up the bar cookies I was sending in military care packages.
As I'm sure I've mentioned before, as snobby as I am about homemade cookies and turning up my nose at storebought cookies, I will freely admit Oreos are one of the exceptions to my snobbery. I love Oreos. I rarely buy them because I would eat them. Not one or two. Maybe 5. At a time. Hence why I don't buy them very often.
When I do buy them, it's to bake with them. Because I can try out a new recipe and eat one (or 5) while I'm chopping them up to put in the batter. Win-win. This was a good bar cookie and should ship well. At least I hope so as by the time I post this, they would've already been packaged up and mailed. And hopefully received. 
1 cup butter, softened
1 cup brown sugar
1/2 cup granulated sugar
2 eggs
1 teaspoon vanilla
1 3.4-ounce box instant vanilla pudding
2 cups all-purpose flour
1 teaspoon baking soda
1/2 teaspoon baking powder
1 teaspoon salt
1 cup semisweet chocolate chips
1 cup white chocolate chips
16 Oreos, broken into pieces
  1. Preheat oven to 350 degrees F. Line a 9 x 13 pan with foil and lightly spray with nonstick cooking spray.
  2. In the bowl of a stand mixer fitted with the paddle attachment, cream together butter, brown sugar and granulated sugar.
  3. Add eggs and vanilla; mix to combine. 
  4. Add dry pudding mix and mix until combined.
  5. Add flour, baking soda, baking powder and salt until just combined. Fold in chocolate chips, white chocolate and Oreo pieces.
  6. Pour into prepared pan and smooth top. Bake for 20-22 minutes or until center is set and toothpick inserted near center comes out with a few moist crumbs, not raw batter. Cool completely before cutting.

Sunday, March 28, 2021

Stamped Brown Sugar Shortbread (recipe 3)

Stamped Brown Sugar Shortbread - made March 13, 2021 from Kelly Neil
Recipe alert - make this. So far it's the best of the ones I've tried, in having dough that's easy to work with to pattern, in keeping the impressions during baking and, best of all, in taste and texture. This was delicious.
I veered slightly away from embossed rolling pins (for now) as I discovered, thanks to a blog post (which I'll cover in the next embossed cookie post), the art of cookie stamping via mooncake molds.
If you find cookie stamps a little expensive (the good ones always are), try the much cheaper alternative of using mooncake molds. Super pretty impressions and the molds make them a great size for a cookie as well as keep the cookie tidily in shape since it's literally a spring-loaded cookie (or mooncake) mold.
I inadvertently made them a little thicker than a normal cookie as it was hard to judge from the size of the dough ball how thick the cookie will turn out once you press the mold down. But the cookie was so good, it turns out they're perfect when they're a little thick.
 
And look how well the impressions stayed. Not gonna lie, that made me happy. Like I said, it doesn't take much these days, lol.  


3 tablespoons granulated sugar
1 cup (2 sticks) butter, softened
1/2 cup firmly packed brown sugar
1 teaspoon vanilla
1/4 teaspoon salt
2 cups flour 
  1. Place granulated sugar in a shallow bowl.
  2. In the bowl of a stand mixer fitted with the paddle attachment, cream together butter and brown sugar until well combined, 2-4 minutes. Add vanilla and mix to combine.
  3. Whisk together salt and flour in a separate bowl. Add to butter mixture in 3 additions, mixing after each addition, until combined and no flour streaks remain.
  4. Portion into 24 dough balls. Roll each ball into granulated sugar, coating completely. Press each ball with cookie stamp. Chill and freeze for several hours or overnight.
  5. Preheat oven to 325 degrees F. Line baking sheets with parchment paper and evenly space stamped cookies. Bake for 20-22 minutes or until edges are lightly browned. Remove from oven and cool cookies completely on wire rack.