Wednesday, November 23, 2016

Lemon Semolina Cake

Lemon Semolina Cake - made November 6, 2016 from the Culinary Institute of America
I first blogged this recipe in the early days of my blog, almost 7 years ago. It's no coincidence that I put up a lemon recipe around this time of year again. My lemon tree is madly producing lemons and I can't keep up. This doesn't use a lot of lemons, just two or three, depending on the size and juiciness of the lemons but it makes a good cake, a bit different than the normal lemon buttermilk pound cake that I typically make to use up lemons. The semolina flour is what makes it a little different from the norm and gives it a slightly grittier texture.

If you click on the post title and see the original post from seven years ago, you'll see how I skimped on posting pictures and how non-picture-worthy that particular cake was. Fortunately, this time around, I was able to get the cake out of the pan more or less intact so it looks a bit better. It still has a very plain appearance but taste is more important than looks (to me) and this makes a good lemon cake.

It's best eaten warm though so after you brush it with the soaking syrup, feel free to cut into it a few minutes later for the best texture. Even after it's cooled to room temperature, I like to warm it up in the microwave for 10-15 seconds to revive the fluffiness of the texture. If you want to dress it up a little more, make a simple lemon glaze by combining powdered sugar with enough lemon juice for the consistency you want, pour it over the cake and sprinkle with sugared lemon zest.
Cake
10 ounces butter
14 ounces sugar
6 ounces eggs
Zest from 2 lemons
1 pound sour cream
1 teaspoon vanilla
8 ounces cake flour
5 ½ ounces semolina flour
½ teaspoon salt
1 teaspoon baking soda

Soaking syrup
½ cup lemon juice
¼ cup water
½ cup sugar
  1. Sift dry ingredients. Whip butter, sugar, zest and vanilla.
  2. Slowly add eggs. Alternate dry ingredients with sour cream in 3 additions.
  3. Pour into buttered and floured molds, ¾ full.
  4. Bake at 325˚F – 350˚F, depending on shape (lower temp for large cake and longer baking time, higher temp for smaller loaf, 30-35 minutes).
  5. Melt together ingredients for the syrup. Pour over the cake while the cake is hot. Put cake on icing grate, poke holes into cake, dab on syrup 3 to 4 times and give time between each time for syrup to soak in.

Saturday, November 19, 2016

Almond Shortbread

Almond Shortbread - made dough October 29, 2016 from Julia's Album
Another holiday cookie possibility if you want something easy to mix up, can be made ahead of time, baked off whenever you need it and however many you need and is delicious.
First, the dough is quick and easy to make, not to mention handles beautifully, meaning it isn't dry or crumbly nor is it sticky and wet. Instead, it's easy to shape into logs before wrapping and putting into the refrigerator or freezer until you need it. I recommend freezing it until you're ready to bake then simply take out and let thaw for 10-15 minutes before slicing.
Second, the beauty of this is it's literally a "slice and bake" cookie. So when you're ready to bake, simply slice off the number of cookies you need. The important thing is to slice the cookies of even thickness. You don't want them too thick or they'll need to bake too long to get them to optimal crunch. You don't want them too thin or thin at the edges and thick in the middle or they won't bake evenly and your edges will be overbaked/too brown while the middles will be underbaked or "just right".
But it isn't hard to slice evenly and after that, you can crowd them a little on the baking sheet since they don't really spread. Make sure to bake long enough that the edges are brown but also that the middles have some color. This is the rare time I don't advocate underbaking. You want to bake long enough to get a beautiful golden color plus to get that "snap" of shortbread once it's cool.
This is also a delicious tea cookie; it would go well for an afternoon tea party or in holiday gifts. Just bake it off at the last-minute though and make sure it's stored in an airtight container. These are best consumed the day of baking to get the optimal crunch and flavor.
1 cup (2 sticks) unsalted butter
1 cup confectioners' sugar
1 teaspoon amaretto liquor (I used vanilla extract)
1/4 teaspoon salt
2 cups all-purpose flour (dip and sweet method)
3/4 cup almonds, chopped or sliced, toasted
  1. In a large mixing bowl, cream butter, sugar, amaretto and salt until smooth and creamy.
  2. With mixer on low speed, add flour and mix until dough forms.
  3. Fold in almonds with a rubber spatula.
  4. Form dough into 2 rectangular logs. Wrap each log in plastic wrap. Freeze logs for at least 40 minutes in the freezer then 20 minutes in the refrigerator.
  5. Preheat oven to 325 degrees F. Line baking sheets with parchment paper.
  6. With a sharp knife, cut dough into 1/4" thick slices, arrange them on baking sheets 1" apart. Bake until edges are edges, about 12 minutes. Cool on baking sheet for 10 minutes then transfer to wire rack to cool completely.

Tuesday, November 15, 2016

Dark Shadows

Dark Shadows - made November 6, 2016 from Baking Style by Lisa Yockelson
After Halloween, I always make brownies. Not that I need an excuse to make brownies but the timing is always good since that's how I use up leftover Halloween candy. I don't get a lot of kids trick or treating in my neighborhood. Some years I don't get any at all. I think that's a combination of not many kids in the neighborhood and/or I often don't get home from work early enough to make my house a worthy stop on Halloween night.
I've learned to buy a bag or two of candy just in case and I've also made a habit of making brownies shortly after Halloween to use up that candy. I'm a chocolate snob so I don't really eat Halloween snack size "grocery store" chocolate (see, told you I was a chocolate snob) unless it happens to be baked into a rich, fudgy, dense brownie.

Which is exactly what this is. The original recipe called for a full 9 x 13 pan of brownies but I didn't need that many so I cut the recipe in half and baked it in an 8" x 8" pan. Which is what I usually do when cutting a 9 x 13 recipe in half since I didn't want the brownies to be too thin. For these brownies, however, I think I could've gotten away with using a 9" x 9" pan. The 8" pan made the brownies a bit thick. Nothing wrong with that but you need to be careful about baking brownies that are too thick. The corners and the top will be done first and you risk overbaking a crust on the top and drying out the corners while the middle is still raw.
I don't like a crust on my brownies so next time I would bake in a slightly larger pan or, stick with the 8" pan but scoop out some of the batter and bake it in an individual ramekin for my own "molten brownie" dessert, served warm with vanilla ice cream. In case you need ideas....
2 cups unsweetened alkalized cocoa powder
1 cup unsifted bleached all-purpose flour
1/2 cup unsifted bleached cake flour
1/2 teaspoon baking powder
1/2 teaspoon salt
3/4 cup miniature semisweet chocolate chips
1 pound (4 sticks) unsalted butter, melted and cooled to tepid
2 ounces bittersweet chocolate, melted and cooled to tepid
8 large eggs
2 1/4 cups superfine sugar
1 3/4 cups firmly packed light brown sugar
4 teaspoons vanilla extract
seeds from 1 small vanilla bean, scraped clean
  1. Preheat oven to 325 degrees F. Line a 9 x 13" baking pan with foil and lightly spray with nonstick cooking spray. 
  2. Sift together the cocoa powder, all-purpose flour, cake flour, baking powder and salt. Toss the chocolate chips with 3/4 teaspoons of the sifted mixture in a small bowl.
  3. In a medium-size mixing bowl, whisk the melted butter and melted chocolate until combined.
  4. In a large mixing bowl, beat the eggs just to mix. Add the superfine sugar and beat for 30 seconds to mix but not add volume. Blend in the light brown sugar. 
  5. Blend in the melted chocolate-butter mixture, vanilla extract and vanilla bean seeds, mixing slowly with a whisk until thoroughly incorporated. 
  6. Add the dry ingredients and whisk slowly into the mixture until just combined, scraping down the sides with a rubber spatula to keep even-textured. The batter will be thick. Fold in chocolate chips.
  7. Scrape batter into prepared pan and smooth top with flexible palette knife.
  8. Bake for 40-44 minutes or until just set and a toothpick inserted near the center comes out with a few moist crumbs. Cool completely before cutting and serving.

Saturday, November 12, 2016

Bittersweet Chocolate Brownies

Bittersweet Chocolate Brownies - made October 22, 2016 from Chocolate Chocolate by Lisa Yockelson
I was taking a nostalgic "walk" through my bookshelves and leafing through some of my favorites. I had purged quite a few baking books over the past year, donating dozens (yes, dozens) to my local library after realizing how few of them I actually used. Yes, I've known I rarely used so many of them for quite awhile but knowing and actually acting on that knowledge are two different things, separated by months of inner conflict and separation anxiety. I'm an instinctive hoarder, particularly of things I love like books and baking paraphernalia.
But it got to a point where the baking books gathering dust were mocking me more than satisfying my (now dormant) acquisitive nature and (now defunct) hoarding instincts so I silenced their reproach by sweeping them off the shelves and taking them to the donation bin for my library's regular book sales.
Some books survived the purge however, including this one by Lisa Yockelson, one of my favorite cookbook authors. I'm particularly a fan of her brownie recipes. I will confess (again) that I would have a hard time distinguishing between her brownie recipes because they're so similar to each other. But that's not necessarily a bad thing because what they have in common is they're all fantastic. Fudgy, chewy, dense, chocolaty, rich. These are not bad traits for brownies to consistently have.
This one I could've sworn I had already made and maybe I have and hadn't documented it or missed it on the blog. Regardless, it was worth making and (possibly re-)blogging. I kept these plain so that nothing could interfere with their dense fudgy goodness. Make sure to let these cool completely before you even think about cutting them or else they'll be too soft and mushy. If you don't overbake them, this is the kind of texture you'll get. Enjoy.
1 cup bleached all-purpose flour
1/3 cup bleached cake flour
1/4 cup plus 1 tablespoon unsweetened alkalized cocoa powder
1/4 teaspoon baking powder
1/8 teaspoon salt
3 ounces bittersweet chocolate, chopped into small chunks, optional (I left them out)
1/2 pound (16 tablespoons) unsalted butter, melted and cooled to tepid
5 ounces unsweetened chocolate, melted and cooled to tepid
5 large eggs
2 cups granulated sugar
2 teaspoons vanilla extract
  1. Preheat oven to 325 degrees F. Line a 9 x 9" baking pan with foil and lightly spray with nonstick cooking spray.
  2. Sift together the all-purpose flour, cake flour, cocoa powder, baking powder, and salt. In a small bowl, toss the chocolate chunks with 1 teaspoon of the sifted mixture, if using.
  3. In a medium-size mixing bowl, whisk the melted butter, melted unsweetened chocolate and melted bittersweet chocolate until smooth. 
  4. In a large mixing bowl, whisk the eggs until blended, about 15 seconds. Add the sugar and whisk until combined, 30 to 45 seconds. Blend in the vanilla extract and melted butter-chocolate mixture.
  5. Sift the flour mixture over and stir to form a batter, mixing until the particles of flour are absorbed. Fold in the chocolate chunks, if using.
  6. Scrape the batter into the prepared pan and spread evenly. Smooth the top with a rubber spatula.
  7. Bake the brownies for 30 to 33 minutes or until gently set and a toothpick inserted near the center comes out with moist crumbs. Cool completely before cutting and serving.

Tuesday, November 8, 2016

Coconut Butter Balls

Coconut Butter Balls - made dough October 15, 2016, modified from Baking Style by Lisa Yockelson
We’re entering into the holiday baking season. Which, for me, typically runs from February 1 to December 31. I give myself a month off in January. For normal people, presumably the holiday baking season is around – you know – the holidays. Some might’ve started early for Halloween and/or Diwali. Some might go all-in for Thanksgiving (Canadian, American and otherwise). Then you’ve got Christmas, Kwanzaa and Hanukkah celebrations crying out for baked goods.
If your holiday season hits the winter months, I like this “snowball” cookie to help usher in the season of desserts and loose pants. If you’re uber-geeky like me, you can also serve them in snowflake containers or mitten-shaped dessert plates. Yes, I have those. Where else would you put snowball cookies?

There are actually several variations of snowball cookies. The most recognizable and traditional is probably the Mexican Wedding Cakes which aren’t cakes at all but little round cookies of buttery goodness stuffed with toasted pecans and covered in powdered sugar. Hence the snowball effect. There’s also a lemon variation without the pecans. And today, I give you the coconut version. 
These are amazing. Do NOT overbake them. I say that all the time and I’m really serious about it for this recipe. Part of what makes this cookie so delicious is the texture. It’s a melt-in-your-mouth, slap-yourself-hard kind of deliciousness. If you (under)bake it just right, the powdered sugar coating adds to the melty-good texture of the cookie. If you overbake it, the powdered sugar will just make the cookie seem more dry and crumbly. So don’t overbake it.
The tricky part is because the dough is so pale, it might be hard to tell when it’s time to take out the cookies. Conventional wisdom says to check the bottom of the cookie – you don’t want it darker than a light golden brown. But who checks the underside of a hot, fragile cookie and risk breaking it? Not me. So what I do is bake just until the cookie dough ball doesn’t look raw or shiny. Instead the tops should be “dry” and there may be a few tiny cracks along the cookie. The edges of the bottom might have some color but don’t rely on that. “Bake until not raw” usually works for me, typically for no more than 10-11 minutes in my oven. Or, if you’re more scientifically minded, you can set a timer but each oven is different so err on the side of caution and check them a couple of minutes early.
Let the cookies cool on the cookie sheet for a few minutes before rolling them gently in powdered sugar. Then let them cool completely before rolling them again. I know, that’s hard but be strong, it’ll be worth it. These are cookies that actually are better eaten at room temp than hot or warm. Because that’s when you get the best texture. Lukewarm might be okay but cool them until at least lukewarm, not warm, not hot. I loved the coconut in these and the snowball look. These are likely going into holiday goodie bags for my baking gifts this year, especially for the coconut lovers on my gift list.
2 1/4 cups unsifted bleached all-purpose flour
3/4 teaspoon baking powder
1/8 teaspoon salt
1/2 pound (16 tablespoons, 2 sticks) unsalted butter
1/3 cup confectioners' sugar
2 teaspoons vanilla extract
1 teaspoon vanilla bean paste, optional
2/3 cup sweetened flaked coconut

about 3 cups confectioners' sugar for dredging the cookies
  1. Whisk together flour, baking powder and salt; set aside.
  2. Cream butter in the large bowl of a freestanding electric mixer for 3 minutes, until creamy. Add the 1/3 cup confectioners' sugar and beat for 1 minute. Blend in vanilla extract.
  3. On low speed, add half the dry ingredients, then the coconut and then the rest of the dry ingredients, mixing briefly after each addition until just combined. Do not overbeat. Scrape down sides of bowl to keep dough even textured.
  4. Portion into golf-ball-size dough balls, cover, and freeze several hours or overnight.
  5. When ready to bake, preheat oven to 350 degrees F. Line baking sheets with parchment paper and evenly space frozen dough balls 2 inches apart.
  6. Bake for 12-14 minutes or until set and the bottoms are a light brown. Let cookies stand for 1 minute on baking sheets then transfer to wire cooling racks with a small metal spatula. After 5 minutes, dredge in confectioners' sugar. Cool cookies completely then dredge them again in the confectioners' sugar.

Saturday, November 5, 2016

Levain Bakery copycat recipes - a mini compilation

Levain Bakery Copycat Recipes - made throughout September 2016
Remember my obsession with chocolate chip cookies and that time I tried a bunch of different ones to come up with some tips and tricks to make “the best” chocolate chip cookies? And how I tried a couple of different Levain Bakery copycat recipes in that sweep?
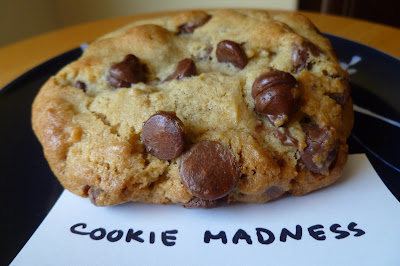
Copycat from Cookie Madness - didn't spread much, stayed thick, good flavor, a little cakey at the edges but had to bake it long enough to not be raw in the middle
Instead of getting it out of my system, apparently my obsession grew only now I became fixated on Levain Bakery cookies. I know, I can’t explain it either. Well, I could if you understood how much I love behemoth-sized, chewy, moist chocolate chip cookies with some heft to them. If you can’t, it’s baffling.
Copycat from The Cooking Actress - used Kerry Gold Irish butter, these spread more than the other cookies even when baked from frozen dough, crisp but light texture at the edges, good chewiness in the middle, when at room temperature, a bit too sweet, best in moderation and not as a big cookie
But since I believe in channeling my obsession into socially acceptable, legal ways, I stalked pinterest for “copycat” Levain Bakery chocolate chip cookie recipes and came up with six versions. At first I thought I would blog each one separately in a one-week spread with a new one posted every day going in the order of how I liked them, somewhat similar to my countdown of chocolate chip cookie recipes from good to great to best. Meh, this time I’m doing something different and just going with one blog post about it. It’s a long blog post but hang in there with me as it’ll be worth it.

First of all, I’m just going to link each recipe back to the original blog I got it from so you can go directly there if there’s one you want to try. The pics are of my cookies as I made them from those recipes so you can see how they turned out.
Copycat from Fran's Favs - stayed thick, good flavor
Second, when I try out recipes of the same thing, I make myself a spreadsheet (insert shrieking alarm of “nerd alert! Nerd alert!”) that list out all of the ingredients and in what proportions they are in each recipe. Because let’s face it – almost all chocolate chip cookies have the same base ingredients: butter, granulated sugar, brown sugar, flour, baking powder, baking soda, salt, vanilla extract and chocolate chips. There will be variations in how much of each, perhaps the mixing method, the baking temps, the baking time and so on but it’s the same players at the party gathering round the mixing bowl. So I like to see how similar they are to each other and what their differences are.
Copycat from Parsley Sage Sweet - didn't spread much, stayed thick and domed, not crisp at the edges like The Cooking Actress version, might have a bit more buttery flavor if used European butter
I tried to find recipes that did have some variations beyond mix up ¼ teaspoon less of this or ¼ cup more than that. For instance, one recipe used European butter or plugra. Another used bread flour. Some didn’t call for vanilla extract at all (eek), a couple included cornstarch, others didn’t.
What they all had in common, and I mean all, is they had the same amount of butter. Everything else might not mirror exactly but all of the other ingredients anchored around 1 cup of butter. And with the exception of 1 recipe, they all used 2 eggs. The majority, although not every single one, also used 1 ½ cups combined of brown sugar and granulated sugar. The brown sugar to granulated sugar ratios varied between each recipe. I’ve found if you want a more caramelized flavor, increase the brown sugar relative to the granulated sugar but keep the total amount between the two the same.

Parsley Sage Sweet
I ended up making a half recipe of each copycat variation, partly because I was making so many different recipes and I didn’t know that I needed all these giant cookies, even if I did give most of them away. Plus, that’s a lot of butter to use up. I did vary whether I used milk chocolate chunks (from Trader Joe’s Pound Plus bar), milk chocolate chips, semisweet chocolate chips or semisweet chocolate chunks. No rhyme or reason other than using up what I had on hand.
Now that I’ve made six copycat recipes, first thing I’m going to tell you is I don’t really have a favorite among the six. Seriously. They’re all good. They all bake up nice, thick, chewy, moist behemoth chocolate chip cookies. It’s hard to go wrong. So you can choose any 1 or 6 recipes to try and I think you’ll like the results. Second, if you really want a Levain copycat, I still can’t tell you which one comes the closest. I haven’t had a Levain cookie in years so I can’t compare them to the real thing. At least not yet (rest assured going to Levain Bakery is on my bucket list). Did that seem anti climactic? Sorry.
Copycat recipe from Plain Chicken
Copycat from Plain Chicken - stayed thick, good flavor

However, what all this chocolate chip cookie baking did was further refine my own quest for “the best” (as considered by me) chocolate chip cookie. My previous trials already had some basic tips I use consistently when I’m on the quest for perfection: use butter, chill the cookie dough for 24 hours then freeze overnight before baking, use dark brown sugar and in higher proportion than granulated sugar, substitute part of the granulated sugar for raw cane sugar, make big-freaking-huge amounts of cookie dough per cookie to bake up big-freaking-huge cookies.
Copycat recipe from Plain Chicken

Copycat from The Naughty Fork - used Kerry Gold Irish butter, substituted 1/4 cup turbinado sugar for granulated sugar
These latest test batches also convinced me to add: use European butter for more flavor. I have never made that switch to European butter because that stuff is expensive and at the rate I go through butter, I’d be in the poor house. But I have to admit, for those special occasions – like wear-your-diamonds and break-out-the-cute-but-uncomfortable-spiky-heels special occasions – it’s time to splurge on European butter. I used Kerry Gold from Trader Joe’s which is a butter from Ireland but you can use any brand of European butter. They just have more flavor and make for a chewy cookie. I tried them for 2 of the 6 recipes and I have to admit, they brought out the caramelized flavor better and added more crisp to the edges while preserving the moistness of the middle. But they do cost almost twice as much as “regular butter” so don’t blame me if you have to take out a second mortgage simply because you followed my advice.