Sunday, June 21, 2015

Restaurant Review: Tadamasa (Ramen)

Tadamasa - lunch on May 31, 2015
My cousin Ellen told us about Tadamasa, a Japanese ramen place she and her fiancé had gone to that she recommended. For me and my parents, it gave us a new place to try and answered another “where do you want to go for lunch?” question after Sunday church service.
Tadamasa is in a mini strip mall that looks a bit rundown and, from the outside, you have no idea what the inside looks like since the front glass windows are pretty much covered in blinds. Inside, it’s rather small. I counted two 6-toppers, two 4-toppers and two 2-toppers. The tables could be configured in 2, 4 and 6 though, depending on the patrons’ needs but that seemed to be the optimal configuration in the space they had. The back half of the restaurant was comprised of a kitchen area and a “bar” area where people could also sit and eat in case there weren’t any tables. I don't know that I would recommend coming here with a large party. 6 would be the max and I'd recommend coming early.
Shrimp Miso Ramen
They opened at 10:30 am and we got there shortly after 11 so we were fortunate enough to snag the last 4-topper. The tables and most of the seats at the bar were all full before we were halfway through our meal. The menu offered several types of ramen as well as a few non-ramen dishes, mainly donburi and the quintessential chicken teriyaki dish. Which is what I, the non-adventurous eater, would normally get at a Japanese restaurant (yes, I’m that person). This time around, I took a walk on the wild side and got the Oyaka Donburi instead which is basically chicken, soft scrambled egg and onions atop a bowl of rice.
Gyudon Donburi
I love donburi dishes when it’s mostly just rice and protein. And I love rice in Japanese restaurants because 9 times out of 10, they have the best rice. Tadamasa was no exception as their rice was amazing. The only drawback to my dish was the plethora of onions. I mean, there were a lot of onions, too much for me to successfully pick out which is my usual strategy. I don’t mind the taste of onions but can’t stand the texture, cooked or raw. I ended up pushing aside half the dish because it was literally all onions. The half I did eat was delicious though.
Miso Soup that came with the Donburi dishes
Prices are pretty reasonable, especially for a Japanese restaurant as they normally tend to run higher than your average Asian eatery. But the dishes here were mainly in the $10-$14 range. That’s partially explained by the fairly modest portion sizes that came out. I wouldn’t call them super small but instead are akin to what a normal portion size of a homecooked meal would be rather than restaurant-size portions. When I travel in Europe, one thing I always appreciate it is they don’t serve you a ton of food and the portion sizes are reasonable. Same thing at Tadamasa. Large enough portion that eating the whole thing leaves you feeling satisfied rather than “full” but not so small that you’re still hungry at the end of the meal. Service was also fairly quick and although there seemed to be only 1 server working the small room, we were able to get anything we needed in a timely manner. Next time I want to try the ramen. Or their chicken teriyaki.
Oyako Donburi

Saturday, June 20, 2015

Top Favorite: Essence of Chocolate Squares

Essence of Chocolate Squares - made multiple times from Baking by Flavor by Lisa Yockelson
I’ve posted about this brownie before and called it the brownie version of Texas Fudge Cake because you make the frosting while the brownie is baking, pour it warm over the hot brownie and let it set, similar to the cake. It’s more rich than its cake brethren though but worth every single freaking calorie. I like to make this when I just need a shot of chocolate and mainlining it isn’t possible. This comes close.

The key to this is (of course) underbaking it or at least baking it until it’s just barely done. Meaning the toothpick test near the center comes out with a few moist crumbs but not raw batter and the corners come out clean. If the middle comes out clean too, yank it out of the oven NOW. 
This also freezes really well but with the warm summer temps upon us, I don’t recommend it for care packages through the mail unless you want a melted frosting mess to greet your recipient upon arrival. Save this for a winter care package instead.
1 ¼ cups unsifted bleached all-purpose flour
2 tablespoons plus 2 teaspoons unsweetened, alkalized cocoa
¼ teaspoon baking powder
½ teaspoon salt
½ pound (16 tablespoons or 2 sticks) unsalted butter, melted and cooled to tepid
4 ounces unsweetened chocolate, melted and cooled to tepid
4 large eggs
2 cups granulated sugar
1 ½ teaspoons intensified vanilla extract

Dense chocolate frosting for topping the fudge chocolate layer
3 ¾ cups plus 2 tablespoons unsifted confectioners’ sugar
1/8 teaspoon salt
¼ pound (8 tablespoons or 1 stick) unsalted butter, melted and cooled to tepid
2 ounces (2 squares) unsweetened chocolate, melted and cooled to tepid.
¼ cup milk
2 tablespoon (light) table cream
1 teaspoon intensified vanilla extract

9 x 9 x 2” baking pan

  1. Preheat the oven to 325˚F. Line a 9 x 9" baking pan with aluminum foil and lightly spray with nonstick cooking spray; set aside. 
  2. Sift the all-purpose flour, cocoa, baking powder, and salt onto a sheet of waxed paper. 
  3. Whisk the melted butter and melted unsweetened chocolate in a medium-size mixing bowl until thoroughly combined. 
  4. Whisk the eggs in a large mixing bowl to blend well, about 1 minute, then add the granulated sugar and whisk slowly for 1 minute, or until just combined. Whisk in the tepid melted chocolate-butter mixture. Blend in the vanilla extract. 
  5. Sift over the dry ingredients and mix until all particles of flour are absorbed into the batter, using a whisk, wooden spoon or flat wooden paddle. 
  6. Scrape the batter into the prepared baking pan. Smooth over the top with a rubber spatula. Bake the cake layer for 35 to 37 minutes or until just set. Cool the cake layer in the pan on a rack for 5 minutes while you make the frosting. 
  7. Frosting: Place the confectioners’ sugar and salt in a large mixing bowl. Whisk the melted butter and melted unsweetened chocolate in a small mixing bowl until thoroughly combined. 
  8. Add the milk, light cream, and vanilla extract. Using an electric hand mixer, beat the frosting on moderately low speed until creamy and completely combined. Scrape down the sides of the mixing bowl two to three times to keep the frosting even-textured. Do not beat the frosting on high speed or it will become airy and fluffy instead of creamy and dense. 
  9. Immediately and carefully, place large dollops of the frosting evenly over the surface of the hot bar cookie base and spread it, using a flexible offset spatula. Spread it smoothly and lightly, to keep the bar cookie layer intact. 
  10. Let the sweet cool in the pan on a rack for 3 to 4 hours, or until cooled and completely set.  Cut the cake into four quarters, then cut each quarter into four squares, using a small, sharp knife.  Remove the chocolate squares from the baking pan, using a small, metal offset spatula.

Thursday, June 18, 2015

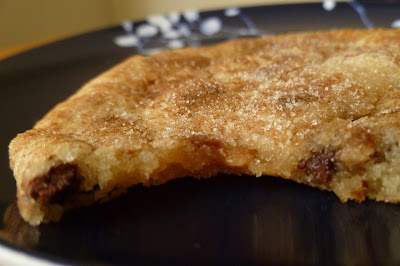
Toffee Chip Snickerdoodles

Toffee Chip Snickerdoodles - made dough May 25, 2015 from The Essential Chocolate Chip Cookbook by Elinor Klivans
I have mixed emotions about this recipe. On the one hand, I like chocolate chips and toffee bits as much as the next cookie-crazed person. On the other hand, it seems wrong to violate the sanctity of the purist snickerdoodle by adding “stuff” to it. Snickerdoodles are supposed to be vanilla butter cookies rolled in cinnamon sugar. That’s what makes them a snickerdoodle. Adding toffee chips and chocolate chips – well, doesn’t that just make it a toffee chocolate chip cookie?
But I’ll try (almost) any recipe once to prove myself right or wrong or indifferent so I went with it. The dough was a bit soft when I finished mixing it so I did what I always did – scooped into dough balls and froze them. That was supposed to help them bake up thicker.
Unfortunately that little trick didn’t work as well as it normally does and these spread thinner than I cared for, even on the convection setting of my oven which tells me either my butter was too soft (unlikely since I beat it straight from the refrigerator) or there wasn’t enough dry ingredients called for in the recipe to give it enough structure. As for the taste, as I expected, despite the traditional rolling in cinnamon sugar, this was more like a toffee chocolate chip vanilla cookie than a true snickerdoodle. It still tasted good but if you’re seeing a more traditional snickerdoodle recipe, I suggest trying my favorite one instead: Soft & ThickSnickerdoodles.

2 1/2 cups all-purpose flour
2 teaspoons cream of tartar
1 teaspoon baking soda
1/4 teaspoon salt
1 1/2 cups sugar
1 cup (2 sticks) unsalted butter
2 large eggs
1 teaspoon vanilla extract
1/4 teaspoon almond extract
1 cup (6 ounces) semisweet chocolate chips
2/3 cup (4 ounces) chocolate toffee bits, such as Heath or finely crushed chocolate-covered toffee

Coating
1/2 cup granulated sugar
1 teaspoon ground cinnamon
  1. Sift the flour, cream of tartar, baking soda and salt into a medium bowl and set aside.
  2. In a large bowl, using an electric mixer on medium speed, beat the butter and 1 1/2 cups sugar until smoothly blended, about 1 minute. Add the eggs, vanilla and almond extracts and mix until blended, about 1 minute.
  3. On low speed, add the flour mixture, mixing just until incorporated. Stir in the chocolate chips and toffee bits until evenly distributed. The dough will be soft.
  4. Scoop into golf-ball-size dough balls and chill or freeze, covered, for several hours or overnight. 
  5. When ready to bake: preheat the oven to 350 degrees F. Line 2 or 3 baking sheets with parchment paper.
  6. In a small bowl, stir together 1/2 cup of the sugar and the cinnamon. Roll each cookie dough ball in the cinnamon sugar mixture (thaw for 5-10 minutes before rolling).
  7. Place the cookies evenly spaced on the cookie sheet, 2-3 inches apart. Bake until the edges are golden but the centers are still pale, 12-14 minutes. Cool on baking sheet for 5 minutes then transfer cookies to wire rack to cool completely.


Tuesday, June 16, 2015

Restaurant Review: Dragon BBQ Express

Dragon BBQ Express - lunch on May 24, 2015
Every Sunday after church, my parents and I go out to lunch. We typically tend to stick to the same places yet every Sunday after the service, we always wonder where we should go for lunch. For my frugal, first-generation immigrant parents, the price points have to be in a “reasonable” range meaning they have to feel like a) it should be cheap, b) they have to feel like they received the right value for what they paid and c) don’t forget it should be cheap. I’m not talking fast food cheap but somewhere in the $10-$14 an entrée range is okay.
After exhausting all the typical chain restaurants nearby, some of which appear to be raising their prices and hence falling out of favor in our usual Sunday lunch circuit, I turned to yelp for suggestions. BBQ Dragon Express had a 3.5-star rating, it was nearby and it was akin to fast Chinese food so it seemed like a safe bet.

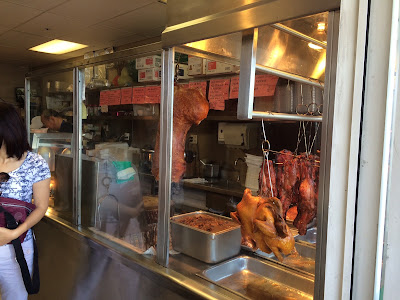
It’s in a mini strip mall and one of those places I would probably easily overlook if it hadn’t been favorably rated on yelp. It’s pretty small with more than half the space taken up by the counters of food and the hanging pork shoulder (looked like lechon), roast duck and chicken. There are several tables for dine in but for the most part, it looked like it was mostly a takeout business. Think of it like a Panda Express but if Panda is Westernized Chinese food, this was slightly more authentic Chinese food. Sort of.
Like Panda, there were trays of various dishes in warming trays. You pointed to what you wanted and the server dished up generous – and I mean generous – portions into a takeout box. A combo was rice, fried rice or noodles plus 2 side dishes. I pointed to “safe” Americanized Chinese food choices: steamed rice, lemon chicken and sesame chicken, the latter both breaded and in their accompanying sauces. Okay, probably not that authentic in terms of China Chinese food but suited to my bland taste buds.
The rice was good as was the sesame chicken but I wasn’t impressed with the lemon chicken. The chicken pieces were good-sized but the texture was a bit odd, not quite the firmness of chicken but too firm to be fish. It was weird. Fortunately the sesame chicken didn’t have a texture issue and was quite tasty.
Sesame Chicken (top left) and Lemon Chicken (top right)
The place was also really cheap. Our 3 combo orders came to $19.55 including tax so it was just slightly more than $6.50 per person. Given the generous portions that were literally enough for 3 meals (2 if you’re really hungry), that was a bargain. Not sure I’d make this a regular stop on our Sunday lunch circuit (I think my parents would have preferred Panda Express) but it was good to try out at least once and support another local small business. 

Sunday, June 14, 2015

Cinnamon Crumb Banana Bread

Cinnamon Crumb Banana Bread - made May 30, 2015 from Little Bits of Baking, Crafting and Life
I’ve mentioned before that I don’t try out a lot of different recipes for banana bread. I have this one from my college undergrad days and my family and friends like it so much and ask for it all the time that they give the side eye to anything that isn’t my go-to recipe. Even when I give them the entire plethora of recipes from my blog that I could make, when I ask them what they want me to bake, I get the same answer “banana bread”. But after making double batches of it last month for my cousin’s visit, my sister’s visit, and my parents, let’s be honest – I’m sick of making it. This is why I can never work in a bakery. I don’t have the patience to make the same thing over and over again, day in and day out. Heck, I can’t even make the same banana bread once a month.
Topping before baking
So to use up some overripe bananas from the last time I made my go-to recipe, I tried out this new recipe for banana bread. Not only was it a recipe I’d never tried before but it also had an added component of a crumb topping. I adore crumb toppings; they’re sanctioned sugar additions to make a baked good even better.
Topping after baking
I’m used to crumb toppings having brown sugar for the streusel part but this had confectioners’ sugar instead so I was a little unsure how that was going to turn out. But my reservations were unfounded as it actually turned out well. Really well. The crumb topping crisped up nicely and made a perfect contrast to the quick bread itself. In fact, I liked the topping so much, I think I’ll have to use it again next time I make a quick bread. The banana bread itself had a nice soft crumb but was still dense enough to qualify as a quick bread. It isn’t as light and “cakey” as my go-to recipe but still had a good crumb and I enjoyed it. This is best served the day it’s made or no later than the day after as the moistness from the bananas, while good for the bread part, had a tendency to also moisten and soften the crumb topping so you lose the crispness after awhile.

I tested this version of banana bread out on my parents. They acknowledged that it was “good” but, in classic parental fashion, my mom followed up with “next time, make your other recipe”. Sigh. No toppling Goliath from that perch.
1 egg
1 cup sugar
1/2 cup unsalted butter, room temperature
1 teaspoon vanilla
1/2 cup buttermilk
2 overripe bananas, mashed
2 cups all-purpose flour
1/2 teaspoon salt
1/2 teaspoon baking soda
1 teaspoon baking powder
1 teaspoon cinnamon

Crumb Topping
1/2 cup confectioners' sugar
1/2 cup all-purpose flour
4 tablespoons unsalted butter, melted
1/2 teaspoon cinnamon
pinch of salt
  1. Preheat oven to 350 degrees F. Spray a loaf pan with nonstick cooking spray.
  2. In a large bowl of a mixer, fitted with a paddle attachment, beat together the sugar, egg and vanilla until combined. 
  3. Add the butter and beat until smooth and the butter is fully incorporated. Beat in the buttermilk and bananas.
  4. In a separate bowl, mix together the flour, salt, baking soda, baking powder and cinnamon. Slowly stir the dry ingredients into the wet until all the flour is incorporated. Pour into prepared pan.
  5. Make the crumb topping by combining the powdered sugar, flour, cinnamon salt and melted butter. Using your hands, crumble the mixture over the batter in the pan. Bake for 45 - 50 minutes or until a toothpick comes out clean.

Friday, June 12, 2015

Melting Moments

Melting Moments - made dough May 23, 2015, adapted from The Essential Chocolate Chip Cookbook by Elinor Klivans
Over Memorial Day weekend, I had plans that got canceled at the last minute which meant I ended up with some free time. Which translates into something to do with baked goods. In this case, I started mixing up cookie doughs, trying out recipes from my baking books and socking them away in the freezer for baking later when I might be more compressed for time and need something to bring somewhere. Because you know there’s always a sometime somewhere where I show up with goodie bags in hand or a cookie plate at the ready.
Which is why I love making cookie dough in my spare time (yeah, it’s a hobby). It’s like my inner Linus having a security blanket. Never will I be caught off guard when I need to bring dessert. All I need is a little notice and I can just pop these suckers in the oven. Near-instantaneous fresh cookies on demand.
The original recipe for these called for making a filling with chocolate chips. It does come from The Essential Chocolate Chip Cookbook after all. I decided to buck convention and sandwich them with – what else? – cookie butter. You can also use Nutella.
I did deviate from the original recipe in that while I did bake them at 300 degrees, I didn’t leave them in as long as 30 minutes. I didn’t want them to get dry and I only baked them until I could see a golden color peeking around the edges of the cookies.  It took maybe 15-18 minutes, tops. To dress them up a little, I made them into small dough balls then pressed the dough balls with the pointed end of a meat mallet to get the nice indents. Sprinkle lightly with granulated sugar then freeze. You want to press them to approximately the same thickness since, when you bake them on a cookie sheet, the thinner cookies will bake up faster than thicker cookies and you don’t want uneven baking.

Let them cool completely before sandwiching with the filling of your choice. Remember those Speculoos sandwich cookies from Trader Joe’s? These were kind of like that in terms of crispness and taste although these weren’t as richly buttery. But they’re good vanilla sandwich cookies and set up the filling quite nicely. Definitely a winner in the sandwich cookie category.
1/2 cup all-purpose flour
1/2 cup cake flour
3/4 cup cornstarch
1/2 teaspoon baking powder
1/4 teaspoon salt
3/4 cup (1 1/2 sticks) unsalted butter
3/4 cup powdered sugar
1 teaspoon vanilla extract or vanilla bean paste
Cookie butter or Nutella for filling
  1. Combine all-purpose flour, cake flour, cornstarch, baking powder and salt; whisk to combine.
  2. Cream together butter, powdered sugar and vanilla until smooth and creamy.
  3. Add dry ingredients in 2 batches, beating until just combined each time.
  4. Scoop into small balls and flatten with the pointed side of a meat mallet or the tines of a fork,
  5. Chill or freeze for several hours until firm.
  6. Preheat oven to 300 degrees F. Line a baking sheet with parchment paper and space cookies evenly.
  7. Bake until the tops feel firm and the cookie bottoms are lightly browned, about 30 minutes; the tops of the cookies should not color. 
  8. Cool the cookies on the baking sheets for 10 minutes then transfer to a wire rack to cool completely.
  9. Sandwich with cookie butter or nutella.


Thursday, June 11, 2015

Restaurant Review: Mayflower (dim sum)

Mayflower Seafood Restaurant - lunch on May 19, 2015

Just a quick write up on this one and I’ll let the (badly lit) pictures speak for themselves since I’ve written up dim sum restaurants before and while this was good, it was “normal” in that it didn’t particularly stand out. It was just good dim sum.
Sticky Rice wrapped in banana leaves
Fried Shrimp dumplings
One of my nieces graduated last month and my cousin Ellen attended the graduation ceremony with us and was nice enough to give me and my parents a ride back home as my sister was making the 4-hour drive back to her house directly afterwards. It was a Tuesday so we figured it would be a good time to go to Mayflower for dim sum.
Har Gow
My parents and I had tried going to Mayflower on a Sunday after church but it was ridiculously crowded with people overflowing outside of the restaurant. Ridiculous. It was much better on a weekday and we were able to get a table right away.
Siu Mai
Steamed Pork Buns
There were only 2 dim sum carts making the rounds but they did have several waitresses going to each table with a different tray of dim sum. Fortunately, all of our typical favorites were available: pork buns, siu mai, har gow and sticky rice. The dim sum was good so Mayflower is a good option. I don’t think it was so good that I would wait in line to get seated on a crowded weekend day but for walk in with immediate service, it was great.
Tofu-wrapped....something

Tuesday, June 9, 2015

Butterscotch Biscoff Pudding Cookies

Butterscotch Biscoff Pudding Cookies - made dough May 23, 2015 from Biscoff Cookie & Spread Cookbook by Katrina Bahl

If you like butterscotch and thick, chewy, chubby cookies, read on, Macduff. I’m still faithfully trying out recipes from my latest baking book before it inevitably gets lost in the plethora of other baking books on my overflowing shelves and I unintentionally forget I have it (alert: blatant first world problem). For now, I’ve marked up which recipes I really want to try from it and have been making my way through the post-its flagging the appropriate pages that need a second look. Think kid with new toy.

I liked how these cookies were pictured in the book with the kind of chubby factor I look for in a good cookie. Plus I had butterscotch chips to use. I did have to go out and hunt down butterscotch pudding mix since that’s not a regular in my pantry but fortunately it isn’t hard to find at the grocery store. I love pudding cookies because they almost inevitably stay thick and are moist.

This one was no exception. If I had to find fault with it – you know me and my picky taste buds – it’s that the cookie butter flavor disappeared almost entirely in the face of the butterscotch flavor. Butterscotch is a pretty dominant flavor and doesn’t share the stage well. In this case, it slapped the cookie butter to the back and kept it there. This is still a good cookie and I like the texture so I forgave it for the intrusion and dominance.
1 3.4-ounce package butterscotch pudding mix
2 1/2 cups all-purpose flour
1 teaspoon baking powder
1/2 cup butter, softened
1/2 cup creamy Biscoff spread
1/2 cup brown sugar, packed
1/4 cup granulated sugar
2 eggs
1 teaspoon vanilla
1 1/2 cups butterscotch chips
  1. Whisk together pudding mix, flour and baking powder; set aside.
  2. Cream butter, Biscoff spread, brown sugar and granulated sugar for 2 minutes until light and fluffy,
  3. Add eggs, one at a time, and vanilla, beating until just combined.
  4. Add dry ingredients in 3 batches, mixing only until just combined.
  5. Add butterscotch chips, reserving a handful. Scoop dough into golf-ball-size balls. Press several butterscotch chips on the outside. Freeze dough balls for several hours or overnight.
  6. When ready to bake, preheat oven to 350 degrees F.
  7. Line baking sheets with parchment paper and space dough balls evenly, 2 inches apart. Bake for 7-9 minutes. Let cool for several minutes on cookie sheet then transfer to wire rack to cool completely.