Sunday, June 7, 2015

Restaurant Review: Kincaid's

Kincaid's - dinner on May 18, 2015
My niece graduated from college last month (college! Where does the time go??) and we held her graduation dinner the night before the ceremony at Kincaid’s at Jack London Square. I’ve never been to Kincaid’s or if I have, it was so long ago that I have no memory of it. And it would have been back in the days when I wasn’t documenting every scrap of food I’ve ever eaten so it’s been at least 5-6 years, probably more.
View from our table
Warm Brie appetizer
She chose Kincaid’s because it was pretty, set on the water, there was parking available (always a big deal) and there was a varied enough menu that both sides of the family would be able to find something pleasing to their palates. Bring a hefty chunk of cash or a high limit credit card because Kincaid’s isn’t cheap. Just kidding…sort of. The average price of an entrée ranged from $40-$60. You can get slightly cheaper options but not by much.

I like the fact that they post their menu online so I can study it at my leisure and make my gustatory decisions ahead of time.  Because really, the few minutes you have with the menu when you’re also supposed to use that time to socialize and make a decision before the waitperson comes by to take your order? I put more thought into my food consumption than that. Because it’s not just about picking your entrée. There are side dish considerations as well. Soup? Salad? Appetizers? And for me, which dessert? You all know I build my entrée decision around what I’m having for dessert, right? Everyone always laughs at me when I say that and they think it’s “cute”. I’m serious here, people. Dessert is not to be taken lightly. It must be planned for and accommodated in that day’s calorie consumption and waistband room. Fail to plan, plan to fail.
Oysters
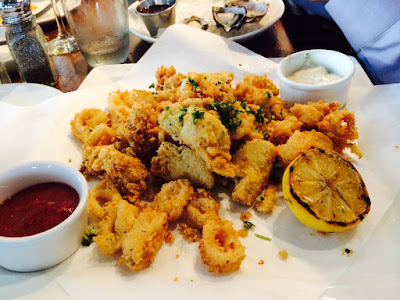
Calamari
Although Kincaid’s is a surf and turf sort of place, I’d already decided to skip the steak selections. I tend to eat (more than) my share of tri tip for lunch at work when I get a salad which is almost every day. The tri tip has to have something to sit on, after all. So for dinner, I went with the barbecue ribs, partly because it was a different meat but mostly because it came with mac and cheese and sweet potato fries. Carb heaven.
BBQ ribs and sweet potato fries
Mac and Cheese
Which they were. I never (rarely?) make mac and cheese, both because I don’t really cook but also because I know how bad it is for you. But it tastes so good, especially when it’s good mac and cheese which this one was. And you can’t go wrong with sweet potato fries. I had to pace myself because I still had dessert in mind so I ate less than half the ribs, half the mac and cheese and a good portion of the sweet potato fries. Because the fries wouldn’t be as good the next day, you know, so they should be consumed more on the day of.
Stuffed catfish
Half of a surf 'n turf split between two plates
For dessert, I waffled between the Bananas Foster Sundae and the chocolate cake. Chocolate cake is common and vastly overdone at every single restaurant that offers it but still….I mean, it’s chocolate cake. Covered in hot fudge sauce. I was severely tempted by the Bananas Foster Sundae since it’s a less typical dessert and I bet would have made for a lovely picture for my blog. But in the end the chocolate cake won, mostly because I was more full from my entrée than I had wanted to be and the sundae came with waffles which sounded just a mite too heavy to me at that point in time. But the chocolate cake was layered with mousse and frosting and you can pour as much or as little (or as much) chocolate sauce as you wanted over it. It was practically light compared to waffles. It was the right choice because it was good but I have to admit, I couldn’t do it justice as I really was full. So much for planning ahead.  
Key Lime Pie for the new grad
Pouring chocolate sauce on the cake
Service was great and our wait person was very nice. Kincaid's is definitely a good choice for celebrating a graduation, especially when you have a large party. They know how to take care of you.

Saturday, June 6, 2015

Caramelized Banana Nutella Puff Pastry

Caramelized Banana Nutella Puff Pastry - made May 23, 2015
If you ever want to serve a quick and easy dessert that looks like you spent some time on it, grab some puff pastry. The kind in the grocery store freezer section that’s premade so all you have to do is thaw and unroll them. They bake up flaky and delicious so you could almost pretend you slaved away in the kitchen to get the right texture and flakiness. Having made flaky pastry dough from scratch in my culinary past, the pre-made stuff doesn’t taste as good but given how much easier it is, I’m not turning up my nose at the convenience.
Otherwise, to get the same type of flaky pastry from scratch, you have to make the dough and roll it into a large rectangle, beat and shape a ton of butter into a smaller rectangular slab, lay it over the dough, fold the dough over it and seal the butter inside, then, using a sheeter, roll out the butter-encased dough, fold it again, roll it again, fold it again, roll it again and so on until you have multiple thin layers of butter and dough folded and rolled multiple times. If you don’t have a sheeter, you can roll it out by hand but that’s even more time and effort. Trust me, unless you’ve got reams of time and finicky guests (I have neither) it’s easier to buy the sheets of puff pastry as the building block for your dessert.
I normally don’t bake with puff pastry, even the premade stuff because it’s so calorie intensive (hello, lots of butter). The flakier it is, the more butter it has. Not that there’s anything wrong with that because it isn’t like I actually bake anything low calorie anyway. But I don’t love it enough to take on that calorie heft very often. But once in awhile is okay and I happened to be in the mood for something decadent, preferably with bananas and Nutella, a first-rate combination in my book.
I also had some pastry cream in the freezer that I had made and put away for a future dessert. I thawed the pastry cream and the puff pastry, cut the pastry into squares, placed the squares into shallow tart pans to give the middle a bit of an indent, lined the bottom with the pastry cream, placed sliced bananas over the pastry cream then sprinkled butter and brown sugar streusel on top. Bake until the pastry is puffed and brown then drizzle with warm Nutella. Quick, easy, delicious.
If you want to make this even easier, you can skip the pastry cream and just increase the bananas and streusel topping but I happen to love pastry cream (too much so) and thought the creamy texture went well with the flaky pastry, the caramelized bananas and the warm Nutella. And I'm not one for custard-y desserts unless it's made with the CIA recipe for pastry cream.
1 sheet frozen puffy pastry dough, thawed
1-2 large, ripe (but not overripe) bananas, sliced into thick rounds
1 1/2 cups pastry cream, more if desired
¼ cup brown sugar
2 tablespoons butter, chilled and cubed
1 tablespoon flour
½ cup Nutella, more if desired
  1. Preheat oven to 400 degrees F.
  2. Line spray individual tart pans with nonstick cooking spray. Cut puff pastry sheet into 3 columns then cut each column into 3 squares. Place in prepared tart pans and press middles into bottom of pans to create a concave shell.
  3. Spoon pastry cream into bottom of shells, dividing evenly. Place a layer of sliced bananas over pastry cream.
  4. Combine brown sugar, chilled butter cubes and flour in small bowl and mix together until you have a crumbly streusel. Sprinkle over tops of bananas.
  5. Bake until puff pastry is golden brown and streusel topping has melted and browned, 15-20 minutes. Remove from oven and drizzle warm Nutella over top of tarts. Serve immediately.

Thursday, June 4, 2015

Bakery Review: Vienna Bakery

Vienna Bakery - visited June 22, 2014
Yet another blog post I’ve been meaning to put up for almost a year. A year, people. The reason I know it’s been almost a year is at the time I set up the post in draft form, I noted the date I had visited Vienna Bakery in anticipation of the write up I was going to do. Plus this was around the time when I was taste testing different bakeries to see where we could order the cake for my dad’s 75th birthday. In case you missed it, we didn’t go with Vienna Bakery.
I had high hopes when I walked in. The place had been recommended by a friend who had tried their sister bakery in another location. The place looked cute inside and had a bunch of mouthwatering looking cakes and other baked goods in the display cases. Lots of picture worthy treats on display to fulfill my olfactory senses. And the counter people were very nice.

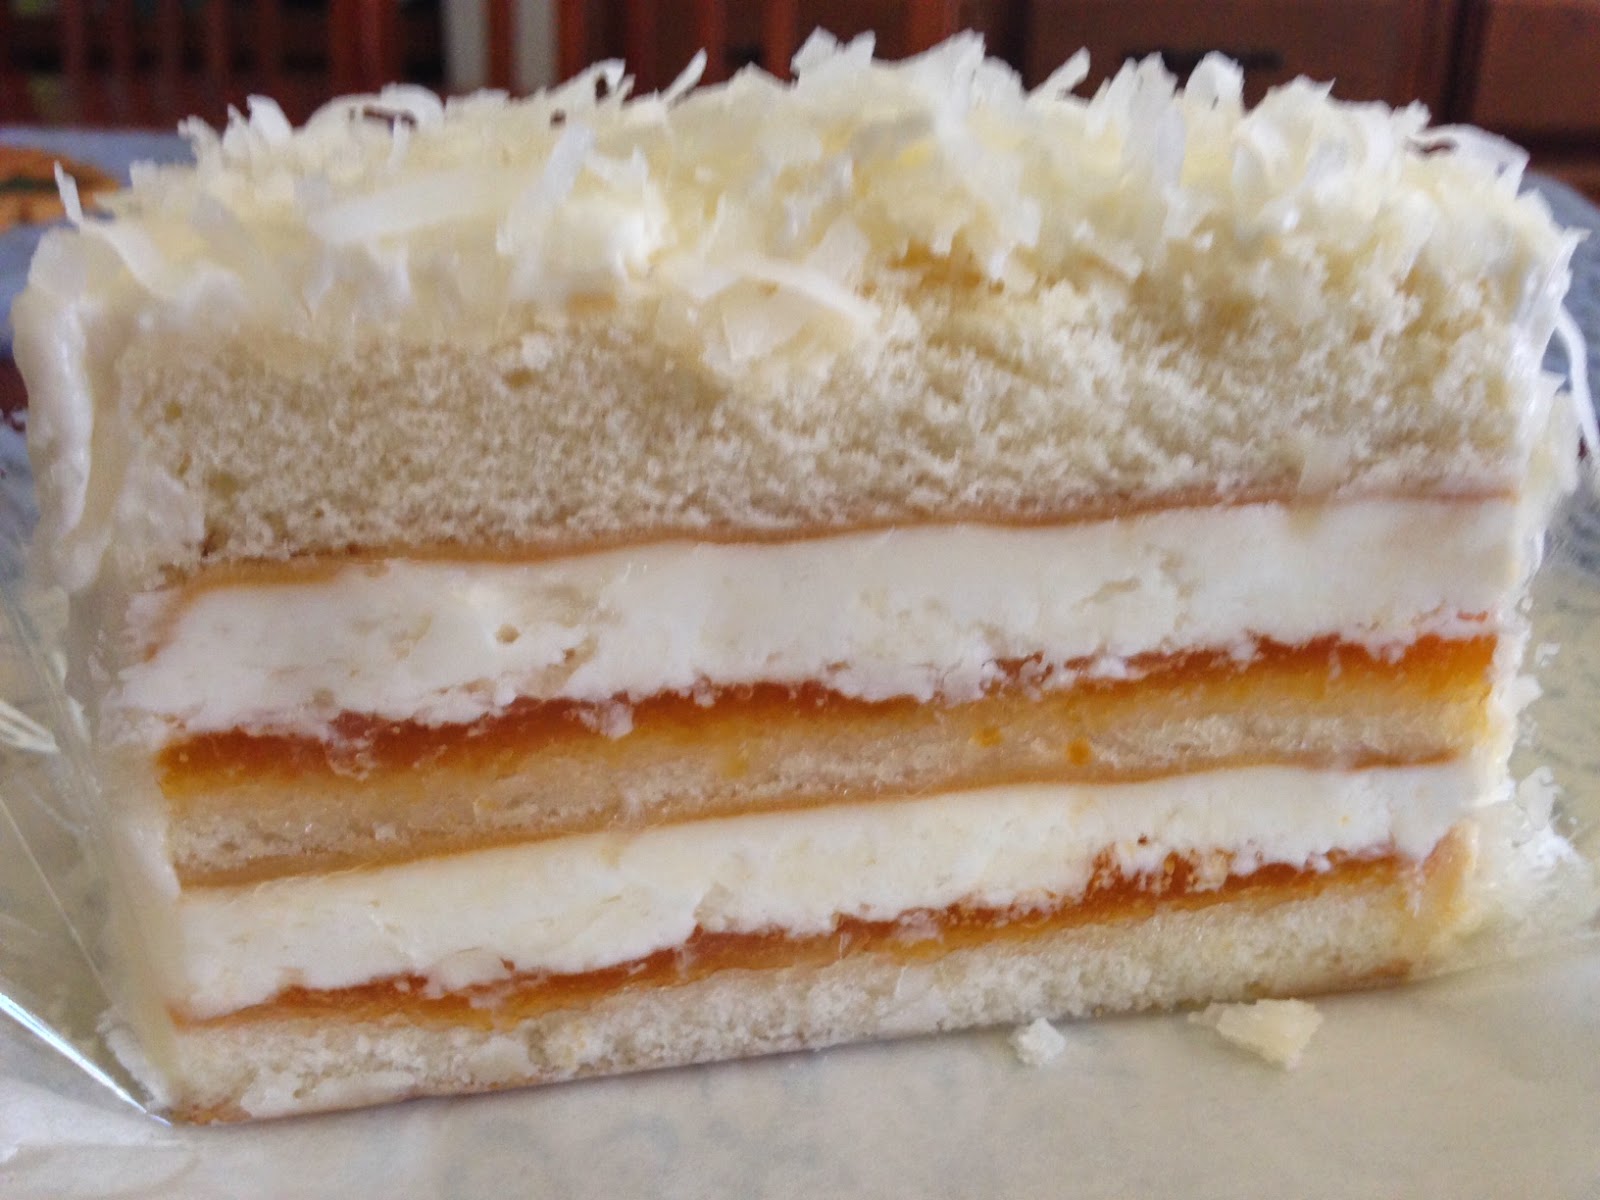
For the taste test, I went with a slice of vanilla coconut cake, thinking it would suit my parents’ taste buds. Okay and my own as well. There was one slice left in the display cake and was carefully wrapped to protect the cut edges, always a nice touch since we know how drying refrigeration can be on cakes. Unfortunately, this slice proved it. I don’t know how long it had been in the refrigerated case before I bought it but plastic protection notwithstanding, this cake was dry. Seriously, bone dry. Which you know is a sin in my baking book.

I think that was another reason why I didn’t blog about Vienna Bakery at the time. I didn’t want to give it a bad review based on one product so I had intended to go back another time and try something else in the hopes that I would find something more to my liking so I could give a more balanced review. Alas, nearly a year later, we know I never made a return visit. Not necessarily because the cake was so bad and I swore never to try another thing from the bakery again but because I’m only in that area on weekends and I just never got around to going back. Although it probably didn’t help that the cake I tried wasn’t very good. If it had been, I would’ve made more of an effort to return.


So take this review with a grain of salt. I’ve tried one thing there and didn’t like it. That doesn’t mean they don’t have other baked goods that are delicious but unfortunately that wasn’t what I ended up with. It does point to the perils of holding onto baked cakes for too long though. If they had one shot to make a good impression, they missed it by selling me this dry cake.


Tuesday, June 2, 2015

Sour Cream Lemon Pound Cake

Sour Cream Lemon Pound Cake - made May 25, 2015 from Goodies by Anna
It’s out of season for lemons but try telling that to my lemon tree. It doesn’t listen to me either when I also tell it it’s supposed to be a dwarf lemon tree. When the tallest branches hit 9 feet, I prune it to take it down a notch. But I generally leave the blossoms and lemons alone. If it wants to produce when I don’t expect it to, nothing to be done about it but snip the lemons when they’re nice and yellow.

A couple of weeks ago, it actually yielded a couple of really big lemons. Actually there were three but one fell before I could get to it so I didn’t want to take any more chances and harvested the other two. I had some sour cream to use up and having lemons and sour cream just cried out for a pound cake. Pinterest to the rescue and I found this luscious looking lemon sour cream bundt cake. Honestly, it was the beautiful glaze work that sucked me into making the cake. Click on the blog title to take you to the original recipe and you'll see what I mean.
So it was unfortunate that my glaze work was a far, far, far cry from the original. Sigh. I actually wonder if the picture matched the recipe because the recipe calls for including lemon zest in the glaze but in the picture, I don’t see any zest. Zest provides wonderful flavor but it does prevent having a smooth glaze like the picture. So maybe my glazed cake isn’t as pretty as the original blog's picture but it is a more faithful rendition of the recipe, lol.
Overall, this was a good lemon pound cake. I ran short on lemons so I didn’t have enough to make the lemon simple syrup but I think I got good lemon flavor from the zest, juice and extract in the batter and from the zest and juice in the glaze. This is a nice summer picnic cake if any of those are coming up on the horizon. The only caution is I found this difficult to get out of the bundt pan intact (as I’m sure you can tell). The outside was a bit crusty which is a sign that beating the batter after the eggs were added contributed to a meringue-like crust which crumbled and clung to the pan. So you might want to make sure you generously grease your Bundt pan and use a nonstick pan.
3 cups all-purpose flour
1/2 teaspoon baking powder
1/4 teaspoon baking soda
1/2 teaspoon salt
1 cup (2 sticks) unsalted butter
3 cups granulated sugar
6 large eggs
1 teaspoon vanilla extract
1 teaspoon lemon extract
grated zest of 2 lemons
1 cup sour cream
1/4 cup fresh lemon juice

Lemon Simple Syrup
1 cup fresh lemon juice
2/3 cup granulated sugar
1/4 cup water
zest of 1 lemon
1/2 teaspoon lemon extract

Lemon Glaze
lemon juice
1/2 teaspoon lemon extract
powdered sugar

  1. Spray a 12-cup Bundt pay with nonstick cooking spray; set aside. Preheat oven to 325 degrees F.
  2. In a large bowl, whisk together flour, baking powder, baking soda and salt.
  3. In the bowl of an electric mixer fitted with a paddle attachment, beat together the butter and sugar until fluffy. Beat in the eggs, one at a time, until incorporated.
  4. Beat in the extracts and zest.
  5. On low speed, alternately add the flour and sour cream in 3 additions. Beat in the lemon juice until batter is smooth. Spread batter evenly in the pan and bake for 1 hour to 1 hour and 15 minutes or until a toothpick inserted near the center comes out clean.
  6. Lemon simple syrup: while cake is baking, combine lemon juice, sugar, water, zest and lemon extract in a small saucepan set over medium high heat. Bring mixture to a boil and cook until reduced down to approximately 1/2 cup of syrup, around 15 minutes. Let syrup cool before brushing onto warm cake.
  7. Poke holes into cake while still warm from the oven. Brush liberally with lemon simple syrup. Let cake cool for 15 minutes then invert cake onto cooling rack. Poke holes into top of cake and brush liberally with more simple syrup. Let cake cool completely on wire rack.
  8. Lemon Glaze: While cake is cooling on a rack, in a small bowl, add lemon juice a tablespoon at a time to 1 cup of powdered sugar until a thick glaze comes together. Add lemon extract. Drizzle glaze over cooled cake. Let glaze set up for 10 minutes before cutting and serving. Store in airtight container.

Sunday, May 31, 2015

Tcho Chocolate

Tcho Chocolate - visited factory store on March 3, 2014
I’ve had these pictures for well over a year but never got around to blogging them until now. My niece and I had spent a day in San Francisco and part of our 10+ miles of walking around the city included stumbling upon the warehouse building at the pier that housed Tcho Chocolate’s factory store. I’d heard of Tcho Chocolate before this but even if I hadn’t, let’s face it, I would have wanted to go in anyway.
There were industrial-looking wire shelves that held an assortment of various Tcho Chocolate products available for purchase, a little table where you could try out some samples (bonus!) and a larger, roped off part of the warehouse structure that looked like it was where they made at least some of the chocolate. I wasn’t sure though as at the time, that section was closed off and we weren’t there at the time when they offered tours. Actually, I think we caught them at the tail end of their San Francisco location as, according to their website, their new production facility and factory store moved to Berkeley last year, shortly after we were at this San Francisco location.

I first sampled Tcho when I ordered from Treatsie. They billed themselves as “New American Chocolate”. I just wanted to buy their product and support them because they were local in the Bay Area. Plus, and more importantly, they focus on Fair Trade and even “beyond Fair Trade”. If you check out their FAQs on their website, it tells you more about that. But having once spent a week in the jungles of Belize learning about cacao production and meeting a local cacao farmer, it’s sensitized me a lot more about buying Fair Trade chocolate.

As much as I like chocolate, it might sound funny for me to say I don’t eat as much of it in pure chocolate bar form as you might think. Probably because I bake a lot and know so much more can be done with chocolate than unwrapping and consuming a chocolate bar. I’ve tried their cocoa powder, their chocolate “wafers” that I’ve melted and used for baking in cookies, cakes and brownies and yes, their chocolate candy bar form. I thought they were all good. I’m not sure I can pick it out in a blind taste test amongst a bunch of like-caliber chocolate but Tcho holds its own in terms of taste and quality. They’re still not as widely available as other brands of chocolate but they’re available online and, if I look hard enough, I can also find them locally, mostly at Whole Foods.

Saturday, May 30, 2015

Soft Chocolate Peanut Butter Cup Cookies

Soft Chocolate Peanut Butter Cup Cookies - made dough May 16, 2015 from Crazy for Crust
The only reason I made these cookies is so I could use those mini peanut butter cups from Trader Joe’s. It isn’t like I love peanut butter cups either because I could take or leave them. Usually I leave them. But these mini ones are cute and I pick up a package once in awhile because I know I want to make some kind of cute cookie with them. That’s pretty much all it takes for me to try out a new cookie recipe.

These are literally chocolate cookies with peanut butter cups in them. Not to be confused with a chocolate peanut butter cookie or a peanut butter cookie with chocolate in it. Nope, it’s a chocolate cookie that contains peanut butter cups. Which means if you’re indifferent to peanut butter but don’t mind it, this is fine because it’s also a good chocolate cookie. Soft, chewy, chocolaty. I gave my nieces a goodie bag of them and one said she inhaled two. While already full from dinner. Let’s hear it for millennials and metabolism.


If you like cookies that bake up thicker, as always, portion the cookie dough into dough balls and freeze them for at least several hours before baking. I also like to hold back some of the mini peanut butter cups when I make the dough and when I portion into dough balls, I press the mini peanut butter cups on the outside so they’re more prominent rather than hiding within the dough. If you don’t have access to mini peanut butter cups, you can use regular-sized peanut butter cups and just cut into chunks. If you want a pure chocolate cookie with nothing to interfere with chocolaty goodness, you can leave off the peanut butter cups, mini or otherwise, and just use chocolate chips. They won’t look as cute though but chocolate is chocolate after all.


1/2 cup unsalted butter, softened
2/3 cup packed brown sugar
1/4 cup granulated sugar
1 teaspoon vanilla extract
1 egg
2 tablespoons cocoa powder
1 box (3.4 - 3.9 ounces) instance chocolate pudding mix (not sugar-free)
1 cup all-purpose flour
1/2 teaspoon baking soda
1/4 teaspoon salt
1 tablespoon cold brewed coffee or water
1 1/2 cups mini peanut butter cups plus more for garnish
  1. Cream butter and both sugars in a stand mixer fitted with the paddle attachment. Mix in vanilla and egg. Add cocoa powder and dry pudding mix; mix until smooth,
  2. Whisk together flour, baking soda and salt. Add dry ingredients and coffee or water to the creamed butter mixture and mix until just combined.
  3. Add mini peanut butter cups to cookie dough and fold in. Scoop dough into golf-ball=size dough balls, pressing mini peanut butter cups on the outside, cover and chill or freeze for several hours or overnight.
  4. Preheat oven to 350 degrees F. Line 2 baking sheets with parchment paper.
  5. Bake 11-12 minutes or until middles no longer look wet and edges are done. Cool cookies on cookie sheet for 5 minutes then transfer to wire rack to cool completely.

Friday, May 29, 2015

Restaurant Review: Newark Buffet

Newark Buffet - lunch on April 29, 2014 (that's not a typo, I'm just really overdue on posting this)
I’m clearing out all the old blog posts that I’ve had in “draft” status for months now, including this one for Newark Buffet. It's been so long I almost forgot I hadn't written it up before. I don’t go here that often because I’m rarely in that area during the week and their weekend buffet prices are higher so my parents and I don’t go there for our post-church Sunday lunches.

The last time I was there when I took these pictures is when I had a day off and my mom and I were flying back from visiting my sister. We landed near the middle of the day and met my dad for lunch. It’s very similar to World Gourmet in that it has a lot of selections, it’s “good enough” food for a buffet but I wouldn’t consider it haute cuisine. 

My buffet experiences are mostly around finding a few dishes I like and consuming normal portions of those. I’m not one to pile a lot of different foods on my plate since my palate is not that adventurous nor can I consume a lot of food in one sitting. I’m more of a snack-throughout-the-day kind of person than a 3 big-meals-a-day sort. So it’s safe to say my ROI on a buffet is on the low end of the investment spectrum.

Still, my parents like to go to them for simplicity and the variety of dishes offered and I can usually consume enough to make the $9.99 price tag for lunch sufficiently worth it. I think this is average, on par with World Gourmet. If you’re looking for French Laundry, this isn’t it. If you’re looking for a reasonably-priced place to bring a large group and you don’t want to worry about picky eaters starving (anyone can find something to eat at a buffet), then this is a decent choice.