Saturday, November 2, 2013

Chocolate Butterscotch Bars

Chocolate Butterscotch Bars - made October 18, 2013, modified from Chocolate Ecstasy by Christine France
Um, can we say "fail" on this one?  I've had this recipe for awhile and kept wanting to make it but putting it off because I always forgot to buy hazelnuts which is what the original recipe called for. I finally got tired of procrastinating and substituted macadamia nuts for the hazelnuts so I could go ahead with it.

The crust was easy enough although it never really formed a dough but remained dry crumbles, like a shortbread crust for my usual lemon bar recipe.  Undaunted, I patted it into a tart layer anyway and went with it. Then I got started on the topping and that's pretty much where the baking gods decided to forsake me and throw me into the failure pile.  For one thing, the directions were a bit sparse in terms of how long to cook the topping to get to "golden".  For another, when your topping ingredients are all pretty pale in color to start with (butter, granulated sugar, LIGHT corn syrup and condensed milk), yeah, golden is subjective.
So you can imagine what happened next.  I'm cooking it over the stove top, whisking away, waiting for that perfect golden moment.  It never happened.  Or if it did, it shot straight from "golden" to "butter separating out, haha, nothing you can do about it" in the blink of an eye.  Butter separating out in a mixture like this means I had the heat too high and I cooked the mixture for too long.  It can usually be fixed by lowering the heat, adding a little cream and whisking to emulsify the butter back into the mixture.  Except I didn't have any cream at the time and adding milk didn't work because by then, I think the butter had decided it was all or nothing in heading for the failure pile and gave me the finger. 
Plan B: throw away the topping failure, melt an 11-ounce bag of caramel bits with a little milk, add the macadamia nuts, pour over the tart crust and forge ahead.  Which is what I did.  So I was able to salvage this so it wasn't a total lost cause but it's not going onto my Baking Hall of Fame wall either. The crust wasn't sweet enough to eat on its own and ironically, paired well with the caramel layer because of it. The dark chocolate topping was also a good complement to the caramel.  So taken all together, this was a decent cookie, especially if you don't have much of a sweet tooth and prefer dark chocolate over sugar.  I don't so it's not something I'd make again....even if I could make the original topping properly.
2 cups all-purpose flour
½ teaspoon baking powder
½ cup unsalted butter
1/3 cup light brown sugar
5 ounces unsweetened chocolate, melted
2 tablespoons ground almonds

Topping
¾ cup unsalted butter
½ cup superfine sugar
2 tablespoons light corn syrup
¾ cup condensed milk
1 ¼ cups toasted whole macadamia nuts
8 ounces semisweet chocolate, broken into squares
  1. Preheat the oven to 325°F. Lightly grease a shallow 12 x 8” baking pan. Sift the flour and baking powder into a large bowl.
  2. Rub in the butter until the mixture resembles coarse bread crumbs, then stir in the sugar. Work in the melted chocolate and almonds to make a light dough.
  3. Press the dough evenly into the prepared pan, prick the surface with a fork and bake for 25-30 minutes until firm. Leave to cool in the pan.
  4. Make the topping: Mix the butter, sugar, corn syrup and condensed milk in a pan. Heat gently, stirring, until the butter and sugar have melted. Simmer, stirring occasionally, until golden, then stir in the toasted hazelnuts.
  5. Pour the topping over the base and set aside.
  6. Melt the chocolate in heatproof bowl over hot water. Spread evenly over the butterscotch layer, then let cool again before cutting into bars to serve.

Thursday, October 31, 2013

Rolo Fudge Cookies

Rolo Fudge Cookies - made October 19, 2013 from Roxana's Home Baking
Around this time of year is usually when I'm making things that use up Halloween candy.  Either what you fish out of your kids' Halloween spoils or what you can buy on sale post-October 31.  If you've got some extra Rolos hanging around after tonight's candy gathering, here's one use for them: make a chocolate cookie dough and wrap it around a Rolo.  Then bake into a caramel fudge cookie.

With the ingredients in this recipe, i.e. a relatively high amount of chocolate chips and a low amount of flour, I expected the dough for this would be soft. Since the chocolate comes from chocolate chips, it stands to reason that after it melts and cools, it'll set close to its original solid form, even with the addition of butter, sugar and eggs.  So I wasn't too concerned after I mixed the ingredients that the dough was more like a batter.  I chilled it briefly but I was a little short on time so I probably made the dough balls a little too soon.  The dough was still really soft so it was a little hard to handle neatly and wrap around a Rolo.
My original plan was to form the dough around one Rolo per cookie and in an ideal cookie-baking world, the chocolate cookie wouldn't flatten too much and the Rolo would remain perfectly in the middle so when you bit into it, there would be free-flowing caramel amidst a fudgy cookie.  In the real world, because the dough was still too soft when I incorporated the Rolos into it, in some cookies, the Rolos were really off-center once the cookies baked.  Fortunately, the taste was still the same.  The cookies did flatten a little more than I wanted but they had a good fudgy texture and flavor.

If you read the original recipe below, you'll notice it calls for using chopped up Rolos and caramels and simply adding them to the finished batter then scooping them out.  No need to do any wrapping around whole Rolos.  That would probably be the easier and better way to go.
8 oz (224 grams) chocolate chips
3 tbsp (42 grams) butter
1/2 cup (100 grams) brown sugar
2 eggs
1 teaspoon vanilla extract
1/3 cup (40 grams) all purpose flour
1/4 tsp baking powder
pinch of salt
1 cup chopped rolos and caramels (I just used the regular-size whole Rolos but minis or chopped Rolos might've been better)
  1. Heat the oven to 350F. Line two baking sheets with parchment paper.
  2. In a microwave safe bowl add the chocolate chips and butter and heat until melted (about 1 minutes) stirring to combined and smooth. You can also melt the chocolate and butter in a heatproof bowl set over a pot of simmering water.
  3. In a mixing bowl beat the eggs and sugar until start to thicken and they have a pale color.
  4. With the paddle attachment on, at low-to-medium speed, pour the melted chocolate over the sweetened eggs. It's important to keep mixing while you add the chocolate to prevent the eggs from cooking. Add vanilla extract and mix.
  5. Add the flour, baking powder and salt. Stir until combined.
  6. With a spatula, fold in the chocolate caramels.
  7. Chill the dough for 1 hour or until hard enough to handle.
  8. With a small scoop, place balls of cookie dough on the prepared baking sheets.
  9. Bake in preheated oven for about 11 minutes.
  10. Let cool for about 10 minutes on baking sheets before transferring them to cookie racks to cool completely.

Wednesday, October 30, 2013

Restaurant Review: Birk's

Birk's - lunch on October 9, 2013, dinner on October 21, 2013
Birk's is a bit oddly located in that it's literally on the ground floor of an office building in an office park.  According to its website, it's been open since 1989 so it definitely has staying power in a restaurant industry known for its high failure rate.  But Birk's seems to have found itself a good niche.  Not surprisingly because of its location, it seems to cater mostly to a business crowd and business travelers to the Silicon Valley.
It's a good place to go for a work lunch and/or team dinner as it has a variety of entrees and the slightly higher price points are still within travel expense guidelines for most companies. You can get steak, chops, seafood, and even a vegetarian dish or two which makes it a logical choice when you're dining with a group and everyone has different tastes.
I took a coworker there who had never been before and we went for lunch.  One of the cheapest items on Birk's lunch menu is their Wood-Grilled Burger with cole slaw and fries for $12 (extra if you want cheese, mushrooms, crab, lobster, avocado, etc). But beyond the value, it's also a really good burger and the portion is pretty sizable.  I opted out of the cole slaw which means they piled on the fries because there was room on the plate.  It was food-coma inducing but really good.  Sadly though, it meant neither of us had room for dessert.
By coincidence however, shortly after, one of my work groups went there for a team dinner so I got to dine at Birk's for a second time in a month after not having been there in over a year. No complaints here.
Carpaccio Filet Mignon
Fried Calamari
I'll let the pictures speak for themselves but we enjoyed a few appetizers that were all nicely plated and rather tasty.  I don't eat calamari so I skipped that but enjoyed the shrimp a lot.  That cute little bundle wrapped in white netting below and tied with a green ribbon is half a lemon, packaged up so you could squeeze the juice over the shrimp without seeds falling or worrying the lemon will squirt someone in the eye.  Clever.
Olive Oil Poached Shrimp
For dinner, I choose the Angus steak with truffle fries.  In case you were wondering, they had me at "fries". The steak was good although not as tender as others I've had. But still tasty.
New York Angus Steak with Truffle Fries
And of course there was dessert.  We ordered 2 dessert samplers for the table to share. The dessert sampler included White Chocolate Cheesecake, Chocolate Espresso Fudge Cake, Vanilla Creme Brulee and sorbet of the day.  I tried a bite of the fudge cake and a small spoonful of the creme brulee but had no interest in (or room for) the cheesecake or sorbet.
Dessert Sampler
But does it come as any surprise that I also ordered my own dessert of Pumpkin Bread Pudding?  It was a seasonal special and I offered it to the others to share (really!) although I probably made the most headway into it.  It was delicious. I like pumpkin but I don't necessarily love it and I'm okay with eating it mostly in the fall when it seems to be the season for it. But I love bread pudding and this was no exception.  They had some fancy chocolate decoration on top of it and I tried a bit but it didn't hold my interest against the pumpkin bread pudding.  It was perfectly made and although I probably could've done without the chocolate sauce on it, it was still good.  I couldn't finish it (too full by then) but I did my best and came close.
Pumpkin Bread Pudding


Tuesday, October 29, 2013

Baked Sweet and Sour Chicken

Baked Sweet and Sour Chicken - made October 12, 2013 from The Recipe Critic
Here's another easy recipe to throw together for a quick weeknight meal when you're pressed for time.  Or, if you're like me and very little about cooking is quick or easy, you make it on a weekend, baffle yourself on what a mess you make while putting together a simple chicken dish and be glad you have time to clean it all up.  Actually, this really would've been quick and easy if I hadn't done the dip into egg, roll in flour, fry until golden steps before baking with the sauce.  As it was, I only had the patience to go through one egg and a third of the chicken pieces before I got bored/tired of the dipping, rolling and frying and just threw the rest of the chicken pieces into the pan and did a quick stir fry.  Hey, once you cover with the sauce and bake, you can hardly tell the difference between the properly done ones and the "I don't want to cook anymore" pieces.

Once the chicken was fried (however you do it), the rest of the recipe was easy.  Mix together the sauce ingredients, pour into the pan with the chicken and bake. I liked this recipe.  The sauce was a good blend of sweet and sour but wasn't thick or goopy like some sauces are.  Pair with brown rice and you're good to go.
3-4 boneless, skinless chicken breasts (I used chicken breast tenderloins)
Salt and pepper to taste
1½ cups cornstarch
3 eggs, beaten
¼ cup canola oil
1 cup granulated sugar
4 tablespoons ketchup
¼ cup white vinegar
¼ cup apple cider vinegar
1 tablespoon low sodium soy sauce
1 teaspoon garlic salt
Green onions, tops cut into pieces, optional
  1. Preheat oven to 325 degrees. Cut chicken breasts into bite-sized pieces and season with salt and pepper.
  2. In separate bowls, place cornstarch and slightly beaten eggs. Dip chicken into cornstarch then coat in egg mixture.
  3. Heat canola oil in a large skillet over medium-high heat and cook chicken until browned. Place the chicken in a 9 x 13 greased baking dish.
  4. In a medium sized mixing bowl, combine sugar, ketchup, apple cider vinegar, white vinegar, soy sauce, and garlic salt. Pour over chicken and bake for 1 hour.
  5. Stir the chicken every 15 minutes to coat them in the sauce.  Garnish with green onions if desired.

Sunday, October 27, 2013

Pumpkin Spice Cake with Caramel Pecan Glaze

Pumpkin Spice Cake with Caramel Pecan Glaze - made October 12, 2013 from Heather Christo
Everywhere I turn on pinterest, I'm seeing all sorts of pumpkin desserts sprout up.  And, being sadly lagging on the blogosphere calendar, I'm finally making a pumpkin cake I pinned awhile back but never got to until now.  The pictures on Heather Christo's blog are mouthwatering and seemed like the perfect autumn dessert with both pumpkin and toasted pecans, not to mention caramel. Caramel.  Sigh.
Although unfortunately, when I was making this cake, I was short on time to make the caramel from scratch so I ended up cheating and topping it with the salted caramel from Trader Joe's. I know, total cheater, right?  It also didn't work as well as I wanted either.  I spread the caramel while the cake was still a little warm.  It looked fine at first but ultimately it absorbed into the cake itself so I was left with a plain-looking cake with random pecans stuck on it and darker colored patches where the caramel once lay.  Oops.

Fortunately, however, despite its appearance, this made a good cake.  It had a nice fluffy texture and a good pumpkin flavor.  I left the original caramel recipe below for anyone who wants to make it from scratch but I think to make the frosting stand out a little more, I'd try making a caramel buttercream for it instead.  Or just use more caramel like the original recipe seemed like it did.
¾ cup butter, room temperature
1 ½ cups white sugar
3 eggs
1 ¼ cups pumpkin puree
3 cups flour

1 teaspoon baking powder
1 teaspoon baking soda
½ teaspoon salt
1 teaspoon cardamom (I omitted)
2 teaspoons cinnamon
½ teaspoon nutmeg
½ teaspoon ginger
1 cup buttermilk

Caramel Pecan Glaze
1 cup sugar
½ cup cream
2 tablespoons butter
½ cup toasted pecans, chopped
  1. Preheat the oven to 350 degrees. Place a bundt cake pan on a baking sheet and generously grease it with baking spray.
  2. For the Pumpkin Spice Cake: 
In the bowl of a standing mixer, beat the sugar and butter together until light and fluffy. Add the eggs and beat to combine. Add the pumpkin and combine well.
  3. In a separate bowl add the flour, baking powder, baking soda, salt and spices and sift them all together. Add half of the flour mixture to the batter, and then half of the buttermilk. Combine completely and then add the rest of the flour and the rest of the buttermilk. Mix the batter until it is completely combined.
  4. Pour the batter into the bundt cake pan. Bake the cake for about 45 minutes or until a toothpick inserted in the center comes out clean.
  5. Remove the cake from the oven and let it cool on a rack almost completely before turning out onto a cake platter.
  6. When the cake has been turned out onto the platter, then make the caramel pecan topping.
  7. In a medium sized pan over medium heat add the sugar. When it starts to turn golden around the edges, reduce the heat to low and begin to stir until all the sugar has melted. Add the butter and the cream and stir constantly over low heat until you have a smooth caramel sauce- this may take up to 10 minutes.
  8. Add the pecans and immediately stir and pour over the top of the pumpkin spice bundt cake.
  9.  


Restaurant Review: Maggiano's

Maggiano's - dinner on October 10, 2013
I met my friend Jeannie for dinner one night and we chose to go to Maggiano's.  Jeannie and I usually meet at either Maggiano's or Cheesecake Factory, both of us primarily driven by the dessert menus.  There are worse criteria to use when picking a restaurant.
Inside Maggiano's
It also helps that our local Maggiano's is in a mall so there's always shopping that can be done before or after dinner.  Actually, before dinner is probably a better idea before we do all that carbo loading at dinner.
Warm bread with oil & vinegar
If you've ever eaten at Maggiano's, you know it's wise to order a half portion instead of a full portion.  The full portion of most of their pasta dishes doesn't cost much more but it'll probably feed you for a good week or more after.  Even a half order feeds me for at least 3 more meals after the initial one.  I remember the first time I had gone to Maggiano's and, not realizing how big their portions were, I ordered a full order, thinking it was no big deal since I would eat the leftovers later anyway and save myself some cooking.  Ha.  I think I was eating pasta for almost two weeks after that.  From then on, half orders were the way to go.
Lobster Carbonara
My regular order is their Chicken Pesto Pasta.  I hadn't been to Maggiano's in awhile so I was surprised to find it was no longer on the menu.  However, when I asked about it, our waiter assured me it could still be made to order.  I asked for it with angel hair pasta since I prefer the thinner noodles but when it came out, they had mistakenly made it with fettuccine.  Not a big deal since pasta is pasta but the manager did come over and apologize for the mistake which I thought was nice of them.  But seriously, not a big deal. I love pesto and they make it with a light broth rather than a cream sauce.
Chicken Pesto Pasta with pine nuts
I managed to eat sparingly, not because I was exerting willpower, but because I was consciously leaving room for dessert - which should surprise absolutely no one who's ever read my blog. There are only two desserts I ever get at Maggiano's and that's their Apple Crostada and Nonna's Pound Cake with bruleed bananas.  The Apple Crostada is a dessert my friend Pauline got me hooked on when Maggiano's first opened in our area.  It's basically a warm, smaller-sized version of a galette (open-faced, homey-looking apple "pie") topped with ice cream.  There are large sugar sprinkles outside the crostada to sweeten the dessert and provide a contrast to the tart apple filling.  My favorite part is the crust but the warm apple filling and the ice cream are a close second and third.
Warm Apple Crostada
The awesome thing about my friend Jeannie is when we talk about "sharing dessert", we both mean she'll get one and I'll get a different one and we'll share both. We don't actually mean splitting ONE dessert. Is that a meeting of the minds or what?  We're friends for good reasons and this is one of them.  Jeannie got the pound cake with caramelized bananas, ice cream and chocolate sauce.  The pound cake was thicker and more generously-sized than I remember but it was good.  Usually I like the bananas best in this dessert but this time around it seemed like they were just a tad too firm.  Either Maggiano's used somewhat green bananas or they should've warmed them up or cooked them a little before bruleeing them.  Or both. 
Nonna's Pound Cake with Caramelized Bananas
In any case, we both had a good time catching up as we hadn't seen each other in awhile. Jeannie battled breast cancer  last year and not only won but kicked its ass and sent it packing. If you ever want to see what "grace under fire" looks like, take a gander at her blog. I'm so glad she won that battle - she and I have many more desserts to share in the years to come.

Saturday, October 26, 2013

Coconut Cream Cheese Sheet Cake

Coconut Cream Cheese Sheet Cake - made August 24 and again October 20, 2013, recipe modified from Just a Pinch
1st time - fail: You can tell just by looking at it that this is underbaked
I first made this cake awhile ago but never posted it because it didn't turn out the way I wanted to and I kept meaning to make it again but it took me awhile.  The first  time I made it, I followed the original recipe directions from Just a Pinch to the letter.  Except I was cursed by the underbaking gods again and didn't bake it long enough.  The toothpick test failed me because it came out clean but I knew it wasn't done yet because top still looked a tad shiny and simply not baked enough.  But I took it out anyway.  I paid for that mistake by having a cake too heavy and dense in texture.  The flavor seemed okay but it was a little hard to tell because I was distracted by the heavy texture.
2nd try - much better
So I finally tried making it again only this time I made a couple of modifications. Given the heaviness of the cake that I don't think was entirely due to my underbaking tendencies, I added a little chemical leavening in the form of baking powder.  Typically, in a recipe with this many eggs, a lighter texture can be achieved via the mixing process and creaming the cream cheese and butter together for longer, beating with the addition of sugar and each of the eggs.  I went a step farther by adding the baking powder and I'm glad I did.  The texture of the second cake was much better and not as dense.  It was still more of a pound cake texture rather than a fluffy cakey texture but that's not a bad thing.
The 2nd try
Actually, I think this was much better the second time around, not just with the addition of the baking powder but also because I slapped myself silly to leave it in the oven long enough.  In other words, I didn't underbake it.  When I really, really wanted to take it out of the oven because I thought it was done, I turned the oven off and made myself leave the kitchen for 5 minutes before I came back and took the cake out.  It's ridiculous that I have to take such measures not to underbake cakes but hey, whatever works.  At least this time, I had a much more edible and good-tasting cake.
Noticeably better texture when baked properly the 2nd time around
1 cup butter, softened (2 sticks)
6 ounces cream cheese, softened
2 cups sugar
6 eggs
1 teaspoon vanilla extract
2 1/4 cups flour
1/2 teaspoon baking powder
1/4 cup coconut milk

Frosting (can be doubled)
4 tablespoons butter, softened
4 ounces cream cheese, softened
1/2 teaspoon vanilla
1 1/2 cups confectioners' sugar
1/2 cup coconut, lightly toasted
  1. Preheat oven to 350 degrees F. Line a 9 x 13 pan with foil and lightly spray with nonstick cooking spray.
  2. Cream together butter, cream cheese and sugar.
  3. Beat in eggs one at a time, mixing to incorporate.  Add vanilla.  Mix in flour, baking powder and coconut milk, if using, on low speed.
  4. Pour batter into prepared pan and bake 35 to 40 minutes or until a toothpick inserted near the center comes out clean or with a few moist crumbs.  Cool completely before frosting.
  5. Make the frosting: Beat together butter and cream cheese until smooth.  Add vanilla and confectioners' sugar and beat until smooth and desired consistency (thin with milk if needed). Spread evenly over cake and sprinkle with toasted coconut.


Restaurant Review: Sushi O Sushi

Sushi O Sushi - lunch on October 15, 2013, 3.5-star rating on yelp
Another Japanese restaurant with "sushi" in its name where I go to and don't eat the sushi.  At least this time, I didn't get teriyaki but went for the katsu instead. This is one of many Asian restaurants in Silicon Valley located in a strip mall that's a good place to go for a quick lunch.  I've eaten here twice and the food has been decent although I don't know that I would rave about it or consider it a must-go place.  It was convenient and easy to get to and my coworker and I felt like going there for lunch so we did.
We got there a little before twelve so we were able to get seated right away.  I don't think the place really got packed but it seemed to be doing pretty good business while we were there.  Our server was very nice and took our orders quickly.  The food came out in a relatively short amount of time which is always good when you're in a time crunch to get back to the office before afternoon meetings.
Miso soup and salad
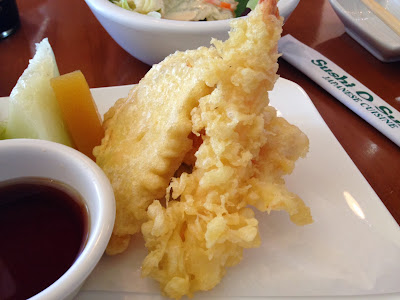
I ordered the lunch combo - two items were $10.50, including miso soup, salad and rice.  It's not super cheap but for Japanese food, that's one of the cheapest lunches you'll find in the area.  They also had a wide selection of sushi but you know I didn't really glance at that menu. For my combo, I selected the chicken katsu and the tempura.  If you get chicken katsu in a bowl, it comes atop a bed of rice with vegetables, onions and egg.  The katsu in the lunch special came out as plain breaded chicken with a dipping sauce.  Unfortunately not super flavorful or tasty so I think I should've gotten the normal katsu order in a bowl.  The tempura was good but a little skimpy: 1 shrimp, 1 slice of sweet potato, and 1 other fried, breaded vegetable hitherto unidentified because I didn't eat it.
Combo lunch: chicken katsu and tempura
Okay, now that I think about it, I guess the relatively low price point (for a Japanese restaurant) was commensurate with the amount of food it came with.  I probably would've enjoyed it more had I ordered something different.  The first time I went to Sushi O Sushi, I also had the lunch combo but picked the chicken teriyaki and the gyoza (pot stickers) which I think were better than what I ordered this time.
Close up of the Chicken Katsu
The lone shrimp tempura
One common item on both visits though was the steamed rice.  The rice was fine but I'm used to Japanese restaurants having really good rice.  This was just standard, like something I could make myself in my little rice cooker.  Whereas the really good rice is a little more moist than this and you can't stop eating it.  I didn't even finish my little bowl. It's not Gochi rice.
Oh well, as always, it's really more about the company than the food.  In that light, my coworker and I had a great conversation so it was a good lunch.

Friday, October 25, 2013

Bacon Quiche

Bacon Quiche - made October 12, 2013, recipe modified from For the Love of Food
I love quiche.  I hardly ever make it because of how many calories are in it from the heavy cream, cheese and crust but I still love it.  I had the best quiche when I went to Paris many years ago but it's hard not to have the best anything when you're in Paris.  Come on, it's Paris.  But, back here in the USA, I decided to make one because I had a frozen pie crust in my freezer from long ago and I was tired of looking at it, mocking me for not making a pie and threatening to get freezer burn if I waited much longer.  Plus I still had most of the turkey bacon from the Cheesy Sweet Potato, Sausage and Bacon Chowder.  So I went with this recipe for Bacon Quiche from For the Love of Food.
Since the pie crust was already pre-made/store-bought (sorry, genuine pie crust makers), this was easy to put together. Cooking the bacon ahead of time was the only "complicated" thing about it which isn't complicated at all except that turkey bacon doesn't really get as crisp as real bacon since there's less fat. 
Other than that, everything else was just about mixing the rest of the ingredients together and pouring it in the unbaked pie shell.  I put the pie pan on a baking sheet and baked it that way, partly because you don't want any egg mixture or custard to bake too hot or too quickly or you won't get a creamy texture (the eggs will curdle instead) and partly to catch any spills if the filling overflowed the pie pan.

Fortunately, it didn't overflow and this baked properly to a nice, creamy texture.  I took the picture of the slice I had cut out when the quiche was still a little warm so it might look a bit runny but once it had cooled, it was the right texture.  You don't want to overbake a quiche, especially if you're not going to eat all of it right away.  When you heat the leftovers, the custard will keep cooking and it's easy for the texture to become rubbery. I really enjoyed this quiche, to the point that I had to cut it into individual slices, wrap them up and place them in the freezer so I could space out how often I was going to eat it. No point tempting myself to snarf up more than one slice at a time. When reheating quiche, I recommend wrapping it in foil and heating in a toaster oven.  The bottom crust may still be a bit soggy but at least not as much as it would get if you heated in a microwave.
1 pie crust, unbaked
8 slices of bacon, crumbled (I used turkey bacon)
2 1/2 cups of shredded Swiss Cheese
2 Tablespoons of flour
4 eggs
3/4 cup of heavy cream
3/4 cup of half and half (half cream/half milk – mix it yourself if you can’t find any)
1/2 teaspoon salt
Dash of Pepper
Tops from 2 green onions,chopped, optional
  1. Preheat oven to 350°F.
  2. Cook bacon in the microwave until crisp. Once cool, crumble and set aside.
  3. Place your pie dough in the pie dish; set aside.
  4. In a medium bowl, combine the cheese and flour; mix well. In a large bowl, beat the eggs then add cream, half and half, salt, pepper, bacon, and cheese mixture. Mix well.
  5. Pour into the pie crust-lined pie dish.
  6. Bake for 30-45 minutes or until knife inserted into center comes out clean. Let it stand for 10 minutes before serving. 

Thursday, October 24, 2013

Apple Streusel Bars

Apple Streusel Bars - made October 5, 2013 from Lovin' from the Oven
Although apples are available year round, I always associate them with autumn.  My friends in New England have an annual tradition of going apple picking and it always sounds like a lot of fun, the quintessential fall activity.  My friend Annie the Baker who used to be the head pastry chef at Mustard's in Napa Valley recommends getting apple desserts in restaurant only in the fall because that's their best season.  So fall always means apples to me.
And apple desserts like this one. It's not quite a cobbler, despite its appearance from the top.  Instead, you have a bottom layer of sweet pastry, then a layer of cinnamon-sugared apple slices, followed by a crumb topping which is just crumbles of the same pastry dough that makes up the bottom layer. Bake to golden and glaze.
While I normally don't like fruit desserts since I prefer my fruit to be whole and consumed in its natural state, apples are an easy exception, especially with desserts like these.  If you want to serve it warm, you can treat it more like a cobbler with a scoop of vanilla ice cream on top.  Leave off the glaze if you don't want it to be too sweet.
But I actually liked this better served at room temperature and, as a rare exception, served the day after I made it.  Freshly made, it's good but a bit more gooey and soft so I tended to focus more on the texture than the flavor.  The next day it was even better because the flavors just seem more developed and pronounced.  It's also easier to slice neatly since the apples have firmed up.
For sweet desserts like this one, I almost always use Granny Smith apples.  The pastry layer and topping plus the glaze and the cinnamon sugar you roll the apple slices in are sweet enough.  The tartness of Granny Smiths offers a nice contrast in flavors to the sweetness of the other ingredients. I thought this was a perfect snack dessert and is going into my fall baking repertoire.

Sweet Pastry
2 cups flour
1/2 cup sugar
1/2 teaspoon baking powder
1/2 teaspoon salt
1 cup butter, softened
1 egg, beaten
Apple Filling
1/2 cup white sugar
1/4 cup flour 
2 teaspoons cinnamon
4 cups (about 3 medium) sliced, peeled baking apples (I used 3 large Granny Smith apples)

Glaze
2 cups powdered sugar
About 3 tablespoons whole milk
1 teaspoon vanilla extract
  1. To prepare crust, mix flour, sugar, salt, and baking powder in a medium bowl. Cut in butter with a pastry blender or two knives until you have pea-sized crumbles. Gently mix in beaten egg. 
  2. Spray a 9×13 baking dish (I used a 9×9) with non-stick cooking spray. Gently pat about 2/3 of the crumb mixture onto the bottom of the dish. Preheat oven to 350 and set aside.
  3. To prepare apple filling, combine flour, sugar, and cinnamon. Toss with apples and spread apples out on prepared crust. Sprinkle reserved crust mixture over apples evenly and bake in preheated oven for 40 minutes (mine took just less than 50 minutes). When finished, allow to cool completely.
  4. To prepare glaze, whisk together powdered sugar, almond extract, and enough milk to achieve desired consistency. Place glaze in a Ziploc bag and cut off a very small portion of one of the corners. Drizzle glaze over cooled pastry and allow to harden (you can place it in the freezer to hurry things along). Cut into bars and serve.