Wednesday, September 14, 2011

Individual Glazed Chocolate Buttermilk Cakes

Individual Glazed Chocolate Buttermilk Cakes - made September 10, 2011 from The Cake Book by Tish Boyle (book #160)


I'm always on the lookout for good chocolate cake recipes.  I want something moist throughout, including the edges, with a deep dark chocolate flavor that can be complemented by a good fudge frosting or contrasted with a vanilla or caramel frosting or glaze.  Whenever I try to make a standard 8 or 9" layer cake, I'm always just slightly dissatisfied with the results.  Either the taste is good but the texture is too light or too dense or the texture is perfect but the taste wasn't anything special.  Or I can get both taste and texture but the cake as a whole is too delicate to successfully frost, slice and present.  Something goes wrong.

So that's my long lead in to say this cake recipe is awesome!  It makes up for the Baked Fudge Pudding debacle.  Tish Boyle - and I say her name with the same reverence I say "Rose Levy Berenbaum" and "Lisa Yockelson" - does it again with a fantastic chocolate cake.  I loved the dark chocolate taste of this cake and the texture was moist and cakey but not too light or too dense.  I didn't glaze with the Bittersweet Chocolate Glaze that she recommended but instead made up my own Kahlua glaze with Kahlua, confectioners' sugar and a little milk.  My glaze didn't turn out very pretty but I preferred something less chocolaty to complement the chocolate cake.  There was just enough batter to fill 3 Bundt-lette pans so I haven't made this as a layer cake yet but I think it would be a good candidate for one the next time I do want to make a chocolate layer cake.

The other reason I really like this book is besides having fantastic recipes that are easy and straightforward to make, she includes weight measurements along with volume measurements.  Weight measurements are more accurate than volume measurements, especially with dry ingredients.  If you don't have a digital food scale, I recommend getting one for the best baking results.

1 cup (4 ounces/114 g) cake flour
½ cup (1.6 ozs/46 g) Dutch-processed cocoa powder
1 teaspoon baking powder
¼ teaspoon salt
¾ cup (1 ½ sticks/6 ozs/170 g) unsalted butter, softened
1 ¼ cups (8.8 ozs/250 g) granulated sugar
2 large eggs
¾ cup buttermilk
2 tablespoons Kahlua, optional
1 teaspoon vanilla extract
4 ounces (113 g) bittersweet chocolate, finely chopped, or ¾ cup miniature semisweet chocolate morsels

Bittersweet Chocolate Glaze
6 ounces bittersweet chocolate, coarsely chopped
3 cups heavy cream
1 teaspoon vanilla extract

1.   Position a rack in the center of the oven and preheat oven to 350⁰F.  Generously grease the molds of a 6-cake Bundtlette pan.  Dust the molds with flour.
2.   Sift together the flour, cocoa powder, baking powder and salt into a medium bowl.  Whisk to combine, and set aside.
3.   In the bowl of an electric mixer, using the paddle attachment, beat the butter at medium speed until very creamy, about 2 minutes.  Gradually beat in the sugar, increase the speed to medium-high, and beat until the mixture is well blended and light, about 3 minutes.  At medium speed, beat in the eggs one at a time, mixing well after each addition and scraping down the sides of the bowl as necessary.
4.   In a small bowl, stir together the buttermilk, Kahlua (if using), and vanilla extract.  At low speed, add the dry ingredients to the butter mixture in three additions, alternating with the buttermilk mixture in two additions and mixing just until blended.  Remove the bowl from the mixer stand and stir in the finely chopped chocolate or semisweet morsels.  Scrape the batter into the prepared cake molds, dividing it evenly and smoothing the tops. 
5.   Bake the cakes for 25 to 30 minutes, until a cake tester inserted into the center of a cake comes out clean.  Cool the cakes in the pan on a wire rack for 10 minutes.
6.   Invert the cakes onto the rack and cool completely.
7.   Make the glaze: Place the chocolate in the bowl of a food processor and process just until finely ground.
8.   In a small processor, bring the cream to a boil.  Remove from the heat and add the chocolate to the pan.  Stir until the chocolate is completely melted and the glaze is smooth.  Stir in the vanilla extract.  Transfer the glaze to a small bowl.  Cover the surface of the glaze with a piece of plastic wrap and let cool for about 10 minutes before using.


Monday, September 12, 2011

Deep Dark Brownies

Deep Dark Brownies - made September 9, 2011 from Chocolate Bar by Matt Lewis and Alison Nelson (book #159)


I'm not sure I even remember when and where I got this cookbook or even why.  Probably because it had chocolate in the title and/or it was on sale and my Pavlovian response to either stimulus is to buy it.  I flipped through it for my baking challenge and nothing really caught my eye to try so I defaulted to the brownie recipe.  Turns out this brownie was well worth the $5 or $6 I paid for this cookbook even if I never try another recipe from it again.

This brownie has exactly the kind of texture I like - it's dense and fudgy but not overly mushy or underdone.  It's definitely not cakey and the chocolate is a dark chocolate taste, not overly sweet.  You can do almost any kind of add-in besides or in addition to chocolate chips since the texture can support it.  Plus it's easy to make.  Whenever I say that, I have friends roll their eyes and tell me "my brownies never turn out like yours."  I'm trying not to keep being baffled by that.  Brownies are so easy to make.  There isn't a magic formula to them but I'll tell you the number one mistake I think people make with brownies is they overbake them.  We're conditioned to "bake until done".  But "done" with a brownie is different than done with a cake or a cookie.  You know a brownie is done when a toothpick comes out clean at the corners but with a few moist crumbs in the middle.  Moist crumbs, not raw batter.  If you go for a clean toothpick test from the middle, your brownies are likely to be overbaked, especially at the edges and corners which will be dry once the brownies cool.  I try to take close-up pictures of the brownies I bake so you can see what I mean by a fudgy texture. 

Baking times also vary by oven and the times listed in recipes are meant to be a guideline, not an absolute.  Err on the side of caution and toothpick test your brownies at least 5-10 minutes before the recommended baking time on the recipe.  I've said this before and I'll keep saying it until everyone can make good brownies: chocolate "sets" as it cools so what might seem underdone or too moist when they're in the oven may become perfect and perfectly fudgy after you take them out of the oven and the brownies have cooled.

¾ cup all-purpose flour
¼ teaspoon salt
1 tablespoon cocoa powder
4 ounces (1 stick) unsalted butter
¾ teaspoon instant espresso powder
5 ounces semisweet chocolate
¾ cup granulated sugar
¼ cup light brown sugar
3 large eggs
1 teaspoon vanilla extract
¾ cup chocolate chips, optional

1.     Preheat the oven to 350F.  Butter an 8-inch square baking pan.
2.    Sift the flour, salt, and cocoa powder together into a bowl; set aside.
3.    In a medium-large, heavy saucepan, combine the butter and espresso powder and stir over low heat until the butter is melted.  Add the chocolate, stirring constantly until the mixture appears completely smooth, approximately 2 minutes.
4.    Take the chocolate mixture off the heat and add the sugars, mixing until combined.
5.    Add the eggs and vanilla and continue stirring until they are evenly incorporated and the mixture does not appear grainy.
6.    Sprinkle the sifted flour over the mixture and stir just until blended.  Stir in the chips, if using.
7.    Pour the batter into the greased pan and smooth the top.  Bake the brownies for 28 to 30 minutes or until a toothpick inserted in the center comes out with a few moist crumbs.  Do not overbake.  Cool completely on a wire rack.

Saturday, September 10, 2011

Baked Fudge Pudding

Baked Fudge Pudding - made September 7, 2011 from Diner Desserts by Tish Boyle (book #158)


I had my Fantasy Football draft last Wednesday night and one of my league mates came over for dinner and the draft.  The draft is something we look forward to all year because it's a fun group and the guys are hilarious.  And, ahem, I've been known to do my fair share of trash talking.  Once upon a time we all worked together and would draft together in a conference room at lunch time and I would bring in baked goods for everyone.  Nowadays, everyone is at different companies so we all draft from our homes.  But we still manage to exchange a fair number of quips through the draft chat box.

I made these "puddings" for our dessert.  I thought it would be much like the pudding cakes I've made in the past, except in individual-sized portions.  The key difference was the liquid went on the bottom and the cake batter was dropped on top of it.  I followed the directions exactly, even down to measuring how much liquid went into each ramekin.  But something must've gone awry.  At first it seemed like these turned out pretty well.  The cake part on top was delicious and there was fudgy syrup mixed in to add to the richness and flavor, offset by the scoop of vanilla ice cream I placed on top of the warm pudding cake.  But then I got to the bottom half of the ramekin and it was literally liquid underneath, as in watery liquid, not rich chocolate sauce liquid.  What cake there was at the bottom was raw.  Ugh.  Epic fail.  Which is unusual with a Tish Boyle recipe as I have several of her cookbooks and her recipes are usually pretty reliable. 

So I'm not sure what I did wrong.  But to salvage this recipe, I would recommend reducing the amount of water for the syrup by at least 1/4 cup, increasing the amount of chocolate, whisking well and letting the mixture reduce a bit before using it.  There was nothing wrong with the taste but you want the chocolate syrup part to actually be more of a syrup than chocolate-flavored water.  I also don't think I baked it long enough.  While the top half seemed it was baked just right, the bottom half kind of ruined it by being watery and raw.  You can also try baking in more shallow ramekins.  I had baked mine in - ironically - pudding cake ramekins that are deeper than the typical ramekin.  Oh well, failure is just success put off.

Chocolate Syrup
¾ cup water
½ teaspoon instant espresso powder
2 tablespoons unsalted butter, cut into tablespoons
½ cup firmly packed light brown sugar
½ ounce semisweet chocolate, chopped
1 teaspoon vanilla extract

Pudding
1 ounce semisweet chocolate, coarsely chopped
1 tablespoon unsalted butter
¼ cup firmly packed light brown sugar
2/3 cup cake flour
1 teaspoon baking powder
1/8 teaspoon salt
¼ cup miniature semisweet chocolate morsels
¼ cup chopped walnuts
1/3 cup buttermilk

Brown Sugar Whipped Cream
2/3 cup heavy cream
1 tablespoon light brown sugar
½ teaspoon vanilla extract

1.   Preheat the oven to 350⁰F.  To make the chocolate syrup, in a medium saucepan, combine the water, espresso powder, butter and sugar.  Place over medium-high heat and cook, stirring constantly, until the sugar is dissolved and the mixture comes to a boil.  Remove the pan from the heat and stir in the chocolate until it is completely melted.  Stir in the vanilla.  Transfer the syrup to a heatproof glass measuring cup.
2.   To make the pudding, in the same saucepan used to make the syrup, place the semisweet chocolate and butter.  Cook over low heat, stirring constantly, until the chocolate is melted and the mixture is smooth.  Remove the pan from the heat and cool slightly.
3.   In a medium bowl, combine the brown sugar, cake flour, baking powder, salt, chocolate morsels, and walnuts.  Stir in the buttermilk and the chocolate mixture just until combined.
4.   Pour about ¼ cup of the chocolate syrup into each of four 8-ounce ramekins or custard cups.  One tablespoon at a time, drop 3 rounded tablespoons of the pudding batter into each ramekin.  Place the ramekins on a baking sheet and bake for 20 to 25 minutes, or until puffed and bubbling.
5.   To make the brown sugar whipped cream, in a medium bowl using a handheld electric mixer, beat the cream, brown sugar, and vanilla until stiff peaks form.
6.     Serve each pudding warm with a generous dollop of the whipped cream.

Button

Thursday, September 8, 2011

Oatmeal Caramel Chocolate Chip Cookies

Oatmeal Caramel Chocolate Chip Cookies - made dough September 3 and baked September 4, 2011 from The Silver Palate Cookbook by Julee Rosso and Sheila Lukins (book #157)


The original recipe title was Oatmeal Raisin Cookies but I can't abide raisins so my mind automatically substitutes something else for them, usually chocolate chips, but in this case I decided to go with caramel bits as well as milk chocolate chips.  It was such a good flavor combination in the Milk Chocolate Caramel Cookies that I decided to try it again.  For my niece who goes to college further away, in addition to the Red Velvet Cookies that are a favorite of both of my nieces (they are twins after all), she asked for oatmeal cookies to "help her study".  LOL.  But, besides being a doting aunt, I also use any excuse for me to try a new recipe and further my baking challenge.

This has all the elements I look for in a good oatmeal cookie recipe - it uses butter, not shortening, and it contains more oatmeal than flour.  I did find the dough a little difficult to work with when forming the dough balls with an ice cream scoop because it didn't form into a ball very well or adhere to a shape and it was sticky.  You have to pack the dough tightly together to form the ball.  I put the dough balls to freeze first before baking them in the hopes that they would be less fragile and easier to work with before baking.  That worked.

This does spread during baking, even at a convection setting, but it doesn't spread too thin.  The caramel bits make it a little more chewy and sweeter than the cookies normally would be but I thought they were a good addition.  You won't taste the cinnamon as much because of the caramel but the edges are crisp and the middles are satisfyingly chewy.  Overall, I thought this was a good flavor and texture combination. So did my niece(s).

Cookies to help her study :)
12 tablespoons butter
½ cup granulated sugar
1 cup brown sugar
1 egg
2 tablespoons water
1 teaspoon vanilla extract
2/3 cup unbleached all-purpose flour
1 teaspoon ground cinnamon
½ teaspoon salt
½ teaspoon baking soda
3 cups quick cooking oats
1 cup raisins (I used caramel bits and milk chocolate chips instead)

1.   Preheat the oven to 350⁰F.  Grease two cookie sheets.
2.   Cream butter and both sugars until fluffy.  Add egg and beat thoroughly.  Mix in water and vanilla.
3.   Sift together flour, cinnamon, salt and baking soda; add to the egg mixture and mix well.  Add oats and raisins and mix.
4.   Form large round dollops of cookie dough on prepared cookie sheets and flatten slightly with wet palms moistened with water.  Bake for 15 to 17 minutes, until edges are done but centers are still soft.  Remove to a rack and cool.

25 to 30 large cookies


Tuesday, September 6, 2011

Mocha Brownie Pudding Cake

Mocha Brownie Pudding Cake - made September 4, 2011 from Luscious Chocolate Desserts by Lori Longbotham (book #156)

My sister and nieces were visiting over Labor Day weekend and you know that means a couple of things: one, I made red velvet cookies again for my other niece who wanted to come up and visit her twin in her dorm.  I made a batch to send off with the girls to share with the other students in the dorm - college kids need homemade treats, right?  They passed along the thanks of their friends and a declaration from one that red velvet cookies are now his favorite too.  At this rate, I could end up converting the whole dorm into red velvet fans.

My nieces spent part of the weekend with their friends up at school and part of the weekend with us.  For the time with us, before we spent an afternoon shopping at the mall, we went to my house for post-lunch dessert.  Since my sister was back, that brings us to two: it was lava cake time again.  This time I went with a rendition of a pudding cake.  I've given up on souffles for the time being since they're too delicate to support the scoop of ice cream which must accompany anything warm and chocolate.  Instead I went with this mocha and brownie version of a pudding cake.  Instead of an 8-inch pan, I baked it in a 7 x 11" glass pan since I had to bake it early in the morning and wanted to be able to reheat it slightly in the microwave when we got to my house in the afternoon and that was only feasible in a glass pan.


This was pretty good - the "brownie" part was really more cakey in texture than fudgy-dense like a brownie so I think the title is a misnomer (I take brownies very seriously).  But the mocha part was right and overall it was a good combination of cake and chocolate sauce.  The cake itself isn't too chocolaty since it only contains 2 tablespoons of cocoa powder but the sauce that bakes up from the hot coffee and the sugar/cocoa sprinkled on top makes up for it.

1 cup all-purpose flour
1 ¼ cups packed dark brown sugar
6 tablespoons Dutch process cocoa powder
2 teaspoons baking powder
¼ teaspoon salt
½ cup whole milk
3 tablespoons unsalted butter, melted
2 teaspoons pure vanilla extract
2 tablespoons cocoa nibs, optional (I substituted chocolate chips)
1 ½ cups very hot brewed coffee
Slightly sweetened whipped cream or vanilla ice cream for serving

1.    Position a rack in the middle of the oven and preheat the oven to 350⁰F.  Butter an 8-inch square baking pan.
2.   Whisk together the flour, ¾ cup of the sugar, 2 tablespoons of the cocoa, the baking powder and salt in a medium bowl. Breaking up any large lumps of sugar with your hands.  Stir in the milk, butter and vanilla with a wooden spoon just until blended; the batter will be very thick.  Transfer to the baking dish and smooth the top with a rubber spatula.
3.   Stir together the remaining ½ cup sugar and ¼ cup cocoa with a fork in a small bowl, breaking up any large lumps of sugar with your hands.  Stir in the nibs (or chocolate chips), if using.  Sprinkle the mixture evenly over the batter.  Pour the hot coffee evenly over the batter – do not stir.
4.   Bake for 30 to 25 minutes, until the top layer is set and the dessert is beginning to pull away from the sides of the pan; the batter will have separated into cake and pudding layers.  Cool the pan on a wire rack for at least 15 minutes.
5.   Serve hot, warm, or at room temperature in small bowls, with whipped cream or ice cream if desired.

Saturday, September 3, 2011

Hummingbird Cake

Hummingbird Cake - made September 1, 2011 from Tate's Bake Shop by Kathleen King


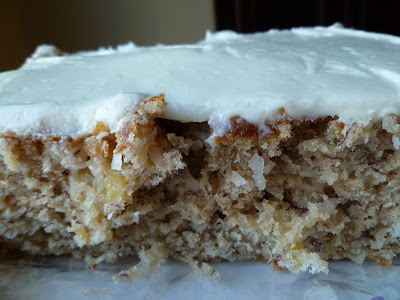
Once upon a time, this is exactly the sort of cake I would never eat, much less bake.  I like banana cakes, I like coconut cakes, I like pineapple upside-down cakes.  But all three flavors in one cake?  Why???  But I've seen various renditions of Hummingbird Cake in a number of cookbooks and since I got over my aversion to pineapple bits in a muffin from the Pineapple Upside Up muffin recipe, I thought I could take my daring one step further and do a banana-pineapple-coconut cake.  In for a penny, in for a pound.  Or probably a few pounds since this is an oil-based cake and I don't want to calculate how many calories are in this thing.

This had the added advantage of using up not only the leftover crushed pineapple I had from the muffin recipe but also the overripe bananas I had in the freezer.  I made it as a 9 x 13 cake instead of a 2-layer 9-inch round cake, mostly because it's easier to slice up and give away as a rectangular single-layer cake.  This is another easy cake to put together and it turned out pretty well.  I have to say though, I would consider this mostly a banana coconut cake and it could've done without the pineapple.  Not that the pineapple was bad but it really didn't add anything to the cake.  The banana flavor took over as the primary flavor and the coconut was good for the chewiness but you could hardly taste the pineapple and this time the tidbits of crushed pineapple didn't play as well as it did in the pineapple muffins.  This was good but next time I'd omit the pineapple and just enjoy a good banana cake.

3 cups all-purpose flour
1 teaspoon baking soda
1 teaspoon cinnamon
½ teaspoon salt
1 ¼ cups vegetable oil
1 ¾ cups sugar
3 large eggs
2 cups mashed very ripe bananas
1 8-ounce can crushed pineapple, drained
1 cup unsweetened desiccated coconut
¾ cup pecans, chopped
1 tablespoon vanilla

1.   Heat the oven to 350˚F.  Grease two 9 x 2 inch round cake pans.  Line the bottoms with waxed paper.
2.   In a large bowl, mix the flour, baking soda, cinnamon and salt.
3.   In another large bowl, mix the oil and sugar.  Add the eggs and mix them well.  Scrape down the sides of the bowl.  Stir in the bananas, pineapple, coconut, pecans and vanilla.  Stir in the flour mixture.
4.   Spoon the mixture evenly between the prepared cake pans.  The pans will be full but this batter doesn’t rise much.
5.   Bake the cake for 40 to 45 minutes or until a cake tester or toothpick inserted in the center comes out clean.
6.   Cool the cake for 10 minutes in the pans and turn it out onto a wire rack to cool completely.
7.   Frost with cream cheese frosting recipe of your choice.


Button

Friday, September 2, 2011

Golden Grand Marnier Cake

Golden Grand Marnier Cake - made August 27, 2011 from The Cake Bible by Rose Levy Berenbaum (book #155)

I've had this recipe in my "Still Need to Make" file for awhile, probably almost since I got the Cake Bible as a gift from my cousin Bernadette.  There are so many good recipes in that book that almost always turn out that I couldn't bake them all.  But I finally got around to this one, mostly because I wanted to use up more of the oranges from my mom's orange tree.

I did take the liberty of omitting the almonds because - you guessed it - I don't like nuts in my cake, especially not when it's supposed to be part of the batter itself.  I also left out the chocolate chips because I don't like a fruit flavor with chocolate.  I know some people like it but I don't.  Can't abide Black Forrest cake or the dark chocolate candy orange they sell and even a chocolate-covered strawberry isn't my first choice for dessert.  I like fruit by itself, preferably in its natural state or with something other than chocolate.  Chocolate is reserved for eating by itself or only paired with a complementary flavor like caramel.  Fruits like anything citrus just seems like there's "too much going on" for my taste buds.

Anyway, despite this not being how Rose Levy Berenbaum probably envisioned it's supposed to be, I think it still turned out well with my modifications.  It became more of a simple, tender-textured Bundt cake.  I didn't use all of the soaking syrup on it as I was afraid the Grand Marnier would be too overwhelming but it turns out I didn't use enough because the orange taste wasn't that strong.

½ cup chocolate mini chips or bittersweet chocolate chopped into ¼-inch pieces
¼ teaspoon Grand Marnier
1 ½ teaspoons cake flour
3 large eggs
1 cup sour cream
2 teaspoons orange flower water or 1 ½ teaspoons vanilla
2 ½ cups sifted cake flour
½ cup plus 1 tablespoon unblanched sliced almonds, toasted and finely ground
1 cup sugar
1 ½ teaspoons baking powder
1 teaspoon baking soda
¾ teaspoon salt
2 tablespoons grated orange zest
1 cup (8 ounces) unsalted butter, softened

Grand Marnier Syrup
½ cup sugar
¼ cup orange juice, freshly squeezed
1/3 cup Grand Marnier

One 9-cup fluted tube pan, greased and floured

1.     Preheat the oven to 350˚F.
2.    In a small bowl toss the chocolate chips and Grand Marnier until the chips are moistened and shiny.  Add the 1 ½ teaspoons flour and toss until evenly coated.
3.    In a medium bowl, lightly combine the eggs, ¼ cup sour cream and orange flower water or vanilla.
4.    In a large mixing bowl, combine the dry ingredients and orange zest and mix on low speed for 30 seconds to blend.  Add the butter and the remaining ¾ cup sour cream.  Mix on low speed until the dry ingredients are moistened.  Increase to medium speed (high speed if using a hand mixer) and beat for 1 ½ minutes to aerate and develop the cake’s structure.  Scrape down the sides.  Gradually add the egg mixture in 3 batches, beating for 20 seconds after each addition to incorporate the ingredients and strengthen the structure.  Scrape down the sides.  Stir in the chocolate chips. 
5.    Scrape the batter into the prepared pan and smooth the surface with a spatula.  Bake 55 to 65 minutes or until a wire cake tester inserted in the center comes out clean and the cake springs back when pressed lightly in the center.  The cake should start to shrink from the sides of the pan only after removal from the oven.
6.    Shortly before the cake is done, prepare the syrup: Heat the sugar, orange juice, and Grand Marnier until the sugar is dissolved.  Do not boil.  As soon as the cake comes out of the oven, place the pan on a rack, poke the top all over with a wire tester and brush on ½ the syrup.  Cool in the pan on the rack for 10 minutes, then invert onto a lightly greased wire rack.  Brush with remaining syrup and cool completely before glazing with chocolate or wrapping airtight.

Wednesday, August 31, 2011

Pineapple Upside Up Muffins

Pineapple Upside Up Muffins - made August 27, 2011 from Mad About Muffins by Dot Vartan (book #154)


This is normally the type of muffin I wouldn't make.  I don't mind the coconut and I love pineapple but I just don't like fruit in baked goods.  I love fruit but mostly in its natural state.  Fresh pineapple is terrific and if it wasn't such a pain to peel and cut, I'd have it more often.  As it is, I cheat and get the pre-cut pack from Costco when I want pineapple.  I also don't like crushed pineapple.  To me, that seems like pineapple mush and not worth the effort of (barely) chewing since they're just tidbits.  I prefer the nice, juicy pineapple chunks to really sink my teeth into.

But I am trying to broaden my baking horizons, so to speak, and thought I'd venture out with this pineapple muffin.  I'm glad I did.  Not only was this recipe super easy to make but it turned out pretty well too.  The coconut gives it a nice chewiness and I was wrong about the pineapple tidbits - they were just the right size and texture for the muffin.  Any larger and they would've been too big and would have overwhelmed the rest of the muffin.  The muffin itself was a nice, cakey texture, not too heavy and not too light.  I enjoyed the flavor from the brown sugar in the batter, complemented by both the coconut and the pineapple.  Not to mention the topping is the bomb!  It goes perfectly with the muffin with a sweet crunch to contrast with the cakey texture of the muffin itself and the chewiness from the coconut and pineapple.  This is best eaten lukewarm when the topping is cool enough to firm up and give some crunch.  I did omit the nuts but you don't really need them. This recipe's a keeper.  Next time, I may even try the base recipe but do different add-ins in place of the pineapple and coconut.


2 ¼ cups all-purpose flour
1 tablespoon baking powder
½ teaspoon salt
½ cup light brown sugar
½ cup coconut
1 egg
¼ cup corn oil
¼ cup melted butter
1/3 cup milk
1 teaspoon vanilla extract
1 cup crushed pineapple, undrained

Topping
2 tablespoons butter
7 tablespoons light brown sugar
7 tablespoons chopped walnuts

1.    Heat the oven to 400˚F.
2.   In a large bowl, sift together the flour, baking powder, and salt.  Stir in the brown sugar and coconut.
3.   In another bowl, mix the egg, corn oil, butter, milk, vanilla extract and pineapple.  Stir the pineapple mixture into the dry ingredients just until moistened.
4.   Fill greased muffin tins.  Make the topping by cutting the butter into the brown sugar and stirring in the walnuts.  Sprinkle the topping over the batter.  Bake for 20 minutes or until the muffins are a golden brown.

Makes one dozen muffins

Monday, August 29, 2011

Orange Pudding Cake

Orange Pudding Cake - made August 27, 2011 from Quick Recipe by the Editors of Cooks' Illustrated (book #153)

You can tell it's done when the cake has pulled away from the sides

I'm going to stray from chocolate for awhile and focus on using more of summer's bounty, namely oranges and lemons from my mom's trees.  My own orange tree boasts a grand total of 1 orange that is still small and green and has been growing by infinitesimal increments for several months now.  My lemon tree has a number of teeny little blossoms that look like they're thinking about becoming lemons someday......a really long time from now.  So in the meantime, I have to partake of my mom's more established and more prolific citrus trees.

I was curious about this recipe because I was familiar with and like chocolate pudding cake but I had never tried a citrus one.  A chocolate pudding cake typically relies on mixing up a cake batter for the bottom layer and pouring a good amount of liquid on top and the cake bakes up with its own sauce.  This was similar in principle except the egg white in the batter is supposed to rise to the top while the bottom bakes into a custard.  I was a little leery about another egg-white type cake since I'm not fond of an egg-white texture.  I like chiffon cakes and angel food cakes well enough but only if they're baked properly and don't taste like warm egg whites, like some of my past failures with souffles have gone.

You can see the custard layer that formed on the bottom

However, I was pleasantly surprised by this recipe.  The top bakes into an airy, almost chiffon-textured cake while the bottom turns into a custard almost like a creme brulee.  The orange flavor was light and refreshing, perfect for summer.  If you want to dress it up, serve with berries and/or a light lemon or orange sorbet.  This is best served warm and is at its most impressive when you first take it out of the oven but you do need to let it cool enough to enjoy the texture and flavor of the orange.

A close up of the larger version of the pudding cake
1 tablespoon unsalted butter, softened
¾ (5 ¼ ounces) cup plus 2 tablespoons sugar
¼ cup (1 ounce) plain cake flour
¼ teaspoon salt
3 large eggs, separated, room temperature
1 cup milk
1 tablespoon grated orange zest plus ¼ cup orange juice
2 tablespoons lemon juice
½ teaspoon cream of tartar

1.     Adjust an oven rack to the middle position and heat the oven to 325˚F.  Lightly grease a 9 x 9-inch glass baking pan with the softened butter.
2.     Whisk together ¾ cup sugar, the flour, and salt in a medium bowl.  Beat the egg yolks, milk, orange zest, orange juice and lemon juice together in a small bowl.  Pour this mixture over the dry ingredients and blend well with a whisk.
3.     In the bowl of a standing mixer, beat the egg whites at medium-high speed until they are foamy, about 30 seconds.  Add the cream of tartar, raise the speed to high, and beat until the whites hold soft peaks, about 1 ½ minutes.  Add the remaining 2 tablespoons sugar and beat until the egg whites hold a 2-inch peak, about 30 seconds.  Using a whisk, fold the egg whites into the yolk mixture.
4.     Pour the batter into the prepared baking dish.  Bake until the center is set and springs back when gently pressed, about 35 minutes.  Remove the pan from the oven and cool for 10 minutes.  Spoon the cake (it will be soft) into bowls and serve warm.

Sunday, August 28, 2011

A little tomato sauce goes a long way

Made August 27, 2011 - Another rendition of the tomato sauce I made last weekend - this time instead of using it as a pizza sauce, I used it as a spaghetti sauce.  I browned some ground turkey breast, thawed some of the tomato sauce I had put in the freezer last weekend, added some more handfuls of chopped basil from the garden and voila - spaghetti for another week's worth of lunches.


The nice thing about using homemade tomato sauce with tomatoes and basil from my own garden is I really can taste the freshness of the ingredients.  Usually my palate is only discerning when sugar is involved but even I can taste the difference between fresh tomato sauce and the processed stuff.