Saturday, January 16, 2010
Lemon Walnut Sour Cream Pound Cake
I think this is the 5th recipe I've tried from this baking book and it's another winner. I have several recipe books published by bakeries and some of them are hit or miss on how good the recipes really are (or not). But I need to look up where The Sweet Melissa Bakery is so I can visit it someday because so far her cookbook has been spectacular. It's rivaling the baking books from Magnolia Bakery and Buttercup Bake Shop in terms of consistently good recipes and, having visited both Magnolia and Buttercup in Manhattan, I love those two bakeries. I may also love the Sweet Melissa Bakery if her recipes keep turning out so well.
While this recipe has "walnut" in the title, your eyes aren't deceiving you that there aren't any walnuts in the picture. There aren't any because I generally don't like nuts in cakes and I specifically don't like walnuts at all. But this was fine without them. The recipe calls for baking the pound cake in a single large loaf pan but I made it in 3 small loaf pans. I like using the smaller sizes because they bake faster and it's nicer to present and give away to several different people as a single small loaf than a large loaf cut into pieces. Just don't forget to adjust the baking time. I baked the small loaf pans in about 40-45 minutes. This one's mostly for my parents, except for the one I had to cut for the taste test. This has a perfectly balanced lemon flavor, is moist without being too dense and has a perfect pound cake texture with a tender crumb. I should know because I ate a second taste test piece just to be sure :).
Lemon Walnut Sour Cream Pound Cake
For the cake
8 tablespoons (1 stick) unsalted butter, softened
¼ cup vegetable shortening
1 ½ cups sugar
2 teaspoons freshly grated lemon zest
2 tablespoons fresh lemon juice
¼ teaspoon almond extract
1 teaspoon pure vanilla extract
3 large eggs
1 ½ cups all-purpose flour
¼ teaspoon baking powder
½ teaspoon kosher salt
½ cup sour cream
1 cup walnuts, coarsely chopped
For the glaze:
¼ cup sugar
¼ cup fresh lemon juice
1. Position a rack in the center of your oven. Preheat the oven to 350˚F. Butter and flour a 1 ½-quart loaf pan.
2. In the bowl of an electric mixer fitted with the paddle attachment, cream the butter, shortening, sugar and zest, 3 to 5 minutes. Add the lemon juice, almond extract, and vanilla and mix to combine. Add the eggs, one at a time, mixing well after each addition. Scrape down the sides of the bowl.
3. In a separate bowl, whisk together the flour, baking powder, and salt. Add the flour mixture to the batter in two batches, alternating with the sour cream. Do not overmix. Scrape down the sides of the bowl. Gently fold in the walnuts, saving some to sprinkle on top.
4. Bake for 1 hour and 15 minutes to 1 hour and 30 minutes, or until a wooden skewer inserted into the center comes out clean. Remove to a wire rack to cool for 20 minutes before inverting onto a rack for glazing.
5. For the glaze: In a small saucepan, combine the sugar and lemon juice and heat to a high simmer. Simmer for 2 to 3 minutes, or until reduced by half.
6. Using a pastry brush, brush the hot glaze on the still-warm unmolded cake. Brush again, if desired, after 15 minutes. Let cool before slicing.
General Pao's Chicken
3 tablespoons cornstarch, divided
1/3 cup 98% fat-free or fat-free, lower-sodium chicken broth
3 tablespoons lower-sodium soy sauce
2 tablespoons rice vinegar
1 ½ tablespoons sugar
1 tablespoon sherry
1 ½ teaspoons hoisin sauce
1 ½ teaspoons minced peeled fresh ginger
1 ½ teaspoons minced fresh garlic
1 teaspoons finely chopped dried red chilies, or to taste
2 teaspoons toasted sesame oil, divided
1 medium red bell pepper, cut into 1-inch pieces
1 cup 1-inch onion squares
1/3 cup chopped whole green onions
1. Place the chicken breasts between two sheets of plastic wrap or wax paper on a flat work surface. Use the flat side of a meat mallet to pound them to an even 1/3-inch thickness. Cut the breasts into ¾-inch strips. Transfer to a medium bowl and add 2 tablespoons cornstarch. Toss to coat well. Let stand for 5 minutes.
2. Meanwhile, whisk the remaining cornstarch and the broth, soy sauce, vinegar, sugar, sherry, hoisin sauce, ginger, garlic, and chiles in a medium bowl until the sugar is dissolved and the mixture is well combined.
3. Place a large nonstick wok or stir-fry pan over high heat. When the wok is hot, put in 1 teaspoon sesame oil. Add the bell pepper and white onions. Cook, stirring frequently, until the veggies are crisp-tender, but not yet browned, 3 to 5 minutes. Remove them from the wok and set aside.
4. Put in the remaining teaspoon of sesame oil and the chicken in a single layer. When the chicken is lightly browned on one side, after about 2 minutes, flip it and let the other side brown lightly. Then continue cooking, stirring occasionally, until no longer pink inside. Return the bell pepper and onions to the pan and then add the sauce. Use a wooden spoon to stir the mixture constantly until the sauce thickens just enough to stick to the chicken and a little bit remains in the wok. Transfer the chicken and vegetables to a serving platter and top with the green onions. Serve immediately.
Serves 5
Wednesday, January 13, 2010
Sesame Chicken
Two weeks into the new year and I haven't set off the smoke alarm yet with my cooking efforts - progress! This recipe harkens back to my early undergrad days at UC Davis (before I transferred to Berkeley) and comes from my cousin Christine (back in the days before I was snipped off that branch of the family tree, lol). It's really easy to make but in the past, I've botched this one up too. This time I made some simple modifications and, buoyed by the moderate success of my recent cooking experiences, I didn't find it that intimidating to make. It's not gourmet cooking but if you want a little flavor for some chicken, it's good enough.
The original recipe calls for chicken thighs but I substituted 2 boneless, skinless chicken breasts that I pounded and cut into 4 thin pieces ala the Chicken Piccata. It also calls for dipping the chicken in flour, then egg, then flour then egg again to give it a good coating that fries up crisp - at least that's how I remember Christine making it. I skipped all that and just did a light coating in flour, also like the Chicken Piccata. I also skipped the oil and fried the chicken in a couple of teaspoons of light butter.
I did keep the sauce recipe exactly the same and once the chicken was fried, I poured the sauce over it, put in the oven and baked for 30 minutes. It came out tender. The flavor wasn't as good as I remember but this was also way back in my college days so I'm sure my taste buds have changed. But still, it's good enough for lunches for the rest of the week and I'm glad I made the modifications I did because my taste for fried, breaded food has also abated.
Sesame Chicken
Package of chicken thighs
½ cup soy sauce
¼ cup sugar
1/8 cup sherry
1. Double dip chicken in egg then flour. Fry until golden brown.
2. Place chicken in foil-lined, shallow pan.
3. Mix soy sauce, sugar and sherry in a bowl. Pour over chicken.
4. Bake, uncovered, for 30 minutes in a preheated 350˚F oven.
ETA: this is a bit saltier than I remember it being. You might want to either substitute some of the soy sauce for sherry or add a bit more water.
Sunday, January 10, 2010
Chicken Tetrazzini
¼ cup flour
1 cup chicken broth
salt and pepper
1 cup whipping cream
2 teaspoons white wine or sherry
7 ounces spaghetti, cooked and drained
2 cups cubed, cooked chicken
⅓ cup sliced mushrooms
¾ cup Parmesan cheese
1. Preheat oven to 350°F. Melt butter in large pan. Add flour and stir.
2. Blend broth well; add cream. Heat to boiling. Boil and stir 1 minute. Add salt and pepper to taste, wine, mushrooms and ½ cup Parmesan cheese.
3. Cook slowly for 5 minutes. Pour sauce in casserole dish mixed with chicken and spaghetti. Top with ¼ cup Parmesan cheese and bake uncovered for 30 minutes or until bubbly.
Banana Apple Bread
2 tablespoons unsalted butter
3 tablespoons firmly packed dark brown sugar
2 Granny Smith apples, peeled, cored, and cut into ½” pieces
½ teaspoon ground cinnamon
½ teaspoon pure vanilla extract
For the Banana Bread
2 cups all-purpose flour
1 teaspoon baking soda
½ teaspoon ground cinnamon
¼ teaspoon ground cloves
¼ teaspoon freshly grated nutmeg
½ teaspoon kosher salt
8 tablespoon (1 stick) unsalted butter
1 cup granulated sugar
2 large eggs
¼ cup fresh orange juice
1 teaspoon pure vanilla extract
1 ¼ cups very ripe mashed bananas (2 to 3)
1. Position a rack in the center of your oven and preheat the oven to 350˚F. Lightly butter and flour a 1 ½-quart loaf pan.
2. To make the apples: Preheat a medium skillet over medium-high heat. Add the butter and brown sugar and heat until bubbling. Add the apples and cinnamon and sauté until golden and tender, about 5 minutes. Stir in the vanilla. Remove from the heat and set aside to cool.
3. To make the banana bread: In a medium bowl, whisk together the flour, baking soda, cinnamon, cloves, nutmeg and salt.
4. In the bowl of an electric mixer fitted with the paddle attachment, cream the butter and sugar until light and fluffy, 1 to 2 minutes. Add the eggs, one at a time, mixing well after each addition. Scrape down the sides of the bowl.
5. In a small bowl, combine the orange juice and vanilla.
6. Add the flour mixture to the butter mixture in three batches, alternating with the orange juice mixture, mixing well after each addition. Scrape down the sides of the bowl after each flour addition. Stir in the mashed bananas until combined. Then stir in the reserved apples.
7. Pour the batter into the prepared loaf pan. Bake for 55 to 60 minutes, or until a wooden skewer inserted into the center comes out clean. Remove to a wire rack to cool for 20 minutes before unmolding onto the rack to cool further.
Serve slightly warm or at room temperature. The banana bread keeps well wrapped in plastic wrap at room temperature for up to 3 days. For longer storage, freeze well wrapped in plastic wrap and then aluminum foil for up to 3 weeks. Defrost still wrapped at room temperate.
Wednesday, January 6, 2010
Skinny Scampi
I love shrimp so I was predisposed to like this dish even just by reading the recipe. And it didn't disappoint. Ironically, I don't usually eat scampi just because of the high butter content and I normally prefer butter in baked goods or on a warm piece of bread rather than on something savory like shrimp or lobster. But the recipe seemed really easy to make and it was. The important thing is to prep your ingredients and that was probably the most time-consuming part. I'm actually an expert at peeling and deveining shrimp since that was one of the few things I could do to help my mom when she cooked so that was no big deal. But I'm certainly not fast at it. Although the recipe says to leave the tails on, I took them off while I was peeling the shrimp. I was peeling them anyway and my hands were already messy so why not? I don't like having to take the tails off of cooked shrimp while I'm eating them - it only slows me down :).
Once you turn the pan on, putting together this dish goes really, really fast so it's important to have your mise en place fully ready. I had bought a wine opener (the good kind since I doubted my strength in yanking a cork out of a bottle with just a corkscrew) so I had the white wine ready and I used the last of my mom's organic lemons to squeeze the lemon juice. Cooking the shrimp and putting together the sauce took almost no time and you end up with a delicious dish. This is another entree I could serve up to company as well as eat without rice - for you low carbers, this easily goes on a salad for a healthy, low-calorie meal.
So far, this cookbook has been a really good investment. I know of a few people who already have it and have recommended other recipes in the book for me to try. I've had a couple of people also tell me they're going to buy the book based on what I've posted so I'm very pleased about that. Definitely don't just rely on what I'm posting as there are many other recipes in the book that look good as well. I doubt I'll be able to try them all or blog about all of them so don't miss out.
Skinny Scampi
1 ¼ pounds medium (31-40 count) shrimp, peeled (tails left on) and deveined
1 teaspoon extra virgin olive oil
¼ teaspoon salt, or to taste
Black pepper
6 garlic cloves, minced (about 2 ½ tablespoons)
¼ cup dry white wine
2 tablespoons fresh lemon juice
2 tablespoons light butter (stick, not tub)
2 tablespoons minced fresh parsley
1. Toss the shrimp with the olive oil, salt, and pepper to taste in a medium bowl.
2. Place a large nonstick skillet over high heat. When the skillet is hot, put in half of the shrimp. Cook, stirring occasionally, until they are just pink on both sides, 2 to 3 minutes. Add half of the garlic and cook, stirring constantly, until the shrimp are lightly browned on the outside and cooked through, 1 to 2 minutes. Transfer the shrimp to a platter and cover to keep hot. Repeat with the remaining shrimp and garlic. Add them to the platter and cover.
3. Add the wine and lemon juice to the pan. When the liquid is reduced by half, 1 to 2 minutes, turn the heat to low and add the butter and 1 tablespoon parsley. Use a wooden spoon to stir until the butter is melted completely, 30 seconds to 1 minute. Spoon the sauce over the shrimp and toss well, then garnish with the remaining parsley. Serve immediately.
Serves 4
Baby Brownies aka Dulce de Leche Brownies
Monday, January 4, 2010
Fettuccine Alfredo
But I’ve decided that’s just as well because one of my problems in the past with learning/not learning how to cook is I was all gung ho about it in the beginning, bought a bunch of ingredients and made a bunch of stuff, some of which turned out, some of which didn’t. And after that first week, I’d completely lose interest in doing it again and back to Costco I’d go for the already-roasted rotisserie chicken for $4.99. This time, I’m trying to make it different. Like dieting or saving for a big financial goal, you have to keep at it if you want results. Consistency is best. It’s easy to take off a few pounds when you’re sick of sugar and feeling fat from holiday eating. But it’s taking it off and keeping it off in the long run that really matters and that only comes about with consistency and perseverance. Same thing with cooking or any other meaningful goal you want to achieve. It’s probably better for me to cook every other day and do it over the long haul instead of loading up the first couple of weeks and losing interest in it all over again once I burned out sufficiently from it.
Before I start on tonight’s cooking experiment, an update on the mac and cheese and the chicken piccata I’d made already. Had the mac and cheese for breakfast this morning – yeah, it’s a weird breakfast but I’ve also been known to eat breakfast food for dinner so I see nothing wrong with dinner food for breakfast. I’m an equal opportunity, doesn’t-matter-what-time-of-day eater. Even aside from the fact that I didn’t have egg beaters on hand and couldn’t fry my usual faux scrambled eggs for breakfast. Besides, I had a lot of the mac and cheese leftovers since I’d made the dish twice so I have to eat it sometime. You definitely don’t want to reheat this too much. Since I had the leftovers portioned out in individual-sized portions in the freezer, I had to heat it up. It got a bit rubbery as I heated it too long. So go easy on the reheating. I think this dish tastes best when eaten immediately after cooking and isn’t ideal as a make-enough-to-have-leftovers kind of dish.
The Chicken Piccata on the other hand was just as good as when I first made it. I’m really pleased with this recipe and how it turned out. Normally when something has a sauce to it, I love to eat it with rice (hey, after all, I’m Asian). But in trying to eat better, I actually had today’s portion on a bed of salad greens. I heated up the chicken piccata first then dumped it over the salad greens. I never eat salad with dressing but the lemon sauce made a perfect “dressing” for the salad. Good stuff. This recipe alone was worth getting the cookbook.
Now onto the Fettuccine Alfredo. This is also from the Most Decadent Diet Ever by Devin Alexander – can you tell once I glom onto a cookbook, I try as many recipes from it as possible? In this case it’s partly because there seem to be a lot of good recipes that are to my taste and my skill level in cooking. And partly because I have over 200 cookbooks and all but 4 or 5 of them are baking books, not cooking books, so I don’t have a big pool to choose from if I want to make “real food”. The original name for this recipe is actually Fettu-skinny Alfredo because it’s supposed to be made with lowfat Parmesan cheese and nonfat half-and-half. I had the nonfat half-and-half but they didn’t have reduced-fat Parmesan cheese at Trader Joe’s so I went with the regular version even if it meant it’s not as low-cal, low-fat as the recipe intended. I also bought the Parmesan cheese already shredded. Yeah, how lazy am I? But grating cheese is a pain and there’s not that much of a price difference between the block of Parmesan and the grated fresh Parmesan in a bag, at least not in the amounts I needed. The extra buck is worth my time. I added chicken breast chunks to the dish for the added protein. Plus I got to use my new meat mallet again and whacked the chicken breasts into tender thinness again so that was fun. Anything to liven up a Monday night.
How it turned out:
So even though it wasn’t with the low-fat Parmesan cheese, I’m hoping that didn’t alter the intended flavor or calorie count by that much. If it did, then I’m glad I worked out this morning. The sauce was good although next time I would do two things differently with this recipe. One, I would use angel hair pasta instead of fettuccine noodles. Much as I like fettuccine alfredo in general, I don't like big noodles. They're too heavy and you're busy eating so much noodle that sometimes the taste of the sauce gets lost. I think this would be much better with angel hair pasta or spaghettini noodles. Second, I would stop garnishing with parsley. It was optional and I didn't have to but since I had a bunch of parsley (literally, 1 bunch) that I bought for the other recipes, it seemed a shame not to use them. But after I tried it, I decided the recipe stands on its own and doesn't need the parsley. Otherwise, if you like pasta with alfredo sauce, this is definitely a good alternative to the calorie-laden versions.
Fettu-Skinny Alfredo - made January 4, 2010, from The Most Decadent Diet Ever by Devin Alexander
9 ounces dried fettucine
2 ½ teaspoons unbleached all-purpose flour
1 cup plus 2 tablespoons fat-free half-and-half
½ cup plus 2 tablespoons grated reduced-fat Parmesan, divided
½ teaspoon garlic powder, or more to taste
1/8 teaspoon salt, or to taste
3 tablespoons light butter (stick, not tub)
Chopped fresh parsley, optional
1. Cook fettuccine according to package directions.
2. Mix the flour with just enough half-and-half to form a paste in a medium bowl. Slowly add the remaining half-and-half, stirring to remove any lumps.
3. Place a medium nonstick skillet over medium heat. Put in the half-and-half mixture, ½ cup Parmesan, the garlic powder and salt to taste. Cook, stirring constantly, until the mixture is as thick as gravy, 5 to 7 minutes. Stir in the butter until it melts and is well incorporated. Toss in the cooked fettuccine. If the sauce still needs to thicken slightly, continue to toss the fettuccine until the sauce thickens. Divide the fettuccine among 4 pasta bowls or dinner plates. Top each with 1 ½ teaspoons of the remaining Parmesan and a sprinkling of parsley, if desired. Serve immediately.
Serves 4
Saturday, January 2, 2010
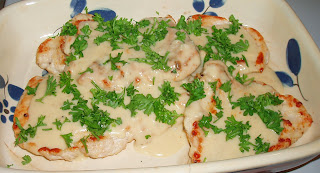
Chicken Piccata
This is going to be one of those times where you can laugh at my cooking attempts. I wanted to try this recipe for Chicken Piccata (also from The Most Decadent Diet Ever by Devin Alexander) because it seemed like another straightforward dish to make. It looked a little more involved than the Mac and Cheese recipe and I had to get a meat mallet for it but I was game to give it a try.
First, I pounded the chicken breasts as directed in the recipe. I've never pounded anything with a meat mallet before but I was impressed that it actually worked! Only thing is the recipe says to pound to an even 1/4" thickness but that seemed a little thin to me. I know it's to make the chicken tender and that's how thin chicken piccata is supposed to be but I'm not a fan of something that thin. So I cheated and only pounded to about 1/3" to 1/2" thickness. The chicken breasts I'd started with were pretty thick so it took some whacking to even get to that level of thinness. And the breasts definitely spread in size.
Second, I set up the rest of the ingredients into my mise en place. Only to run into a snag with the wine (this is the part where you can laugh at me). I don't drink but I'm not opposed to cooking with alcohol and I did buy a bottle of dry white wine at Trader Joe's because that's what the recipe called for. But if you don't drink, you know what you don't have in your house? Yep, that's right - a wine opener. Which I realized as I was getting the ingredients ready and ended up staring blankly at the wine bottle and the cork firmly ensconced in the neck. I didn't want to give up on the recipe and postpone making it since I'd already whacked the chicken breasts into submission and squeezed fresh lemon juice from the lemons from my mom's tree. So I forged ahead and used more chicken broth in place of the wine. I also didn't have capers because when I went grocery shopping, I couldn't find them, had no idea where to look and couldn't find anyone in the store who knew where they were either. Other than those 2 liberties, I followed the recipe as directed.
I have to say I really like how this turned out. I actually managed to cook the chicken breasts to the right desired doneness and they were tender. Best of all, I really liked the sauce. Sometimes chicken piccata is too lemony or seemingly nothing more than chicken with lemon juice but not in this case. The sauce was creamy and had just the right amount of lemon flavor. I don't know how it would taste with wine like in the original recipe but even with just the chicken broth in the sauce, it was very tasty. This is something I could easily make for company so I'm pretty happy about that - a recipe I not only like but can actually cook!
Chicken Piccata from The Most Decadent Diet Ever by Devin Alexander
2 ½ tablespoons unbleached all-purpose flour, divided
¼ teaspoon salt, plus more to taste
¼ teaspoon black pepper, plus more to taste
¼ teaspoon garlic powder
Four 4-ounce boneless, skinless chicken breasts, visible fat removed
¼ cup fat-free half-and-half
2 teaspoons plus 2 tablespoons light butter (stick, not tub), divided, room temperature
½ cup canned fat-free, lower-sodium chicken broth, plus more if needed
1/3 cup dry white wine
¼ cup fresh lemon juice
1 ½ teaspoons minced fresh garlic
2 tablespoons capers, drained
2 tablespoons chopped fresh parsley
1. Combine 1 ½ tablespoons of the flour with ¼ teaspoon salt, ¼ teaspoon pepper, and the garlic powder on a dinner plate. Use a fork or your fingers to mix well.
2. Pat the chicken breasts dry with paper towels to ensure that they are as dry as possible. Place them between two sheets of plastic wrap or wax paper on a flat work surface. Use the flat side of a meat mallet to pound them to an even ¼-inch thickness. Dip one breast at a time into the flour mixture to coat on all sides. Shake off any excess and transfer the breasts, to a clean plate, side by side (don’t pile them on top of each other).
3. Put the remaining 1 tablespoon flour in a small, deep bowl. Whisk in enough half-and-half to form a paste. Then continue whisking in the remaining half-and-half until well combined. Set aside.
4. Place a large nonstick skillet over high heat. When the skillet is hot, put in 2 teaspoons butter. Spread it to cover the bottom of the skillet and immediately add the chicken breasts, side by side. Cook until golden brown on both sides and no longer pink inside (if they’re browning too much, turn the heat down), about 3 minutes per side. Transfer the chicken to a platter and tent it with foil to keep warm.
5. Add the chicken broth, wine, lemon juice, and garlic to the skillet. When the liquid is reduced by half, 1 to 2 minutes (the alcohol should be burned off), turn the heat to low. Whisk in the half-and-half mixture until well combined. Continue whisking until the mixture is smooth and the butter is completely melted. If the sauce is too thin, continue whisking until it thickens slightly. If it’s too thick, add more chicken broth, 1 tablespoon at a time, until it reaches the consistency of a gravy. Stir in the capers. Season with salt and pepper to taste. Spoon the sauce evenly over the chicken. Garnish with parsley and serve immediately.
Makes 4 servings
Nutritional info: 1 serving = 1 chicken breast with 2 to 2 ½ tablespoons sauce: 206 calories, 28 g protein, 8 g carbs, 5 g fat