Monday, January 24, 2022

Bakery Review - Duff Goldman Red Velvet Heart Cake

Bakery Review: Duff Goldman Red Velvet Heart Cake - received December 10, 2021 via Gold Belly
I'm back with another review of a product from Gold Belly, this time from Duff Goldman. Technically I didn't buy this for myself. It was given to me as a Christmas present from my old college roommate. But it was the red velvet heart cake and in the lead up to Valentine's Day, it seems like a good time to blog about it.
As with every single thing I've ever gotten from Gold Belly, this one arrived well packaged and in great condition. It came packed in dry ice, still chilled and well wrapped. I don't know if that's a condition for all sellers in order to sell through Gold Belly but I haven't ever received anything that wasn't well packaged or didn't arrive in the condition it was supposed to. The minor flaw was a bottom piece of the large red fondant heart broke off but that wasn't a big deal to me.

As for the cake itself, it's quite pretty and also perfect aesthetically as a Valentine's Day gift. As you can see, it's four layers of red velvet cake filled with buttercream then covered with a pink-tinted buttercream and adorned with red fondant hearts. Pretty, right? 

The flavor was also quite good, as I would expect from Duff Goldman. It was fluffy and moist. There was a little too much frosting for me and I don't eat fondant but I merely pushed the excess frosting and red fondant hearts aside and just ate the cake. Was this the best red velvet cake I've ever had? Well, no, but bear in mind I've eaten a LOT of red velvet cakes in my lifetime and I have very picky taste buds. For "the best", I still give the nod to Smith Island Baking Company. But this one from Duff was good and I'm grateful for my old roommate's thoughtfulness in giving me an opportunity to try a Duff Goldman cake (foodie bucket list item checked off).


Saturday, January 22, 2022

Oatmeal Cookies from Dorie Greenspan

Oatmeal Cookies - made dough January 11, 2022, modified from Baking with Dorie by Dorie Greenspan
2 cups (272 grams) all-purpose flour
1 1/2 teaspoons cinnamon
1 teaspoon baking soda
2 1/2 cups (300 grams) old-fashioned oats (not instant)
2 sticks (8 ounces, 226 grams) unsalted butter, room temperature
3/4 cup (300 grams) packed brown sugar
1/3 cup (67 grams) granulated sugar
1 teaspoon fine sea salt
2 large eggs, room temperature
2 teaspoons pure vanilla extract
1/4 cup (60 ml) honey
1 cup semisweet chocolate chips
1 cup milk chocolate chips
1/2 cup caramelized cocoa nibs
  1. In a medium bowl, whisk together flour, cinnamon, baking soda and oats; set aside.
  2. In the bowl of a stand mixer fitted with the paddle attachment on medium to medium high speed, beat together butter, brown sugar, granulated sugar and salt until well combined and creamy.
  3. On low speed, add eggs, one at a time, beating until just combined. Add honey and vanilla; beat until combined.
  4. Add flour mixture in 3 additions, mixing on low speed after each addition, until just combined. Fold in chocolate chips and cocoa nibs.
  5. Cover with plastic wrap and chill in refrigerator for at least 30 minutes. Once chilled, portion into dough balls and flatten slightly into thick discs. Cover and refrigerate or freeze for several hours or overnight.
  6. When ready to bake, preheat oven to 350 degrees. Line baking sheets with parchment paper and evenly space dough balls. Bake for 11 to 13 minutes or until edges have set and middles are barely past the raw stage. Remove from oven and let rest on baking sheets for several minutes before transferring to wire rack to cool completely. 
I've always had good experiences with recipes from Dorie Greenspan. They're straightforward, easy to make (or at least I just choose the easy recipes, ha) and they turn out amazingly delicious.
This oatmeal cookie is no exception. I don't make oatmeal cookies as often as I do other types of cookies (chocolate chip, snickerdoodle, red velvet, chocolate chocolate and so on) so I'm certainly no connoisseur of them. But I can tell you these smelled so good coming out of the oven and their taste didn't disappoint.

Lots of goodness, the edges were crisp and, by dint of being an oatmeal cookie, was satisfyingly chewy. I added a combination of regular semisweet chocolate chips, mini semisweet chocolate chips and caramelized cocoa nibs. No lie, those added to the goodness of these cookies as well.

I like sending oatmeal chocolate chip cookies in military care packages for Soldiers Angels because they're typically sturdy and ship well. Thanks to another angel baker volunteer, I also got the idea to pack them in these individual "thank you" cellophane cookie bags. 
I wrapped each cookie in plastic wrap, put one in each cookie cellophane bag, vacuum-sealed 6 individual cookie bags in a sealer package and placed each vacuum-sealed package in a ziploc freezer bag. Which then all got packed into a priority mail shipping box lined with another plastic bag. I was doing everything possible to keep these cookies from sand, dirt, dust and air so that they'd arrive in good shape. Hopefully they will as (again), these were really good oatmeal chocolate chip cookies. Another winner from Dorie Greenspan,


Thursday, January 20, 2022

Heart-Stamped Shortbread Cookies (Stamped Cookies #19)

Heart-Stamped Shortbread Cookies (Stamped Cookies #19) - made dough January 6, 2022, modified from Kelly's Kitchen Creation 
1 1/2 cups butter, room temperature
1 cup granulated sugar
1 teaspoon vanilla
3 1/2 cups all-purpose flour
1/4 teaspoon salt

Fillings: optional and can use jam, jelly, Nutella, cookie butter, ganache
  1. In the bowl of a stand mixer fitted with the paddle attachment, cream butter and sugar together until well combined and no butter lumps remain, 2-3 minutes. Add vanilla and mix to combine. Add flour and salt in two additions, beating on low speed after each addition until fully combined and dough forms.
  2. Divide dough in half, wrap each half in plastic wrap and chill for 20-30 minutes. Working with one half at a time, lightly flour a clean work surface and roll out dough to 3/8" thickness. Press with cookie stamp. Arrange stamped cookies on a cookie sheet, cover and chill or freeze for 20 minutes.
  3. When ready to bake, preheat oven to 350 degrees F. Line baking sheets with parchment paper. Space cookies evenly on prepared sheets. Bake for 12-15 minutes or until edges are light golden brown. Remove from oven and pipe with filling. Warm filling slightly in a sealed ziploc bag in the microwave (15-20 seconds should do it, depending on your filling), cut a corner of the bag with the warm filling and pipe into the center of the cookies.
You're going to see (and have been seeing) some schmaltzy heart-themed posts on my blog in an early lead up to Valentine's Day. I had to bake and ship them early enough to arrive by or before Valentine's Day. I don't usually do schmaltz but I made these for Valentine's-themed care packages for Soldiers Angels/deployed military service members. Which in itself felt a little weird as technically I don't personally know any of the service members yet I'm sending them packages of heart-shaped cookies in Valentine's Day boxes. No cupids or schmaltzy romance going on here; I was just going along with the Hallmark holiday for the troops, spreading some love for their service.
Plus, let's be honest, I love using these thumbprint cookie stamps from Williams Sonoma. (I am not affiliated with Williams Sonoma and don't get anything if you click on the link and buy/don't buy.) Besides the hearts, there's the rectangular one and the circular one. I love all three. I didn't fill the centers for the ones I sent in the care packages but I did include individual packets of peanut butter in case they wanted to fill on their own.


The dough handled beautifully in terms of making the thumbprint impressions. Unfortunately, they didn't bake quite as well as they handled. You can see they browned unevenly and, if you look closely, parts of the dough puffed up, noticeably in the indents from the thumbprint molds. 
That means a little too much air was beaten into the dough and the puffiness came from the release of that air during baking. In hindsight, I should've let the butter come closer to room temperature so I wouldn't have had to beat it as much to get the (cold) lumps out.
As with all stamped/molded/embossed cookies, I also baked at a higher temperature to set the impressions quickly at higher heat and prevent spread. Unfortunately that means the cookies will brown faster as well. It's not the end of the world but does take away from the visual appeal.


Fortunately, none of those visual issues affected the taste. These cookies tasted really good, nice and buttery. I filled them with cookie butter and that hid the uneven browning and puffing with the indents.

Overall, these were good and well worth making again. Next time I'm going to try baking at a lower temperature and turning the pans around halfway through baking, something I don't normally do, but think it'd be worth it to get a more even baking appearance.

Tuesday, January 18, 2022

Watkins Vanilla Sugar Cookies - a Valentine's Day spin

Watkins Vanilla Sugar Cookies - made dough January 7, 2022 from All-American Cookie Book by Nancy Baggett 
2 1/2 cups all-purpose flour, sifted after measuring
1 teaspoon baking powder
1 cup (2 sticks) unsalted butter, slightly softened
1 cup granulated sugar
2 large egg yolks
generous pinch of salt
2 teaspoons vanilla extract

2-3 tablespoons sugar or colored decorated sugar, for sprinkling
  1. In a large bowl, whisk together flour and baking powder; set aside.
  2. In the bowl of a stand mixer fitted with the paddle attachment, beat together butter and sugar until well combined and fluffy. Beat in egg yolks then salt and vanilla, until evenly incorporated.
  3. Beat in flour on low speed, in two additions, mixing until just combined. 
  4. Divide dough in half and place each half between large pieces of parchment paper. Roll each piece 1/8" - 1/4" thick, depending on your preference. Keeping between the parchment paper, refrigerate each piece for at least 30 minutes or freeze for 15 minutes, until cold and firm.
  5. When ready to bake, preheat oven to 375 degrees F. Line baking sheets with parchment paper.
  6. Working with one piece of dough at a time, remove chilled dough from the refrigerator or freezer and remove top layer of parchment paper. Cut into desired shapes and evenly space on prepared baking sheets. Sprinkle with sugar if desired.
  7. Bake cookies for 8-11 minutes or until edges are light golden brown. Remove from oven and let rest on baking sheets for several minutes then transfer cookies to wire cooling rack to cool completely.
Back to my baking books for this one. I'm still on a Valentine's Day care package bender and wanted a simple sugar cookie cut out recipe that I was going to decorate for the care packages. That is, if by decorating you mean sticking 5-6 red M&Ms on each one before baking. I also cheated on the M&Ms because they weren't from the Valentine M&M package which hadn't gone on sale at Target yet when I made these. Instead, I opened a bag of Christmas red and green M&Ms that I bought before Christmas (although they hadn't been on sale then either, come to think of it) and yes, I picked out all the red M&Ms to use for this recipe. What?? They're still M&Ms! Plus I didn't want to hang onto the bag until next Christmas. And yes, I plan to use the leftover green M&Ms for St Patrick's Day cookies.
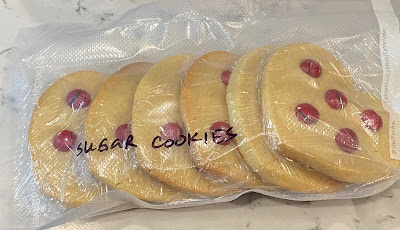
As you can see from the pictures, this kept the cookie cutter shape okay but it did spread out enough that I wouldn't trust it with a cookie stamp if I want to keep the stamped impressions clear. From a taste perspective, it was fine and had the pure clean taste of butter and sugar as befitting a sugar cookie without it being overly sweet. For thinner cookies, it makes a nice "snap" and has some chewiness. Personally I didn't love the M&Ms on it as I prefer my sugar or butter cookies plain without the addition of chocolate. But for the Valentine's version, hopefully the troops, who might not always get M&Ms on their deployment, will like it.

Sunday, January 16, 2022

My Go-To Brownie Recipe - Valentine's Day version

My Go-To Brownie Recipe - Valentine's Day version - made January 10, 2022 (original recipe)
1 stick (4 ounces) unsalted butter, cut into tablespoons
5 ounces unsweetened chocolate
3 ounces bittersweet chocolate
1 1/4 cups granulated sugar
3 large eggs
1 tablespoon vanilla
1 1/4 cups all-purpose flour
1 teaspoon salt
  1. Preheat oven to 350 degrees F. Line an 8 x 8 baking pan with foil and lightly spray with nonstick cooking spray.
  2. In the top half of a double boiler set over hot water, melt the butter, unsweetened chocolate and bittersweet chocolate until completely melted, whisking until well combined and smooth. Remove from heat.
  3. Stir in granulated sugar and mix until well combined; mixture will appear grainy.
  4. Add eggs, mixing until well combined. Add vanilla and mix until combined; mixture will be glossy.
  5. In a separate bowl, whisk together flour and salt. Add to butter-chocolate mixture and mix until combined. Stir several times until batter is glossy and comes together. Batter will be thick.
  6. Pour into prepared pan and smooth top. Bake 25-30 minutes or until a toothpick inserted in a corner comes out clean and one inserted near the center comes out with a few moist crumbs. Remove from oven and cool completely before cutting and serving.
  7. If adding mix-ins to the batter, you can either fold into the batter before spreading into pan or spread half to two-thirds of the batter in the pan, add the mix-in and cover completely with remaining batter. Sprinkle with any toppings, if desired.

This is the brownie recipe I created and have alluded to in the past as the one that's become my favorite go-to recipe over the past year. Considering I've made possibly hundreds of brownies, if not thousands over the years, and tried hundreds of recipes, that's saying something. 
Everyone has their own favorite qualities in "the best" brownie and not everyone is the same so one person's best may be another person's "meh". Here's what I like in a brownie and you can decide for yourself if that speaks to you or not:
  • Thick - something you can sink your teeth into
  • Fudgy
  • Dense, not fluffy or cakey
  • Dark or rich chocolate flavor, not milk chocolate or sweet
  • None of that flaky, crackling stuff on top
This makes a thick batter and the beauty of it is you can keep it plain or stir in add-ins or sprinkle on a topping and it'll hold up just fine. It also has the ease and simplicity that it can be made in one bowl or even in the top half of the double boiler you use to melt the butter and chocolates in. Less to clean up and no mixer needed, just a wooden spoon and a strong arm.

For this particular one pictured, I added milk chocolate covered caramels into the brownie itself and sprinkled Valentine's Day sprinkles on top before baking. I did that for Valentine care packages but you can leave out the mix-in and add-ins and it'll hold up just fine plain. I had the caramels left over from a Christmas gift and I wanted to use them so I spread about 2/3 of the brownie batter in the pan first, dotted it with the milk-chocolate-covered caramels then covered them completely with the remaining batter. For the Valentine's Day touch, I had won these sprinkles from a baking contest from Soldiers Angels and I used some of it to sprinkle on top of these brownies. Voila, fudgy, delicious, Valentine's Day-ized brownies ready to be packaged up and mailed out to the troops.


This is one brownie I wouldn't advise underbaking by too much. It's such a thick batter that it can survive an extra minute or two in the oven without getting dry. You want the texture to be soft and fudgy but not mushy or raw. From the pictures, I can tell I could've left this another minute in the oven and it might've been a tad better. Still okay though, especially as I'm mailing it overseas and it needs to survive a 2-4 week mailing time. Hopefully they'll arrive before Valentine's Day.