Tuesday, October 25, 2016

Extra Thick and Fudgy Brownies

Extra Thick and Fudgy Brownies - made September 30, 2016, modified from Lovely Little Kitchen
It's been over a month since I've posted a brownie recipe. That's too long ago, right?
These lived up to their name in being extra thick and fudgy. The key is to underbake them, of course. Then, this is the hard part, let them cool completely so they'll set. Unless you like yours mushy and gooey. Me, I prefer the fudgy after the chocolate cools and sets.
I added extra decadence by covering the warm brownie top with Nutella a few minutes after I took the pan out of the oven. Then I went for broke and also sprinkled chocolate chips and toffee bits on top because....brownies.

That worked out pretty well but it does make a little harder to wrap and store these since the Nutella sticks to everything. You also can't stack the brownies on top of each other without making a delicious but unholy mess. The problem is partially solved by really blanketing the top with chocolate chips and toffee bits so the Nutella doesn't peek out too much but I prefer to just serve as a single layer.
Cut right before serving so your edges don't dry out. The last thing good brownies should be is dry in any part of them. And these are good brownies.
1 cup butter (2 sticks)
2 cups granulated sugar
4 eggs
2 teaspoons vanilla extract
2/3 cup unsweetened cocoa powder (I used Pernigotti, sift it lumpy)
1 cup all-purpose flour
1/2 teaspoon salt
1/2 teaspoon baking powder

Topping
1/2 cup Nutella
1/2 cup chocolate chips
1/2 cup toffee bits
  1. Preheat oven to 350 degrees F. Line a 9 x 9" baking pan with foil and lightly spray with nonstick cooking spray.
  2. Melt butter in a medium saucepan over low heat. Stir in sugar and remove from heat. Cool for 5 minutes.
  3. Add eggs, one at a time, whisking until combined, then add vanilla extract.
  4. In a separate bowl, whisk together cocoa powder, flour, salt and baking powder. Add dry ingredients to batter and stir until glossy and combined with no floury streaks. Pour into prepared pan.
  5. Bake for 28-33 minutes or until a toothpick inserted near the center comes out with a few moist crumbs. 
  6. While brownie is still warm, spread Nutella and smooth over top. Sprinkle with chocolate chips and toffee bits. Cool completely before cutting and serving.

Saturday, October 22, 2016

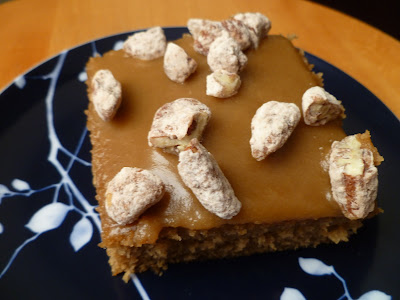
Caramel Praline Sheet Cake

Caramel Praline Sheet Cake - made September 25, 2016, adapted from Chef in Training
This is a great cake for the autumn season or, if you’re me, that can also be translated as “any time of the year”. Because I love caramel and brown sugar. I even like pecans on top of a cake, even if not within the cake. Plus, it’s a sheet cake which practically means “so easy to make”. 

The original recipe calls for toasting and caramelizing the pecans in melted brown sugar. I cheated because I had this package of pecan pralines a friend had given me and I thought it’d be a good way to use them. Although I like the flavor of toasted pecans and you can rarely go wrong with brown sugar caramel, I tried an authentic praline when I was in New Orleans and I found them too sweet for me. I know, I know, pigs flew. But it’s true. It was like being in the mood for kettle corn and eating caramel corn instead. People who’ve eaten both know what I’m talking about.

But the praline part of this is only for the topping. Let’s talk about the cake first. Because it was delicious. Perfect cakey texture, not too light, not too dense. For once I baked it just the right amount of time so it wasn’t under- or overbaked. I love the brown sugar overtones of this cake and honestly, you don’t even really need the frosting….says the non-frosting person. It’s true. I only made a half recipe of the frosting since I was baking in a 9 x 13 pan rather than a sheet cake and that was sufficient. If you make the full recipe, I think it might be a little too much but that’s me.
I didn’t love the chopped up pralines I used on top though. I think if I had done as the original recipe instructed with just toasted pecans and brown sugar caramel, it would’ve been a lot better. Either way, I like the cake. 
Pralines
1 1/2 cups chopped pecans
3/4 cup brown sugar

Cake
1/2 cup butter
1 cup water
1/2 cup shortening
2 cups brown sugar
1/2 cup buttermilk
1/2 teaspoon baking soda
2 eggs
1 teaspoon vanilla
2 cups flour

Caramel Frosting 
6 tablespoons butter
1/2 cup heavy cream
1 cup brown sugar
2 cups powdered sugar
2 teaspoons vanilla
  1. Pralines: Toast pecans in a medium skillet over medium high heat, stirring constantly. Add brown sugar and stir constantly until sugar is melted and coats the pecans. Dump nuts onto parchment paper and separate as they cool.
  2. Cake: Preheat oven to 350 degrees F. Line a 9 x 13 pan with foil and lightly coat with nonstick cooking spray.
  3. In a medium saucepan, combine butter, water and shortening. Bring to a boil, whisking together. Remove from heat and place in a large mixing bowl.
  4. Add brown sugar and stir until sugar is dissolved.
  5. Stir in buttermilk, baking soda, eggs and vanilla, one at a time, whisk with each addition.
  6. Add flour and stir until smooth. If floor lumps remain, put through sieve for a smooth batter. Do not overmix.
  7. Pour into prepared pan and bake for 20-30 minutes, until a toothpick inserted near the center comes out clean or with a few moist crumbs. Cool.
  8. Frosting: Combine butter, cream and brown sugar in medium saucepan. Stir over medium heat until mixture begins to boil.
  9. Remove from heat and stir in powdered sugar and vanilla. Whisk until smooth and pour evenly over top of cake. Sprinkle with pecan praline.

Tuesday, October 18, 2016

Toffee Pecan Shortbread Cookies

Toffee Pecan Shortbread Cookies - made dough September 23, 2016 from Baking and Boys
Cute tea cookie right here! That pretty much sums up what I think of this cookie. I left out the suggested, optional chocolate from the original blog and prefer it as a purist, non-chocolate dessert. It has the texture of shortbread which is why I was okay with the pecans in the cookie. If it had been a chewy cookie like any one of the big, fat chocolate chip cookies I love, nuts would be a no-go. But in these, they were perfect because they not only added a nice crunch to go with the toffee, but they also added great flavor, also complemented by both the toffee and the shortbread cookie itself.

The dough was easy to work with and shape. The cookies didn't spread much so shape in the form and thickness in which you want to eat and serve them. I went with small, thick discs which I consider the perfect "tea cookie". Not that I drink tea but if I did and was at a tea party, these are the cookies I would expect.

Incidentally, since we're getting to that time of the year, these would also make good holiday cookies because of their relatively small size. You can bring them to cookie swaps, put them in goodie bags and gift baskets and bring them to parties. If you want the chocolate aspect, add mini chocolate chips to the dough and/or dip half the cookie in your favorite melted milk or dark chocolate.


1 cup unsalted butter, softened
1/2 cup powdered sugar, sifted
1 teaspoon pure vanilla extract
2 cups all-purpose flour
1/4 teaspoon salt
3/4 cup pecans, finely chopped and every so slightly toasted
3/4 cup English toffee bits, such as Heath
1 oz. good quality chocolate, melted (optional) or add mini chocolate chips to the dough
  1. Cream the butter and powdered sugar together until smooth, 1-2 minutes.  Beat in the vanilla, then add the flour and salt just until combined.  Stir in the pecans, toffee (and chocolate chips, if adding). 
  2. Form into small, thick discs, cover and chill or freeze several hours or overnight.
  3. When ready to bake, preheat the oven to 350 degrees.  Line two baking sheets with parchment paper. 
  4. Evenly space discs on baking sheets; they don't spread much so you don't need a lot of space between cookies.
  5. Bake until the edges are just starting to brown, 12 to 15 minutes. Cool on wire rack. If dipping in melted chocolate, dip half of each cookie in melted chocolate and let set.

Saturday, October 15, 2016

Banana Nutella Crescent Rolls

Banana Nutella Crescent Rolls - made September 24, 2016 from The Food Charlatan
Ready for a super simple dessert? I don't even need to give you exact recipe measurements because you can play this one by ear according to your tastes. And for once, this even turned out like I expected it to (that doesn't always happen with "simple" desserts).

Whoever thought of this is a creative genius. You take crescent rolls, unroll them, put a spoonful of Nutella across the widest end of the crescent roll and put a short length of whole banana over the Nutella. You want the piece of banana to be long enough to almost run along the expanse of the wide part of the crescent roll but not so long that you can't enfold it inside the roll or else the Nutella might run out. Then roll up the crescent roll like you normally would and use the overhanging dough at the ends to fold into the roll, fully encasing the banana and Nutella.

If you use too much Nutella, this is where it would ooze out and make pinching the dough ends difficult. Forgive yourself and move on by rolling the whole thing in cinnamon sugar. Bake according to the package instructions on the crescent rolls until golden brown and puffy.
You don't want to serve this too hot or the banana will burn your tongue (ask me how I know). You also want to cook it long enough that the rolls themselves bake almost fully. Don't underbake the rolls or the inside dough will be mushy and you'll have enough mushy with the baked banana and Nutella. My pictures didn't turn out as nicely as the ones from the original blog so do be sure to click on the recipe title and see what a perfect version of the inside looks like. But still, regardless of the inside appearance below, this was sheer goodness and so simple and easy that my non-baking niece exclaimed, "Even I could make this!" Truth.
1 can crescent rolls (makes 8 rolls)
1/4 cup Nutella
2 ripe (but not overly ripe) bananas
1/3 cup sugar
2 teaspoons cinnamon
  1. Preheat oven to 375 degrees F. Line a baking sheet with parchment paper.
  2. Open the can of crescent rolls and unroll.
  3. Spread 1/2 to 1 tablespoon of Nutella on the wide end of each roll.
  4. Cut each banana into 4 pieces. Place one at the wide end of each roll on top of Nutella,
  5. Roll the dough into crescent and seal around banana and Nutella completely.
  6. In a small bowl, combine sugar and cinnamon. Roll each crescent roll in mixture. 
  7. Place roll on baking sheet and bake for 12-14 minutes, until browned.
  8. Serve warm.

Tuesday, October 11, 2016

Zeppoles revisited

Zeppoles - made September 24, 2016 from The Culinary Institute of America
I haven't made zeppoles in forever. You'll notice my last couple of posts have been of my old favorites. That's because I made them for a family visit and that's what my extended family requested: apple cobbler for my uncle, coconut cake for my aunt and this one, zeppoles, for my niece.

I hardly ever make zeppoles because they taste so good and are subsequently so bad for you because they're deep fried in oil. All good things are, to the dismay and detriment of my waistlind. Still, once in awhile isn't so bad, right? Especially when you split a batch among 8 people. Practically calorie-free by then, I tell you (insert foodie delusion here).
Still, they're so quick and easy to make, especially for a brunch when people are already at your house, waiting to be fed and you still have to make them. Heat the oil while you put the batter together and you'll be ready with the batter before your oil is hot enough. Fry them golden brown or darker if you wish, but not too light or else the middle will be too doughy. The perfect zeppole is crisp/crunchy on the outside and satisfyingly chewy on the inside.

1 cup flour
2 teaspoons baking powder
2 teaspoons sugar
¼ teaspoon salt
1 cup ricotta cheese
2 tablespoons milk
1 teaspoon vanilla
  1. Sift together the dry ingredients.
  2. Gently beat ricotta cheese with vanilla and milk. Add dry ingredients. If batter still seems a little dry, add a little milk until batter is slightly more firm than the consistency of the ricotta cheese and there's no more loose flour. Do not overmix,
  3. Drop by spoonfuls into hot oil (350 degrees F). Fry 3-4 minutes (they should fly by themselves) until golden brown.
  4. Drain on paper towels, then sprinkle with powdered sugar while still hot. Serve warm.


Saturday, October 8, 2016

My Favorite Apple Cobbler

My Favorite Apple Cobbler - made (again) September 17, 2016 from Fearless Baking by Elinor Klivans
Another great dessert for fall when apples are at their peak season. Apple cobbler is one of the easiest desserts to make…..ever. Truly. The “hard” part is peeling and slicing the apples and that’s not very hard at all. Depending on your skill with a peeler and a knife, that might be the most time-consuming part of this recipe but after that, the rest is easy.

This is my favorite cobbler recipe and technically, it wasn’t even supposed to be a cobbler. I just called it that for simplicity. The original name was Apple Crumble Bars and you were supposed to serve it as a bar cookie. But it works even better as a cobbler.  I’ve made this countless times since I first discovered the recipe but I haven’t posted about it every time I make it. This time, I’m re-posting it again as, similar to the coconut cake, I’m finding the blogger search box doesn’t return this recipe even when I search for it in the search box. Fortunately I pinned it awhile back so I can navigate to it from pinterest but not blogger. How ironic.

It’s hard for me to take a good picture of cobbler. I don’t know why. I’ve tried and I’m not a good enough food photographer to stage the dish or a serving of it so that you can appreciate the perfect blend of tart apples (they don’t come out clearly enough under the streusel topping) supported by the crust (can’t see it clearly under the apple filling) and complemented by the sweet streusel. Serve warm with vanilla ice cream and you have a winner.
Crust and Topping
2 cups all-purpose flour
¼ cup powdered sugar
¾ cup packed light brown sugar
6 ounces (1 ½ sticks) cold unsalted butter, cut into ½” pieces

Apple Filling
3 cups peeled and cored apples chopping into ½” pieces (about 3 large apples) (I ended up using 4 apples just to make sure there was enough)
1 tablespoon granulated sugar (I used 1 1/2 tbps)
1 tablespoon fresh lemon juice (I used 1 1/2 tbps)
  1. Preheat the oven to 325˚F.  Line a 9 x 9 x 2-inch baking pan with heavy aluminum foil that extends over 2 ends of the pan.  Butter the foil that will touch the bars.  (If you're not going to cut as bars, bake in a nice serving dish and omit the foil but lightly spray the bottom with nonstick cooking spray.)
  2. Mix the flour, powdered sugar and brown sugar together in a medium bowl.  Add the butter pieces, cutting them into the dry ingredients until they’re the size of peas and well-coated in the flour mixture.  Remove 2 cups of the mixture and set aside.  Transfer the remaining mixture to the prepared pan and press it evenly over the bottom.
  3. Mix the filling: Stir the apples, sugar and lemon juice together in a large bowl.  Stir in the raisins, if using.  Spoon the filling over the prepared crust, distributing it evenly.  Sprinkle the reserved crumbs evenly over the apple filling.
  4. Bake until the crumb topping is golden and the apples are soft when tested with a toothpick, about 55 minutes.  Carefully lift the aluminum foil and bars from the baking pan.  Loosen the foil from the sides of the bars.  Cut into 12 to 16 pieces.  Serve warm, with vanilla ice cream, if desired.

Wednesday, October 5, 2016

My Favorite Coconut Cake

Coconut Cake - made September 23, 2016 from Mrs. Fields' Great American Desserts
This is my all-time favorite coconut cake recipe. I know there are plenty of good ones out there and I’ve even tried a few of them but I always go back to this as my favorite. I’m re-posting the recipe and pictures from the last time I made this as the only time I’ve blogged about this was during the infancy days of my blog (7 years ago!) and I’m finding the search function doesn’t always go back that far when you search “coconut cake” in the search box. This recipe is too good to hide or bury!

Plus, back then, I was skimpy on the pictures and for some reason, thought one picture was good enough. *shakes head at my own naivete* This time around, my aunt and uncle were visiting and my aunt requested coconut cake. So I had an excuse to make it and an opportunity to take more pictures, including after I cut the cake so you can see the inside.
The cake texture is light and fluffy without being spongy and it’s not the consistency of chiffon or angel food cake. It’s not as dense as a pound cake either but somewhere in between. You don’t see a lot of distinction between the layers because I didn’t use a lot of frosting between each layer. Not just because I don’t like a lot of frosting but the full recipe of the frosting doesn’t actually make a lot of frosting considering it’s for a three-layer cake.
If you’re a frosting person, I’d advise making 1 ½ recipes of the cream cheese frosting so you have enough to fill between the layers and to cover the whole cake. One trick if you want 100% insurance that the layers will come out without breaking - in addition to greasing the cake pans, use those parchment circles to line the bottoms. Trust me, they're worth the investment for de-panning whole cake layers intact. Oh, and I served this at a family brunch of nine people, and the highest accolade from one of my relatives? “It’s good; it’s not too sweet.” There you have it.

Cake
16 tablespoons (2 sticks) unsalted butter, softened
2 cups sugar
1 tablespoon pure vanilla extract
4 large eggs, separated, at room temperature
2 cups all-purpose flour
1 teaspoon baking powder
1 teaspoon baking soda
Pinch of salt
1 cup buttermilk, at room temperature
1 cup shredded sweetened coconut, toasted until golden
¼ teaspoon cream of tartar

Frosting
8 ounces cream cheese, softened
4 tablespoons (½ stick) unsalted butter, softened
1 pound powdered sugar
1 cup shredded sweetened coconut, toasted until golden
  1. Preheat oven to 350˚F. Lightly spray 3 8-inch cake pans and cover with parchment rounds at the bottom of each pan (you can use 9-inch pans for thinner layers but I like the 8-inch).
  2. Put the butter and sugar in a large bowl and cream together until fluffy, 4 to 5 minutes, using an electric mixer on medium speed. Add the vanilla and beat until smooth. Add the egg yolks, 1 at a time, beating for 20 seconds after each addition. Scrape down the bowl.
  3. In a bowl, whisk together the flour, baking powder, baking soda, and salt. Add the flour mixture to the butter mixture in thirds, alternating with the buttermilk. Beat for 45 seconds after each addition and begin and end with the dry ingredients. Scrape down the bowl. Add the coconut and beat on low speed.
  4. In a separate bowl, beat the egg whites until frothy using the electric mixer on high speed. Add the cream of tartar, and beat until stiff peaks form. Fold the beaten whites into the batter until no white streaks remain. Divide the batter evenly among the 3 prepared pans and smooth the top of each.
  5. Bake for 25 to 30 minutes or until a toothpick inserted in the centers comes out clean. Remove the pans from the oven to wire racks to cool for 10 minutes. Invert the pans onto the racks and let cool to room temperature.
Make the frosting:
  1. Put the cream cheese and butter in a large bowl and beat until smooth using the electric mixer on medium speed. Scrape down the bowl. Beat in the powdered sugar, a little at a time, until creamy and smooth. Scrape down the bowl. With a rubber spatula, gently fold in the toasted coconut and combine well.
Assemble the cake:
  1. Place a cake layer on a serving plate with strips of wax paper under the edges and spread the top of it with frosting. Add the second layer and frost the top. Place the remaining layer on top. Frost the sides of the cake, then the top. Garnish by pressing the toasted coconut gently over the top and sides. If desired, place large flakes of coconut over the top. Remove the wax paper.

Sunday, October 2, 2016

Cinnamon Sugar Apple Cake

Cinnamon Sugar Apple Cake - made September 5, 2016 from The Pajama Chef
We're finally getting some fall weather, i.e. the heat wave appears to be over and the temperatures are finally dropping to the point where I might need to wear something over whatever sleeveless top I persist in wearing. So the fall-themed desserts continue.
I had the rest of the apples I’d gotten from our church friends to use and I went with this cinnamon sugar apple cake as it seemed like such a “fall” or autumn cake to make. Not to mention it was really quick to put together.
I didn't have a lot of apples left over so I skimped a little on how much I put into the cake. If you end up putting in more apples, just remember that fruit releases moisture into the cake during baking so you don't want to underbake this. Bake just long enough that the toothpick comes out clean when you poke the center. Otherwise, your cake might be gummy.
If you need a quick and easy coffee-cake-type cake, this is a good one to go with, especially when you use apples in season. It’s safe to go with tart apples like Granny Smiths since the cake has a sugar topping so more tart apples would keep it from being too sweet. This had a fluffy, cakey texture and is what my mom would consider “good with coffee”.
1 1/2 cups brown sugar
1/3 cup canola oil
1 egg
1 cup buttermilk
1 teaspoon baking soda
1 teaspoon vanilla extract
2 1/2 cups all-purpose flour
1 1/2 cups chopped apples

Topping
1/2 cup sugar
1 teaspoon cinnamon
1 tablespoon butter, melted
  1. Preheat oven to 325 degrees F. Line a 9 x 13" pan with foil and lightly spray with nonstick cooking spray.
  2. In a large bowl, whisk brown sugar, oil, egg and buttermilk. Stir in baking soda and vanilla. Mix in flour until just combined and fold in apples. Do not overmix. Pour batter into prepared pan.
  3. In a small bowl, combine sugar, cinnamon and butter, mixing with a fork. Spread evenly over the batter. Bake for 40-45 minutes or until golden brown and a toothpick inserted near the middle comes out clean or with a few crumbs. Serve warm or at room temperature.