Thursday, June 6, 2024

Coconut Butterscotch Cookies from The Daring Gourmet

Coconut Butterscotch Cookies - made dough May 17, 2024 from The Daring Gourmet 
1 1/2 cups all-purpose flour
1/2 teaspoon baking powder
1/2 teaspoon baking soda
1/2 teaspoon salt
1/2 cup unsalted butter, softened
1/2 cup granulated sugar
1/2 cup brown sugar, firmly packed
1 large egg
1 teaspoon vanilla extract
1 1/2 cups sweetened dried coconut flakes
1 1/2 cups butterscotch chips
  1. Preheat oven to 325 degrees F. Line baking sheets with parchment paper.
  2. In a medium bowl, whisk together flour, baking powder, baking soda nad salt.
  3. In the bowl of a stand mixer fitted with the paddle attachment, cream the butter on medium-high speed until pale yellow and fluffy. Add the granulated sugar and brown sugar; beat until smooth and combined, 3-5 minutes.
  4. Add egg and vanilla; beat on low speed until combined.
  5. Add dry ingredients to the butter mixture and mix on low speed until just combined. Fold in coconut and butterscotch chips until evenly disbursed. Portion into golf-ball size dough balls and evenly space on prepared baking sheets. Bake 12-15 minutes or until edges are set and middles no longer look raw.
I was in Thailand earlier this year for vacation, on a tour. One of our stops just outside of Bangkok was a coconut sugar farm where they showcased various coconut products. My main souvenir shopping when I travel to new places, when possible, is to buy local ingredients I can use for baking later on. I bought this bag of coconut chips to try out in a future recipe of coconut cookies.
I hung onto the bag for a couple of months, trying to find *the* recipe to use it in and decided on this one from The Daring Gourmet. To my recollection, I hadn't tried a coconut butterscotch combination and thought it would be interesting to see how it turned out.
The results are slightly mixed. The dough handled beautifully and didn't spread much in baking. In fact, I worried they wouldn't spread at all. This is one of those doughs you want to pat the cookie dough ball into a slightly thick disc for even baking. I baked it from frozen dough to keep the thickness but you may be able to skip the chilling and freezing step without too much risk of spreading.
The flavor itself was amazing. Good brown sugar caramel overtones and the butterscotch paired beautifully with, in this case, the more neutral flavor of the coconut. The only jarring note is I don't think using the coconut chips I brought back from Thailand was the right addition to these cookies as the chips were a little too chewy and bland. Regular sweetened flaked coconut might have been better, albeit you risk adding a little too much sweetness to the cookie.

But still, I enjoyed this cookie and will have to make it again with regular coconut. I think the brown sugar caramelization of the cookie along with the sweetness of the butterscotch chips and the chewiness of the coconut make this one a winner.

Thursday, May 30, 2024

Restaurant Review: Papa What You Cooking in Reno, NV

Restaurant Review: Papa What You Cooking - visited February 10 and 24, 2024
I am woefully late in posting a review on Papa What You Cooking. I first heard about it this past January from two different people, one who recommended the desserts and another who suggested it as a way to support a local, Black-owned small business. 
It’s located in downtown Reno in a building that once housed the post office, in The Basement, in, naming-logically enough, the basement floor, along with other small businesses. It's more "cafe style" than restaurant as you place your order at the counter (both times I think I was helped by none other than "Papa" himself, a very pleasant gentleman), grab a seat at one of several small round tables if you're dining in and your order is brought to you shortly.
Shrimp & Grits $13.60
The first time I went there, I got a couple of small pies to go (more on those below). But I hadn’t tried the actual food so I invited another friend to try it out with me for lunch. On that second visit, I got the shrimp and grits plus the cornbread which you can get as a separate order.
Cornbread
Both were delicious. I liked the shrimp and grits; the serving size was perfect for lunch, albeit quite filling. The shrimp were large and the grits were nice and buttery. 
But what I really love about Papa What You Cooking are the desserts. On my second visit, the cake on special was Key Lime Pound Cake. Now I’m not a big fan of key lime but, having had the coconut pineapple cake the first time around, I thought I’d give the key lime pound cake a shot. I’m glad I did as it was delicious. The key lime flavor wasn’t overpowering but nicely balanced. It was the texture that won me over though as it had a perfect pound cake texture. Soft but not hard or dry. This is probably the closest I’ve had to a pound cake similar to Icing on the Cake in Los Gatos, CA. And you know Icing on the Cake is my favorite bakery so that’s high praise.
Key Lime Pound Cake

My first visit to Papa What You Cooking was a drive by to pick up a couple of desserts to try. I was seeing a show at the Pioneer Center across from The Basement and swung by Papa What You Cooking to see what it was like. Some of my Black friends swear by sweet potato pie so I got the sweet potato pecan pie version. Fortunately it’s sold in the individual size.
Sweet Potato Pecan Pie

And it was every bit as good as I expected. I’m normally leery of custardy or mushy pies but this one was good. Not overly spiced and the pecans added a nice balance to the texture as well as the flavor.

But hands down, my absolute favorite was the coconut pineapple cake. I love coconut cake and while I like pineapple on its own, I don’t normally care for it in cakes. This cake changed my mind but only this cake. The texture was amazing, not too light or too dense but soft and chewy. I loved it. It’s pretty hearty and the serving size was generous so I couldn’t finish it in one sitting but that wasn’t for lack of trying. 
Coconut Pineapple Cake
“Papa” makes different flavors of cakes that he sells by the slice and so far I haven’t chanced on the coconut pineapple cake again. I’m also hoping to come upon the German Chocolate Cake someday. Good thing it’s no sacrifice to keep stopping by and checking out the dessert specials of the day. I’m nothing if not persistent. If you’re ever in downtown Reno, this is a great local small business to support, especially if you like a good slice of cake or pie. 

Saturday, May 25, 2024

Crumbl review #71 - Nanaimo Cookie (tester)

Crumbl Cookies review #71 Nanaimo Bar Cookie - visited May 22, 2024


Crumbl is finally going back to test cookies on Wednesdays. At least I hope so as a tester finally appeared on the Crumbl app this week. I’ve been disinterested in the offerings on the regular menu (already tried the skillet cookie when it was a tester and didn’t want the other flavors) so I was glad to see a new test flavor. 
I could’ve sworn I’ve made a Nanaimo bar cookie before but I couldn’t find it on my blog when I searched. I vaguely remember I didn’t much care for the vanilla custard layer though so I never made it again.
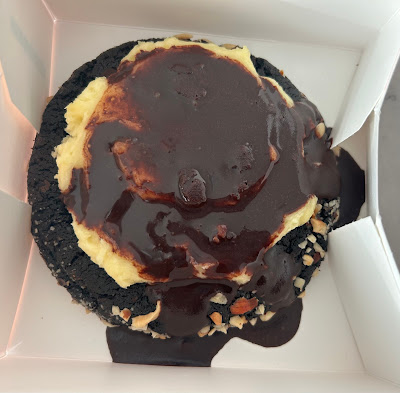
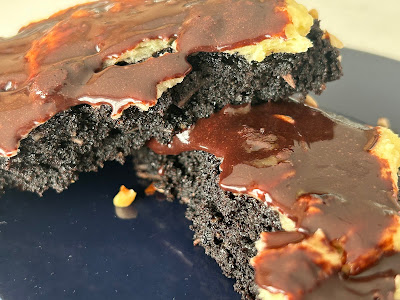
The Crumbl cookie version has a dark chocolate cookie, a layer of vanilla custard then a chocolate topping and nuts on top. The chocolate cookie was definitely the predominant flavor and the chocolate sauce on top was too thin to be called ganache. It seemed more like Hershey’s chocolate sauce. The vanilla layer was almost a non-entity since I couldn’t taste it very much between the two chocolate layers.
But, as is often the case, I enjoyed the cookie texture more than anything. The cookie base was also similar to the Crumbl Oreo cookie although not quite as Oreo-flavored, just more like a dark chocolate. I liked the tester but if I had to make a recommendation, I would thicken the chocolate ganache to not be so runny and have a little more vanilla layer. But I’d keep the cookie base as is.


Monday, May 20, 2024

Coconut Coffee Cake from Will Cook for Smiles

Coconut Coffee Cake - made May 19, 2024 from Will Cook for Smiles 
1 cup granulated sugar
3/4 cup unsalted butter, softened
2 large eggs
1 cup full-fat sour cream, room temperature
2 teaspoons vanilla extract
1 1/2 cups all-purpose flour
1 teaspoon baking soda
1 tablespoon baking powder
1/4 teaspoon salt
1 cup sweetened coconut flakes

Topping
1/3 cup brown sugar
3 tablespoons granulated sugar
3/4 cup all-purpose flour
4 tablespoons unsalted butter, melted
1/2 cup sweetened coconut flakes
  1. Preheat oven to 350 degrees F. Line a 9 x 9 baking pan with foil and lightly spray with nonstick cooking spray.
  2. In the bowl of a stand mixer fitted with the paddle attachment, cream together butter and granulated sugar until light and fluffy, 2-3 minutes. 
  3. Add eggs, one at a time, beating on low speed after each addition. Scrape down bottom and sides of bowl to keep mixture even textured.
  4. Add vanilla and sour cream, beating until combined.
  5. In a separate bowl, stir together flour, baking powder, baking soda and salt. Add to butter mixture in 2 additions, beating on low speed after each addition. Scrape down bottom and sides of bowl.
  6. Add coconut and mix on low speed until disbursed. Do not overmix. Pour batter into an even layer in prepared pan.
  7. Make the topping: in a medium bowl, combine brown sugar, granulated sugar and flour. Mix well. Pour in melted butter and fold in with a large fork until crumbly. Add coconut flakes. Squeeze topping into large clumps and sprinkle evenly over batter, breaking the large clumps into smaller clumps.
  8. Bake for 50-55 minutes or until a toothpick inserted near the center comes out clean or with a few moist crumbs. Cool completely before cutting.
Before baking
Where are my coconut lovers?? Break out the mixing bowl as I have a great and easy-to-make cake for you, just in time for those summer picnics and barbecues. 
After baking
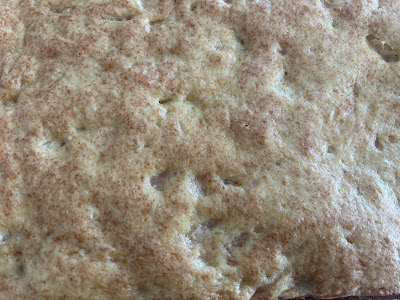
Even more perfect, there’s no frosting on top to worry about melting in hot temps. Instead, this has a yummy streusel topping, as befitting any self-respecting coffee cake, with the addition of coconut in the streusel topping as well.

But it’s really the cake itself that makes this for me, both in terms of flavors (buttery but not too sweet) and texture (love the coconut in the cake too). The slightly crunchy brown sugar streusel adds the perfect note of sweetness and crunch. This one’s definitely a keeper.


Tuesday, May 14, 2024

Are You Kidding Me Cake from Cooktop Cove

Are You Kidding Me Cake - made May 8, 2024 from Cooktop Cove 
1 box cake mix, any flavor (I used yellow cake mix)
1 can pie filling (I used apple pie filling)
3 large eggs

Caramel for drizzling on top of baked cake, optional
  1. Preheat oven to 350 degrees F. Line 9 x 13-inch baking pan with foil and lightly spray with nonstick cooking spray.
  2. In a large mixing bowl, mix all three ingredients until combined. Pour into prepared pan and smooth top. Bake for 30 minutes or until toothpick inserted near the center comes out clean. Drizzle with caramel glaze if desired. Serve.
I'm going to admit I was a little disappointed in this cake. Not in how easy it was to make because it was: cake mix, 3 large eggs and a can of pie filling. Mix together, pour into pan and bake. Drizzle with caramel topping if desired (I desired) and you have an easy snack cake.

The flavor was fine as you can hardly go wrong with caramel apple cake. My disappointment was in the texture. It was a little too "airy" for me as you can tell by the large air pockets/holes in the inside pictures.
The pictures from Cooktop Cove looked to be a more dense yet still soft crumb. This was mostly airy pockets. Still tasted good but you can tell it's from a cake mix. At least I could. And no, I didn't mix it too much either as I actually had to give a couple of manual stirs to incorporate all the cake mix into the batter after I mixed it with a paddle attachment for less than a minute.
Oh well, tried something new, got to serve it at a financial literacy class I gave at my house for a few local people and they seemed to enjoy it so all was not lost.

Friday, May 10, 2024

Black and Whites from A Chocolate Chip Cookie Murder by Joanne Fluke

Black and Whites - made dough April 3, 2024 from A Chocolate Chip Cookie Murder by Joanne Fluke
2 cups chocolate chips
3/4 cup butter (1 1/2 sticks)
2 cups brown sugar
4 eggs
2 teaspoons vanilla
2 teaspoons baking powder
1 teaspoon salt
2 cups all-purpose flour

1/2 cup confectioners' sugar in separate bowl, for rolling
  1. Melt chocolate chips and butter in the top half of a double boiler set over hot water. Stir until combined and completely melted.
  2. Add in brown sugar and let cool, 5-10 minutes.
  3. Add eggs, one at a time, mixing well after each addition. Mix in vanilla, baking powder and salt. Add flour and mix until just combined.
  4. Portion dough into golf-ball-size dough balls (or smaller), cover and chill or freeze for several hours or overnight.
  5. When ready to bake, preheat oven to 350 degrees F. Line baking sheets with parchment paper.
  6. Roll chilled dough balls in confectioners' sugar and evenly space on baking sheets. Bake for 12 - 14 minutes, cool on baking sheets for several minutes then transfer to wire racks to cool completely.
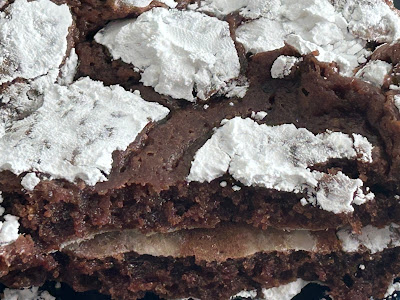
Before you get too far into this post, let me caution that, as you can see from the pictures, these are not the traditional "black and white" cookies that are common on the East Coast (New York City comes to mind) where a vanilla cookie is covered half in vanilla glaze and half in chocolate glaze, hence the "black and white" term. This black and white is more commonly referred to as chocolate crackles: a chocolate cookie rolled in powdered sugar before baking. Black and Whites is what they were called in A Chocolate Chip Cookie Murder by Joanne Fluke so that's what I'm listing them as.
I had mixed results on this one. After I mixed the dough, it was very, very soft and liquid-y, more like a thick brownie batter than actual cookie dough. I had to chill it for half an hour before I could even reasonably scoop it out into dough "balls". Even then the dough was still rather sticky.
I froze them before I baked them like I do with most cookie doughs as I was afraid these would spread too much if I didn't. They did still spread but not as much as I feared they would.
Flavor wise, they were good but I think I underbaked the first batch a tad too much as they were more like fudge than chocolate cookie. Nothing wrong with that but make sure they cool and set first before you eat them or you'll just have mushy goo instead of fudgy cookie.

Monday, May 6, 2024

Giant Chewy Chocolate Chip Cookies from Mom on Timeout

Giant Chewy Chocolate Chip Cookies - made dough March 1, 2024 from Mom on Timeout
2 1/3 cups all-purpose flour
1 teaspoon baking soda
1 tablespoon cornstarch
1/2 teaspoon salt
3/4 cup unsalted butter, melted and cooled
1 cup brown sugar
1/2 cup granulated sugar
1 large egg
1 large egg yolk
1 tablespoon vanilla extract
1 1/2 cups chocolate chips
  1. In a medium bowl, whisk together flour, baking soda, cornstarch and salt; set aside.
  2. In the bowl of a stand mixer fitted with the paddle attachment, cream together melted butter, brown sugar and granulated sugar until well combined. Add vanilla extract, egg and egg yolk, mixing until combined.
  3. Add dry ingredients in 2 additions, mixing on low speed after each addition, until just combined.
  4. Mix in chocolate chips until evenly disbursed.
  5. Portion dough into 1/4 cup portions and roll into balls. Flatten each ball slightly, cover and chill for at least 1 hour up to overnight.
  6. When ready to bake, preheat oven to 325 degrees F. Line baking sheets with parchment paper and evenly space dough balls. Bake 12-15 minutes or until edges are set and middles no longer look raw. Remove from heat and let rest on baking sheet for several minutes before transferring to wire rack to cool completely.
I've been lagging on the posts because I've been lagging on the baking lately. You'll notice I made this cookie dough way back in early March. I didn't start baking it off until the past few weeks when I needed it for care packages and events I was hosting or going to so the dough definitely kept well in the freezer.

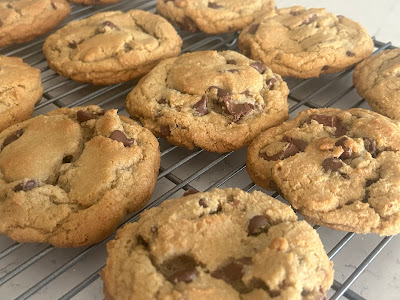
Besides being easy to make, handling beautifully (the dough was not too dry or too sticky), and keeping well in the freezer for a couple of months, this dough also baked into really good chocolate chip cookies.

I didn't make them "giant" as the recipe instructed but kept them normal-sized. They still turned out well. The edges were airy and crisp and the middles were chewy. The whole cookie had that brown sugar caramelization that marks a great chocolate chip cookie.
I definitely want to make these again in the giant size so I can see how they turn out. I imagine they would be even better with the same crisp edges but also a gooey middle.