Monday, December 27, 2021

Stamped Cookies #16 - Cinnamon Brown Sugar Stamped Cookies

2 cups (250 grams) all-purpose flour
1/2 teaspoon baking soda
1/2 teaspoon salt
2 1/2 teaspoons ground cinnamon
1/2 teaspoon ground nutmeg
1/2 teaspoon ginger
1/4 teaspoon ground cardamom
1/2 cup (1 stick) unsalted butter, room temperature
3/4 cup (150 grams) brown sugar
1/3 cup (65 grams) granulated sugar
1 tablespoon molasses, maple syrup or honey
1 large egg, room temperature
1 teaspoon vanilla extract
  1. In a medium bowl, whisk together the flour, baking soda, salt, cinnamon, nutmeg, ginger and cardamom; set aside.
  2. In the bowl of a stand mixer fitted with the paddle attachment, cream together butter, brown sugar and granulated sugar on medium-high speed until well combined and creamy, about 2 minutes.
  3. Add molasses, egg and vanilla extract, beating on high speed until combined. Scrape down the sides and bottom of the bowl to keep mixture even-textured.
  4. Add the flour mixture to the butter mixture in 2 additions, mixing on low speed after each addition, until just combined.
  5. Cover and chill the dough for at least 2 hours. If chilling longer, allow to sit at room temperature for at least 15 minutes before rolling.
  6. Preheat oven to 350 degrees F. Line baking sheets with parchment paper.
  7. Roll dough into dough balls (size depending on the size of your cookie stamp), then roll in a small bowl of granulated sugar, coating completely. Press with cookie stamp(s). Evenly space on baking sheets. Bake until the edges are set, about 10-13 minutes, depending on the size of your cookies. Remove from oven and let cool on baking sheets for 5 minutes before transferring cookies to wire racks to cool completely.
Yes, me again with new cookie stamps from Nordic Ware. This is called the geo cast set and it's so pretty. I'm going to stop pretending I have any control over cookie stamp purchases, especially those made in the USA from Nordic Ware. I liked the patterns and figured they would hold impressions well on most cookie doughs.
My only disappointment with this trial is, as you can see, the impressions in the baked cookies aren't as distinct as the pre-baked ones in the first picture. I wonder if I did something wrong as recipes from Sally's Baking Addiction almost always turn out and the baked cookies in her post kept the fidelity of her cookie stamp impressions pretty well. I did weigh the ingredients since she provided weight measurements and those tend to provide more accuracy for the dough making.
I also chilled the dough before stamping, then froze the stamped cookies for several days before baking them. Then I baked them at a higher temp (375 degrees) so the cookies would set quickly and not lose the impressions.

But they still didn't come out as distinctly as I would like. I can also tell (user error) that I had a couple of butter lumps in the finished dough. Your sharp eye can see the telltale sign in the cookie below with the misshapen left side of this cookie. That happens when that part of the dough is softer than the rest and not even-textured. Butter lump. Next time my butter needs to be more room temperature and beaten more thoroughly with the sugar to get rid of all the lumps.

But despite all the above, the flavor is great. I love the cinnamon and brown sugar combination. The texture was crisp but not hard. Don't overbake (of course) or the whole cookie will be too hard. Baked properly, the edges were crisp and the middle was also crisp though not with the snap of shortbread or hard. But still delicious.


Friday, December 24, 2021

Biscoff-Stuffed White Chocolate Chip Cookies

1 cup (2 sticks) unsalted butter, softened
1 cup granulated sugar
1 cup brown sugar, packed
2 large eggs
1 tablespoon vanilla extract
4 cups all-purpose flour
1 teaspoon baking soda
1 teaspoon salt
2 1/2 cups white chocolate chips
2 cups Biscoff spread or Speculoos cookie butter
  1. In the bowl of a stand mixer fitted with the paddle attachment, beat together the butter, granulated sugar and brown sugar until well combined and creamy, 2-3 minutes. Add eggs and vanilla; beat until combined.
  2. In a separate bowl, whisk together the flour, baking soda and salt. Add to butter mixture in two additions, mixing briefly after each addition until just combined. Do not overmix. Fold in chocolate chips.
  3. With a medium cookie scoop, portion out dough into balls. Make an indentation over half of the dough balls to make a well. Place a tablespoon of cookie butter into each indentation. Place another cookie dough ball (without the impression) over the first dough balls and seal edges around cookie butter. It's okay if cookie butter isn't completely enclosed. 
  4. Cover and chill or freeze dough balls for several hours or overnight.
  5. When ready to bake, preheat oven to 350 degrees F. Line baking sheets with parchment paper. Evenly space chilled dough balls on prepared sheets. Bake 12-15 minutes or until edges are just golden brown. Let cool on baking sheets for 5-10 minutes then transfer cookies to wire rack to cool completely. 

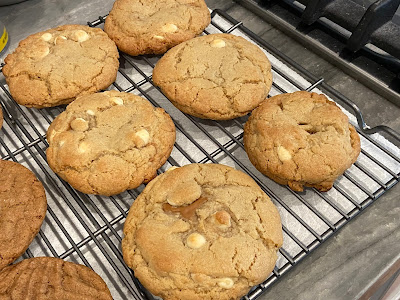
Merry Christmas Eve! At this point in the holiday season, you might have already finished your holiday baking or be in a constant state of sugar overdose. Which would be a shame if that means you won't have room for these cookies. So, take a break, wait for your waistband to loosen and your blood sugar to decrease then have a gander at these cookies. Because, hello, cookie butter lovers! Come take a look at this perfect combination of white chocolate, brown sugar and cookie butter.
I much prefer cookie butter combined with white chocolate or anything non-"real" chocolate. I'm not a fan of combining cookie butter with chocolate as the chocolate tends to overwhelm the cookie butter flavor and my taste buds just don't like the two dominant flavors battling each other.
But this? Perfection. If you bake for anyone who loves cookie butter or you want to introduce them to it, this is a great recipe to make for them. The cookies don't spread very much, the edges are crisp and the middles are chewy.

At room temperature, cookie butter is solid so you won't get a lava flow of cookie butter. But if you serve these warm, you will and they'll be nice and gooey. I took the pictures at room temperature. But either warm or room temperature, these are delicious.

Wednesday, December 22, 2021

Stamped Cookies #14 - Pumpkin Spice Shortbread Cookies

Pumpkin Spice Shortbread Cookies (stamped cookies #14) - made dough November 18, 2021 from Curly Girl Kitchen 
1 1/2 cups all-purpose flour
1/2 cup powdered sugar
1/4 teaspoon coarse kosher salt
1 teaspoon ground cinnamon
1/2 teaspoon ground ginger
1/2 teaspoon ground nutmeg
1/4 teaspoon ground cloves
1/2 cup unsalted butter, cold, cut into tablespoons
2 tablespoons cream
1 teaspoon vanilla
  1. In a medium bowl, whisk together flour, powdered sugar, salt, cinnamon, ginger, nutmeg and cloves.
  2. Cut cold butter into dry ingredients until mixture resembles coarse cornmeal. Add cream and vanilla and toss with a fork to distribute evenly throughout.
  3. Dump the mixture onto a clean work surface and gather together to work liquid into dough. Work until soft dough forms; do not overwork dough.
  4. Lightly flour and roll out into 1/4" thickness. Cut into desired shapes with cookie cutters and/or cookie stamps. Cover cookie cutouts and freeze for at least an hour.
  5. When ready to bake, preheat oven to 350 degrees F. Depending on the size of your cookie cutouts, bake 8-10 minutes or until edges are set and middles no longer look raw. Remove from oven and let cookies cool completely.
I almost didn't want to post this as it's one of those near-epic fails that I had. And you can tell I didn't want to post this because it's labeled stamped cookies #14 and I (erroneously) blogged stamped cookies #15 before #14. Oops. But, Freudian slip notwithstanding, long ago, when I first started this blog, I promised I would post what I've tried, whether it turned out or not. So I shall. But let's put this in the "not" column.
I got my first inkling this wasn't going to work out for me when I realized the directions were similar to making pie crust. And we already know how that's been working for me so far. Exhibit A: Apple Pie #1. Exhibit B: Apple Pie #2. 'Nuff said. Similar to my failures at pie crust making, I'm defeated by how to get the dough to come together when it's relatively dry. Curly Girl does warn this is floury but that it should come together. HAHAHAHAHA. Me: Hold my beer.
This didn't make many cookies as, to be honest, I ended up dumping the drier parts of the dough which seemed like mostly flour and rolled out what parts of the dough had come together enough to be barely rolled out. And given the dryness of the dough, it also didn't take kindly to being pressed with cookie stamps and didn't hold impressions well at all so I only ended up using cookie cutters on them. I highly encourage you to click on the post title to take you to the original blog post from Curly Girl Kitchen so you can see how these were supposed to turn out. Yeah, I know, mine look nothing like those.
The only thing that (somewhat) saved these is the taste was pretty good. Not my favorite because I'm not a pumpkin spice girl but for those who like pumpkin spice, this isn't a bad variation on shortbread. Just brush up on your pie crust making skills before you try this and you'll probably make it a lot better than I did. If you don't, keep your sense of humor and it'll be fine.

Monday, December 20, 2021

Biscoff Snickerdoodles

Biscoff Snickerdoodles - made dough November 29, 2021 from Moribyan
3 1/4 cups all-purpose flour
1 teaspoon baking soda
1/4 teaspoon baking powder
2 teaspoons cream of tartar
1/4 teaspoon salt
1 1/2 cups granulated sugar
1 cup unsalted butter, softened
2 large eggs
1 teaspoon vanilla extract
1 cup Biscoff spread or Speculoos cookie butter

4 tablespoons granulated sugar
2 teaspoons cinnamon
  1. In a medium bowl, whisk together flour, baking soda, baking powder, cream of tartar and salt; set aside.
  2. In the bowl of a stand mixer fitted with the paddle attachment, cream together butter and sugar until light and fluffy, 2-3 minutes. Add eggs, vanilla extract and cookie butter; beating until fully combined.
  3. Add dry ingredients in two additions, mixing until just combined after each addition; do not overmix.
  4. Portion dough into golf-ball-size balls and flatten slightly. Cover and chill or freeze for several hours or overnight.
  5. When ready to bake, preheat oven to 375 degrees F. Line baking sheets with parchment paper. Remove dough balls from freezer and let thaw while oven preheats.
  6. In a small bowl, combine 4 tablespoons granulated sugar with 2 teaspoons cinnamon. Roll dough balls in mixture until completely coated. Evenly space on baking sheets. Bake 10-12 minutes or until edges have set and middles no longer look raw. Remove from oven and let rest on baking sheets for several minutes. Transfer cookies to wire cooling rack to cool completely.
I've made something similar before but that recipe was called Cookie Butter Snickerdoodles. Cookie butter is also known as Biscoff or Speculoos (Trader Joe's version) so they're actually the same thing.
This recipe is similar to the other one I had made earlier this year and is also pretty good. If you're a snickerdoodle purist, you may not like it as much as the cookie butter does flavor it.
But it has the same components of a snickerdoodle in terms of the chewiness and the cinnamon sugar coating. 
If you like cookie butter more than plain snickerdoodles though, this is a great recipe. The cookie butter flavor isn't that strong as it does have to share your taste buds with the cinnamon and sugar but I like how it baked. It didn't spread too thin, the edges were crisp and the middle was chewy.


Friday, December 17, 2021

Levain-Style Soft Baked Brown Butter Funfetti Cookies

1 cup unsalted butter, melted and browned, then re-chilled to solid form
1/2 cup dark brown sugar, packed
1/3 cup granulated sugar
1 large egg
2 large egg yolks
1 tablespoon vanilla extract
2 cups (250 grams) all-purpose flour
1 1/2 cups (172 grams) cake flour
2 tablespoons cornstarch
1 teaspoon baking powder
1 teaspoon baking soda
1/2 teaspoon salt
2 tablespoons milk
1/2 cup sprinkles
  1. To brown the butter: place butter in medium saucepan over medium high heat. Stir as it melts, foams and begins to brown, 4-6 minutes or until a nutty aroma arises and you can see the browned bits on the bottom. Remove from heat, transfer to a 9-inch round cake pan and place in freezer for 20 minutes or until solid and re-formed.
  2. Scrape solidified brown butter into a mixing bowl and beat with paddle attachment until smooth and creamy.
  3. Add dark brown sugar and granulated sugar; beat until combined.
  4. Add egg, egg yolks and vanilla; mixing until combined.
  5. In a separate bowl, whisk together flour, cake flour, cornstarch, baking powder, baking soda and salt. Add in two additions to butter mixture, beating until just combined after each addition. Add milk and beat until just combined. Do not overbeat.
  6. Fold in sprinkles. Portion dough into 4-ounce balls then pat into thick discs. Cover then chill or freeze for several hours or overnight.
  7. When ready to bake, preheat oven to 375 degrees F. Line baking sheets with parchment paper and evenly space dough discs. Bake 14-16 minutes or middles are just barely set. Remove from oven, let rest on cookie sheet for several minutes then transfer cookies to wire rack to cool completely.
You don't often see baked goods made with sprinkles on my blog. Mostly because I'm not a fan of sprinkles. I like them well enough when used as decorative garnish on top of a frosted cupcake but for the most part, I dodge sprinkles. They add crunch to a cookie and stay crunchy, unlike nuts, in baking. However. I don't like crunch in a chewy cookie. Hence the no-sprinkles-in-my-baking thing.
But, as you can see here, I made an exception for these funfetti cookies, mostly because I was putting together holiday care packages for Soldiers Angels and wanted to do Christmas-themed baked goods in my boxes. And a reminder to myself that *I* wasn't the one eating these and hopefully they would go to military service members who didn't have my bias against sprinkles.
Sprinkles are the easiest way to add a holiday flare to cookies so I can see why they're so popular. They look fun. I didn't make these as big as a Levain cookie since they were going to care packages and smaller cookies are easier to share among the unit.
The cookies themselves were pretty good. I didn't bake them for very long since they were small and didn't need a long bake. The flavor and texture were good except - yes, it's coming - the sprinkles part. I still don't like the crunch that interferes with the soft chewiness of the cookie. So I may make this recipe again and leave out the sprinkles.


Thursday, December 16, 2021

Bakery Review: Caramel Apple Pie from Justice of the Pies

Caramel Apple Pie - ordered October 28, 2021 for November 24, 2021 delivery from Justice of the Pies via Goldbelly
I ordered this caramel apple pie from Justice of the Pies as one of our Thanksgiving desserts. As you can see from the pictures, I ordered it through Goldbelly. Like all the other times I've ordered from Goldbelly in the recent past, they were having a sale. In this case, it was $20 off full price so I was able to get it $49 shipped. 
Cutie pie - get it?
Which might seem expensive for a pie but to support a small business, to support their social justice cause and just for a caramel apple pie, I'll spend the money. Any combination of the three is enough for me to break open my wallet. 
Well packaged, well-insulated

The pie arrived as pictured above, well wrapped, frozen in perishables packaging (insulated, dry ice) with a sleeve of the salted caramel packaged separately. The caramel is meant to be drizzled over the heated pie once it's out of the oven.

The pie also came with these cards, with heating and storage instructions.
And it came with the story of their mission. I encourage you to visit the Justice of the Pies website to read the story. And to hopefully get a pie of your own.

The pie before re-heating and without the caramel sauce

This pie was delicious.. The bottom crust was flaky and the top crust of oatmeal topping with caramel drizzle added the perfect touch of sweetness as well as additional texture to the apple pie filling. Despite the caramel, it actually wasn't too sweet. Or else the oatmeal fooled me into thinking it wasn't.
If I had any critique about the pie, it's that the caramel got a little lost in the oatmeal topping. When I drizzled the caramel over the heated pie, the drizzle was only visible for a few minutes before it absorbed fully from sight into the oat topping.
Which was a bit aesthetically disappointing as nothing I like better than seeing (and eating) that caramel. So mine didn't look like the picture on the postcard that came with the pie. I couldn't taste the caramel very much either as it combined with the apple filling. 
But other than that, this was still mighty good pie.