Thursday, August 26, 2021

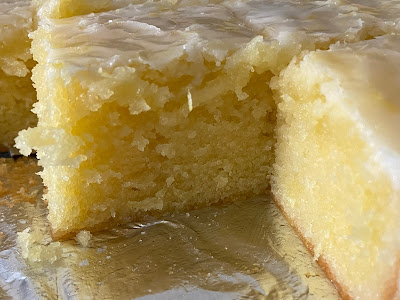
Lemon Brownies

Lemon Brownies - made August 20, 2021 from Pies and Plots 
1 cup (2 sticks) unsalted butter
1 1/2 cups granulated sugar
Zest of 1 lemon
4 large eggs
2 tablespoons fresh lemon juice
1 1/2 cups all-purpose flour
1/2 teaspoon salt

Glaze
2 cups confectioners' sugar
zest of 1 lemon
2 tablespoons fresh lemon juice, more as needed
  1. Preheat oven to 350 degrees F. Line an 8 x 8" pan with foil and lightly spray with nonstick cooking spray.
  2. In the mixing bowl of a stand mixer fitted with the paddle attachment, cream together butter, granulated sugar and lemon zest until combined and fluffy, 2-3 minutes. Beat in eggs, one at a time, until just combined. Stir in the lemon juice.
  3. Beat in flour and salt until combined. Pour batter into prepared pan and smooth top. Bake 35-45 minutes or until a toothpick inserted near the center comes out with a few moist crumbs. Poke holes into top of lemon brownies with a toothpick.
  4. Prepare glaze: in a medium bowl, whisk together confectioners' sugar, lemon zest and lemon juice. Add additional sugar or lemon juice until desired consistency is achieved. Spread glaze over warm brownies, coating top completely. Let cool before cutting and serving.
You might see more lemon recipes coming up shortly. I needed a lemon to make lemon bars for a friend so of course, I ended up buying a whole bag of them at Costco. I'm sure that made sense to me at the time but once those two seconds passed, I realized I'd better use up the lemons while I could. I hate baking ingredients going to waste.
As always when I have a plethora of a baking ingredient, I take advantage of it by trying new-to-me recipes that use up said ingredient. In this case, lemon brownies. You could conceivably call this lemon cake but it has the nice dense texture of a brownie so I'm going with that.
These were delicious. Kind of like a lemon pound cake but better. Bonus that they were easy to make, cut and serve from an 8 x 8-inch square baking pan. Plus I think they'll ship well in cooler months so I'm filing this recipe away to make for military care packages for Soldiers Angels this fall.

In the meantime, the other batch baking I do is for a group that feeds the local houseless population every week. One of the organizers is kind enough to pick up the baked goods from my house the afternoon before she does the meal distribution so it's extremely convenient for me to bake on the weekends, store these in my freezer for a couple of days then do the hand off. 
The big benefit to me is I can only eat the taste test piece then I give the rest away before I can indulge and eat the whole pan. Because these were so good that I could have. 

Wednesday, August 25, 2021

Pound Cake Brownies

Pound Cake Brownies - made August 9, 2021 from Buttermilk by Sam
Pound Cake
1/2 cup unsalted butter, room temperature
3/4 cup granulated sugar
2 teaspoons vanilla extract
1/2 teaspoon salt
1 large egg
3/4 cup cake flour
2 tablespoons sour cream, heavy cream or milk

Brownies
1/2 cup unsalted butter
1 cup granulated sugar
1/2 cup dutch processed cocoa
2 large eggs
1/2 teaspoon salt
1 teaspoon vanilla extract
1/3 cup all-purpose flour
1/4 cup semisweet chocolate, finely chopped
  1. Preheat oven to 350 degrees F. Line an 8 x 8" baking pan with foil and lightly spray with nonstick cooking spray.
  2. Pound cake: In the bowl of a stand mixer fitted with the paddle attachment, beat the butter, sugar, vanilla and salt until light and fluffy, 5-7 minutes.
  3. Add the egg and beat for another 3 minutes. Scrape the bowl and beat for another 2 minutes.
  4. Over the bowl, sift in the flour and add the sour cream. Mix on low speed to combine. Scrape sides and bottom of bowl to keep batter even-textured. Set aside.
  5. Brownies: Melt butter in microwave (usually takes 1 minute). Stir in the sugar and cocoa and microwave 1 minute. Whisk briskly for 1 minute. Let cool for 3 minutes.
  6. Whisk in the eggs, salt and vanilla for 1 minute until batter is smooth. Whisk in the flour until just combined; fold in chocolate.
  7. Pour half the brownie batter into prepared pan. Dollop pound cake batter onto the brownie batter. Spoon the remaining brownie batter over the pound batter and gently swirl them together with a butter knife or offset spatula.
  8. Bake for 30-40 minutes, until a toothpick inserted near the center comes out with a few moist crumbs. Cool completely before cutting and serving.
Whenever I see a new baking idea like these pound cake brownies, I wish I was more original and creative. It seems like such a simple idea but I'd probably never think of it on my own. Swirl pound cake and brownie batters together to make a pound cake brownie? Brilliant.
The pound cake batter was more stiff than the brownie batter, which isn't surprising. But it did make swirling a bit of a challenge. I always err on the side of underswirling because I don't want to mix the two batters too much and risk too much co-mingling and not enough distinct brownie and pound cake portions.
When I first made these, I followed the instructions to place half the brownie batter on the bottom of the pan, dollop the pound cake batter over it and cover it with the remaining brownie batter then swirl. But because the pound cake batter is a bit too stiff for easy swirling, next time I'm going to place a third of the brownie batter on the bottom instead of half, dollop half the pound cake batter, dollop the second third of the brownie batter, dollop the remaining pound cake batter then cover with the last third of the brownie batter. 
That way you don't have to swirl as much and you get slightly more even distribution between the two batters.
But regardless of how you do it, this was delicious. I'm partial to the pound cake part in both texture and taste, so much so that I want to make the pound cake recipe as a stand alone pound cake. 

But it's also good swirled with the brownie and is a nice change of pace to dress up a normal brownie. 


Monday, August 23, 2021

Nutella-Stuffed Peanut Butter Blondies

1/2 cup unsalted butter, softened
1 1/2 cups packed brown sugar
2/3 cup creamy peanut butter
2 eggs
2 teaspoons vanilla
1 teaspoon baking powder
1 3/4 cups all-purpose flour
1/2 cup - 3/4 cup Nutella
  1. Preheat oven to 350 degrees F. Line an 8 x 8" baking pan with foil and lightly spray with nonstick cooking spray.
  2. In the bowl of a stand mixer fitted with the paddle attachment, beat together butter and brown sugar until combined and creamy with no lumps. Add peanut butter and beat until well mixed.
  3. Add eggs, one at a time, and vanilla, mixing after each addition until combined.
  4. Add baking powder and flour, mixing until just combined. Do not overmix.
  5. Spread half the batter evenly on bottom of prepared pan. Smooth Nutella in an even layer over peanut butter bottom. Spread remaining batter on top of Nutella, covering completely and smoothing evenly. Bake 23-25 minutes or edges are golden brown and center is set. Remove from oven and let cool completely before cutting and serving.
Nutella and peanut butter. If you like that combination and want a quick and simple bar cookie that doesn't make too much, this one's for you.
The main trick is to make sure your butter is slightly softened, beat it with the brown sugar first until they're well combined then add the peanut butter. If you try beating the butter and peanut butter together first, you're more likely to end up with butter lumps because the peanut butter itself is too soft to merge well with the butter on its own. Let the brown sugar beat the butter into submission first then add the peanut butter for a smoother consistency.


Saturday, August 21, 2021

Cookies and Cream Cutout Cookies

Cookies and Cream Cutout Cookies - made dough August 7, 2021 from Semisweet Designs 
1 cup butter, softened
1 cup granulated sugar
4 ounces cream cheese
1 egg
1 1/2 teaspoons vanilla extract
1 teaspoon salt
1 cup crushed Oreos (about 10 whole Oreos)
3 cups all-purpose flour
  1. In the bowl of a stand mixer fitted with the paddle attachment, cream together butter and sugar until well combined. Add cream cheese and beat until combined. Add egg, vanilla extract and salt, mixing until combined.
  2. Add flour, 1 cup at a time, and the crushed Oreos, mixing briefly after each addition until incorporated.
  3. If dough is too soft for rolling, chill for at least 30 minutes.
  4. When firm enough to roll, place half the dough between two sheets of parchment and roll to an even thickness. Repeat with second half of dough. Chill rolled dough (leave between parchment sheets) for at least 30-60 minutes or until firm to touch. Cut into desired shapes, cover and chill again for at least another hour.
  5. When ready to bake, preheat oven to 375 degrees F. Line baking sheets with parchment paper and evenly space chilled cutouts. Bake 7-9 minutes. Remove from oven and let rest on hot baking sheets for 10 minutes before removing to wire rack to cool completely.
I've decided to make a simple but hopefully welcome change to the format of my blog posts. Namely, I'm going to put a picture and the recipe first instead of doing the commentary and making people scroll to the bottom of the post to find the recipe they want to try.

I know why most bloggers do it the traditional way of pictures and write up first then the recipe. They want you to read the words they've poured over and crafted. But, let's be honest, most of us would rather just cut to the chase and see the recipe, not read a bunch of words about someone else's experience. Or is that just me? Some bloggers are savvy enough to provide a helpful link at the top of their posts to "jump to the recipe". I'm not that sophisticated so here you go, from now on, recipe will be at the top. Whether you read this far down to hear about tips and tricks as well as my assessment of how the recipe turned out, well, that's up to you. It always has been but now I'm just saving you the trouble of scrolling all the way down. #yourewelcome

So let's also cut to the chase with this recipe. It's delicious. There's a slight tang from the cream cheese to keep it from become too sweet and the texture is soft. Even more thrilling, it really does keep its shape as advertised on the original blog. Woot. You know how hard it is to find a good-tasting cutout cookie recipe that keeps its cutout shape? This one delivers.

The only thing that gives me a little pause is, with the addition of the Oreo cookie crumbs to the dough, the cookies come out a bit gray. I can handle black and white but gray is not the most appetizing color for any baked goods. (Cue Steel Magnolias, armadillo red velvet groom's cake covered in gray icing. Thanks for that, Aunt Fern.) 
Gray doesn't do it for me. Next time I make these, I'm not going to process the Oreo cookies so finely in my food processor and will try to have more small chunks and fewer fine crumbs. So they can have more of a cookies and cream appearance.


Friday, August 20, 2021

Cinnamon Roll Blondies

Cinnamon Roll Blondies - made August 4, 2021 from A Latte Food 
Back to bar cookies for military care package mailings. And what a return to bar cookie baking. This is exactly what it says it is; it really does evoke similarities to a cinnamon roll.
That of course is due to the cinnamon filling which is similar to the filling in actual cinnamon rolls. If you don't have time or inclination to make cinnamon roll dough and roll out real cinnamon rolls, these bar cookies will do in a pinch.

It's a great brown sugar blondie with a cinnamon filling layered inside - easy and quick to make, even easier to package and eat. Plus. since it's a blondie, there's no chocolate to worry about melting in the summer heat.
This does have butter rather than shortening which always makes long mailing times to desert temp locations a little worrisome. I vacuum sealed the ones I sent but I also included packaged store bought snacks just in case these don't make it in edible shape. But I hope they did as these were delicious.
2 cups all-purpose flour
1 teaspoon baking powder
1/2 teaspoon salt
1/2 teaspoon cinnamon
3/4 cup butter, softened
1/2 cup granulated sugar
1 cup dark brown sugar
2 large eggs
2 teaspoons vanilla

Cinnamon Roll Filling
1/4 cup butter, melted
1/2 cup dark brown sugar
1/2 teaspoon vanilla
3/4 teaspoon cinnamon
  1. Preheat oven to 350 degrees F. Line a 11 x 7" or 8 x 8" pan with foil and lightly spray with nonstick cooking spray.
  2. In a small bowl, whisk together the flour, baking powder, salt and cinnamon; set aside.
  3. In the bowl of a stand mixer fitted with the paddle attachment, cream together butter, granulated sugar and brown sugar until well combined and fluffy, 2-3 minutes.
  4. Add eggs and vanilla, one at a time, mixing briefly after each addition.
  5. Add dry ingredients in two additions, mixing until just combined after each addition, scraping sides and bottom of bowl to keep mixture even textured.
  6. Filling: in a small bowl, whisk together melted butter, brown sugar, vanilla and cinnamon until smooth. 
  7. Spread half of the batter in an even layer in the prepared pan. Spread filling evenly over batter. Top with remaining batter, covering filling completely, and smooth top.
  8. Bake for 25-30 minutes or until toothpick inserted near the middle comes out clean. Cool completely before cutting.

Wednesday, August 18, 2021

Soft Batch Double Chocolate Fudge Cookies

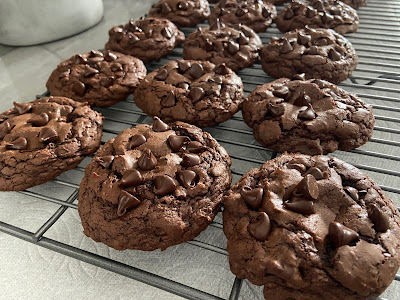
Want a shot of chocolate? Here's exactly what the title of these cookies say they are: soft, chocolate and fudgy.

The dough was a bit soft when first mixed so I had to chill in the refrigerator for about 15 minutes. Don't chill for too long or they'll be too difficult to portion as the chocolate in them sets. I would only chill long enough to form dough balls easily. Then once you've made them into dough balls, cover and chill or freeze until you're ready to bake.


You can guess from the proliferation of near-pristine chocolate chips on the tops of the cookies that I pressed them into each cookie as soon as I took them out of the oven. That's my trick with chocolate and chocolate chip cookies whenever I want them to be loaded with chips.


These were definitely fudgy and soft. As always, bake just until the edges are set and the middle no longer looks raw. The chocolate will set as it cools so you don't want to eat them too warm or they'll be mushy more than fudgy. Also as always, the quality of the flavor of the cookie will be highly dependent on the quality of your ingredients, especially the cocoa powder and chocolate chips. You don't have to go super high end (I used fair trade cocoa powder and chocolate chips from Costco) but don't go too low either.

1 cup plus 2 tablespoons all-purpose flour
3 tablespoons unsweetened cocoa powder
1 teaspoon baking powder
1/2 teaspoon salt
2 cups semisweet chocolate chips, divided, plus more reserved for pressing into baked cookies, if desired
2 1/2 tablespoons unsalted butter, cut into small cubes
1/2 cup granulated sugar
1/4 cup light brown sugar, packed
2 large eggs
2 tablespoons whole milk
  1. In a small bowl, whisk together flour, cocoa powder, baking powder and salt; set aside.
  2. In the top half of a double boiler set over hot water, melt together 1 cup semisweet chocolate chips and butter, whisking until combined and completely melted. Remove from heat.
  3. In the bowl of a stand mixer fitted with the paddle attachment, beat together eggs, granulated sugar and brown sugar until combined. Beat in milk and vanilla until combined. Add melted chocolate-butter mixture and stir until evenly combined.
  4. Add dry ingredients and mix until just combined. Fold in remaining 1 cup chocolate chips. Dough will be soft. Chill until firm enough to portion into dough balls (10-15 minutes). Don't chill for too long or dough will become too stiff to portion easily.
  5. Cover and chill or freeze dough balls for several hours or overnight.
  6. When ready to bake, preheat oven to 350 degrees F. Line baking sheets with parchment paper and evenly space chilled dough balls. Bake for 10-13 minutes or until edges are set and middle no longer looks raw. Do not overbake. Remove from oven and press additional chocolate chips into tops of hot cookies if desired. Let cookies rest on baking sheets for several minutes before transferring with a small metal spatula to wire rack to cool completely.