Tuesday, April 19, 2016

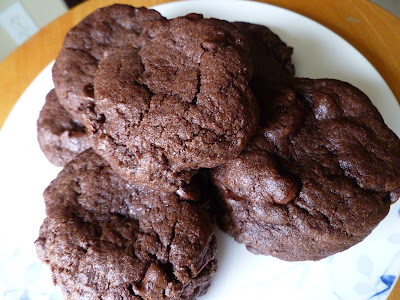
Double Chocolate Chip Cookies (Levain Bakery copycat)

Double Chocolate Chip Cookies - made dough March 12, 2016 from Love from the Oven
I first heard of Levain Bakery when my old college roommate sent me their chocolate cookies for my birthday.  It was more than 6 or 7 years ago but to this day I remember they were huge slabs of chocolate goodness. It seems almost misleading to call them merely "cookies" because that makes them sound so normal and there's nothing normal or modest about a Levain cookie.
They were so huge that I literally could not finish a cookie in one sitting. I did manage to consume one in one day but that involved me going back periodically to snitch a bite throughout the day. They were hearty, they were big and there were delicious. I've only had the mail order version but it's on my bucket list to go visit in person the next time I'm back in New York City.

But until then, I was pleased to find this copycat recipe on pinterest. The pictures from Love From the Oven lured me in first because they looked exactly like how I remembered Levain Bakery's cookies looked. Even if they weren't the same cookies, they looked the part and yes, you know, that chubby appeared got me.

I was even more pleased when I made the cookies myself and mine turned out just as thick and chubby. And also delicious. Use the dark, good quality cocoa (I always use Pernigotti) for the rich chocolate flavor. You don't want your butter too soft or your dough will mix up too soft and your cookies will spread more than they should. I did make my cookies a bit smaller than the Levain Bakery size since I didn't want these to be an all-day eating project. Don't overbake. Bake just long enough that the middles don't look raw. Then once the cookies are cool, they'll be fudgy goodness.

1 cup butter
1 1/4 cups sugar
2 eggs
1/2 cup dark cocoa powder
2 1/4 cups all-purpose flour
1/4 teaspoon salt
1 teaspoon baking powder
2 1/2 cups semisweet chocolate chips
  1. Preheat oven to 350 degrees F. Line a baking sheet with parchment paper.
  2. In the bowl of an electric mixer, combine the butter and sugar. Beat together on medium-high speed until light and fluffy, 2-3 minutes.
  3. Blend in the eggs, one at a time, scraping the bowl as needed. Mix in the cocoa powder until blended.
  4. Add the flour, salt, and baking powder; mix on low speed just until incorporated. Fold in the chocolate chips.
  5. Portion dough into golf-ball size dough balls and flatten slightly into thick discs.
  6. Evenly space on prepared baking sheet and bake 16-20 minutes. Cool for 5 minutes then transfer to wire cooling rack to cool completely.

Friday, April 15, 2016

Chocolate Cookie Cups with Nutella or dulce de leche and Cadbury mini eggs

Chocolate Chip cookie cups as Easter nests - made dough March 25, 2016, recipe adapted from Something Swanky
I don’t have a short title to describe these Easter-themed calorie pockets. And yes, I'm woefully late in posting them since Easter was a few weeks ago. They were originally from a blog that considered them a Throwdown with Bobby Flay for chocolate chip cookies. I made the recipe, fully intending to serve them “as is”. Except when I baked off the taste test cookie, it spread and flattened thin. Eek. Thin chocolate chip cookies just don’t cut it with me. Granted, they were delicious but they were thin. I don’t do thin when it comes to chocolate chip cookies, literally and figuratively.

So if they were going to spread anyway, I decided to repurpose them into chocolate chip cookie cups. The dough was frozen by the time I discovered their dismaying tendency to spread while baking but I cut the dough balls into thirds and placed them in greased mini muffin tins. No need to shape the dough into cookie cups prior to baking because they’ll just lose shape in the baking anyway. Instead, what you want to do is, as soon as you take them out of the oven, press the rounded side of a half teaspoon in the center of each mini muffin cavity to make a depression. Not too deep but not too shallow either. 

Taking them out of the mini muffin tins can be tricky. You don’t want to take them out while they’re hot because they’ll still be too soft and mushy to come out whole. But you don’t want them to cool completely either because they’ll stick to the pan and be harder to dislodge without breaking apart. If they get too cool and start to fall apart, place them briefly (very briefly!) back in the warm oven, just enough to soften slightly and allow you to take them out of the pan. You may need to press the half teaspoon bottom into the “muffins” again to make the indentation stay. 

Once the cookie cups are completely cool, spoon a bit of Nutella or dulce de leche (you can also use salted caramel) into the cavities, filling just enough to barely reach the rims. You don’t want it overflowing if you’re going to add the Cadbury mini eggs on top. Which I did to make Easter nests. I’d like to tell you I was channeling my inner Martha Stewart baking goddess and that’s why I did it but the reality is I had my annual bag of Cadbury mini eggs that I hadn’t even opened yet and I was about to give up sugar (again) for a month (again) and didn’t want the mini eggs around to tempt me. So I pushed them into the Nutella or dulce de leche instead to make these cute Easter-themed treats. 

Couple of other tips to make these better: use mini chocolate chips for the cookie dough. At the time I made them, I hadn’t known that’s what I was going to use them for so I used regular size chocolate chips. The problem with that is when you bake them in the mini muffin tins, the chocolate chips had a tendency to stick to the pan and were more stubborn about it than the cookie part which led to more easily falling apart. Mini chocolate chips shouldn’t give you that problem. 
Also make sure you fill the mini muffin cavities with relatively the same amount of dough. You don’t want some mini cups to bake more than others because you have to take them all out at the same time so they should all be relatively the same size. You do want just enough that it’ll fill the cavity when baked but not so much that it overflows the top. This is one time where having a muffin top isn’t a good idea. The reason is the overflow also has a tendency to stick to the top as it’s cooling and will separate from the body of the mini cookie cup when you try to take it out of the pan. Trust me, I know. 

No need to press the Cadbury mini eggs too far into the Nutella or dulce de leche. You want to press down gently, just enough so that it’ll stay but no need to submerge all the way or completely. I think it’s prettier when you can actually see the mini egg in its cookie cup nest. These are super cute at an Easter lunch or tea. I didn’t think of them until Easter Sunday itself and am getting them up too late for this year but bookmark this for when you buy those Cadbury mini eggs next year. I put a plate of these out in the kitchen at work and they went fast. I guess I’m not the only one who considers the Cadbury mini eggs to be a form of Easter crack. 
2 cups plus 3 tablespoons all-purpose flour
3/4 teaspoon salt
3/4 teaspoon baking soda
2 sticks (1 cup) butter, room temperature
1 cup granulated sugar
1/3 cup dark brown sugar
1/3 cup light brown sugar
2 large eggs
1 1/2 teaspoons vanilla extract
2 cups mini chocolate chips
1 bag Cadbury mini eggs
  1. Preheat oven to 350 degrees F. Lightly coat mini muffin tins with nonstick cooking spray.
  2. Mix together flour, salt and baking soda; set aside.
  3. In a stand mixer, cream butter until smooth. Add the sugars and beat until light and fluffy, 3-4 minutes. Add the eggs, one at a time, beating after each addition. Add vanilla.
  4. Add half of the dry ingredients and mix until just combined. Add the remaining flour mixture and beat until just combined. Fold in the mini chocolate chips.
  5. Using a cookie scoop, portion dough evenly into each mini muffin tin, filling about 3/4 full. Bake until golden brown and middles no longer look raw, 9-10 minutes. Remove from oven and immediately make indents in the center of each cookie cup, pressing the rounded side of a half teaspoon in the center.
  6. Let cool for several minutes before gently removing using a small metal spatula. Place cookie cups on wire rack to cool completely.
  7. Once cool, fill cavities with nutella and/or dulce de leche and press several Cadbury mini eggs on top to make an Easter "nest".

Saturday, April 9, 2016

Soft and Chewy Lemon Cookies

Soft and Chewy Lemon Cookies - made dough March 6, 2016, adapted from Averie Cooks
It’s extremely rare – as in has never happened before – that I tell you I tried a recipe from Averie Cooks and….I didn’t like it. I typically love, not just like, but love most of her recipes. There have been a handful where mine haven’t turned out as well as hers looked but most of them have been amazing. Unfortunately, not this time and I blame it all on lemon extract.

I actually liked everything else about this recipe: it was easy to make, the dough was great, the cookies didn’t spread and remained chubby (you know I like the chubby) and the texture was perfectly soft and chewy as the title advertises. I also added lemon chips for a little extra lemon flavor. But I hated the taste of the lemon extract. Seriously. Just hated it. I don’t like most extracts anyway, with the notable exception of vanilla extract which I love. Any other extract just has too much of a metallic tang. Almond extract is a no-go. Much as I love coconut, I hate coconut extract. I’ve used lemon extract before and been fine but this is the first time I’ve used it in such a relatively large quantity and it ruined the cookie for me.

When I say ruined, I mean, I threw the taste test cookie away after eating half of it. That’s right – tossed it. I thought later maybe I was being a mite too persnickety (like I haven’t been accused of that before) so I baked off the rest of the cookies, intending to give them away along with a couple of other kinds of cookies I’d made for a lunch. Then I tried the cookie again. This time I got through 2/3 of the cookie then I couldn’t do it. I tried but I just couldn’t. I can’t give away something I can’t even finish myself. That’s not how I roll.

I do want to try making these cookies again though since I liked everything else about it but next time I’m either going to leave the lemon extract out completely or just it down to a max of a teaspoon, maybe half a teaspoon. I’m fine if they’re not super lemony if it means I can get rid of that metallic lemon taste.
1/2 cup unsalted butter, softened
3/4 cup granulated sugar
2 tablespoons light brown sugar, packed
1 large egg
1 tablespoon lemon extract (beware this is a lot of extract and what I didn't like about it - try cutting to 1 teaspoon)
2 tablespoons lemon zest
1/2 tablespoon honey
2 cups flour
2 teaspoons cornstarch
pinch salt
1 teaspoon baking soda
2 tablespoons lemon juice
1 cup lemon chips, optional
  1. In the bowl of a stand mixer fitted with the paddle attachment, combine butter, sugars, egg and lemon extract and beat on medium-high speed until creamed, light, fluffy and well combined, about 4 minutes.
  2. Add lemon zest and honey and beat until well combined, about 2 minutes.
  3. Add flour, cornstarch, salt, and baking soda. Add lemon juice. Beat until just combined.
  4. Using a large cookie scoop, portion into golf-ball-size dough balls, cover and chill or freeze for several hours or overnight.
  5. When ready to bake, preheat oven to 350 degrees F. Line baking sheets with parchment paper and evenly space frozen dough balls on baking sheets. Bake for 10-12 minutes or until edges have setand middles no longer look raw. Do not overbake. Cool completely before serving.

Friday, April 1, 2016

Old-Fashioned Sugar Cookies

Old-Fashioned Sugar Cookies - made dough February 15, 2016 from The Domestic Rebel
I think I have to get over my prejudice in using oil in recipes. My first inclination is I only want to bake with butter but I have to admit, in the right recipe, oil serves a good purpose. And it’s the right recipe in this one for sugar cookies. The oil helps prevent the cookie from spreading too much and it adds a crispness to the edges while still keeping the rest of the cookie moist. I’m still a butter girl but I can’t argue with oil in this recipe.

Next to an amazing chocolate chip cookie, my next favorite is a good sugar cookie. And this is a good sugar cookie. I like the simplicity of the recipe and, unlike my penchant for tinkering with plain brownie recipes to fancy them up, I prefer to keep my sugar cookies as plain as possible so you get the full hit of that sugary, buttery goodness with nothing to interfere with the taste. Love it.

Just make sure you beat the butter until it's creamy and there are no lumps. I like to beat the butter first before I add the other ingredients. If you combine the oil and butter while the butter is still cold or lumpy, it's harder to get the lumps out after all the oil or eggs are in.

Oh and don't let their modest, homemade appearance fool you - this is a really delicious cookie.
2 sticks (1 cup) butter, softened
1 cup oil
1 cup granulated sugar
1 cup powdered sugar
1 tablespoon vanilla
2 eggs
1 teaspoon baking soda
1 teaspoon cream of tartar
1 teaspoon salt
4 cups plus 2 tablespoons all-purpose flour
Additional granulated sugar, for rolling
  1. In a large bowl of a stand mixer, beat together the butter, oil, sugar, powdered sugar, vanilla and eggs until creamed and well combined, about 2 minutes. 
  2. Add in the baking soda, cream of tartar, salt and flour; gently mix until a soft dough forms. Do not overmix. Chill in the refrigerator for at least 2 hours.
  3. Preheat oven to 350 degrees F. Line 2 baking sheets with parchment paper. Using a cookie dough scoop, portion into golf-ball-size dough balls and roll in the additional sugar. Evenly space on baking sheets, about 2 inches apart.
  4. Bake for 9-11 minutes or until edges are golden brown and middles no longer look raw. Do not overbake.

Friday, March 25, 2016

"The Best" Lemon Bars

The Best Lemon Bars - made March 13, 2016 from Your Home-Based Mom

Almost everyone I know loves lemon bars and almost every lemon bar recipe I see claims it’s “the best”. I have very jaded taste buds so I rarely go into the superlative when I’m describing something unless it really, really deserves it. It doesn’t mean it isn’t good if I don’t call it “the best”. Only that there are so many amazing recipes out there that are super fantastic that it’s hard to claim any single one recipe as “the best” of anything.

So I don’t know if this is THE best lemon bar recipe I’ve ever tried. It’s good. It’s fine. My normal go-to lemon bar recipe is also quite good and I don’t know if I would choose this one above that. The good thing is it’s not really a competition. Both are good. Both can be made easily and eaten even more easily. Crisp shortbread crust, lemony topping, sweet vanilla glaze – not much not to love here.  If you’re a lemon bar fan, give this recipe a whirl. It’s good for using up at least 1 lemon.
Oh and true confession time, I probably left this in the oven for 5 minutes longer than I should have. I was busy doing something on my computer and the time got away from me. By the time I checked on these, the top was golden brown all over and edging more towards “brown” than “golden” – eek. The good thing with lemon bars though is they’re hardy enough to withstand a few minutes’ neglect because the topping is more of a custard and not a cake to dry out. And the bottom came out a little crisp but not burnt and not crunchy-hard.  Dodged a baking bullet. Whew.

Crust
1/2 cup butter, cold
1 cup flour
1/4 cup powdered sugar

Filling
1 cup sugar
2 tablespoons flour
1/2 teaspoon baking powder
2 eggs, beaten
2 tablespoons lemon juice
grated rind of 1 lemon

Glaze
3/4 cup powdered sugar
lemon juice to make soft glaze
  1. Preheat oven to 350 degrees F. Line an 8 x 8 pan with foil, lightly spray with cooking spray.
  2. Cut together butter, flour and powdered sugar until mixture resembles coarse meal and press into an even layer into prepared pan. Bake for 15 minutes.
  3. Mix together sugar, flour and baking powder. Add in eggs, lemon juice and lemon rind.
  4. Pour over hot, baked crust and bake for 20-25 minutes or until edges are golden brown and mixture is set.
  5. Mix together powdered sugar and enough lemon juice to make a glaze soft enough to drizzle over lemon bars while they are still warm. Glaze, let cool then cut into squares.

Saturday, March 19, 2016

Frosted Cinnamon Sugar Cookies

Frosted Cinnamon Sugar Cookies - made dough March 12, 2016, adapted from I Heart Naptime
You know how I always say that I only have 1 taste test cookie or taste test piece of whatever I make and I give the rest away? But if something is really, really good, I’ll have a second piece? Compared to all I bake, it’s relatively rare when I like something enough to have more than 1 piece of it. And that includes even my favorite chocolate chip cookie recipes. A warm chocolate chip cookie 10 minutes out of the oven is the peak of culinary dessert nirvana for me but even so, I’m fine only having one cookie and no more. At least not until I make the next batch days or weeks later. But eating one after the other of something? Very rare for me. I’m a moderate; I don’t overindulge like that.

So it says something when I flag that this cookie is one of those rare ones. I honestly didn’t expect to like it as much as I did. I figured I would like the cookie well enough because it had all the right elements I look for in a good cookie: it didn’t spread, it was soft, moist and chewy and it tasted good. No, make that: it tasted great. Much as I love chocolate, when it comes to cookies, I actually prefer vanilla. I even liked the frosting. Hello, not a frosting person but I liked the frosting. Actually, I made up the frosting recipe based on modifying the original one that came with the recipe.  And I liked it paired with this cookie. The cookie would be good without the frosting but it was great with it.
I waited for the first batch to cool so I could frost the cookies, had a taste test cookie and thought “hmm, that’s really good.” Then “Wow, that’s really good.” So, although it was supposed to be a rest day, I went and did a 40-minute workout, came back and had a second cookie. There you go, that’s how much I liked this cookie.

Don’t overbake these! I know I say that with almost every recipe I post but seriously, don’t overbake them or they’ll be more cakey than chewy and they’ll be dry. I shaped the dough balls into thick discs instead of “balls” so that when they baked, they would stay a fairly uniform thickness. They did still dome a bit in the middle but that’s okay, the edges didn’t spread thin. Depending on your oven, I wouldn’t bake these longer than 11-13 minutes, long enough for the edges to get golden and the middles not to look shiny or raw. Let them cool completely before you spread them with frosting. They’ll be moist, chewy cinnamon-vanilla goodness.  Oh, and please, don’t use old, tired cinnamon. You know I’m talking about that bottle you’ve had in your pantry forever because you haven’t used it in awhile and there’s still some left. If you can’t remember when you bought the cinnamon and/or if you remember but it wasn’t during this decade, please go buy a new bottle. Trust me, it’s worth it.
Cookies
1 cup (8 ounces) butter, softened
1 cup granulated sugar
2 eggs
1 tablespoon vanilla
3 cups flour
3 teaspoons baking powder
2 teaspoon ground cinnamon
1/2 teaspoon salt

Frosting
4 ounces cream cheese, softened
4 tablespoons (2 ounces) butter, softened
2 to 2 1/2 cups powdered sugar (to taste and desired consistency)
1 teaspoon vanilla
1-2 teaspoons whole milk (to desired consistency)
additional cinnamon for sprinkling
  1. In a large bowl of a stand mixer, beat together the butter and sugar until light and fluffy, 2-3 minutes. Add the eggs, one at a time, then the vanilla; mix well. Add the flour, baking powder, cinnamon and salt; mix just until combined. Chill 30 minutes.
  2. Preheat the oven to 375 degrees F. Line baking sheets with parchment paper.
  3. Roll the dough into golf-ball-size balls, flatten slightly into thick discs and space evenly on baking sheets, 2 inches apart. Bake 10-12 minutes (depending on the thickness of your discs) or until edges are golden and middles no longer look raw. Remove and cool completely before frosting.
  4. To make the frosting: beat together the cream cheese and butter until completely combined and no lumps remain. Add up to 2 cups powdered sugar, vanilla and a little milk. Alternately add remaining powdered sugar and additional drops of milk until desired consistency. Beat until light and fluffy.
  5. Frost cookies and sprinkle lightly with cinnamon.


Tuesday, March 15, 2016

The Classic Brownie - swirled with Nutella and topped with Ferrero Rocher

The Classic Brownie - made February 20, 2016, recipe adapted from Brownie Points by Lisa Slater
A brief break from cookie recipes (although I have more coming) to put up my latest hack on a typical (plain) brownie recipe. It’s hard for me to make a plain brownie. I value the simplicity and goodness of a perfectly fudgy brownie as much as the next person but when you’ve made as many brownies as I have, you (or I) can’t resist tinkering.
This is one of my many baking books with brownie recipes in them. I’ve gone through a fair number of them as anyone reading my blog for awhile can attest to and every now and then, I try another one so I can increase the return on my investment of having so many baking books. I’ve thinned out a fair number already but let’s face it, when you have more than a hundred – and I do – that’s still a lot.
The beauty with brownies is they’re pretty forgiving no matter what you add to them. I was doing a clean out of my pantry and needed to use up some Nutella before it expired (because, c’mon, who lets Nutella expire??) and some Ferrero Rochers that I really didn’t want calling out to me anymore. I’ve ignored their siren song for this long and it was best that they be on their way.

To “stuff” the brownie with Nutella, simply layer half the brownie batter in an even layer on the bottom of the pan and dollop Nutella generously over it. And I mean generous. Don’t be dainty; now isn’t the time. No need to try to connect the dollops but don’t let them be too far apart either. Then cover all the dollop-y Nutella goodness with the rest of the brownie batter and bake. The tricky thing will be the toothpick test may not be that useful if you hit a pocket of Nutella when you insert the toothpick. If you did it right, there’s a high probability you’ll hit the Nutella too. What I try to do is insert the toothpick at an angle so I should get some of the toothpick through the brownie itself and not just the Nutella. Timing it doesn’t hurt either but you know I never remember to do that. A few minutes before the end of the baking time, drop the chopped Ferrero Rochers on top so they can melt slightly into the brownie. You don’t want them to melt completely but they should melt just enough to adhere a bit to the top of the brownie. Cool completely, cut into small pieces, go workout then come back and have a piece of rich chocolaty, fudgy goodness.
1 cup butter
1 cup brown sugar
1 1/2 cups granulated sugar
12 ounces bittersweet chocolate, chopped
2 ounces unsweetened chocolate, chopped
6 large eggs
1 teaspoon salt
1 tablespoon vanilla
1 cup all-purpose flour
1 cup Nutella
12 Ferrero Rochers, chopped into quarters
  1. Preheat oven to 350 degrees F.
  2. Line a 9 x 13" baking pan with foil and lightly spray with nonstick cooking spray.
  3. Melt butter and sugars in medium saucepan over medium-low heat, whisking until melted and smooth. Add chopped chocolates and whisk until melted and combined.
  4. Add eggs, one at a time, whisking in each one until incorporated.
  5. Add salt and vanilla, stir to combine. Add flour and stir until just incorporated. Beat with wooden spoon until mixture is glossy. Do not overmix.
  6. Pour half of the batter into prepared pan. Dollop Nutella over batter. Cover with remaining batter.
  7. Bake 30-35 minutes until toothpick inserted near center comes out with moist crumbs, not raw batter. Sprinkle top with chopped Ferrero Rocher, return to oven for 2 minutes (turn oven off) then remove to cool on wire rack.
  8. Let cool completely then cut into squares.