Thursday, October 17, 2013

Warm Mix-in-a-Mug Chocolate Cake

Warm Mix-in-a-Mug Chocolate Cake - made September 11, 2013 from One Bowl Baking by Yvonne Ruperti
If you've noticed I've tried a few recipes from One Bowl Baking by Yvonne Ruperti lately, it's because I was testing them out for a cookbook review.  So far I've tried out her fudgy brownie recipe, Fluffy Yellow Sheet Cake, Classic Chocolate Chip Cookies and Lunchbox Chewy Peanut Butter Cookies. You can read my cookbook review on the Stir It Up section of the Christian Science Monitor here.  As part of my recipe testing, I also tried out this recipe for a single serving chocolate cake.  I normally don't make microwave desserts since that always feels like "cheating" and technically isn't really baking since I normally associate baking as being done in an oven. But I do make these (feeble) attempts to get out of my comfort zone and there's nothing like chocolate to mitigate any unease in risk taking.
The premise of One Bowl Baking is you only need one bowl to do all your mixing in and not a lot of fancy equipment to make something delicious.  In this case, you don't even need a bowl, just a mug to mix, microwave and eat from. The recipe is as easy as that sounds.  I did have to mentally adjust my baking instincts because I don't normally measure flour or sugar in measurements as small as a teaspoon or tablespoon.  But that's the point of an individual-size dessert; by definition, it's only meant for one.

Which is actually quite handy in this case because this literally took less than 5 minutes to throw together in the mug, mix and microwave.  Included in the 5 minutes was even a minute or two of cooling time before I topped it with ice cream and tried it.  The cake texture was a little dense, almost like a flourless chocolate cake but not as creamy but it was cooked (microwaved?) to doneness.  I wouldn't overcook this or it'll be tough. Don't expect the fluffy texture of a baked cake either, not unless you can time it perfectly to the point of "done" but not underdone or dry.  I added the ice cream as a personal preference to cut the richness. I don't know that this would replace a good slice of chocolate cake for me but as a quick dessert to throw together for one, it fit my need for something sweet (and chocolaty) after dinner with little cleanup and no leftovers.

1 tablespoon plus 1 teaspoon packed light brown sugar
1 tablespoon unsalted butter, softened, plus more for greasing the cup
Pinch salt
2 teaspoons water
1/8 teaspoon vanilla extract
2 tablespoons plus 2 teaspoons all-purpose flour
Pinch baking soda
1 tablespoon bittersweet chocolate chips (I used mini chocolate chips)

1.       Butter a large microwave-safe mug.
2.       Add the brown sugar, butter, salt, water, and vanilla to the mug and stir to combine.
3.       Add the flour, baking soda and chips and stir until just combined.  Press the dough into the bottom of the mug.
4.       Microwave on high power just until the dough puffs and doesn’t look wet, about 45 seconds.
5.       Remove from the microwave and let rest for 5 minutes before eating.

Wednesday, October 16, 2013

Cheesy Sweet Potato, Sausage and Corn Chowder

Cheesy Sweet Potato, Sausage and Corn Chowder - made October 5, original recipe
I live in a pretty mild climate so it's a stretch to wax poetic about "chilly" autumn days being upon us, making it perfect soup (or chowder) weather.  So I won't pretend and instead say I made this because I wanted to.  One of my favorite soups is baked potato, preferably served in a crusty bread bowl just to make sure I get all of those carbs safely into my waistband.  I made up this recipe because I wanted something with the thick, creamy consistency of baked potato soup but I wanted to use sweet potatoes instead of white potatoes.  I had purchased 3 sweet potatoes and wanted to try out three different recipes for them.  This is the first one.

The ultimate potato soup for me is (perhaps oddly enough) the potato cheese soup at Marie Callendar's.  Love it.  Love the creamy consistency and the cheesy flavor.  But I don't really eat at Marie Callendar's anymore (they keep closing down) so I've been without potato cheese soup for awhile.  Hence my attempt to make my own. 
I didn't quite know what I was doing but I did a search of potato soups and potato cheese soups online and came up with the ingredients most of them had in common: potatoes (check), cheese (yup), milk and sour cream. There were other variations so I just winged it and invented this one.  For the most part, I thought it turned out rather well, even despite my having a low bar of "just don't poison yourself" when it comes to my cooking.  The chowder had the thick, creamy consistency I was going for, thanks to the sour cream and the melted cheese. I added the kernels from a fresh ear of white corn for some crunch and for protein, I threw in chunks of chicken sausage to the chowder itself and topped it with turkey bacon.  I know many bacon snobs don't consider turkey bacon "real bacon" but, not being a bacon aficionado, it worked for me since it has less fat than the real thing.  The sweet potatoes were also good in the chowder but I think it would've been better if I had used a more spicy sausage.  The one I used was a sweet sausage from Trader Joe's but since the sweet potatoes were already, well, sweet as was the sweet corn, a spicy sausage would have provided for a better contrast.

This chowder is best consumed the day it's made for the optimal creamy consistency.  I refrigerated the leftovers and ate them for the next few days after and it wasn't as good.  The chowder was more lumpy to eat rather than creamy and the oil from the cheddar cheese separated a bit and had to be emulsified back in.  Otherwise, I didn't give myself food poisoning so I would consider this a success (remember the low bar).
1 medium to large sweet potato, peeled and diced into even-sized chunks
1 tablespoon olive oil
Salt and pepper to taste
1 2-ounce sausage, cut into chunks and cooked
1/4 cup butter
1/4 cup flour
1 cup whole milk
1 cup chicken broth
1/2 cup sour cream
1/2 cup shredded cheddar cheese, mild or sharp
Cooked kernels from 1 ear of corn
2 strips bacon, crisp, crumbled
2 mini boules, centers cut out (reserve tops)
1 green onion, green top chopped for garnish (optional)
  1. Heat olive oil in a medium or large saucepan over medium-high heat.  Add sweet potato chunks and stir fry until tender but not mushy, stirring with a wooden spoon to cook evenly.  Salt and pepper to taste.
  2. Add sausage and cook until heated through.  Set aside.
  3. In a medium saucepan, melt butter over medium heat.  Whisk in flour to make a roux.  Gradually whisk in the milk and the chicken broth, whisking the mixture smooth.  Add sour cream and whisk smooth.  Add shredded cheddar cheese and whisk until melted smooth.
  4. Add sweet potatoes, sausage and fresh corn kernels.  Let simmer, stirring occasionally until thickened to desired consistency.
  5. Heat mini boules at 350 degrees F until insides are very lightly browned.  You can butter the tops and brown them in the oven if desired.  Remove boules from oven and fill with chowder.  Garnish with crumbled crisp bacon and green onion if desired.

Tuesday, October 15, 2013

Lunch Box Chewy Peanut Butter Cookies

Lunch Box Chewy Peanut Butter Cookies - made dough September 14, 2013 from One Bowl Baking by Yvonne Ruperti
Funny thing happened to me on the way to making this recipe.  In the baking book, it turns out the volume and weight measurements for the flour didn't match; the weight measurement of 10 2/3 ounces called for double the 1 cup plus 2 tablespoons volume measure listed. By the time I discovered it, the dough was almost made and I had no way of knowing which was the right measurement.  Since the author had talked about the importance of and her preference for weight measurement, I gambled that the weight measurement would be the correct one.  Plus I spot checked the other cookie recipes in the book and they all seemed consistent with the weight measurement being the one to go with. Lastly, when I only had the volume measurement of flour added, the dough still seemed too soft and I didn't want cookies that spread so, again, that seemed to indicated the weight measurement was the right one.
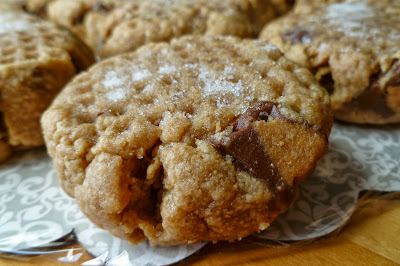
Um, turns out I was wrong.  By the time I weighed the last of the flour in there and finished incorporating it, the dough was dry and crumbly. Ack.  What to do, what to do.  I needed this as part of Zoe's bake sale in my carefully time-managed schedule of cookie dough making all week and I couldn't afford the lost time in making up the right version of these cookies.  So I did what any good baker would do - I rolled with it and improvised.  I doctored in more peanut butter to make the dough less dry and come together more easily.  I added chopped up chunks of peanut butter cups (which I had planned to do anyway even if I had made the dough correctly). I formed the dough into thick discs rather than dough balls as I was afraid with a disproportionate amount of flour, the cookies wouldn't spread.  I chilled the dough discs first as is my habit with all cookie doughs.  When I baked off the taste test cookie, I drastically underbaked the cookie.  The disc remained in pretty much the same shape as when I put it in the oven as when I took it out.  It was also worrisomely fragile.  But it tasted great.  The texture was like baked peanut butter fudge.  With peanut butter cups.  Whew - cookie crisis averted.

Later on, Yvonne Ruperti confirmed the volume measurement was the correct one and the weight measurement unfortunately wasn't caught (she has the correction up on her website). So I made the recipe again, using the correct volume measurement for flour instead of the weight measurement listed. The dough still seemed soft so I didn't imprint it with the pointy end of the meat mallet like I normally do for peanut butter cookies and instead just made them into normal dough balls and froze them before I baked them.
The correct version
I was pleasantly surprised that, despite the softness of the dough, the cookies didn't spread very much and instead stayed chubby. I still underbaked them although they weren't quite the baked peanut butter fudge that the first batch was.  They're also fragile because I underbaked them but they weren't crumbly. Another good recipe from this book.
The correct version

6 tablespoons (3 ounces) unsalted butter, softened
1 cup (7 ounces) packed light brown sugar
½ teaspoon salt
1 1/3 cups (12 ounces) creamy peanut butter
1 large egg
2 teaspoons vanilla extract
1 cup plus 2 tablespoons all-purpose flour
½ teaspoon baking soda
1 cup peanut butter cups, chopped, optional
  1. Place oven racks in the upper-middle and lower-middle positions.  Preheat the oven to 375⁰F. Line two sheet pans with parchment paper.
  2. In a large bowl, stir the butter, sugar and salt until creamy.  Stir in the peanut butter and then the egg and vanilla.
  3. Add the flour and baking soda to the bowl, then stir until combined. Add chopped peanut butter cups, if desired.
  4. Scoop the dough into 18 balls, spacing evenly on the sheet pan (9 per pan).  Using a fork, press a crosshatch onto each cookie, pressing to about 1-inch thick.
  5. Bake until light golden, puffed and just beginning to crack, 8 to 10 minutes, rotating pans halfway through baking. 
  6. Let the cookies cool on the pan for 5 minutes, then transfer to a wire rack to cool.

Restaurant Review: da Campo Osteria, Ft Lauderdale, FL

da Campo Osteria - dinner on October 1, 2013, restaurant at il Lugano hotel
White Chocolate Bread Pudding - room service dessert
For my second week in Florida, I was out there for a 2-day offsite and we were literally offsite, holding our all-day meetings at Il Lugano Hotel. The restaurant in the hotel is da Campo Osteria and that's where our meeting attendees of 12 people went for our team dinner.  Nothing so handy as leaving the meeting room, taking the elevator back to your room to dump your laptop then taking the elevator back down to show up at the restaurant on the ground floor.
da Campo Osteria also makes the food served for room service and when I had arrived the night before, I ordered in since I'd gotten to the hotel late due to flight delays.  I had my ultimate comfort food, spaghetti and meatballs and this rich white chocolate bread pudding.  I couldn't finish it all but what I did have was pretty good.  I'm not a big fan of white chocolate but I love bread pudding and this was presented beautifully.
Bruschetta
For our team dinner, we started off with appetizers.  One of the things da Campo Osteria is known for is their appetizer of fresh pulled mozzarella prepared tableside.  One of the staff wheeled over a cart with all the ingredients and accoutrements he needed and set up by our table.  He started with cow milk curds in a stainless steel bowl that he broke up into chunks.  Wearing gloves, he poured very hot (possibly boiling hot, hence one reason for the gloves) water over the curds and started working them together, kneading the curd chunks into a smooth mass, with a folding motion, adding more hot water as he went. At a certain point in the kneading process, he started pulling the mozzarella into a long strand, much like you pull taffy into a ribbon.  Fold the strand over, pull again, knead, shape.  He ended up with an impressive smooth round disc of fresh mozzarella which he covered with oil and balsamic vinegar and plated with an accompaniment of olives, peppers, tomatoes and other foodstuffs I couldn't identify.  And that was our appetizer.  We had ordered 3 so he did the first one as a demonstration and two of my coworkers did the remaining two so they experienced preparing fresh mozzarella "from scratch".
Breaking up the milk curds
Kneading the milk curds together
Need more hot water
Stretching like taffy
Cutting the mozzarella into pieces
The plated fresh mozzarella
We got margherita pizza to share which I don't see on their online menu but it was nicely done with a thin crispy crust and a light smattering of cheese, tomato sauce and herbs.  As an appetizer, you don't want to fill up too much too soon, not when there's pasta on the menu and dessert to follow.  At least I don't.
A slice of the margherita pizza we all shared
I had had the spaghetti and jumbo meatball for dinner the night before with room service so for the team dinner, I went with the Lobster Tagliatelle.  I'm mindful to make my contributions to the seafood economy in Florida and it's hard to go wrong with lobster. This was pretty good although, having already had the bread, margherita pizza and freshly pulled mozzarella, I had to start pacing myself if I wanted room for dessert so I focused on consuming the lobster. It was a foregone conclusion I wasn't going to be able to eat all the pasta. I had run 4 miles in the hotel gym that morning, not 40.
My entree: Lobster Tagliatelle
A coworker's entree: Grilled New York Strip
And I can't have a restaurant review without dessert, of course.  Since I had already had the White Chocolate Bread Pudding the night before, I went with the Ricotta Zeppole this time.  They were served slightly warm, crunchy on the outside, and stuffed with nutella on the inside. There was some fancy food art stuck in the gelato and I tried a snippet but set it aside to focus on the zeppoles and the accompanying vanilla bean gelato. Do I even need to mention it was delicious?  Let me say it again: warm zeppoles stuffed with nutella.  Yes, they were as good as that sounded.  I shared a couple of zeppoles with my boss and that was probably a good thing so I wouldn't snarf them all down.  Because again, I only ran 4 miles that morning, not 40.  I had to keep telling myself that.
Ricotta Zeppole
Sorry, the below pic is up-ended but I couldn't get it to rotate properly.  It uploads correctly then turns itself on its end.  Anyway, one of my coworkers seated on my left ordered this dessert which is essentially a chocolate cake filled with amaretto buttercream topped with vanilla bean gelato and chocolate sauce.  He said it was good but nothing fantastic.  I'm glad I got the zeppoles instead.
Caprese Torta aka chocolate cake
My other coworker seated on my right ordered the tiramisu souffle.  I thought it was a cute presentation, warm in the cast iron pot with separate containers for the mocha gelato and mascarpone cream. I forgot to ask him how it tasted.  At the time, I wasn't sure I had looked up from my zeppoles just yet.
Tiramisu souffle with mocha gelato and mascarpone cream
Overall, I thought da Campo Osteria was a good choice for our team dinner.  Beyond the convenience factor of being located in the hotel we were staying at, the food was good, the place was large enough to accommodate our party of 12 and the service was attentive.


Monday, October 14, 2013

Classic Chocolate Chip Cookies

Classic Chocolate Chip Cookies - made dough September 14, 2013 from One Bowl Baking by Yvonne Ruperti
Not too long ago, I had blogged about Dorothy's Crazy for Crust Bakery-Style Chocolate Chip Cookie recipe as claiming one of the top 2 spots in my chocolate chip cookie repertoire.  After years of trying and trying to make Mrs.-Fields'-but-better type of chocolate chip cookies that stayed thick, had crisp edges and chewy middles, I had narrowed it down to Dorothy's recipe and Alton Brown's recipe.  Then, out of the blue, came this recipe from One Bowl Baking that had the same components I look for in a great chocolate chip cookie recipe.  It doesn't spread very much, it's buttery, it's chocolaty, it stays chubby, the edges are crisp, the middle is chewy, and hey, it's just good.
I don't know that I could really pick between the three as to which one is the best and fortunately I don't have to.  The beauty of having different recipes to choose from is you can like them all and I don't think you can go wrong with any of them.  The funny thing is, now that I had discovered Dorothy's recipe, I wasn't really on the lookout for a "better" one but just decided to try Yvonne Ruperti's recipe because the picture of the cookies in her book, One Bowl Baking, looked so enticing.
I used milk chocolate chunks instead of bittersweet chocolate chips in my cookies and I didn't flatten the dough ahead of time so the cookies would stay thick.  So I think that's why I liked them better in terms of appearance :). Plus I had the I'm-so-spoiled-when-it-comes-to-cookies thing going on since I had the taste test cookie 10 minutes out of the oven.  I haven't tried these a few hours at room temperature yet or even the next day since the first batch I made of these went to Zoe's bake sale but I'm certainly open to making them again and giving them another test run. We all gotta do what we gotta do in the name of cookie research.
1 ¼ cups (8 ¾ ounces) packed light brown sugar
¼ cup (1 ¾ ounces) granulated sugar
¾ teaspoon salt
12 tablespoons (6 ounces) unsalted butter, melted
1 large egg
2 teaspoons vanilla extract
2 cups (10 ounces) all-purpose flour
¾ teaspoon baking soda
¼ teaspoon baking powder
1 ½ cups (9 ounces) bittersweet chocolate chips
  1. Place oven racks in the upper-middle and lower-middle positions.  If baking right away, preheat the oven to 375⁰F. Line two sheet pans with parchment paper.
  2. In a large bowl, stir the brown sugar, granulated sugar, salt and melted butter until completely combined.  Stir in the egg and vanilla.
  3. Add the flour, baking soda, and baking powder to the bowl, then stir until almost combined.  Stir in the chocolate chips.
  4. Scoop the dough into 20 balls (I made mine bigger and only ended with with 13 dough balls), and space evenly on the pans. (I froze mine overnight.) Gently press down on each dough ball to about 1” thick (if you like chubby cookies, don't press down and just bake the dough balls as is).
  5. Bake until the cookies are puffed in the center and browned at the edges, about 9 minutes, rotating the pans halfway through baking.  The center may look underdone.  Do not overbake.
  6. Let the cookies cool on the pan for 5 minutes, then transfer to a wire rack to cool.


Sunday, October 13, 2013

Fluffy Yellow Sheet Cake

Fluffy Yellow Sheet Cake - made September 21, 2013 from One Bowl Baking by Yvonne Ruperti
This was the 3rd dessert I packaged up and brought to Florida with me to pass out to my coworkers there.  Normally I wouldn't bring a frosted cake across the country with me as cakes don't hold up as well as brownies for traveling and are easily smushed en route.  But I had already made 2 kinds of brownies and wanted something non-chocolate to bring that also made enough to fill multiple treat bags.

Cakes also don't remain as fresh as brownies for very long (at least, not to my picky taste buds) so what I did as soon as I had baked and frosted this is package it all up (2 squares of frosted cake to a package, wrapped in plastic wrap) and place them in freezer bags to reside in the freezer until the day I left.  When I pack for my travels and am bringing baked goods, I pack my carry-on luggage the night before and on top, put in empty amazon shipping boxes.  That way I know how much room I have and I put the wrapped brownies and cake directly into the empty boxes right before I leave.  The baked goods go directly from the freezer to my carry-on, I zip it up and I'm off to the airport.
They'll slowly thaw on the flight but by the time I hand them out the next day, they still retain some freshness.  I counsel the recipients of the treat bags that if they're not going to eat them right away, to put them in the freezer (never the fridge) to maintain their freshness. I'm possibly the only one who's that picky about it though as no one seems to notice if they're a day or two away from the oven or freezer. But since I tend to consume everything I post within hours, if not minutes, of when they come out of the oven, my taste buds are pretty jaded.
The taste of the cake was good although it wasn't quite as fluffy as I would have liked.  You can tell by looking at the air pockets in the cake that I certainly beat the batter enough for the cake to rise so it's possible I should've baked it a minute or two longer so it wouldn't be as dense and would be a little lighter.  And that was with me actually baking the cake for a few minutes longer than my underbaking instincts told me to because I know I usually underbake cakes and I was trying to break that bad habit. Apparently I still need a little more work in that area.

16 tablespoons (8 ounces) unsalted butter, softened
1 ½ cups (10.5 ounces) granulated sugar
¾ teaspoon salt
3 large eggs
2 large egg yolks
1 ¼ cups (300 ml) whole milk, room temperature
4 teaspoons vanilla extract
2 ¾ cups (11 ounces) cake flour
2 ½ teaspoons baking powder

1.       Place an oven rack in the middle position.  Preheat oven to 350⁰F.  Line a 9 x 13” baking pan with foil and lightly spray with nonstick cooking spray.
2.       In a large bowl, beat the butter, sugar and salt until creamy.
3.       Whisk in the eggs and egg yolks, one at a time, until each is incorporated.
4.       Whisk in the milk and vanilla.
5.       Add the flour and baking powder to the bowl, then whisk gently until combined.
6.       Pour the batter into the pan and bake until golden, just firm, and a toothpick inserted into the center comes out clean, 25 to 30 minutes.
7.       Set the pan on a wire rack and let the cake cool completely before frosting.