Tuesday, July 16, 2013

Rolo-Stuffed Chocolate Chip Cookies

Rolo-Stuffed Chocolate Chip Cookies - made July 5, 2013, recipe adapted from Mon Cheri Cooking School

Since the Nutella-Stuffed Brown Butter Chocolate Chip Cookies turned out so well, I thought I'd try another chocolate chip cookie recipe and stuffing that too, this time with caramel and Rolos.  Sometimes when I have a chocolate chip cookie recipe I want to try, I make it as is and other times I dress it up a bit.  This recipe seemed so normal and typical of chocolate chip cookies that I decided it needed to be dressed up.  Hence the caramel stuffing.
By now I've become a cookie-stuffing expert.  Mini chocolate chips to make it easier to work with the dough, chilling the caramel and Rolos, and sealing the cookie dough tightly around the caramel so nothing leaks out during baking.  Except things didn't go as planned and the caramel leaked out anyway in most of the cookies, probably because they weren't as tightly sealed as I thought.  Not to be daunted, I cut around the cookies while they were still warm and peeled off the leaked, melted caramel.  That made the cookies a bit more presentable.  I brought these into work and people seemed to like them but I didn't get a chance to try them until a day later.  Normally I don't wait that long to taste test a cookie but I just didn't get a chance to eat this on the day I made it, probably because of the time of day/evening I baked them and I wasn't hungry then.  In any case, I wasn't impressed by these cookies.  They were okay but nothing out of the ordinary, even with their Rolo-caramel stuffing.  So these don't oust the Alton Brown recipe or the Nutella-Stuffed Brown Butter Chocolate Chip Cookies in my recipe hall of fame.

1 cup light brown sugar, solidly packed
½ cup granulated sugar
½ cup vegetable shortening, such as Crisco
½ cup (4 ounces) unsalted butter, room temperature
2 eggs
1 teaspoon vanilla extract
3 cups all-purpose flour
1 teaspoon baking soda
1 teaspoon salt
12 ounces semisweet chocolate chips
  1. Using the paddle attachment of an electric mixer, beat both sugars with the shortening and butter until light and fluffy.  Beat in eggs and vanilla extract.  Mix flour, soda, and salt in a large bowl.  Add dry ingredients to the butter mixture and mix until blended.  Stir in the mini chocolate chips by hand.
  2. Flatten 1 1/2 tablespoons of dough in the palm of your hand and drop a dollop of caramel in the middle.  Add a Rolo in the center and wrap the cookie dough around the filling, sealing the edges tightly.  Patch any "holes" with a bit of cookie dough.  Chill or freeze until firm.
  3. When ready to bake, preheat oven to 350 degrees F. Place chilled dough balls onto parchment-lined baking sheets, spacing 2 inches apart.  Bake until golden brown, about 12 minutes until edges are brown and the middle is just barely no longer raw looking or doughy.  Keep cookies on baking sheets 5 minutes before transferring cookies to a wire rack to cool completely.  If any caramel has leaked out during baking, cut neatly around the cookie with a small sharp knife while still warm.

Monday, July 15, 2013

Bakery Review: Frost Cupcake Factory

Frost Cupcake Factory - visited July 1, 2013
I've been writing my blog for several years now - unbelievably, it'll be 4 years this September; my, how time flies when you're baking.  I feel like I've been doing much the same thing for awhile lately: try a new recipe, taste it, take a picture, write it up and post.  Nothing wrong with that but I feel the need to mix things up a bit.  So, with that in mind, I'm going to do a series of "bakery reviews" in the upcoming months.  I want to try local bakeries and eateries and do an honest assessment of what I think of them and how I find their products.  I've pretty much started that with my write up of Stan's Donut Shop and, to a lesser extent, Tartine.  I'm just formalizing it into my summer project. Which could also bleed into fall, winter and spring because I'm fortunate enough to live in a food mecca and it's hard to run out of new places to try.  The only theme I'm going to try focusing on is patronizing and writing about small businesses as much as possible, not just to help promote them but to encourage everyone to try out the small businesses in their own local area - you never know what hidden gems you'll find in your neighborhood.

Remember Cookie Palooza and the dozens of baked goods I made for my coworkers for our volunteer event last month?  After we volunteered at RAFT, we did a team lunch at an Indian buffet restaurant nearby.  Although there were 16 of us who made it to the lunch, we got seated at 3 different tables.  At my table of 6, we discovered an affinity for good food and sweets; recommendations of places to try started flying around the conversation.  Which morphed into "hey we should take a field trip to some of these places and check them out."  See why I like my coworkers?

Our first field trip was to Frost Cupcake Factory. Since I have a tendency to watch Cupcake Wars like a sugar-starved maniac in a candy store, I knew Frost had been a winner on Cupcake Wars (the Space Shuttle Endeavor episode) and I'd always wanted to try them.  So a few of us packed ourselves into my car during lunch one day and set out. Frost is located in a cute little shop in downtown Campbell and the first thing that strikes you when you walk into the cupcake shop is it smells divine.  Like I almost didn't need to eat a cupcake because my olfactory senses were so fulfilled.  Fortunately, almost is the operative word here.
Left to right, top to bottom: Banana, Salt 'n Sweet, Rose Velvet, Coffee Toffee Crunch

We were fortunate that we happened to go in on a Monday because it turns out that on Mondays, you can buy mini cupcakes 3 for $5.  Regular-size cupcakes are $3.25 each.  They have some amazing flavors listed and I wish I had taken a picture of their display cases with mouthwatering-looking cupcakes but at the time, I hadn't planned on writing up this post.  Anyway, after some dithering, I chose a regular-size cupcake of their Salt 'n Sweet which was a chocolate cupcake filled with salted caramel topped with chocolate ganache and drizzled with caramel. I also bought 3 minis: Coffee Toffee Crunch (chocolate cupcake frosted with chocolate buttercream which was covered with chocolate-covered toffee bits), Rose Velvet (red velvet with cream cheese frosting) and a banana cupcake topped with frosting and a banana chip.  4 cupcakes might seem like a lot to consume, albeit 3 of them were "mini" size but the sacrifices my waistline, running shoes, treadmill and I make in the name of research....

I really, really want to say these were the best cupcakes ever and it was no wonder they won Cupcake Wars.  Unfortunately.....I can't.  I cringe to even write those words because I really want to be supportive.  But I also have to be honest.  The regular-size Salt 'n Sweet cupcake was dry.  The caramel was good but the chocolate cupcake itself was dry and I wasn't hit with a lot of chocolate flavor.  The Coffee Toffee Crunch in the mini size was more moist but again, not a lot of chocolate punch.  I'm not fond of a lot of frosting on my cupcakes so I scraped off most of the frosting (it was light and airy so if you're a frosting person, I'm sure you'd enjoy it) and ate the toffee crunch bits which were the best part of the cupcake.  The Rose Velvet wasn't very moist either although it wasn't as dry as the Salt 'n Sweet.  The banana cupcake was "okay", not quite moist but not quite dry.  Instead, the texture was a bit tough, like it had been overmixed.  I honestly don't know if I just tried Frost on an off day but in my defense, my coworkers who came with me and got other cupcakes in different flavors had the same view of their cupcakes: most were on the dry side and nothing really stood out in terms of flavor.

After that road trip, I went home that night and re-watched their episode on Cupcake Wars.  I discovered 2 of the flavors they had on the show were also in their display case that day: Tear-I-Miss-You (presumably a tiramisu cupcake) and Peanut Butter Moon Pie.  It was too bad I hadn't tried either of those cupcakes, just in case those were really knockouts.  I'm willing to give Frost another try and see if they do have cupcakes that would blow me away because I want to like them and promote them but they're a bit of a drive so I don't know if I would go there just for the express purpose of getting a cupcake.  It'll have to be when I'm there "someday" for another reason.

Oh, and in case anyone does want to try them out, they just published their summer flavor calendar.  Similar to Sprinkles, they have certain flavors they make every day and some flavors they only make on certain days of the week.

Saturday, July 13, 2013

In-Love-With-Chocolate Coconut Cake

In-Love-With-Chocolate Coconut Cake - made July 4, 2013 from Baking by Flavor by Lisa Yockelson

I'm trying to get back to my baking books and the recipes I've been meaning to make for literally years but never got around to before.  This is one of them.  I love Baking by Flavor where this recipe comes from.  The paperback version is was on sale at amazon for $10 when I first linked it but now that sale price is gone.  Too bad because that's a steal.  I paid more than twice that for the hardback version and have more than gotten my money's worth from the recipes I've already tried from it.

This was another good recipe from it - the cake was soft and moist and the frosting was delicious. It was the first time I had made a frosting with egg yolks in it so I was leery but it turned out pretty well.  Just make sure you temper in the eggs or too much heat too quickly will scramble them and that's not what you want. While this is a good-tasting cake, be warned, however, that it doesn't cut neatly.  The cake is almost too soft to slice cleanly and the frosting sticks to the knife which also makes it difficult to get a clean cut.  It's also easier to eat this cake with a spoon rather than a fork.

2 cups unsifted bleached cake flour
¼ cup unsifted bleached all-purpose flour
2 teaspoons baking powder
¾ teaspoon salt
10 tablespoons (1 stick plus 2 tablespoons) unsalted butter, softened
1 ¾ cups plus 2 tablespoons granulated sugar
2 large eggs
2 teaspoons pure vanilla extract
4 ounces unsweetened chocolate, melted and cooled
1 cup milk blended with 1/3 cup light (table) cream
1 cup lightly packed sweetened flaked coconut

Coconut Frosting for topping the baked cake
  1. Preheat the oven to 350°F.  Film the inside of a 9 x 13” baking pan with nonstick cooking spray; set aside.
  2. Sift the cake flour, all-purpose flour, baking powder and salt onto a sheet of waxed paper.
  3. Cream the butter in the large bowl of a freestanding electric mixer on moderate speed for 2 minutes.  Add half of the granulated sugar and beat for 1 minute; add the balance of the granulated sugar and beat for 1 to 2 minutes longer.  Beat in the eggs, one at a time, mixing for 45 seconds to 1 minute after each addition.  Blend in the vanilla extract and melted unsweetened chocolate.  Scrape down the sides of the mixing bowl frequently with a rubber spatula to keep the batter even-textured.
  4. On low speed, alternately add the sifted mixture in three additions with the milk-table cream blend in two additions, beginning and ending with the sifted mixture.  The batter will be creamy and lightly thickened.  Mix in the coconut. 
  5. Spoon the batter into the prepared baking pan.  Gently shake the pan from side to side, two or three times, to level the top or smooth over the top lightly with a rubber spatula.
  6. Bake the cake in the preheated oven for 40 minutes, or until risen, set, and a wooden pick inserted in the cake withdraws clean.  The baked cake will pull away slightly from the sides of the baking pan.  Let the cake stand in the pan on a cooling rack.  Cool completely.
  7. Frost the cake: Place large spoonfuls of the frosting on top of the cooled cake and, using a flexible palette knife, spread the frosting over the surface of the cake.  Cool completely.

Freshly baked, the cake keeps for 2 days.

Coconut Frosting
¾ cup heavy cream
¾ cup plus 2 tablespoon firmly packed light brown sugar, sieved if lumpy
¼ cup granulated sugar
3 large egg yolks, lightly beaten
large pinch of salt
2 cups lightly packed sweetened flaked coconut
1 ½ cups coarsely chopped walnuts, lightly toasted and cooled
7 tablespoons (1 stick less 1 tablespoon) unsalted butter, cut into tablespoon chunks
1 ½ teaspoons pure vanilla extract
  1. Combine the heavy cream, light brown sugar, granulated sugar, egg yolks, salt, coconut and walnuts in a heavy, medium-size saucepan (preferably enameled cast iron).  Add the butter chunks.  Set over moderately high heat and cook, stirring frequently with a wooden spoon or flat paddle, until the butter melts down entirely and the mixture comes to a low boil.  Cook the frosting mixture at a low boil for 8 to 10 minutes, or until thickened, stirring continually.  The thickened frosting will be somewhat shiny.
  2. Remove the saucepan from the heat.  Stir in the vanilla extract.  Carefully spoon the frosting into a large heatproof bowl.  Cool for 15 to 20 minutes, stirring occasionally.  The frosting is now ready to be used.

Friday, July 12, 2013

Butter Mochi

Butter Mochi - made June 29, 2013 from Miss Mochi's Adventures
I had a hankering for bibingka one day but I didn't make it myself because my mom always makes it when my niece comes for the weekend to visit.  Except the one time I really wanted some and my niece came over, my mom didn't make it because she thought we would be sick of it.  Um. No.  So that left me hanging and bibingka-less. Now I suppose I could have made it myself since I have my mom's recipe and I've made it before.  But somehow it's never as good as when my mom makes it.  So I thought I would try something similar but different with this recipe I found on pinterest.  The ingredients are similar although not exactly the same and I knew the rice flour would give it a chewy texture like bibingka.

It was just as easy to make as well.  I sprinkled the coconut on top before baking but some of it sank into the batter.  The picture makes it seem like this would have a fluffy, cakey texture but because it uses rice flour instead of wheat flour, it actually isn't cakey but more chewy and dense, similar to mochi if you've ever had it (or gummy bears if you haven't).  To be honest, I couldn't decide if I liked this or not.  On the one hand, it was similar to bibingka and I always like coconut.  But it was way too sweet which wasn't surprising given the amount of sugar in it.  I'm not well-versed enough in working with rice flour or coconut milk to experiment with the effect of cutting back on the sugar but I wish I had. I liked the texture and the coconut but the sweetness was too much, even for me.  I think I need to stick to bibingka after all.

1 stick of butter, melted and cooled (1/2 cup)
1-pound box of mochiko (3 cups, sweet rice flour)
1 12-13oz can of coconut milk
3 cups sugar
1/2 tablespoon vanilla extract
1 tablespoon baking powder
5 eggs
Coconut for top layer, if desired
  1. Mix all the ingredients together and pour into 9x13 inch pan sprayed with nonstick cooking spray. Sprinkle with coconut if desired.
  2. Bake for 1 hour at 375 degrees F or until toothpick comes out clean. Cut into squares after letting it cool slightly.

Thursday, July 11, 2013

Nutella-Stuffed Brown Butter Chocolate Chip Cookies

Nutella-Stuffed Brown Butter Chocolate Chip Cookies - made June 29, 2013 from The Bite-Sized Baker

Back to the recipes....  I had made these cookies as the cookie layer of Fudgy Chocolate Chip Toffee Bars but that layer was so good I needed to make the cookies as standalone as they were meant to be. Stuffed with Nutella of course.  It was really hot when I made these and that actually makes working with cookie dough a little tricky, even when you're wont to freeze the dough before baking like I always do.  I never bother letting butter come to room temperature because by then it'll be too soft and greasy to work with and the cookies will spread.  Instead, I take it from refrigerator to stand mixer and beat it until it's creamy enough not to have any more lumps but not so well beaten that it's softened and warm.

If it's hot where you are, definitely chill your nutella before using it or it'll be hard to keep neat when "stuffing" inside the cookie dough.  Technically you're supposed to pat out the cookie dough to a disk, put a dollop of nutella in the middle then close/pinch the cookie dough around it, encasing the nutella completely.  But my kitchen was hot, the dough was warm, the nutella was liquid-y so I had the devil's own time trying to "stuff" the cookie dough properly without nutella leaking out all over the place.  Instead, I chilled the dough and the nutella briefly but since I didn't have a lot of time, I ended up using my mini cheesecake pan with removable bottoms to make these: I made a shell in each cavity of cookie dough, dropped a dollop of nutella in the middle then covered/sealed the top with more cookie dough.  Pushing up from the bottom of the pan meant the stuffed cookies came out easily and went straight to the freezer to chill before baking.  I ended up with bigger cookie dough "balls" than I was aiming for but I could live with that.  If you want to make them smaller, try using mini muffin tins: fill all the cavities then turn over and tap them out all at once.

One other tip for stuffed cookies is to use mini chocolate chips.  I used regular-size chips and they were harder to work with in the dough because they kept getting in the way of shaping and stuffing.  Mini chips would have been easier.  However, despite all of those logistics, the baked result was worth all the trouble. Crisp edges, gooey middle, excellent flavor. Be forewarned that these are rich cookies.  Almost too rich so making them small might not be a bad idea.  But if you like thick, chunky, decadently rich cookies, this is a winner.

2¼ cup all-purpose flour
1¼ teaspoons baking soda
¼ teaspoon of salt
2 sticks (1 cup) unsalted butter
1¼ cup packed dark brown sugar
¼ cup granulated sugar
1 large egg plus 1 egg yolk
1½ teaspoons vanilla extract
1 tablespoon plain greek yogurt (I substituted sour cream)
½ cup semi-sweet chocolate chips
½  cup chocolate chips (I recommend using mini chocolate chips)
1 jar of Nutella, chilled in refrigerator
Coarse sea salt for sprinkling, if desired
  1. In a large bowl mix flour, baking soda, and salt until combined. In a saucepan over medium heat, brown butter and set aside to cool.
  2. In the bowl of a stand mixer with the paddle attachment, beat together butter and sugars until light and fluffy. Mix in egg, yolk, vanilla, and yogurt (or sour cream) until incorporated. Gradually add the dry ingredients until combined. Fold in chocolate chips.
  3. Place cookie dough in the refrigerator for 2 hours to let the flavors meld together.
  4. Preheat the oven to 350 degrees F. Roll 1½ tablespoons of dough and flatten the dough to make a flat circle. Place 1 teaspoon of chilled Nutella in the middle then place another flat circle of cookie dough on top. Crimp edges to seal.
  5. Place dough balls on cookie sheet, 2 inches apart and bake 9-11 minutes or until the edges turn golden brown and middles no longer look raw.
  6. Sprinkle with sea salt if desired and let cool on wire racks.

Wednesday, July 10, 2013

Stan's Donut Shop

Stan's Donut Shop - July 3, 2013

One more 4th of July eating post before I go back to posting recipes of what I've baked.  This was actually pre-4th of July but only by a day. I've said before that I'm not really a doughnut person and while I can enjoy a good doughnut, I don't go out of my way to get one.  I had to bend that rule when one of my coworkers told me about Stan's Donut Shop, both because it's a local small business and I try to patronize and promote those as much as possible and because they have a 4.5-star rating on yelp.  Even that might not have swayed me except the comments on yelp were hilarious.  There are some serious doughnut eaters out there and Stan's Donut Shop has a following that I can safely describe as almost cult-like in their devotion to their doughnuts.  So as a self-described foodie, I had to see what the fuss was all about.  631 reviews couldn't possibly all be wrong.

The glaze melted into the hot doughnut and set nicely without being too thick
Fortunately my coworker told me the tricks to maximize my Stan's Donut Shop experience. a) Go in the morning.  They make doughnuts all morning up until 10:30 am (they open at 6 am) and once they're sold out, they're sold out.  There might be a line that goes out the door but it usually goes quickly, she said.  b) Get the glazed original doughnuts.  Because demand is so high, chances are you'll have to wait a few minutes for them to fill your order when the next batch of doughnuts comes out of the fryer but that's okay because then they'll be really fresh, hot and newly glazed.  If you come too late in the day for fresh doughnuts, you can put in an order for the following day.  I've never gone to that kind of trouble for doughnuts but if you believe most of the 631 yelp reviews, many of them can and have.
I did as dutifully instructed and lucked out because I went early the morning before the 4th of July holiday weekend started.  The people who would ordinarily pick up a couple dozen doughnuts for the office on their way to work weren't there because many people were taking the day off to extend the holiday weekend.  There were only 5 people in line in front of me at 7:30 am but even so, I had to wait about 10 minutes because the guy in front of me got the last of the already-made doughnuts and I had to wait for the next batch to come out of the fryer.  Which was great because I got really fresh doughnuts.  They were still warm by the time I got home and logged onto my computer to start the workday.

I have to say, this was a very good doughnut.  Even as a non-doughnut person, I could appreciate how "cakey yet fluffy" (as one yelp reviewer described it) the doughnut was.  The glaze wasn't too sweet and the doughnut itself was pretty yummy.  If you like Krispy Kreme doughnuts, Stan's Donuts are better - they're bigger, tastier, not as sickly sweet, and at 85 cents a doughnut, a much better value.  They're like Krispy Kreme doughnuts on steroids.  In a good way.  And better.  If you are a doughnut person and haven't had a Stan's Donut yet, this could be your Holy Grail of doughnuts.

Monday, July 8, 2013

4th of July eats, Part 2 - Summer Barbecue

My uncle retired last week after 45 years on the job and last Saturday, we drove to Central California to help him celebrate.  In Filipino families, that means food.  Lots of food.  His son, my cousin Chris, is a professionally trained chef and worked in the restaurant industry for some years so you know the food was going to be good.  And even with expectations that high, he went over and above that - all the eats were amazing. What was even more amazing is Chris pulled this off in triple digit heat, barbecuing over a hot grill (actually 2 grills) so we could descend like ravening wolves on the spread (which we did).  It was all his cooking so I don't have any recipes to share but even if I did, I probably wouldn't as we (the cousins) kept urging him to take his recipes and open his own catering business or start up his own food truck business - food this good is made to be shared with the general public.
Shrimp and Scallop Cocktails
Shrimp Curry Finger Sandwiches
Barbecue Beef Skewers and Sriracha Chicken Skewers
Fresh oysters - from my cousin Ellen
 By the way, when I say "amazing", that includes the barbecued dishes not only being flavorful but also grilled to perfection, moist and tender, not dry as some barbecues end up being.  The beef skewers were one of my favorites as they were both delicious and so tender you didn't need a knife or even a fork to cut it; your teeth could do the job easily. I tested it out myself on 2 beef skewers just to be sure and yup, both times, tender, juicy and full of flavor.
Coconut Shrimp with peanut dipping sauce (sauce not pictured)
Barbecue Chicken Wings - no barbecue sauce needed for flavor, just marinade
My other favorite was the pork tenderloin; I don't know if I've ever had pork be so tender or so flavorful.
Pork Tenderloin
Pork Tenderloin, sliced
Honey Dijon Chicken
Sushi Bake, made by my cousin Christine
Not pictured because I forgot to take pictures of them: Potato Salad and Asparagus Risotto.  The bounty just kept on coming!

Dessert from bottom to top: Chocolate chip cookies, White Chocolate Cranberry Macadamia Nut Cookies, Apricot Bowties, Blueberry Hand Pies
Cookie Assortment - he makes dessert too!

Sunday, July 7, 2013

4th of July eats, Part 1 - Anchor Oyster Bar and Tartine Bakery

Anchor Oyster Bar and Tartine Bakery - July 5, 2013
Oysters on the half shell - Anchor Oyster Bar
I still have some recipes to put up of stuff I've baked over the past week or so but for a change of pace, here's some food porn of what I've been eating over the holiday weekend. And probably hence why I will need to take a break from baking while I increase my time at the gym.
Garlic Bread appetizer was delicious - Anchor Oyster Bar
The 4th of July weekend eating actually was for the 2 days after Independence Day.  My sister was visiting from out of town and one of my nieces came over so, with my mom, we spent a good part of the day in San Francisco this past Friday.  My niece's friends had recommended a couple of seafood places and we decided to try Anchor Oyster Bar in the Castro.  If you've never been there, be prepared for a wait, both because this place is highly rated (4.5 stars on yelp, Michelin Guide Recommended, Zagat Rated, Top 5% SF Restaurants in Trip Advisor and SF Magazine Best of Bay Area Winner in 2009) and because it's tiny.  There are only a handful of tables that can seat 2-4 people each and a bar counter that can seat a few more.  I wouldn't recommend coming here with larger than a party of 4.  When you arrive, you write your name, the number in your party and the time you arrived on the restaurant's white board posted outside.  Because the place is so small, you literally can't wait inside (no room) and have to wait outside on the bench the restaurant has thoughtfully provided or just stand there looking longingly through the plate glass window and wondering when the current patrons will be leaving.
My mom got the crab, shrimp and cheese open-faced sandwich
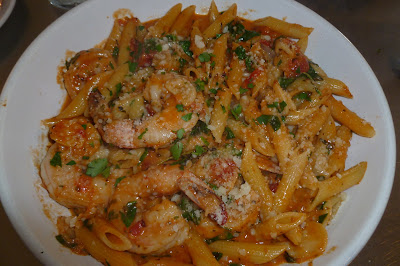
We arrived mid-afternoon so it wasn't lunchtime by any means but we still had a 20-minute wait for the 4 of us.  I don't actually eat oysters but there were other seafood options so that didn't worry me.  My mom, sister and niece did order the oysters (you can order individual oysters prepared a couple of different ways) along with their entrees.  I got the pasta special of the day which was jumbo prawns and penne pasta in a very excellent tomato cream sauce.  I usually don't like penne but the sauce was amazing and the prawns were to die for.
Pasta Special of the Day: Penne Pasta with Jumbo Prawns
My niece's Boston Clam Chowder
My sister's Combination Caesar Salad
We were pretty full after that late lunch but since we were already in the city and could use the walk, we decided (or my niece and I were in favor of it and talked my mom and my sister into it) to head over to Tartine Bakery, about half a mile away. I actually have Tartine's baking book and I've even been there before but it was long ago and I can't even remember what I got.  My niece's friend recommended the banana cream pie and the coconut cream pie so we were on a mission to find either or (preferably) both.
Unfortunately, since it was so late in the day when we got there, their display case was a little skimpy and they were out of the banana cream pie.  There was 1 individual-size coconut cream pie left and a guy ahead of us who was asking about it.  My niece and I held our collective breath to see if he would buy that one but fortunately he chose something else.  What a bummer that would've been if we were thwarted in both of the desserts we were seeking.  As it was, we were able to get the coconut cream pie and a hazelnut chocolate tart.
Coconut Cream Pie - Tartine Bakery
The coconut cream pie was in a flaky tart shell that contained a bottom layer of bittersweet chocolate then the coconut cream filling and shavings of fresh toasted coconut on top.  I'm not usually a fan of creamy desserts but this was delicious.  There is a recipe for it in the Tartine book I have so I may try recreating this one.
Chocolate Hazelnut Tart - Tartine Bakery
The chocolate hazelnut tart was also a winner.  You really can tell when a bakery uses "the good chocolate".  The only downside for me was the taste of liquor and I thought they used frangelico which is a hazelnut liqueur.  But I looked up the recipe in the Tartine book when I got home (assuming it's the same one) and it looks to be brandy.  I'm not a brandy fan but still, this was also good. The texture was creamy and the hazelnuts added a nice crunch on top. Since we were still full from lunch, we took both desserts to go for enjoying later.  And fortunately, it was almost a mile-long walk back to the car.

Friday, July 5, 2013

Beef and Broccoli (Crockpot) - hold the broccoli

Beef and Broccoli (without the Broccoli) - made June 29, 2013 from Table for Two

Another simple crock pot recipe in line with my cooking skills.  And yes, I left out the broccoli so I guess I should just call this recipe "Beef".  This took about 6 hours in my slow cooker with half the time on the high setting and half the time on the low setting before I was satisfied that the beef strips were tender enough.  As always with crock pot cooking, the liquid is more soupy than I wanted so I had to be more generous with the cornstarch than the recipe called for.  It tasted pretty good and, more importantly, was easy enough to cook and is going to feed me for weeks.
 
1 lb boneless beef chuck roast, sliced into thin strips
1 cup beef consomme or beef broth
1/2 cup low-sodium soy sauce
1/3 cup dark brown sugar
1 tablespoon sesame oil
3 cloves garlic, minced
2 tablespoons cornstarch (I used more than 4 tablespoons)
4 tablespoons sauce from the crockpot after beef has cooked
Frozen broccoli florets (as many as you want....or none :))
  1. In the insert of the crock pot, whisk together beef consomme or broth, soy sauce, dark brown sugar, sesame oil and garlic.
  2. Place your beef slices in the liquid and gently toss to coat.
  3. Cook beef on low for 6 hours or until tender.
  4. When done, in a small bowl, whisk together cornstarch and sauce until smooth, pour into crockpot and mix well. Cook on low for an additional 30 minutes to thicken sauce.
  5. Toss in broccoli florets if using and cook until broccoli is warmed through.