Monday, July 8, 2013

4th of July eats, Part 2 - Summer Barbecue

My uncle retired last week after 45 years on the job and last Saturday, we drove to Central California to help him celebrate.  In Filipino families, that means food.  Lots of food.  His son, my cousin Chris, is a professionally trained chef and worked in the restaurant industry for some years so you know the food was going to be good.  And even with expectations that high, he went over and above that - all the eats were amazing. What was even more amazing is Chris pulled this off in triple digit heat, barbecuing over a hot grill (actually 2 grills) so we could descend like ravening wolves on the spread (which we did).  It was all his cooking so I don't have any recipes to share but even if I did, I probably wouldn't as we (the cousins) kept urging him to take his recipes and open his own catering business or start up his own food truck business - food this good is made to be shared with the general public.
Shrimp and Scallop Cocktails
Shrimp Curry Finger Sandwiches
Barbecue Beef Skewers and Sriracha Chicken Skewers
Fresh oysters - from my cousin Ellen
 By the way, when I say "amazing", that includes the barbecued dishes not only being flavorful but also grilled to perfection, moist and tender, not dry as some barbecues end up being.  The beef skewers were one of my favorites as they were both delicious and so tender you didn't need a knife or even a fork to cut it; your teeth could do the job easily. I tested it out myself on 2 beef skewers just to be sure and yup, both times, tender, juicy and full of flavor.
Coconut Shrimp with peanut dipping sauce (sauce not pictured)
Barbecue Chicken Wings - no barbecue sauce needed for flavor, just marinade
My other favorite was the pork tenderloin; I don't know if I've ever had pork be so tender or so flavorful.
Pork Tenderloin
Pork Tenderloin, sliced
Honey Dijon Chicken
Sushi Bake, made by my cousin Christine
Not pictured because I forgot to take pictures of them: Potato Salad and Asparagus Risotto.  The bounty just kept on coming!

Dessert from bottom to top: Chocolate chip cookies, White Chocolate Cranberry Macadamia Nut Cookies, Apricot Bowties, Blueberry Hand Pies
Cookie Assortment - he makes dessert too!

Sunday, July 7, 2013

4th of July eats, Part 1 - Anchor Oyster Bar and Tartine Bakery

Anchor Oyster Bar and Tartine Bakery - July 5, 2013
Oysters on the half shell - Anchor Oyster Bar
I still have some recipes to put up of stuff I've baked over the past week or so but for a change of pace, here's some food porn of what I've been eating over the holiday weekend. And probably hence why I will need to take a break from baking while I increase my time at the gym.
Garlic Bread appetizer was delicious - Anchor Oyster Bar
The 4th of July weekend eating actually was for the 2 days after Independence Day.  My sister was visiting from out of town and one of my nieces came over so, with my mom, we spent a good part of the day in San Francisco this past Friday.  My niece's friends had recommended a couple of seafood places and we decided to try Anchor Oyster Bar in the Castro.  If you've never been there, be prepared for a wait, both because this place is highly rated (4.5 stars on yelp, Michelin Guide Recommended, Zagat Rated, Top 5% SF Restaurants in Trip Advisor and SF Magazine Best of Bay Area Winner in 2009) and because it's tiny.  There are only a handful of tables that can seat 2-4 people each and a bar counter that can seat a few more.  I wouldn't recommend coming here with larger than a party of 4.  When you arrive, you write your name, the number in your party and the time you arrived on the restaurant's white board posted outside.  Because the place is so small, you literally can't wait inside (no room) and have to wait outside on the bench the restaurant has thoughtfully provided or just stand there looking longingly through the plate glass window and wondering when the current patrons will be leaving.
My mom got the crab, shrimp and cheese open-faced sandwich
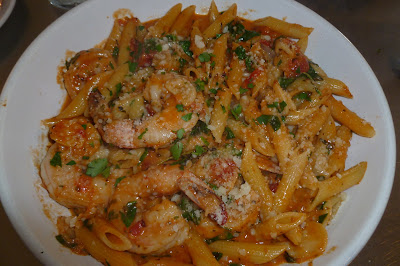
We arrived mid-afternoon so it wasn't lunchtime by any means but we still had a 20-minute wait for the 4 of us.  I don't actually eat oysters but there were other seafood options so that didn't worry me.  My mom, sister and niece did order the oysters (you can order individual oysters prepared a couple of different ways) along with their entrees.  I got the pasta special of the day which was jumbo prawns and penne pasta in a very excellent tomato cream sauce.  I usually don't like penne but the sauce was amazing and the prawns were to die for.
Pasta Special of the Day: Penne Pasta with Jumbo Prawns
My niece's Boston Clam Chowder
My sister's Combination Caesar Salad
We were pretty full after that late lunch but since we were already in the city and could use the walk, we decided (or my niece and I were in favor of it and talked my mom and my sister into it) to head over to Tartine Bakery, about half a mile away. I actually have Tartine's baking book and I've even been there before but it was long ago and I can't even remember what I got.  My niece's friend recommended the banana cream pie and the coconut cream pie so we were on a mission to find either or (preferably) both.
Unfortunately, since it was so late in the day when we got there, their display case was a little skimpy and they were out of the banana cream pie.  There was 1 individual-size coconut cream pie left and a guy ahead of us who was asking about it.  My niece and I held our collective breath to see if he would buy that one but fortunately he chose something else.  What a bummer that would've been if we were thwarted in both of the desserts we were seeking.  As it was, we were able to get the coconut cream pie and a hazelnut chocolate tart.
Coconut Cream Pie - Tartine Bakery
The coconut cream pie was in a flaky tart shell that contained a bottom layer of bittersweet chocolate then the coconut cream filling and shavings of fresh toasted coconut on top.  I'm not usually a fan of creamy desserts but this was delicious.  There is a recipe for it in the Tartine book I have so I may try recreating this one.
Chocolate Hazelnut Tart - Tartine Bakery
The chocolate hazelnut tart was also a winner.  You really can tell when a bakery uses "the good chocolate".  The only downside for me was the taste of liquor and I thought they used frangelico which is a hazelnut liqueur.  But I looked up the recipe in the Tartine book when I got home (assuming it's the same one) and it looks to be brandy.  I'm not a brandy fan but still, this was also good. The texture was creamy and the hazelnuts added a nice crunch on top. Since we were still full from lunch, we took both desserts to go for enjoying later.  And fortunately, it was almost a mile-long walk back to the car.

Friday, July 5, 2013

Beef and Broccoli (Crockpot) - hold the broccoli

Beef and Broccoli (without the Broccoli) - made June 29, 2013 from Table for Two

Another simple crock pot recipe in line with my cooking skills.  And yes, I left out the broccoli so I guess I should just call this recipe "Beef".  This took about 6 hours in my slow cooker with half the time on the high setting and half the time on the low setting before I was satisfied that the beef strips were tender enough.  As always with crock pot cooking, the liquid is more soupy than I wanted so I had to be more generous with the cornstarch than the recipe called for.  It tasted pretty good and, more importantly, was easy enough to cook and is going to feed me for weeks.
 
1 lb boneless beef chuck roast, sliced into thin strips
1 cup beef consomme or beef broth
1/2 cup low-sodium soy sauce
1/3 cup dark brown sugar
1 tablespoon sesame oil
3 cloves garlic, minced
2 tablespoons cornstarch (I used more than 4 tablespoons)
4 tablespoons sauce from the crockpot after beef has cooked
Frozen broccoli florets (as many as you want....or none :))
  1. In the insert of the crock pot, whisk together beef consomme or broth, soy sauce, dark brown sugar, sesame oil and garlic.
  2. Place your beef slices in the liquid and gently toss to coat.
  3. Cook beef on low for 6 hours or until tender.
  4. When done, in a small bowl, whisk together cornstarch and sauce until smooth, pour into crockpot and mix well. Cook on low for an additional 30 minutes to thicken sauce.
  5. Toss in broccoli florets if using and cook until broccoli is warmed through.

Wednesday, July 3, 2013

Giant Sugar Cookie - Happy Birthday USA!

Giant Sugar Cookie - made dough July 2, 2013 from Sally's Baking Addiction
This took up most of a full-size plate
I still had most of the jar of red, white and blue sprinkles I used for the non-flag pieces of the Red Velvet Flag Brownies and since I didn't have occasion to use them until next year (and by then they'd be old), I decided to incorporate them into a thematic sugar cookie.  I was meeting my cousin and my nephew Vanilla King for a pre-4th of July lunch so it was perfect timing to test out this recipe.  I'm not a fan of sprinkles for their taste but they're great to dress up a confection, especially for the decorating-impaired like yours truly.  Plus, kids like sprinkles, right?

I have to confess I had to make this twice.  The first time, I didn't bake it long enough and the middle sank like a crater.  That's the tricky thing with giant cookies.  The outer circle will be golden brown and perfectly done while the middle is still doughy.  You can't imagine how twitchy I get wanting to take it out of the oven at that point.  For me, it's better to have an underbaked middle and perfectly baked edges than a perfectly baked middle and dry, overbaked edges.  But my first attempt looked a little too underdone when it cooled so I had to try again.  Failure was not an option for something as simple as a sugar cookie.
The unfrosted version
Fortunately, making the cookie dough, especially with such small portions takes practically no time at all so it only took a few minutes to make another cookie and throw it into the freezer to chill briefly before baking.  Of course, the upside of the first failed attempt is it could now be my taste test cookie. The initial plan was to persuade Vanilla King to share a bite with me after I gave him the cookie but this was better (really, was I going to ask for my cookie back after I gave it to him just so I could take a bite and see how it tastes so I could report it on my blog?  He's good-natured enough not to mind but still, that would have been tacky.)  Anyway, the taste test cookie was pretty good.  This is a cakey cookie so don't expect a dense chewiness.  The outer edge that was done was definitely cakey.  Not surprisingly, I preferred the underdone middle in terms of texture.  For taste, I could taste a slight aftertaste from the cream of tartar so this was almost like a snickerdoodle without the cinnamon sugar coating.  Surprisingly for a sugar cookie, it actually wasn't that sweet.  So, to give it more sweetness and a patriotic flair for the occasion, I did a simple vanilla frosting to top Vanilla King's cookie with and added more sprinkles. 
Happy Birthday, America!

Giant Sugar Cookie
2 tablespoons butter, softened to room temperature
4 tablespoons sugar
2 tablespoons beaten egg
1/2 teaspoon vanilla extract
6 tablespoons all-purpose flour
1/4 teaspoon baking soda
1/4 teaspoon salt
1/4 teaspoon cream of tartar
2 tablespoon sprinkles
  1. Preheat oven to 350 degrees. Line cookie sheet with parchment paper.
  2. In a medium-sized mixing bowl, beat butter and sugar together until creamy. Mix in the egg and vanilla.
  3. Stir in flour, baking soda, salt, cream of tartar, and sprinkles until just combined. Do NOT overmix.
  4. Place the dough in the center of the prepared cookie sheet into a tall ball. Bake for 14-16 minutes until the edges are browned. The center may appear undone but that's what you want. It will firm up. Allow to cool completely ON the baking sheet. Enjoy!
Vanilla Frosting (optional)
2 tablespoons butter, softened slightly but still cool
1/2 cup powdered sugar
1/2 teaspoon vanilla extract
1 tablespoon milk (or more or less depending on the consistency you want your frosting)

Beat butter and powdered sugar together.  Add vanilla and just enough milk for the desired consistency.  Beat until smooth.  Frost cooled cookie and top with sprinkles if desired.

Monday, July 1, 2013

Grilled Pesto Shrimp Skewers

Grilled Pesto Shrimp Skewers - made June 29, 2013 from Skinny Taste

Are you going to a barbecue for 4th of July or hosting one?  Want something a little different from hamburgers and hot dogs? Or, more importantly, something that leaves room for dessert afterwards?   Then try these pesto shrimp skewers.  I love both shrimp and pesto so I can't imagine why I haven't made something like this before.  I used to eat a lot more pesto when I grew my own basil a couple of summers ago but ever since, I haven't had it as often.  But I was thawing some shrimp and wanted to do something different with them so I jumped at this recipe I found on pinterest from Skinny Taste.

First I had to hunt up basil.  I knew Trader Joe's sold the basil plants but I was looking for just the leaves.  I finally found them in a plastic box in the organic section for $2.69.  The basil plants, which carried a lot more leaves and were lushly thriving, were $2.99 each. The finance nerd in me couldn't not buy the live plant knowing basil is a creature that keeps on giving over and over again, even after you cut off the first harvest and it goes from lush to shorn.  Past experience has taught me that it'll go from shorn back to lush very shortly and, for 30 extra cents, I was looking at being well supplied with multiple pesto dishes from 1 basil plant.  Despite not having a green thumb, basil is the one plant I haven't killed and even managed to make grow which tells you it's likely to grow regardless of what you do to it.

This is a classic pesto recipe except it doesn't have pine nuts but I loved these skewers. I don't use my indoor grill very often because it's a pain to clean.  Actually, it's easy to clean in terms of nothing sticks to it but I like to get into all the little grooves and clean. (If I'm going to eat whatever comes off that grill, it has to be very clean to start with.) So it's time-consuming.  But I'd put up with that for these skewers. This is a very simple, straightforward recipe.  Putting the pesto together literally only took a few minutes so you can mix this up the morning you need it, let it marinate until lunchtime, thread the shrimp onto the skewers and grill them just in time for your barbecue. If you don't anticipate eating all of the skewers in your initial serving of them, try cooking them only to the point of being barely done.  When you heat them up later in the microwave, they'll keep cooking and can eventually dry out if heated too hot or too often.  Serve on a bed of salad greens or eat straight off the skewers - either way, they're delicious.
1 cup fresh basil leaves, chopped
1 clove garlic
1/4 cup grated Parmigiano Reggiano
3 tbsp olive oil (I used only 2 tablespoons)
1 1/2 lbs jumbo shrimp, peeled and deveined (weight after peeled)
kosher salt and fresh pepper to taste
7 wooden skewers
  1. In a food processor pulse basil, garlic, Parmesan Reggiano cheese, salt and pepper until smooth. Slowly add the olive oil while pulsing.
  2. Combine raw shrimp with pesto and marinate a few hours in a bowl. Soak wooden skewers in water at least 20 minutes (or use metal ones to avoid this step). Thread shrimp onto 7 skewers. 
  3. Heat an outdoor grill or indoor grill pan over medium-low heat until hot. Be sure the grates are clean and spray lightly with oil. Place the shrimp on the hot grill and cook until shrimp turns pink on the bottom, about 3-4 minutes; turn and continue cooking until shrimp is opaque and cooked through, about 3-4 minutes. 

Sunday, June 30, 2013

Banana Caramel Bread Pudding

Banana Caramel Bread Pudding - made June 22, 2013, recipe modified from A Passion for Baking by Marcy Goldman
I originally started off with the vanilla bread pudding recipe from A Passion for Baking but I made enough changes to the original recipe that I'm calling this one my own invention.  The real inspiration for this was from a Bananas Foster Bread Pudding I tried when my niece and I had lunch at Angeline's Louisiana Kitchen in Berkeley last month.  I was already predisposed to like it because ever since I went to New Orleans, I've developed a fondness for Bananas Foster.  And I've had a love affair with bread pudding for some time so the two married together in the same dessert?  You know it had to be good.  And it was.  I haven't yet tried to recreate an actual Bananas Foster bread pudding but I thought I'd play with Marcy Goldman's recipe and see what I could come up with.
All modesty aside, what I came up with was serious goodness.  I added mashed banana and caramel to the custard that soaked the bread to ensure the flavor would come out as well as substituted brown sugar for some of the granulated sugar in the original recipe, again to promote that caramel flavor.  Be sure to bake the bread pudding long enough for it to get golden brown and puffy on top so the custard will set when cooled.  What really puts this over the top is, well, the topping.  I caramelized bananas in butter and brown sugar and served it warm over lukewarm bread pudding.  Eeek.  So good. When you're serving this, I recommend you only make enough topping for the amount of bread pudding you plan to serve as that's when the caramelized bananas look their best. Later on, they will look more grey and unappetizing (although they'll still taste good).
This is the kind of dessert that sends me running to the treadmill just so I can have another piece later.  And I eat a smaller dinner so I can have it for dessert.  And when those things still aren't enough, I put on my oldest, most well-broken-in pair of jeans (read: loose waist band), tell myself this is why I can't seem to lose the last 10 pounds then admit I don't really care as long as I can have another piece.  My sweet tooth wins again.
10 cups challah, brioche or egg bread, cut into chunks (I recommend at least 20 ounces of challah)
6 large eggs, lightly beaten
3/4 cup sugar
1/4 cup brown sugar, firmly packed
1/2 cup unsalted butter, melted
2 teaspoons pure vanilla extract
1 teaspoon ground cinnamon
2 teaspoons baking powder
1/4 cup all-purpose flour
1/8 teaspoon salt
1 3/4 cups whole milk
1 1/4 cups heavy cream
1/3 cup caramel
1 large overripe banana, mashed
  1. Line a 9 x 13" baking pan with foil and lightly spray with nonstick cooking spray.
  2. In a large mixing bowl, place bread chunks.  In a separate bowl, beat eggs and add sugars to form a paste.  Whisk in melted butter, vanilla, cinnamon, baking powder, flour and salt.  Gradually add milk and heavy cream, whisking to maintain a smooth mixture.
  3. Stir in 1/3 cup caramel and mashed banana.  Whisk, or with an electric mixer, beat mixture until smooth. It's okay for the banana to be a little chunky in the custard. Pour over bread and let stand 10 minutes or so to absorb. Spoon into prepared pan. 
  4. When ready to bake, preheat oven to 350 degrees F.
  5. Bake until firm to touch, about 45-50 minutes, and golden brown on top.
Caramelized Banana Topping
4 tablespoons butter
1/2 cup brown sugar, firmly packed
 2 large bananas, firm and yellow with brown spots on the skin (you don't want it too overripe), sliced in 1/4" - 1/3" slices
  1. Melt butter and brown sugar in a shallow saucepan. 
  2. Add banana slices and saute over low heat until bananas have softened and caramelized but aren't overly mushy.  
  3. Spoon on top of squares of bread pudding and serve immediately.

Saturday, June 29, 2013

Soft and Chewy M&M Cookies

Soft and Chewy M&M Cookies - made June 20, 2013 from Averie Cooks
Last cookie for the Cookie Palooza goodie bags.  I thought I had planned ahead and pre-made enough to fill 19 goodie bags.  As soon as I got home from work the night before the event, I turned on the oven and started cranking through all the frozen cookie dough in my freezer.  I parceled out the Caramel Fudge Brownies and the Oatmeal Chocolate Chip Peanut Butter Bars I'd already made and, as the various cookies cooled, started filling the bags.  Only to come up short by 3 bags.  Uh-oh.  I had enough Toffee Cashew Cookies to top off the other 3 bags but then that didn't give those last 3 bags the same variety as the first 16.  Can't have that.  A quick flip through my pin board of Baking Recipes I Want to Try and I pulled up this recipe.  Since I had successfully made cookies from Averie's blog before, it was minimal risk to try a new one.  By the time I realized I needed one more cookie batch, it was late so all I did was mix up the dough and get it ready to bake off first thing the next morning.

Unlike the Toffee Cashew Cookies, these didn't spread too much and remained obligingly at a good thickness.  A nice cookie to use with M&Ms as well.  I ended up making 21 goodie bags as I was paranoid I wouldn't have enough for everyone even after all that baking.  Only to get to the event and discover 6 more people had signed up and joined us and I ran out after all.  Oops.  Sorry to the people who didn't get one!  Oh well, it was fun to bake all that anyway :).
3/4 cup (1 1/2 sticks) unsalted butter, softened
3/4 cup light brown sugar, packed
1/4 cup granulated sugar
1 large egg
2 teaspoons vanilla extract
2 cups all-purpose flour
2 teaspoons cornstarch
1 teaspoon baking soda
pinch salt, optional and to taste
1 1/2 cups plain milk chocolate M&Ms
  1. In the bowl of a stand mixer fitted with the paddle attachment, combine the butter, sugars, egg, vanilla, and beat on medium-high speed until well-creamed, light and fluffy, about 5 minutes (or use a hand mixer and beat for at least 7 minutes). Stop, scrape down the sides of the bowl, and add the flour, cornstarch, baking soda, optional salt, and mix until just combined, about 1 minute. Add the M&Ms and fold in by hand.
  2. Using a medium 2-inch cookie scoop, form heaping mounds. Place mounds on a large plate, flatten mounds very slightly with your palm, cover with plastic wrap, and refrigerate for at least 2 hours, or up to 5 days, before baking. Do not bake with warm dough because cookies will spread.
  3. Preheat oven to 350 degrees F, line a baking sheet with a Silpat Non-Stick Baking Mat, or parchment paper and place them on the baking sheet, spaced at least 2 inches apart. Bake for 8 to 10 minutes, until edges have set and tops are just beginning to set, even if slightly undercooked, pale and glossy in the center. Do not bake longer than ten minutes as cookies will firm up as they cool. Allow cookies to cool on the baking sheet for 5 minutes before removing and transferring to a rack to finish cooling.

Friday, June 28, 2013

Toffee Cashew Cookies

Toffee Cashew Cookies - made June 20, 2013 from Suzanna Winter
Baked without chilling dough first
I pinned this recipe a year ago but never made it.  Although I don't normally like nuts in my cookies, I (occasionally) try to keep an open mind about it and since I like both cashews and toffee, I knew that "one day" I would want to try these cookies.  For the Cookie Palooza goodie bags, "one day" had arrived.  This one stood out, not just because of the picture of nice thick cookies from the original blog I got it from but it also had the trick of dissolving the baking soda in water.  I hadn't thought of making it until the night before our volunteer event so I didn't think I'd have enough time to freeze the dough before baking all of it so it seemed like a perfect opportunity to test that dissolving baking soda trick again.
Also baked without chilling dough first
Hmmm, m'kay, I tried it and it didn't really work this time.  The cookies that were baked straight from newly made dough still spread somewhat thin.  So I only baked one test batch and, since I had a 6:30 am meeting the day of our volunteer event (and a 7:30 and an 8 am), I froze the rest of the dough overnight to bake off before going to RAFT since I was going to be up early anyway.  And....they still spread thin.  Not as thin as the night before but not thick as in the picture from Suzanna's blog.  Not sure what's up with that but the baking soda trick didn't work in this recipe. Taste-wise they were pretty good although next time I would be more generous with the cashews as, despite my no-nuts-in-cookies prejudices, the cashews were great in this cookie.  Or I just like cashews.  I actually really liked the cookie itself and think it would make a good recipe for any type of brown-sugar cookie.  I liked the flavor and the texture, just not the thinness of the cookie. I need to try it again because if you look at the picture on Suzanna's blog, they were exactly what I wanted but didn't get yet it's got to be possible to get them that thick. Hmph.
Baked from frozen dough
1 cup butter, softened
1 cup granulated sugar
1 cup packed brown sugar
2 eggs
2 teaspoons vanilla extract
3 cups all-purpose flour
1 teaspoon baking soda
2 teaspoons hot water
½ teaspoon salt
1⅓ cup toffee pieces
1 cup cashew halves and pieces (or more if you choose)
  1. Preheat oven to 350 degrees F.
  2. Cream together the butter and sugars until smooth. Beat in the eggs one at a time, then stir in the vanilla. Dissolve the baking soda in hot water and add to batter along with salt. Stir in the flour, toffee pieces, and nuts. Drop by spoonfuls onto ungreased pans.
  3. Bake for about 10 minutes in the preheated oven, or until edges are nicely browned.

Thursday, June 27, 2013

Macadamia and White Chocolate Chunk Cookies

Macadamia and White Chocolate Chunk Cookies - made dough June 17, 2013 from Chewy Gooey Crispy Crunchy Melt-in-Your-Mouth Cookies by Alice Medrich
I could have sworn I had made these cookies already but I can't seem to find any evidence that I had, either on my blog or in my files.  I suspect I had planned to make them half a dozen times and something always came up, such as I was out of an ingredient like macadamia nuts or white chocolate chips/chunks.  When I look at something often enough, I can talk myself into believing I'd made it already even if I haven't.  Just to play it safe, I'm going to make them for real instead of just in my head.  Since I was baking a variety of things for Cookie Palooza, I wanted to add a white chocolate macadamia cookie into the mix both to have a different flavor of cookie and because I wanted to try a recipe out of one of my baking books.  I'd been so distracted by pinterest and the plethora of recipes I keep endlessly pinning that I've been neglecting my baking book collection and they're getting a mite dusty.

I baked these off on the night before our volunteer event, along with several dozen other cookies.  I couldn't taste test all the different kinds of cookies I baked that night so I tried this one the next day.  It was okay.  I can't say it's any better than other White Chocolate Macadamia cookies I've made before and I wasn't thrilled that it spread.  I was afraid it would as the dough was rather soft when I put it to chill and yes, it did spread.  I think I would rather make Alton Brown's chocolate chip cookie recipe and just add in white chocolate chips and macadamia nuts to that one.
3/4 cup (2.5 ounces) rolled oats
3/4 cup (3.375 ounces) unbleached all-purpose flour
1/2 teaspoon baking soda
1/4 teaspoon salt
8 tablespoons (1 stick/4 ounces) unsalted butter, melted and still warm
1/3 cup (2.33 ounces) granulated sugar
1/3 cup (2.33 ounces) packed brown sugar
1/2 teaspoon pure vanilla extract
1 large egg
1 cup (4.5 ounces) dry-roasted salted macadamia nuts, coarsely chopped
1 cup (6 ounces) white chocolate chips or chopped white chocolate
  1. Pulverize the oats in a food processor until fine.  Add the flour, baking soda, and salt and pulse to combine.  Set aside.
  2. In a large bowl, combine the melted butter with the sugars and vanilla.  Whisk in the egg.  Stir in the flour mixture just until all of the dry ingredients are moistened.  Let the mixture cool for a few minutes if it is at all warm.  Stir in the nuts and chocolate chips.  Portion into dough balls, cover and refrigerate for at least 2 hours and preferably overnight.
  3. When ready to bake, preheat oven to 325 degrees F. Place dough balls 2 inches apart on baking sheets lined with parchment paper.  Bake until the cookies are golden brown at the edges and not shiny or raw looking in the middle, 13 to 15 minutes.  Cool completely before storing or stacking. 

Tuesday, June 25, 2013

Oatmeal Chocolate Chip Peanut Butter Bars

Oatmeal Chocolate Chip Peanut Butter Bars - made June 18, 2013 from Crazy for Crust
Back to Cookie Palooza - this was another of the treats that went into last week's goodie bags and could possibly have been the "healthiest" thing in there.  As long as you ignore the sugar, butter and chocolate and turn a blind eye to the sweetened condensed milk (it's dairy, right?).  And persuade yourself oatmeal and peanut butter make it all good.  This was pretty tasty but I think I should've baked it a little longer. I did bake it for the time suggested in the recipe but I should have let it brown a little more on top so the topping and oats had a bit more "crunch" to them. It would have made a better contrast with the creamy sweetness of the filling.  Next time I might also parbake the bottom crust first before layering on the peanut butter layer and topping, again to make the texture more firm on the bottom.

For the crust and topping:
2 1/4 cups quick oats
1 1/4 cups brown sugar, firmly packed
1 cup flour
1/2 teaspoon baking soda
1 cup butter, softened
    Filling
    1 (14-ounce) can sweetened condensed milk
    1/4 cup peanut butter
    1/2 teaspoon vanilla
    12 ounces or 2 cups semisweet chocolate chips
    1/2 cup chopped nuts, optional
      1. Preheat oven to 350 degrees. Line a 9 x13” baking dish with foil and spray with cooking spray.
      2. Combine all crust and topping ingredients in a large bowl. Mix with a hand mixer until crumbly (you may need to use your hands to finish this step). Reserve 2 cups of the mixture and press the rest into the bottom of the prepared pan.
      3. Mix sweetened condensed milk, peanut butter, and vanilla in a small bowl with a hand mixer. Pour and spread over crust. Top evenly with chocolate chips and nuts if using. Press remaining crust mixture evenly over the top of the chocolate chips.
      4. Bake for 25-30 minutes until it is brown around the edges. The center will not be set. Let completely cool before cutting into bars.