Monday, December 6, 2021

Stamped Cookies #13 - Ginger Molasses Cookies

Ginger Molasses Cookies (stamped cookies #13) - made dough November 13, 2021, recipe (and stamps) from Nordic Ware 
3 3/4 cups all-purpose flour
1 tablespoon ginger
1 tablespoon cinnamon
2 teaspoon ground cloves
1 1/2 teaspoons salt
1 cup unsalted butter, room temperature
1 cup granulated sugar plus more for rolling dough in
1 large egg
1/2 cup molasses

Orange Cream Cheese Filling
1 (4 ounces) stick butter, softened
8 ounces cream cheese
4 cups powdered sugar
1/2 teaspoon salt
zest of 1 orange
juice of half an orange
  1. In a medium bowl, whisk together flour, ginger, cinnamon, ground cloves and salt; set aside.
  2. In the bowl of a stand mixer fitted with the paddle attachment, cream together butter and sugar on medium speed until light and fluffy, 2-3 minutes. Scrape down the sides of the bowl and add egg. Beat until combined. Add molasses and beat until just combined, scraping down sides and bottom of bowl. Add flour mixture in two additions, beating on low speed until just combined. Cover and refrigerate for at least 2 hours but less than a day.
  3. When ready to bake, preheat oven to 350 degrees F. Line baking sheets with parchment paper. Roll dough into golf-ball-sized balls and roll in sugar before placing on baking sheets. Press dough evenly with stamps. Cut with round cookie cutters if you want even edges. Remove any dough scraps before baking 10-14 minutes. Let cookies cool on baking pan for 5 minutes then transfer to wire rack to cool completely before frosting.
  4. Make filling: cream together butter and cream cheese until fluffy. Gradually add powdered sugar and beat until combined. Mix in salt, orange zest and orange juice until combined. Spread filling over half of the cooled cookies and sandwich with the rest of the cookies.
Another "tis the season" recipe. I'm not overly fond of ginger molasses cookies. I can deal with ginger but mostly in savory recipes. I don't care much for the strong taste of even mild molasses though so I rarely make ginger molasses cookies.
Except during the holidays and when I want to try my new Christmas cookie stamps. How cute are these?? Yes, they're from - of course - Nordic Ware and I freaking love them.
The original recipe called for the cream cheese filling and I've included the recipe for it here but I didn't make it for these cookies. Because I was shipping them in military care packages overseas that have a 2-3 week mailing time, I would never risk a cream cheese filling going unrefrigerated for that long.
Because I was mailing them, I made the cookies pretty thick so they would hold up well in shipping. As you can see from the pictures, this recipe kept the impressions fairly well. Although, as I've learned from my multiple experiments with cookie stamps, this recipe would work better with stamps that don't have a lot of intricate detail. The Nordic Ware ones are perfect as they have just the right amount of detail for this dough to hold the impression clearly.

As for the flavor, I ended up liking it more than I expected (but remember I have low expectations for ginger molasses cookies). They definitely had a bite to them but in a good way (also remember I have bland taste buds). I liked the texture best of all.
You do want to watch the baking time on these as overbaking them will make for hard cookies. Underbaking, if you're using cookie stamps, may lead to the impressions sinking a bit and not being as clear.
But overall, this is a great addition to the holiday cookie lineup.

Saturday, December 4, 2021

Nutella Peanut Butter Cookies

Nutella Peanut Butter Cookies - made dough November 11, 2021 from Simply Bakings
1 cup butter, softened
1 cup granulated sugar
1 cup brown sugar
2/3 cup creamy peanut butter
2 eggs
2 teaspoons vanilla extract
2 2/3 cups all-purpose flour
2 teaspoons baking soda
1 teaspoon salt
heaping 1/2 cup Nutella
  1. In the bowl of a stand mixer fitted with the paddle attachment, cream together butter, granulated sugar and brown sugar until well combined. Beat in peanut butter until combined.
  2. Add eggs and vanilla extract, beat until just combined.
  3. In a separate bowl, whisk together flour, baking soda and salt. Add to butter mixture and beat on low speed until just combined. Do not overmix.
  4. Dollop Nutella over cookie dough and scoop into golf-ball-sized balls, leaving swirls of Nutella in each dough ball. Cover and chill for several hours or overnight.
  5. When ready to bake, preheat oven to 350 degrees F. Line baking sheets with parchment paper. Evenly space dough balls on baking sheets. Bake 10-12 minutes or until edges are set and middles no longer look raw.
It’s National Cookie Day. So this is for all the Nutella and peanut butter lovers out there. Make a simple peanut butter cookie dough, swirl or dollop Nutella into it and bake. If you like a more uniform cookie, swirl the Nutella into the completed dough before portioning into dough balls but don't overmix the Nutella to actually become incorporated into the dough. You want distinct Nutella swirls.

If you're a little more nutso about Nutella *raises hand* then you want the dollop approach. After I finished mixing the dough, I dolloped generous spoonfuls of Nutella over the dough and began scooping into dough balls, only dabbing a bit of dough onto a dough ball to partially cover the Nutella if a too-generous amount of Nutella ended up deforming the dough ball. Otherwise I left the dollops as intact as possible.
Once you scoop out the top layer of dough, dollop the Nutella again over the remaining cookie dough and keep scooping. You get the picture. This was a good basic peanut butter cookie, amped up with the Nutella. If you're more of a purist and don't like mixing flavors, instead of dolloping or swirling Nutella, try it with some peanut butter.


Friday, December 3, 2021

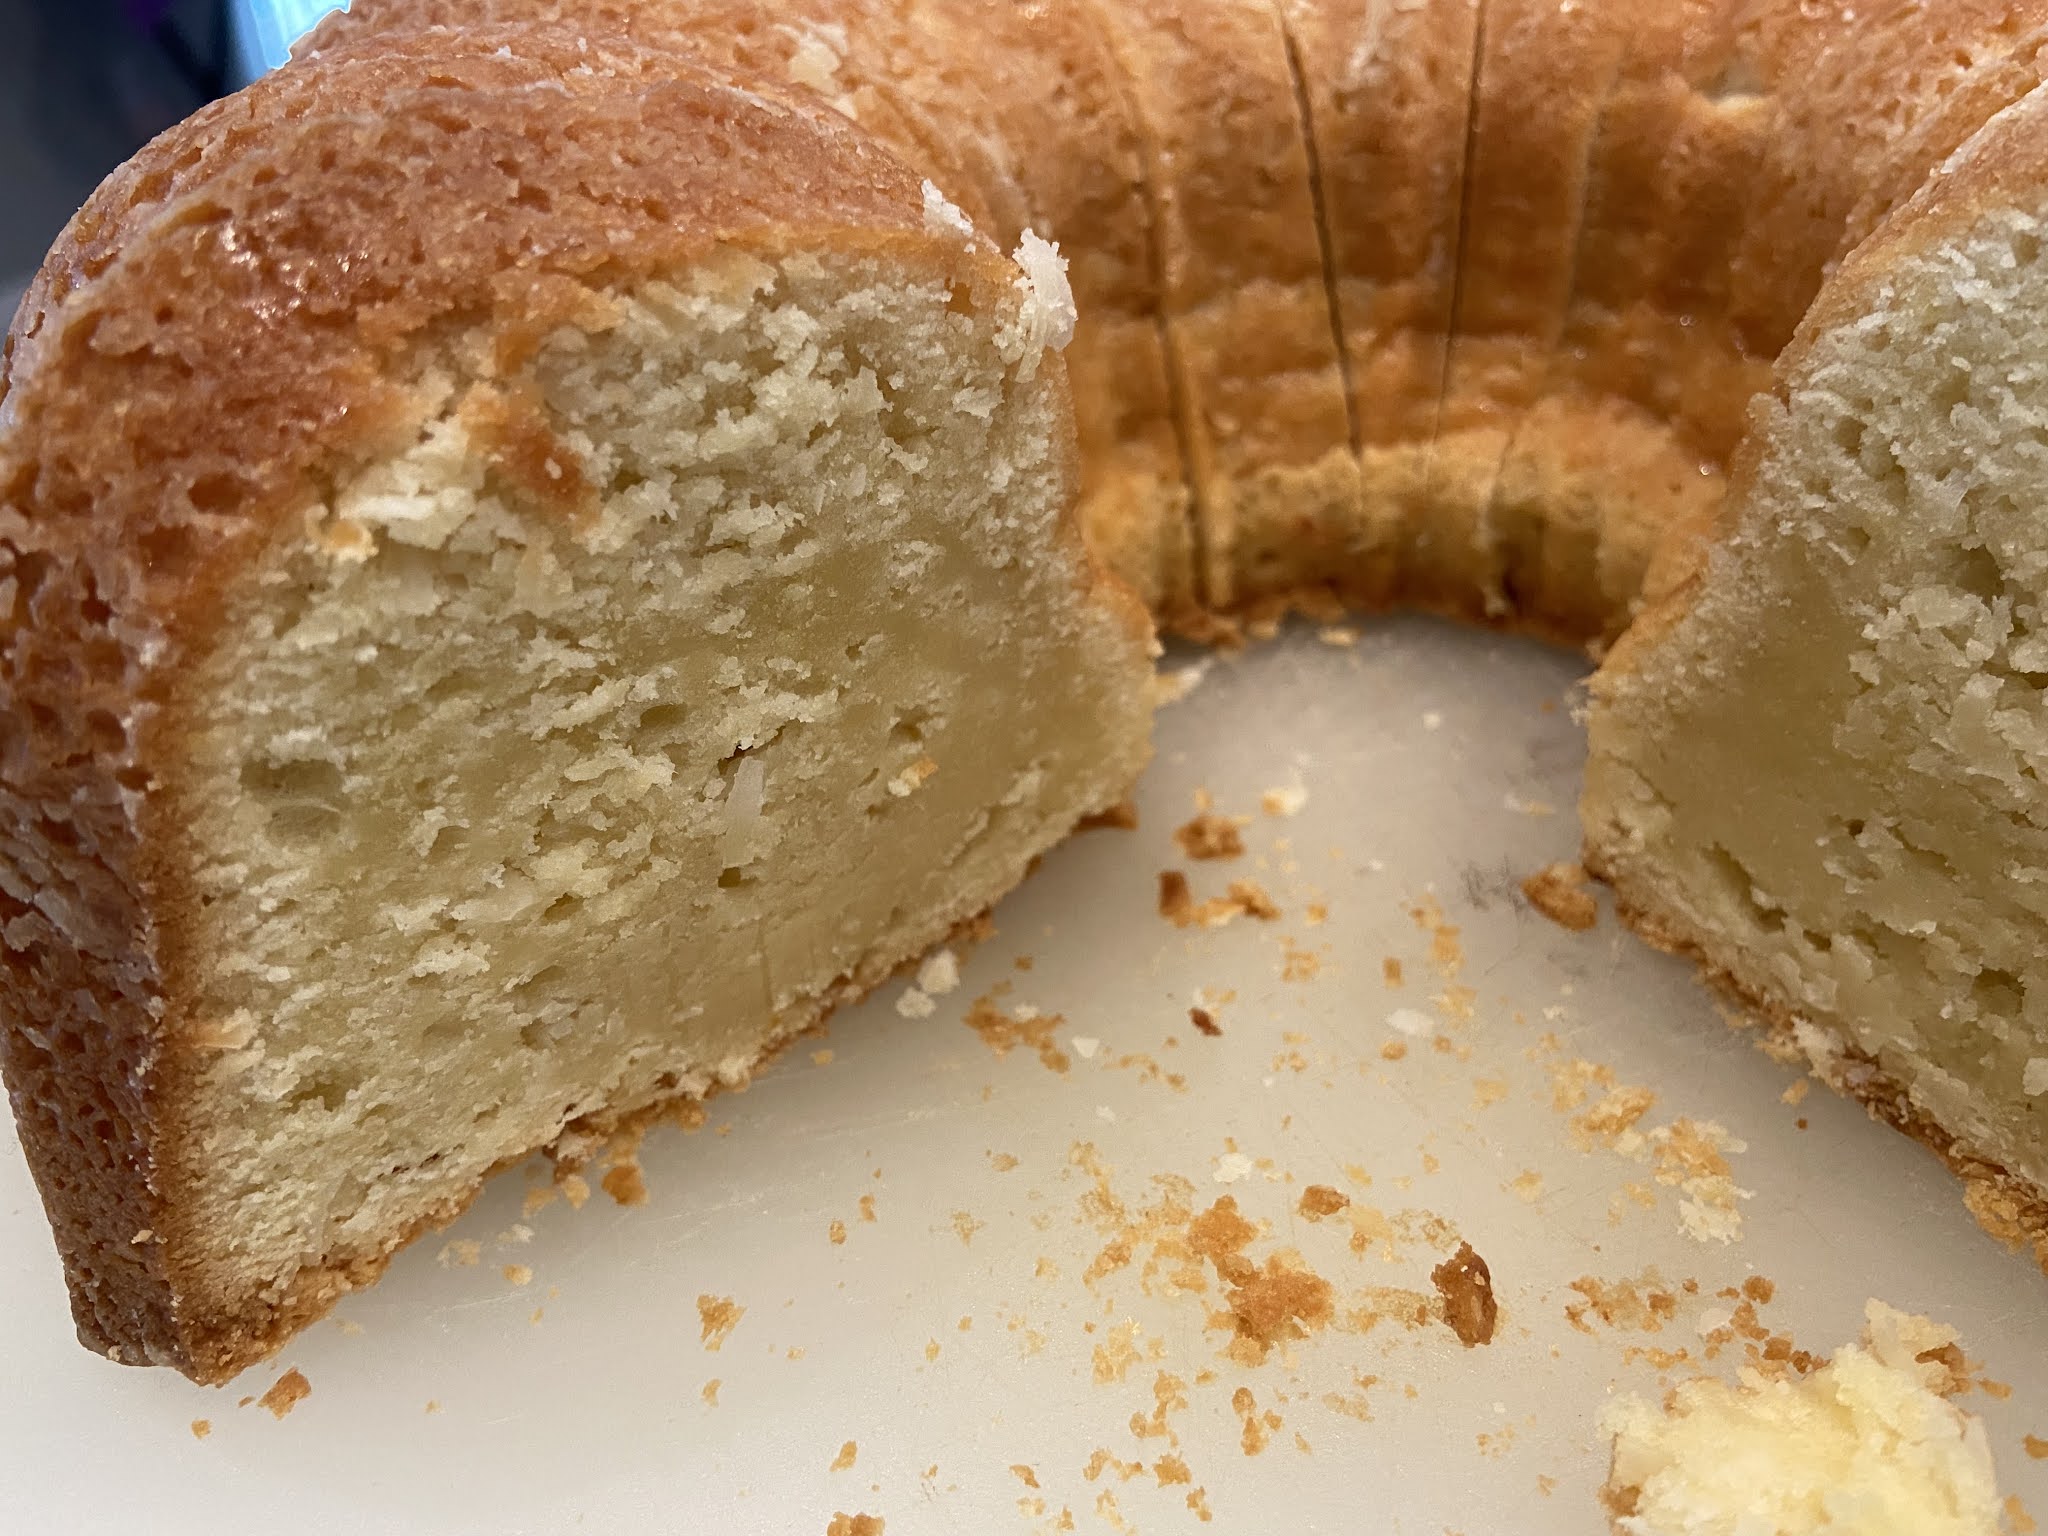
Coconut Cream Cheese Pound Cake

Coconut Cream Cheese Pound Cake - made November 9, 2021 from Call Me PMC 
1 cup butter, room temperature
1/2 cup shortening
3 cups granulated sugar
1 8-ounce package full-fat cream cheese
7 large eggs
3 cups all-purpose flour
1 tablespoon coconut extract
1 teaspoon almond extract
1 cup sweetened, flaked coconut
  1. Preheat oven to 325 degrees F. Generously grease and flour Bundt pan.
  2. In the bowl of a stand mixer fitted with the paddle attachment, cream together butter, shortening and granulated sugar until well combined and fluffy, 2-3 minutes.
  3. Add the cream cheese and beat until well combined and fluffy, 1-2 minutes.
  4. Alternately add eggs, 2 or 3 at a time, with the flour, 1 cup at a time, beginning and ending with the flour and beating until just combined after each addition.
  5. Stir in the extracts. Fold in coconut. Pour into prepared Bundt pan and smooth top into an even layer. Place on a baking sheet and bake for 85-90 minutes or until a toothpick inserted into the thickest part of the cake comes out with a few moist crumbs or clean.
  6. Cool for 5-10 minutes before loosening sides and center with a small rubber spatula and inverting onto a serving plate.
I have mixed feelings about this cake but the downside comes from my baking rather than the recipe itself. If you look at the ingredients, you'll see there's no chemical leavening in it so you would expect it would have the dense texture of a pound cake. And it does.
Even though I did beat the butter, shortening and sugar together a fair amount to incorporate air into it, it still came out as as a thick batter and baked into a dense texture. I expected that.
What I didn't expect is how long it would take to bake. The directions say 85-90 minutes. I left this in the oven for over 100 minutes and during parts of the baking, even increased the temperature to 350 as my oven runs cool. 
I finally took it out after 105 minutes as the toothpick test came out "clean" but you can see in the picture above in the bottom left corner of the cake slice that it was still underdone. The top part of the cake was fine and tasted great. Bottom, inner parts, not so much.


Even if/when baked properly, this is a really heavy cake. In hindsight, I would beat the butter and sguar even more than I did and "cheat" with a little baking powder to lighten up the texture a bit.


Wednesday, December 1, 2021

Stamped Cookies #12 - Red Velvet Springerle Cookies

Red Velvet Springerle Cookies (stamped cookies #12) - made dough November 11, 2021 from Springerle Joy
1 cup butter, room temperature
1 1/2 cups powdered sugar
1 egg
1-2 tablespoons LorAnn Red Velvet emulsion (I used 1 tablespoon)
1 teaspoon vanilla
1 tablespoon cocoa powder
1/4 cup chocolate chips, melted
3 cups flour
1 teaspoon baking powder
1 tablespoon dry buttermilk
1 teaspoon salt

Cream Cheese Filling
8 ounces full-fat cream cheese, room temperature
1/2 cup butter, slightly softened
2 1/2 cups powdered sugar, sifted
1 teaspoon vanilla extract
heavy cream, as needed, to thin filling if desired
  1. In the bowl of a stand mixer fitted with the paddle attachment, cream together the butter and powdered sugar until no butter lumps remained. Add egg and mix to combine. Mix in red velvet emulsion, vanilla, cocoa powder and melted chocolate.
  2. In a separate bowl, whisk together flour, baking powder, dry buttermilk powder and salt. Add to butter mixture and mix until dough pulls away from paddle and begins to form a ball.
  3. Dust the surface of your counter and rolling pin with flour and roll out the dough to a thickness of approximately 3/8" to 1/2". If your dough is too soft, refrigerate for 15-30 minutes.
  4. Dust the surface of your dough and your cookie mold with flour. Press the mold into the dough just far down enough to fill the mold cavity. Remove your mold and cut out the cookie. Gently brush off the excess flour on top of your cookie. 
  5. Place cookies on a baking sheet lined with parchment paper. Chill for at least 30 minutes in the fridge or freezer.
  6. Preheat oven to 400 degrees F. Bake chilled cookies for 7-9 minutes, depending on the size of the cookies. Remove from oven and let rest on baking sheet for several minutes before transferring cookies to wire rack. Cool completely before filling.
  7. Cream Cheese Filling: In a large mixing bowl fitted with a paddle attachment, cream together the cream cheese and butter until combined. Beat in vanilla. Gradually add the powdered sugar. Mix until just combined. Add a dash of cream if needed or until desired consistency is reached.
It’s December 1! If you haven’t fired up your holiday baking yet, here’s a great recipe to start with. This is another post where I'm going to rhapsodize not only about embossed rolling pins and stamped cookies but also about recipes that keep the impressions after baking. 

Above are the pictures of the cookies before baking. Below is after baking. Pretty good, right?

This recipe does require a couple of ingredients you might not have readily available in your pantry so you may need to plan ahead. I had to buy the LorAnn red velvet emulsion and the buttermilk powder on amazon. Normally my grocery stores at least carry the buttermilk powder but not this time. 
It was worth it to get these pretty cookies that also tasted good. I preferred the designs on my embossed rolling pin with the flowers rather than the stars. I think I'll keep the stars rolling pin for vanilla dough instead. 
This dough was easy to work with. I did chill it but not too long as it was already stiff when I first mixed it and not really sticky. If you're using an embossed rolling pin as opposed to a cookie stamp, you want to roll the dough with a plain rolling pin to a thickness thicker than you want the end cookie to be. The reason is when you roll out with the embossed rolling pin, the dough will flatten further with the embossed rolling.
If you're making these as cookie sandwiches like I did, you don't want to make them too thick or the cookie sandwich will be too unwieldly to eat. I could've made mine a little thinner but they still turned out fine.


When making cookies with an embossed rolling pin, rather than reroll the scraps, I push them into cookie molds instead to get different looking cookies and to avoid overhandling the dough by rolling it again.
I didn't fill the center of these since I was mailing them in care packages but if you're serving these kinds of cookies. I would fill with a cream cheese or Nutella filling. Let the holiday baking begin/continue.


Tuesday, November 30, 2021

Ground Beef Tortellini

Ground Beef Tortellini - made November 6, 2021, modified from Salt and Lavender
1 pound extra lean ground beef
1/2 medium onion, chopped (I used 1 teaspoon onion powder)
3 cloves garlic, minced
1 dash Italian seasoning
1 14-ounce can diced tomatoes, with juice
1/3 cup chicken broth
3/4 cup heavy whipping cream
10 ounces fresh tortellini
1/2 cup freshly grated parmesan cheese
salt and pepper to taste
  1. Brown ground beef and onion in a skillet over medium-high heat for 7-10 minutes. Drain excess fat if needed. Stir in garlic and Italian seasoning.
  2. Add diced tomatoes, chicken broth, cream and tortellini to the pan; stir. Once the sauce starts to bubble, cover the pan and reduce the heat to medium; Cook for 5 minutes.
  3. Uncover pan, stir and let cook for another few minutes or until tortellini has cooked through. Stir in parmesan cheese. Salt and pepper to taste. Serve immediately.
This was supposed to be made with gnocchi but Trader Joe's still didn't have it and I still had the tortellini from the Costco 2-pack I bought some time ago so I went with that. 
I like the simplicity of this recipe and how easy it is to throw together. The heavy cream guarantees this isn't low-calorie but the diced tomatoes and the chicken broth lighten it up a little and give it enough liquid for the tortellini to cook in.
As you can see from my substitutions, this would work with whatever filled pasta you use as well as with gnocchi; in addition, you can substitute sausage or ground pork for the ground beef. The sauce is pretty versatile and likely the only way I would eat tomatoes as the diced tomatoes didn't bother me (yes, I ate them in this dish). This is a good comfort food dinner on a cold night.


Sunday, November 28, 2021

Coconut Almond Bars

Coconut Almond Bars - made November 9, 2021 from Shugary Sweets
Crust
2/3 cup unsalted butter, softened
1/4 cup light corn syrup
1/4 cup brown sugar, packed
1 1/2 teaspoons almond extract (I used vanilla)
1 egg yolk
1 1/2 cups all-purpose flour
1/2 teaspoon baking powder
1/2 teaspoon salt

Filling
1 bag (14-oz) shredded, sweetened coconut, toasted
1 can (14-oz) sweetened condensed milk
1 teaspoon almond extract (I used vanilla)

Topping
1 bag (12-oz) milk chocolate morsels
1/4 cup caramel sauce
1/2 cup sliced almonds
  1. Preheat oven to 350 degrees F. Line 9 x 13" baking pan with foil and lightly spray with cooking spray.
  2. Crust: beat together butter, corn syrup, brown sugar, extract and egg yolk until smooth. Add in flour, baking powder and salt; beat until combined.
  3. Pat dough into bottom of prepared pan. Bake for 5-6 minutes.
  4. While crust is baking, combine toasted coconut, extract and sweetened condensed milk in a bowl. Drop by tablespoons onto partially baked crust. Return to oven and bake an additional 20-22 minutes, until edges of crust are lightly browned.
  5. Remove from oven and sprinkle with milk chocolate chips immediately. Drizzle caramel sauce over the top and add sliced almonds. Cool completely. When cooled, cover and refrigerate at least 30 minutes before slicing and serving.
This is another one of those recipes I've had on my pinterest board for ages that I've been meaning to try. The pics from Shugary Sweets look so mouthwatering and this has my favorite ingredients: caramel, coconut and chocolate.
I did deviate from the original recipe and used semisweet chocolate rather than milk chocolate. I personally prefer milk chocolate but since I was sending all but a small piece of this in military care packages for Soldiers Angels and I thought there were likely few military service members with my level of sweet tooth, I opted for the semisweet version, especially when this already came with caramel.
For once, I didn't underbake. While I didn't overbake, I think I baked this a minute or two longer than would be my normal preference. They weren't dry but they weren't as gooey looking as on Shugary Sweets' blog. Hmmm.
They still setup and cut well and the bars were good. At least the taste test piece I tasted seemed fine. I might try the milk chocolate version later on though, add more caramel and underbake a little, just to get that gooey factor.