Tuesday, August 27, 2024

Stamped Cookies #41 - Vanilla Brown Sugar Shortbread from Salted Sugared Spiced

Stamped Cookies #41: Vanilla Brown Sugar Shortbread - made dough July 4, 2024 from Salted Sugared Spiced 
1 cup (8 ounces) unsalted butter, room temperature
1/2 cup (1100 grams) light brown sugar, packed
1 tablespoon vanilla extract
2 cups (260 grams) all-purpose flour
1/4 teaspoon kosher salt
  1. In the bowl of a stand mixer fitted with the paddle attachment, cream together butter and brown sugar until well combined, 2-3 minutes.
  2. Add vanilla and mix to combine.
  3. Add flour and salt in two additions, mixing on low speed after each addition until just combined. Do not overbeat.
  4. Using a 1 1/4" ice cream scoop, scoop balls of dough. Roll in granulated sugar and use cookie stamp to press each dough ball into 1/4" thickness. Use cookie cutter to cut each stamped cookie for neat edges. Cover and chill or freeze for at least 30 minutes or several hours.
  5. When ready to bake, preheat oven to 325 degrees F. Line baking pans with parchment paper.
  6. Bake 20-25 minutes or until the edges of the cookies are lightly browned. Let rest on baking sheet for several minutes before transferring to wire rack to cool completely.
It's hard to go wrong with brown sugar shortbread, especially one that can be stamped. This didn't go wrong at all as it delivered in both keeping the stamped impressions reasonably well in baking and tasting delicious.
The dough handled well, although, being summer and we were in the 90s and 100s where I'm at when I made this dough, it did require a bit of chilling in order to work with effectively. I also erred on the side of caution and used my cookie stamps that had larger impressions and not fine, small details. As you can see, that worked out pretty well.

As always, shortbread is the one cookie I recommend baking fully and not underbaking. You want the golden brown caramelization and the snap. Plus the butter and brown sugar flavor come through beautifully. This one's definitely a keeper.

Friday, August 23, 2024

Large Gourmet Snickerdoodles from Lady Behind the Curtain

1/2 cup shortening
1/2 cup unsalted butter, softened
3 ounces cream cheese, softened
2 cups granulated sugar
2 teaspoons cinnamon
2 large eggs
1 tablespoon vanilla extract
3 1/2 cups all-purpose flour
1/2 teaspoon salt
1 1/2 teaspoons baking powder

Cinnamon Sugar Coating
1/3 cup granulated sugar
1 teaspoon cinnamon
  1. In the bowl of a stand mixer fitted with the paddle attachment, cream together shortening and butter until combined and creamy. Add cream cheese and beat until combined. Add sugar and beat until combined. Add cinnamon, eggs and vanilla extract, mixing until combined.
  2. In a medium bowl, whisk together the flour, salt and baking powder. Add to butter mixture in 2 additions, mixing on low speed after each addition until just combined.
  3. Portion dough into 12 3.6-ounce balls. Cover and chill for several hours or overnight.
  4. In a small bowl, stir together 1/3 cup sugar and cinnamon. 
  5. When ready to bake, preheat oven to 350 degrees F. Line baking sheets with parchment paper.
  6. Roll chilled dough balls in cinnamon-sugar coating mixture, covering completely. Evenly space on prepared baking sheets. Bake 20-22 minutes or until edges are set and middles no longer look raw. Let rest on baking sheet for 5 minutes then transfer to wire rack to cool completely.
My friend Eileen loves snickerdoodles. It's a running joke between us that when I once made snickerdoodles for her and gave her 5, expecting she would give her partner 2 and keep 3 for herself, I was shocked to discover she kept all 5 for herself. I never let her forget that. Yet her snickerdoodle love means she is unbothered whenever I bring it up, haha. 
So around her birthday, I make it a point to try out a new recipe for snickerdoodles, knowing I have a willing taste tester for them. As Eileen knows, I'd been distressed over the past couple of years that nearly all of my snickerdoodle experiments have resulted in flat cookies, even with tried and true recipes that once yielded thick cookies. I'm convinced, and no one can tell me otherwise, that butter makers had been watering down their butter and only recently have they stopped with the watering down, probably because of the complaints they'd been getting. I haven't had the unexpectedly flat cookie problem so far this year and I'm glad to say I didn't have it with this recipe either. 

These made for some terrifically thick and also delicious snickerdoodles. I'm sure having the combination of shortening and butter as well as the cream cheese helped to prevent spread and added to the amazing texture. 

Not to overstate it (okay, I'm overstating but barely) but this could now be my favorite recipe for snickerdoodles. Texture and thickness were on point. I loved it, especially after my flat snickerdoodle cookie problems of the past. 

The only thing I would tweak the next time is to add a little cinnamon to the dough as it could use a slightly more cinnamon punch. I'm going to try that next time as I welcome any excuse to make this recipe again.

Tuesday, August 20, 2024

Crumbl Cookies review #79 - Peanut Butter Bar (tester) and Dirt Cake Cup (tester)

Crumbl Cookies review #79 - Peanut Butter Bar (tester), visited August 17, 2024 and Dirt Cake Cup (tester), visited August 19, 2024
Peanut Butter Bar
No, Crumbl didn't test two products in the same week. What they did do was change the Crumbl app so that I couldn't find the test products the way I used to and didn't discover until last Saturday that it was under the new "hometown" icon on the updated app. Hence why I didn't realize until almost too late that last week, my store was testing the peanut butter bar.
Menu week of August 12, 2024

Display week of August 12, 2024
One thing I don't like about this new version of the app is they don't describe what the test product is (the old version used to) until you go to fill out the survey after you buy the test product. I hope they fix that in a future release as it's always better for consumers to know what they might buy instead of telling them what it is they have after they bought it. Yes, you can ask the store personnel when you go in but this still feels like a takeaway from the old version of the app.

In any case, despite my indifference to peanut butter, I got it anyway because....test product and FOMO.
In my first bite of this, I wasn't impressed. I started at the corner and the texture seemed dry. It also had a dense, heavy texture, in part because the batter included oatmeal but also because that's what they made. It's not a cake or even a heavy cake. It really is a bar cookie. The peanut butter flavor wasn't that prevalent so the whole thing seemed bland. The chocolate frosting was okay; at least it imparted some flavor. 
I only ate a little when I first bought it then ate about 1/4 of a piece the next day. I have to say, I liked it much better the next day. I think it was because I wasn't eating just the corner but actually got into the bar itself. Surprisingly, that was moist, even a day later, and I liked the dense texture much better. The peanut butter flavor also came through better but that could've been because I scraped off all the frosting and just had it as a straightforward peanut butter bar. If I were Crumbl, I'd cut out the oats, amp up the peanut butter and add more chopped peanuts. And glaze it with a thin chocolate glaze rather than that heavy frosting.
This week, now that I've learned how to read the new app, I checked the "hometown" tab and saw they were testing "Dirt Cake Cup". Once again, no description and this time my survey link didn't even work but I bought it anyway, expecting it would be a cake version of the Dirt Cake Cookie, which I actually liked.
I was wrong. First, don't go by the picture above in the app; that's just for marketing purposes. The actual "dirt cake cup" only came to about 2/3 of the Crumbl cup and doesn't reach the top, much less overflow it. Being used to marketing tactics, I was okay with that.
But, second, I should've been tipped off by the container it came in that this wasn't a cake at all. Rather it was a container of mousse with some crunchy chocolate cake bits thrown in and, as a nod to the original Dirt Cake cookie, a gummy worm on top. 
This is a clear case of, if my expectations had been set on what I was buying (mousse), I might've liked it better. Or at least not been surprised when I started eating it and could only find mousse with crunchy bits. I even dug to the bottom, thinking the top layer of mousse was just thick and there was cake underneath.
Yeah, no. It looks like there would be from the pictures but that dark layer you see at the bottom was just more crunchy bits. Think yogurt with crumbles. The mousse itself wasn't bad but it was just mousse. Nothing special. Not worth the calories to me. I think Crumbl would've been better off making this more like a parfait with cake, mousse and then the crunchy bits. Or else, again, fix their app to include the description so people have their expectations set up front.
So, in summary, I'd probably get the peanut butter bar again (maybe) but definitely not the Dirt Cake (Mousse) Cup. I do want to try the Banana Pudding on this week's menu; that does have a description so I know what I'd be getting. But it was sold out yesterday when I went to my Crumbl so I'll have to try again later this week.

Monday, August 19, 2024

Copycat Levain Bakery Lemon Cookies from Salted Sugared Spiced

1 cup (226g) unsalted butter, room temperature
3/4 cup (150g) granulated sugar
2/3 cup (134g) light brown sugar
1 large egg
1 large egg yolk
Zest from one large lemon
1 1/2 teaspoons lemon paste (I used Nielsen Massey)
2 1/4 cups (293g) all-purpose, unbleached flour
1 cup (118g) cake flour
1 teaspoon baking powder
3/4 teaspoon baking soda
3/4 teaspoon kosher salt
16 ounces (453g) white chocolate chips
  1. In the bowl of a standing mixer fitted with a paddle attachment, beat butter for approximately 1 minute.
  2. Add granulated sugar and brown sugar. Beat until light and fluffy, approximately 4 minutes.
  3. Add egg, egg yolk, lemon zest, and lemon paste. Beat until well combined.
  4. In a medium-sized bowl, whisk all-purpose flour, cake flour, baking powder, baking soda and salt. Add dry ingredients to the mixing bowl. Beat on low-medium speed until the dry ingredients are just combined.
  5. Fold in the white chocolate chips. 
  6. Roll in 8 balls, slightly more than 6 ounces (171g) each. Break each ball in half and press sides into each other to create a round ball with a top of the craggly edges.
  7. Place balls of dough onto a platter or baking sheet. Cover and chill for 60-90 minutes.
  8. When ready to bake, preheat oven to 375 degrees (F).
  9. Line two baking sheets with parchment paper. Note: You will bake only one sheet at a time.
  10. Place 4 balls of dough on a baking sheet.
  11. Turn a baking sheet upside down. Place the baking sheet with the balls of dough on top of it. Insert onto the middle rack of the oven and bake for 17-18 minutes or until the cookies are golden brown. Rotate the baking sheet midway through the baking process and check for doneness at the 16 minute mark.
  12. Remove from the oven and let the cookies remain on the hot cookie sheet for at least 8 minutes before transferring to a cooling rack.
  13. Bake the remaining cookie sheet.
  14. Let the cookies cool completely.
I have yet to try Levain Bakery's Lemon Cookies since they only recently released this offering and I haven't been back to New York City or Levain Bakery in years (why no, I'm not bitter about that at all <<<< lies)
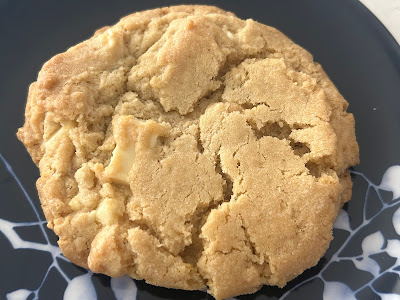
So I was glad to find this copycat recipe for it. Since I haven't tried the real thing, I can't tell you how faithfully this replicates Levain's. However, I can tell you, this is an excellent cookie. Like, I regret only withholding one cookie for the taste test and shipping the rest off in military care package. Y'all, I don't even care how selfish that makes me sound, lol.
I loved this cookie. It made getting the pricey bottle of Nielsen Massey lemon paste completely worth it. The texture was crisp at the edges but also somewhat throughout the cookie without sacrificing the chewiness of it. The lemon flavor paired with the white chocolate was perfection. Remember that I'm not a big white chocolate fan either but it worked tremendously well here. Freaking delicious.
So delicious, in fact, that I bought a Costco-sized bag of lemons so I can make this recipe again. And again.

Friday, August 16, 2024

Apple Cake with Maple Butter Glaze from Lisa Yockelson

Apple Cake with Maple Butter Glaze - made July 27. 2024 from Baking Style by Lisa Yockelson
3 cups unsifted bleached all-purpose flour
1 teaspoon baking powder
1 teaspoon baking soda
3/4 teaspoon salt
1 3/4 teaspoons ground cinnamon
1 teaspoon freshly grated nutmeg
1/2 teaspoon ground allspice
1/4 teaspoon ground ginger
1 1/2 cups granulated sugar
1/2 cup firmly packed dark brown sugar
3 large eggs
1 cup canola oil
2 teaspoons vanilla extract
3 1/2 cups peeled, cored and coarsely shredded apples

Maple Butter Glaze
2/3 cup pure maple syrup
4 tablespoons unsalted butter, cut into chunks
pinch of salt
1/2 teaspoon vanilla extract
  1. Preheat oven to 350 degrees F. Lightly spray a 9-inch Bundt pan with nonstick cooking spray and lightly flour.
  2. Sift together the flour, baking powder, baking soda, salt, cinnamon, nutmeg, allspice and ginger.
  3. In the bowl of a stand mixer, beat together the granulated sugar, dark brown sugar, and eggs on moderate speed for 2 minutes. With the mixer running, add the oil in a thin, steady stream; beat on moderate speed for 2 minutes. Blend in the vanilla extract and apples.
  4. On low speed, add the sifted mixture in 2 additions, scraping down the sides of the mixing bowl.
  5. Pour into prepared pan. Bake for 1 hour, or until risen, set and a toothpick inserted into the cake comes out clean or with a few crumbs.
  6. While cake is baking, make the glaze: place the maple syrup, butter, and salt in a small, heavy saucepan and bring to simmer over medium-low heat, stirring occasionally. Simmer for 1 minute. Stir in the vanilla extract and remove from heat. 
  7. Cool the cake in the pan for 10 minutes. Loosen with a small spatula then invert onto a cooling rack. Lift off the pan. Paint the warm glaze over the top and sides with a soft pastry brush. Cool completely and store in an airtight container.
This is the second dessert I made for Ronald McDonald House when I brought over the lemon bars. I wanted to make this recipe, not only because it's from one of my favorite cookbook authors and I've been wanting to try this recipe for awhile, but also because it uses maple syrup. One of my friends from Vermont gave me this real Vermont maple syrup. While I enjoy syrup on my pancakes as much as the next person, what I like even better is using food gifts as ingredients for what I bake. (Side note: one of the best gifts you can give a baker is some kind of ingredient they can use - you'd literally be giving a gift that keeps on giving.)
Since I was making this as a Bundt cake to give away and you can hardly give away a Bundt cake with a slice missing (seriously, please don't do that - it's tacky), I reserved some of the batter to bake into a small ramekin. That was my tester. Since it was smaller than the Bundt, it baked faster, but in essence, it was the same as the larger cake.
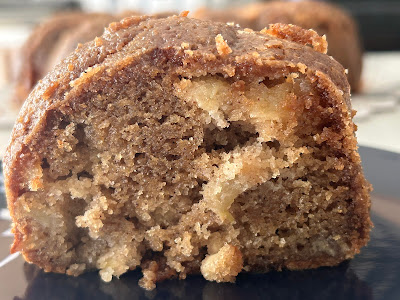
As you can tell from the ingredients, this is an oil-based cake. It doesn't contain butter so it's not going to give a buttery flavor or a fluffy texture. This was dense but moist. Not like a pound cake either which, while dense, also can have a soft crumb. I say all that so that you don't underbake this cake. If you do, the texture will be gummy rather than moist. The toothpick test may also be misleading as it can come out "clean" but still be a bit underdone. Best thing to do is actually time it (mine baked for exactly an hour but each oven is different) and go by appearance (top should look "dry" with a few cracks) as well as the toothpick test. 
Overall, I liked this cake. Although there are a lot of spices in it, it didn't taste overly spiced; it was just the right blend. No one spice overwhelmed the flavor profile and I liked the texture as well. This is more like an oil-based carrot cake but with apples. It's best made in autumn when apples are at their peak season but it worked well enough now for this cake.
Below is the slice from the Bundt cake but I only took it out for the picture so you can see the inside texture of the Bundt version then I neatly put it back into the sliced cake, covered it and delivered it to Ronald McDonald House.

Tuesday, August 13, 2024

Lemon Curd Squares from Williams-Sonoma Dessert

Lemon Curd Squares - made July 27, 2024 from Williams Sonoma Dessert by Abigail Johnson Dodge
Crust
1 cup (140 grams) all-purpose flour
1/3 cup (70 grams) granulated sugar
1/2 teaspoon salt
1/8 teaspoon ground cinnamon
1/2 cup (4 ounces) cold, unsalted butter, cut into 1/2-inch pieces

Filling
3/4 cup (160 grams) granulated sugar
2 tablespoons all-purpose flour
pinch of salt
1 teaspoon finely grated lemon zest
3 large eggs, room temperature
1/2 cup fresh lemon juice
3 tablespoons heavy cream

confectioners sugar for dusting
  1. Preheat oven to 350 degrees F. Line an 8 x 8-inch baking pan with foil and lightly spray with nonstick cooking spray.
  2. In a food processor, combine the flour, sugar, salt and cinnamon. Pulse briefly until blended. Add the butter pieces and pulse until dough forms moist crumbs and sticks together when pinched, about 1 minute. Press the dough into the bottom and 1 inch up the sides of the prepared pan. Bake the crust until pale golden, 20-22 minutes. Let crust cool completely on rack. Reduce oven temperature to 325 degrees F.
  3. Make the filling: whisk together the sugar, flour, salt and zest. Add the eggs, lemon juice and heavy cream; whisk until just blended. Carefully pour mixture over the baked crust.
  4. Bake until the filling is set but still jiggles slightly when the pan is gently shaken, about 20 minutes or longer if using a metal pan. Let cool on a rack for about 30 minutes. Cool completely before lightly dusting with confectioners sugar and cutting and serving.
Although I have a long-standing, battle-tested recipe for lemon bars, every once in awhile, I test out a new recipe for them. I'm on this never-ending, Marie-Kondo-style quest to thin out my recipe book collection but before I give any cookbook away, I flip through the pages and gather up any recipe I might want to try. I've hung onto this one for awhile from the Williams Sonoma dessert cookbook and am finally getting around to testing it. 
I signed up to provide desserts again for the families staying at Ronald McDonald House and thought this would be a good option as a summer evening dessert. You make the crust in a food processor and keep pulsing until a dough forms. That was easy enough. I didn't build up the crust on the sides as there wasn't that much dough and I wanted a thicker bottom layer as the crust.
The lemon curd was quite thin and liquidy compared to my other recipe and made a thicker layer than the crust. I forgot to tap the pan gently before sliding it into the oven so you can see all the air bubbles that rose to the surface during baking. Fortunately, with lemon bars, you can cover those popped air bubbles and craters with a good dusting of powdered sugar.

If you're a fan of tart lemon curd filling, this one's for you. If you prefer a thicker curd layer than crust, this is also for you.
I myself am a bit ambivalent about both. I thought these were a trifle too tart for me. Which wasn't surprising given the 1/2 cup of fresh lemon juice the recipe called for (my go-to recipe only uses 3 tablespoons). I would've liked a thicker crust as well. Overall it was good but probably something I wouldn't make again, at least not for me. For lemon aficionados, it's a good option.