Friday, September 21, 2012

Lemon Ricotta Pasta

Lemon-Ricotta Pasta - made September 15, 2012 from Crumb blog

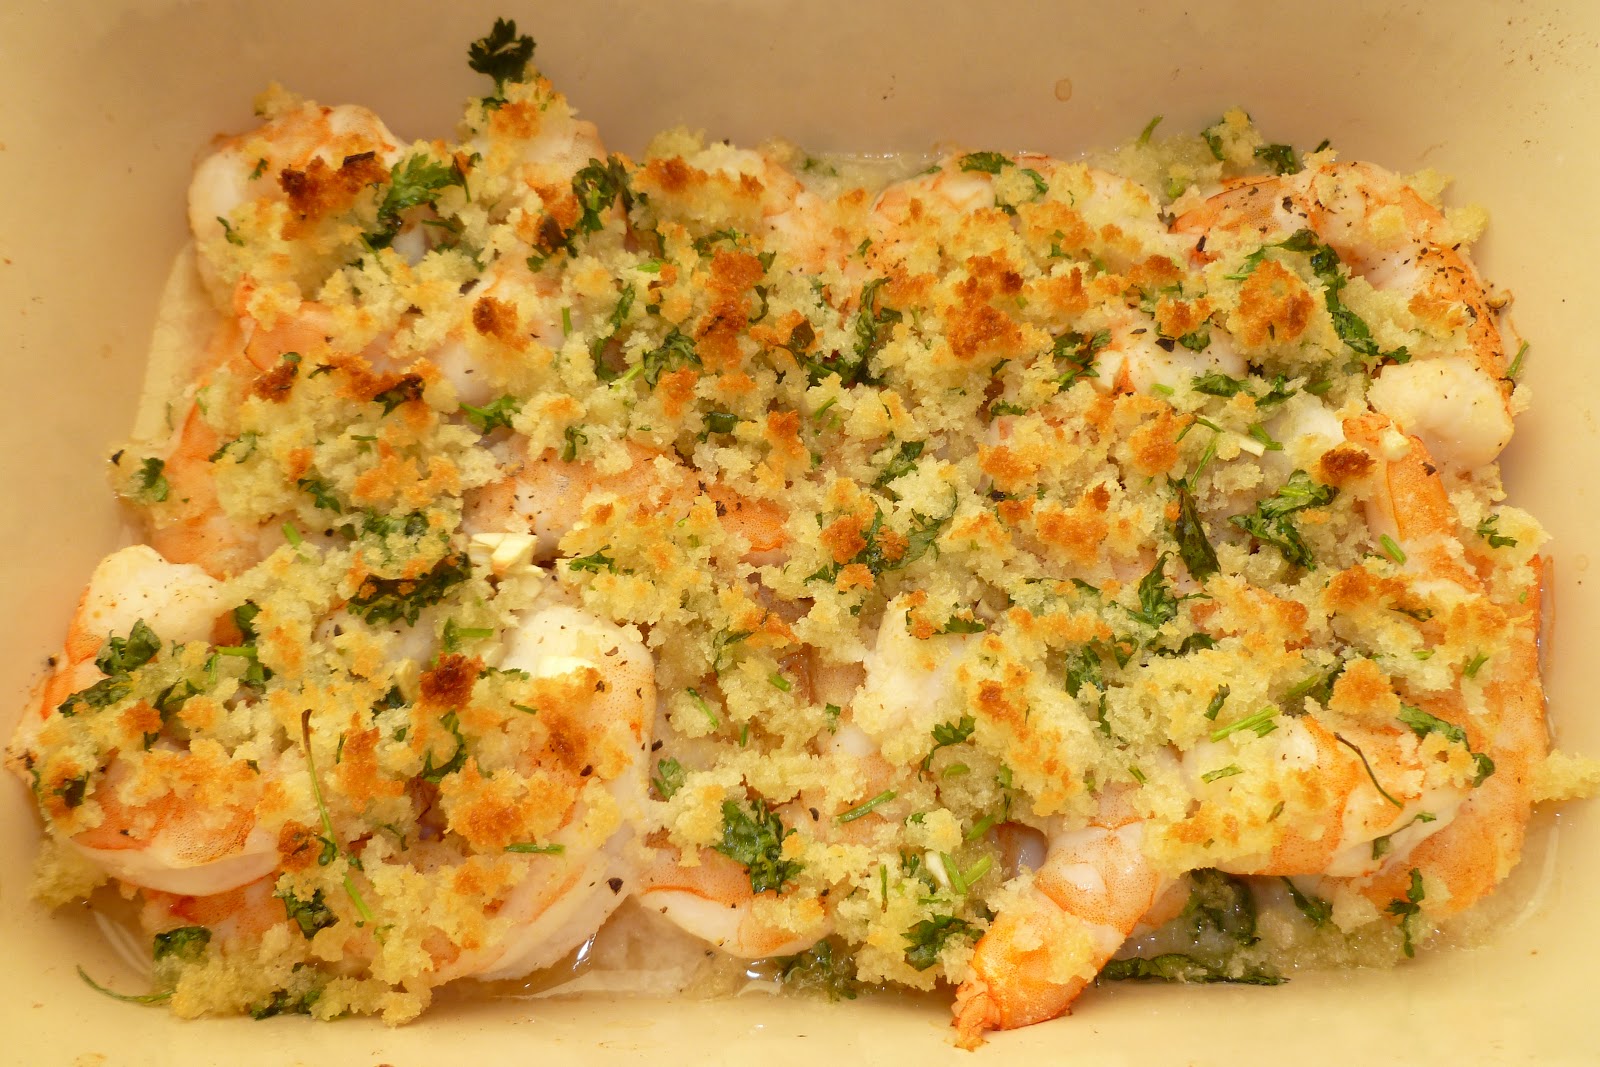
You have to click on the recipe title to go to the original blog this is from.  I say that because that's how the recipe should turn out.  It was originally scallops with lemon ricotta pasta but, ahem, I took some liberties with the recipe (you were expecting that one, right?).  In my defense, I started out intending to make the recipe as is.  But the wheels came off that bus when I couldn't find scallops at Trader Joe's which is where I was shopping to make this recipe a reality.  No problem, I knew I was making the Garlicky Baked Shrimp so I figured that would do and the scallop-less pasta would be the accompaniment.

Other than the scallops thing, I fared better following this recipe more religiously than the other recipe.  Except for the part where I only had 1 tablespoon of olive oil left in the bottle and hadn't bought a new bottle because I could've sworn I wasn't running that low on olive oil.  And I thought 475 g of ricotta cheese was a lot to use.  And I wasn't willing to make an entire package of pasta or else I'd be eating this thing for weeks.  So....I made some adjustments.  This turned out okay, if a bit bland.  I could probably have used more lemon juice or salt and pepper.  But it was good enough to eat with the shrimp. 

This is the original recipe, not the one I actually ended up making, although it was somewhat close:

1 box pappardelle or fettuccine pasta (I used whole wheat spaghetti)
12 large fresh sea scallops
4 tbsp good-quality olive oil, divided
1 tbsp butter
Zest of 1 lemon
1/4 cup lemon juice
1 1/2 cups fresh green peas, shelled and blanched (I used corn kernels)
4 tbsp fresh thyme, minced (preferably lemon thyme, if you have it - Trader Joe's didn't so I didn't)
Sea salt and freshly ground black pepper
1 container (475g) ricotta cheese
  1. Cook the pasta per package directions until al dente.
  2. While pasta is cooking, rinse scallops and pat dry. Heat 1 tbsp olive oil and 1 tbsp butter over high heat in a skillet until foamy. Sprinkle scallops with a little salt and pepper; place in skillet in single layer. Cook, turning once, until brown on outside and just opaque in center, about 2 minutes per side. Remove from pan and set aside.
  3. Drain pasta and return to the pot over low heat. Stir in lemon zest, juice, remaining 3 tbsp olive oil, peas, and thyme. Toss to coat, then season with salt and lots of pepper. Add the ricotta and mix gently until pasta is coated evenly.
  4. To serve, divide the pasta between four plates, topping each with three scallops and a sprig of fresh thyme.

Wednesday, September 19, 2012

Garlicky Baked Shrimp

Garlicky Baked Shrimp - made September 15, 2012 from Normal Cooking's blog
When I started using pinterest, it was primarily to find good baking recipes and new dessert ideas from all the other bloggers out there.  What I hadn't counted on, but am glad about, is I've also come across some "real food" recipes that are simple enough for me to make.  I'll get lured in by a foodie picture of a scrumptious-looking dish and if the ingredient list isn't too long and the cooking steps aren't too complicated (remember, I'm barely a half step above Hamburger Helper in my cooking skills), I'll pin it and give it a whirl when I've completed the Herculean-to-me task of figuring out what ingredients I need (usually most of it), already have (typically very little of it) and what I need to buy, how much and where.

Case in point, this recipe for Garlicky Baked Shrimp.  I love shrimp.  It's easy enough to buy in a frozen pack - heads off, tails on - and keep in the freezer until I'm ready to cook it.  I'm not even squeamish about handling raw shrimp and peeling the tails off, thanks to having to help my mom during my formative years peel and devein shrimp.  The instructions were pretty straightforward and I thought I even had "most" of the ingredients.

I've listed the recipe as it was meant to be made but I will abashedly confess my shortcuts/misdemeanors.  I had a bulb of garlic I "borrowed" from my mom a few weeks ago when I intended to make a different recipe but never did.  So the garlic sat on my kitchen counter for awhile.  I don't know exactly how long but turns out it was long enough to shrivel up and dry out except for 2 cloves.  And even those were sketchy.  But I forged on and added garlic powder instead.  Never mind that it was months old and in a clump in the spice bottle.  It said it was garlic powder and that was good enough for me.  White wine.  I mentioned before I don't drink, right?  The only alcohol I have in the house is anything I had leftover from the last time I cooked that needed it.  Turns out I had red wine (don't know how long it's been opened) and sherry.  No white.  What the heck, I used the sherry. Italian-leaf parsley.  Didn't have that at Trader Joe's so whaddaya say to cilantro?  Good.

Despite my flexibility with the recipe, I thought this turned out pretty well.  If you ignore the fact that my Garlicky Baked Shrimp didn't have much real garlic in it.  And honestly, I love shrimp so I'm very forgiving over however it turns out.  I also have a low bar - as long as I don't give myself food poisoning, it's all good.

1 lb. raw shrimp, deveined and peeled (I pull the tails off beforehand too)
4 cloves garlic, minced
2 tablespoons white wine
salt and pepper
1/4 cup (4 Tbsp.) melted butter
1/2 cup Panko bread crumbs
2 Tbsp. fresh Italian-leaf parsley, chopped
half of a lemon (optional)
  1. Preheat oven to 425 degrees F.
  2. In a bowl, combine the shrimp, garlic, and white wine.  Stir to combine, then pour into a baking dish.  Spread out evenly, and then season with salt and pepper.
  3. In another bowl, use a fork to mix melted butter, Panko, and parsley until well combined.  With your fingers, sprinkle the mixture evenly in the baking dish over the shrimp.
  4. Transfer dish to oven and bake until the shrimp are pink and opaque, about 15-18 minutes.
Cast Party Wednesday  What's cooking, love?

Tuesday, September 18, 2012

Brown Sugar Snickerdoodles

Snickerdoodles - made September 14, 2012 from Lovin' From the Oven blog


I have tried many snickerdoodle recipes and blogged about a few of them so I'm renaming these Brown Sugar Snickerdoodles to distinguish them from the others and because they do have brown sugar in them.  I wanted to try them when I saw the picture of them from Lovin' from the Oven's blog.  In her picture, the cookies were thick and looked moist.  Mine came out more flat, even baking them from frozen dough on a convection setting in my own.  I think it's because I had the butter out too long and it was more "room temperature" than I wanted.  When working with butter, especially for cookie doughs, you want it to be cool, not room temperature.  The butter will soften and warm up as you beat it and cream it with sugar and other ingredients.  If your butter is too soft, it could affect the texture of your finished product. However, I really liked the taste of these cookies, possibly more than the majority of snickerdoodle recipes I've tried.  I may need to make these again and work with cooler butter to see if that'll make thicker cookies.  Taste-wise, they were great and worth the workout I did the next day to burn off the calories.


1/2 cup butter (1 stick), softened 
1/2 cup granulated sugar 
1/3 cup brown sugar 
1 egg 
1/2 teaspoon vanilla 
1 1/2 cups flour 
1/4 teaspoon salt 
1/2 teaspoon baking soda 
1/4 teaspoon cream of tartar
For rolling:
2 tablespoons granulated sugar
1 teaspoon cinnamon
  1. In a large bowl, cream together the butter and sugars with an electric mixer on high speed. Add the egg and vanilla and beat until smooth.
  2. In another bowl, combine the flour, salt, baking soda, and cream of tartar.
  3. Pour the dry ingredients into the wet ingredients and mix well.
  4. Make the dough into dough balls and chill in the refrigerator for an hour or place in freezer bags in the freezer overnight.
  5. In a small bowl, combine the sugar with the cinnamon for the topping. Roll the dough balls in the cinnamon/sugar mixture and place onto an ungreased cookie sheet. Repeat for the remaining cookies.
  6. Bake the cookies for 12 to 14 minutes. The cookies may seem undercooked, but will continue to develop after they are removed from the oven. When the cookies have cooled they should be soft and chewy in the middle.
Makes 16 to 18 cookies

  Chef In Training

Saturday, September 15, 2012

Toasted Coconut Shortbread

Toasted Coconut Shortbread - made September 11, 2012 from Cookies for Kids Cancer Best Bake Sale Cookbook by Gretchen Holt-Witt

I like making this kind of cookie because during a busy work week, you can split the making of it into two manageable stages.  The first is to simply make the dough which is super easy to do, given the short list of ingredients.  The dough is also very easy to work with and shape into logs since it's not too soft or sticky.  Simple roll it into logs, wrap in waxed paper, place in freezer bags and chill in the refrigerator overnight or put in the freezer until you're ready to bake it.  If you put it in the freezer, let it thaw for about 20-30 minutes first before you slice it or else the dough will be too hard and may not slice cleanly (I discovered that firsthand).

The important thing with shortbread is to bake it long enough.  For once I don't advocate underbaking.  You want to fully bake it so it'll have that nice snap when it's cool.  With such a high butter content, it's harder to overbake shortbread, although it certainly is possible.  I liked these cookies; they reminded me of Pepperidge Farm cookies with their buttery taste and crisp snap.  The coconut is a nice touch but it isn't a very strong coconut taste so even non-coconut lovers may enjoy this.
½ cup sweetened flaked coconut

2 sticks (1/2 pound) unsalted butter, room temperature
¼ cup confectioners’ sugar
¼ cup granulated sugar
2 ¼ cups all-purpose flour
¼ teaspoon kosher salt

1.     Preheat the oven to 250°F.  Spread the coconut evenly on a cookie sheet, place in oven and bake until just golden, about 10 minutes.  Set aside to cool.
2.     Place the butter, coconut, and sugars in the bowl of a mixer fitted with a paddle and beat until smooth and creamy.  Scrape down the sides of the bowl, add the flour and salt, beat well and scrape again.  Form the dough into a 1 ½”-diameter log and cover with parchment paper.  Place the log in a resealable plastic bag and refrigerate at least 1 hour and up to 2 days or freeze up to 2 months.
3.     Preheat the oven to 325°F.  Line a  cookie sheet with parchment paper.
4.     With the tip of a very sharp knife, cut ¼” - ½” slices of the dough and place 2 inches apart on the prepared cookie sheet.  Bake until the cookies are just beginning to brown on the edges, around 20 minutes.  Transfer to a wire rack to cool.

Thursday, September 13, 2012

Brownie Sundae

Classic Chewy Brownies - made September 10, 2012, recipe adapted from Cookies for Kids' Cancer Best Bake Sale Cookbook

When I blogged earlier this summer about Zoe, a blog poster let me know about a nonprofit org called Cookies for Kids' Cancer which raises funds for pediatric cancer research.  Since then, I've ordered cookies from their website to give as a birthday gift and I was delighted to discover they have a cookbook out.  Naturally I had to order it to show support for a good cause.  Several of my friends will also likely be getting it as part of their Christmas gift this year.  If you like baking books or need a gift for a baker friend, please consider giving this book for them and raising awareness for a good cause.

Earlier this week, we had some major org announcements at work that would impact me and my team.  Not necessarily in a bad way if you believe change creates opportunity but it was certainly enough for my boss to half-jokingly ask me if the changes were going to drive me to update my contacts on LinkedIn and start trolling through my network.  Ha.  No because I've worked in high tech long enough to know how to roll with the punches and also because my coping mechanism of choice was to head to my kitchen and do some comfort baking as soon as I got home from work.  Hence, the brownie sundae.

I pulled the brownie recipe from the Cookies for Kids Cancer Bake Sale cookbook as it seemed simple, easy and fudgy.  And it was all three of those things.  The only thing I changed from the original recipe was to bake it in a smaller pan rather than the 9 x 13" pan in the original directions.  Just from eyeballing the list of ingredients, it didn't seem to me that it would make that much batter so I made it in a 9 x 9" pan instead.  Which turned out to be the right  thing to do as the brownie in the smaller pan still wasn't overly thick and might've even been a bit on the thin side if you like your brownies thicker.  But this thickness made a good base for the ice cream.  If you do need enough brownies for a 9 x 13 pan, I would recommend doubling the recipe.

2 sticks (1/2 pound) unsalted butter
4 ounces unsweetened chocolate, coarsely chopped
1 ¾ cups granulated sugar
4 large eggs
2 teaspoons vanilla extract
¾ cup all-purpose flour
¼ teaspoon kosher salt
1 ½ cups walnuts or pecans, optional

1.     Preheat the oven to 325°F.  Line a 9 x 9” baking pan with foil and spray lightly with nonstick cooking spray. 
2.     Place the butter and chocolate in the top half of a double boiler over hot water and melt, stirring until smooth.  Set aside to cool for 3-5 minutes.
3.     Combine the sugar, eggs and vanilla in a large mixing bowl and stir just until combined.  Add the cooled chocolate mixture and stir until just combined.  Add the flour and salt and stir until just combined.  Pour into the prepared pan and sprinkle with the nuts, if using.
4.     Bake 35-40 minutes or until a toothpick inserted near the center comes out with moist crumbs.  Cool completely before cutting and serving.  Top with ice cream, hot fudge sauce and sprinkle with toasted chopped almonds if desired.

What's cooking, love?

Wednesday, September 12, 2012

Peanut Butter Crispy Bars

Peanut Butter Crispy Bars - made September 6, 2012 from Baked: New Frontiers in Baking by Matt Lewis and Renato Poliafito

When you look at this recipe, it instantly seems like Rice Krispie treats for grownups.  It's got a caramelized rice krispie layer, followed by a creamy milk chocolate peanut butter layer, topped with a dark chocolate ganache.  It sounded mouthwatering so I made it.  I discovered 1 thing and remembered 2 things.  I remembered I'm not a huge peanut butter fan.  I discovered "caramelized rice krispies" was really more "crunchy rice krispies".  I discovered I prefer the normal rice krispies treat over crunchy rice krispies.  So, almost needless to say, I don't know that I was a fan of this recipe.  I think it sounded better in theory than it tasted in reality.  Peanut Butter and chocolate lovers might like it though so don't let me stop you from trying it out.  For now, I will stick to the pure, simple taste of traditional Rice Krispie treats.
Crust

1 ¾ cups crisped rice cereal
¼ cup water
¼ cup sugar
3 tablespoons light corn syrup
3 tablespoons unsalted butter, melted

Milk Chocolate Peanut Butter Layer
5 ounces milk chocolate, coarsely chopped
1 cup creamy peanut butter

Chocolate Icing
3 ounces dark chocolate, coarsely chopped
½ teaspoon light corn syrup
4 tablespoons unsalted butter

1.     Make the crust: Line an 8-inch square pan with foil and lightly spray with nonstick cooking spray.
2.     Put the cereal in a large bowl and set aside.
3.     Pour ¼ cup water into a small saucepan.  Gently add the sugar and corn syrup without letting them get on the sides of the pan.  Use a small wooden spoon to stir the mixture until just combined.  Put a candy thermometer in the saucepan.  Cook over medium-high heat and bring to a boil; cook until the mixture reaches the soft ball stage, 235F.
4.     Remove from the heat, stir in the butter, and pour the mixture over the cereal.  Working quickly, stir until the cereal is thoroughly coated, then pour it into the prepared pan.  Using your hands or a spatula, press the mixture into the bottom of the pan (do not press up the sides).  Let the crust cool to room temperature. 
5.     Make the milk chocolate peanut butter layer: Melt the milk chocolate and peanut butter together in the top half of a double boiler set over hot water, stirring until completely melted and smooth. Remove the top half from the bottom half of the pan and stir for 30 seconds to cool slightly.  Pour the mixture over the cooled crust.  Put the pan in the refrigerator for 1 hour, or until the top layer hardens.
6.     Make the chocolate icing: In a large nonreactive bowl, combine the chocolate, corn syrup and butter.
7.     In the top half of a double boiler, set over hot water, melt together and stir until smooth.  Remove the pan from the heat and stir for 30 seconds to cool slightly.  Pour the mixture over the chilled milk chocolate peanut butter layer and spread into an even layer.  Put the pan in the refrigerator for 1 hour or until the topping hardens.  When firm, cut into small squares and serve.

  Chef In Training    Cast Party Wednesday

Tuesday, September 11, 2012

Never Forget


And remember our troops as well.  I met a mother a couple of weeks ago whose son is in the Navy and deployed overseas.  I offered to send a care package to her son and, as well as snacks he can share with his unit, I also asked friends to write letters I can include in the package so our military personnel can hear from folks "back home" and know they're not forgotten and their service is appreciated.

If you've thought about sending care packages to our troops, go for it!  I wrote a blog post last year on some tips and possible things to include if you need ideas here.