Thursday, January 5, 2023

Crumbl copycat Coconut White Chocolate Cookies from Lifestyle of a Foodie

1/2 cup butter, softened
1/2 cup + 2 tablespoons brown sugar
1 egg, room temperature
2 teaspoons butter vanilla emulsion or vanilla extract
1 1/3 cups all-purpose flour
2/3 cup sweetened toasted coconut flakes
1/2 teaspoon baking soda
1/4 teaspoon salt
2/3 cup white chocolate chips
1/2 cup sweetened untoasted coconut flakes for rolling the cookies
  1. In the bowl of a stand mixer fitted with the paddle attachment, cream together butter and brown sugar until light and fluffy. Beat in egg and vanilla butter emulsion.
  2. Add flour, toasted coconut, salt and baking soda; mix until just combined. Fold in white chocolate chips.
  3. Portion evenly into 7 large cookie dough balls. Roll in untoasted coconut flakes, flatten into discs 1" thick. Chill for 30 minutes.
  4. Preheat oven to 350 degrees and line baking sheets with parchment paper. Evenly space dough discs and bake for 11-12 minutes or until edges are set and middles no longer look raw. Let cookies rest on baking sheets for 20 minutes before transferring to wire rack to cool completely.
This is a cookie for coconut lovers. I can't remember if I've ever eaten the original Crumbl version of it (likelihood is high) but even if I have, clearly I can't remember what it tastes like so I don't know how true this is to the original.
But the copycat recipes from Lifestyle of a Foodie are consistently pretty good recipes in their own right and this one is no exception.
Coconut and white chocolate pair well with each other, especially in a brown-sugar-based cookie like this. It's a great combination overall, particularly in this recipe.


Roll the dough balls generously in flaked coconut to add to their appearance, texture and chewiness. This is a straightforward cookie to make for anyone who likes coconut.


Wednesday, January 4, 2023

Monster Cookies from Baking with Blondie

Monster Cookies - made dough December 27, 2022 from Baking with Blondie
1 cup unsalted butter, cold and cubed
1 cup brown sugar, packed
1/4 cup granulated sugar
1/2 cup creamy peanut butter
2 large eggs, cold
1 teaspoon vanilla
1/2 cup uncooked, old-fashioned oats
3 1/2 cups all-purpose flour
1 teaspoon cornstarch
1 teaspoon baking soda
1 teaspoon salt
1 cup semisweet chocolate chips
1 cup M&Ms
  1. Preheat oven to 410 degrees F. Line baking sheets with parchment paper.
  2. In the bowl of a stand mixer fitted with the paddle attachment, beat butter for 1 minute until light and fluffy. Add brown sugar and granulated sugar, beating on high speed for 3 minutes, until mixture is light and fluffy. Scrape down the sides and bottom of bowl to keep mixture even texutred.
  3. Beat in peanut butter, vanilla and eggs, one at a time, beating after each addition until well combined.
  4. Add in oats, flour, cornstarch, baking soda and salt, mixing on low speed until just combined. Do not overmix.
  5. Reserve 1/8 cup chocolate chips and M&Ms then fold in the rest of the chocolate chips and M&Ms.
  6. Portion dough into 8 equal-size dough balls and form into tall round balls. Evenly space 4 dough balls on each sheet and flatten slightly to thick discs. Hand press reserved chocolate chips and M&Ms onto the tops of each disc.
  7. Bake for 9-10 minutes. Remove from oven and let rest on baking sheets for 5 minutes then transfer cookies to wire rack to cool completely.
These were meant to be Giant Monster Cookies from Baking with Blondie's blog but I made all but the taste test cookie into smaller ones instead. Sometimes I like to make them all giant-sized for my care packages but for this particular one, I needed quantity so I portioned them into normal sizes. Easier to fit into the shipping boxes.

As with all the cookies from Baking with Blondie, the base recipe is similar (no need to mess with a good thing) and the flavoring (peanut butter) and add-ins are the main changes.

And just like all her other cookie recipes, this turned out well. There isn't a strong peanut butter flavor since it only contains a half cup so if you want to amp up the peanut flavor, add toasted chopped peanuts as one of the add-ins.

This is a soft, chewy texture, not crisp. Don't overbake it. You really only need to leave it in the oven at the 410-degree temperature for about 10 minutes (slightly less if you make them small) and then let them rest on the hot baking sheets for another 10 minutes to continue the bake.
These don't spread much so if you don't want a thick domed middle, press into thick discs for a more uniform bake.


Monday, January 2, 2023

Dark Chocolate Dark Brown Sugar Cookies from Averie Cooks

Dark Chocolate Dark Brown Sugar Cookies - made dough December 24, 2022 from Averie Cooks 
1/2 cup (1 stick) unsalted butter, softened
3/4 cup dark brown sugar, packed
1 large egg
1 tablespoon vanilla extract
1 1/2 cups all-purpose flour
1/2 cup unsweetened natural dark cocoa powder (I used King Arthur's black cocoa powder)
1 teaspoon cornstarch
3/4 teaspoon baking soda
pinch salt, optional and to taste
  1. In the bowl of a stand mixer fitted with the paddle attachment, cream together butter and sugar until light and fluffy, 3-4 minutes. Add egg and vanilla and continue beating until well combined, scraping down sides and bottom of bowl to keep mixture even textured.
  2. In a separate bowl, whisk together flour, cocoa powder, cornstarch, baking soda and salt, if using. Add in two addition to butter mixture and mix on low speed after each addition until combined.
  3. Portion into 2-tablespoon mounds, arrange on a flat plate, cover and chill in the refrigerator for at least 2 hours or overnight.
  4. When ready to bake, preheat oven to 350 degrees and line baking sheet with parchment paper. Evenly space cookies (they don't really spread much) and bake for 8-9 minutes or until edges have set. Do not bake longer than 10 minutes.
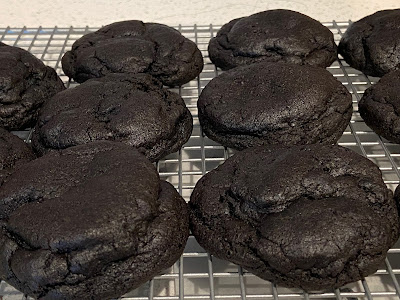
Happy New Year! Normally I'd stop baking and try my hand at cooking like I do every January but, also like every January, I'm still catching up from the baking recipes I tried in December so I've got some backlog posts to do. Let's start off the new year with a good one. Remember the Homemade Oreos that I didn't think tasted much like Oreos? Well, it's a little ironic that, without trying, I think I hit upon this recipe that actually does taste like the soft homemade version of Oreos and they weren't even trying to be.
I've had this recipe from Averie Cooks on my pinterest board for awhile and I'm trying to clear out recipes I've held onto for too long without trying them so I went with this one. If you don't use black cocoa, you'll likely get just a nice dark chocolate fudgy cookie. I did have and did use black cocoa and hence why I (accidentally) ended up with something closer to homemade Oreo cookies, sans filling.
Mine didn't look like Averie Cooks' on her blog but these were still good fudgy chocolate cookies. That tasted a little like Oreos, thanks to the black cocoa. I might have to try to make this as a thinner cookie and sandwich them with a vanilla buttercream to come up with a genuine, if accidental, version of homemade Oreos.

Saturday, December 31, 2022

Danish Butter Cookies by The Gardening Foodie

Danish Butter Cookies - made December 21, 2022 from The Gardening Foodie 
1/2 cup butter, room temperature (remove butter from refrigerator at least an hour before)
1/2 cup powdered sugar
1 teaspoon vanilla extract
1 cup cake flour or all-purpose flour
  1. In the bowl of a stand mixer fitted with the paddle attachment, cream together butter, powdered sugar and vanilla extract until light and fluffy, 5-8 minutes.
  2. Scrape down sides of mixing bowl, add flour in 3 additions, 1/3 cup at a time, mixing after each addition until combined.
  3. Transfer for the dough to a sheet of plastic wrap and roll into a log. Cut a hole in one end of the plastic wrap and place into a piping bag fitted with a star tip (I used Wilton 1M).
  4. Pipe the dough onto baking sheets lined with parchment paper. Cover with plastic wrap and chill in the refrigerator for 30 minutes.
  5. Preheat oven to 300 degrees F. Sprinkle coarse sugar over chilled piped cookies before placing in oven. Bake for 15 minutes or until edges of cookies turn a light golden color. Remove from oven and let rest on baking sheets for 5 minutes before transferring to wire rack to cool completely.
dough after mixing original recipe ingredients

dough after several tablespoons of milk and a little extract vanilla added

I hate to end the year on a down note but let's just consider it an honest one. Every so often, I have a baking fail. I don't count the last few months when tried and true recipes made the way I've always made them, with fresh ingredients, baked from frozen dough, oven temp is verified, etc, have been coming out flat (butter, you're the problem). I'm talking epic fail. Okay, maybe not as epic as the time I tried to make fudge the old-fashioned way without the help of marshmallow fluff or sweetened condensed milk.

I'm not sure where I went wrong with this recipe. I followed the instructions exactly, even to the point where I left the butter out to soften longer than the recipe prescribed and it still wasn't that soft but it wasn't that hard either and was fairly easy to beat in my stand mixer. I beat the butter, powdered sugar and vanilla extract for 7 minutes but it was still stiff and not light and fluffy. Nevertheless I forged on and added the powdered sugar and cake flour (not all-purpose) as the original blogger said they always use cake flour.
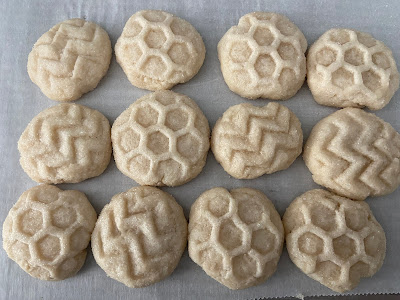
Result? A stiff dough I could've probably rolled out and cut out with cookie cutters or stamped. That wouldn't be so bad except this dough was supposed to be soft and malleable enough to pipe. Um, no. So I added several splashes of whole milk and mixed again. Added more vanilla extract and kept on mixing. Still no. I finally gave up since I didn't want to change the composition of how the cookie was supposed to bake or taste and decided I could live with stamped cookies instead of piped cookies. I rolled the dough into small balls and stamped them. Then I froze them before baking to make sure the impressions held.
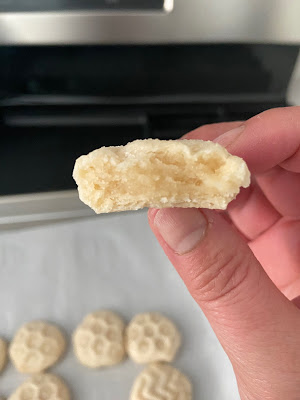
The baked result was disappointing. I think part of that was my fault in that I didn't bake the first batch long enough. The cookies were dense and powdery. Not even that butter flavored. I baked the second batch longer. Better but still blah. No crisp texture, very little butter flavor. It just tasted powdery. So, again, not sure where I went wrong but this cookie isn't for me.

Friday, December 30, 2022

Chocolate Nutella Fudge from Midget Momma

Chocolate Nutella Fudge - made December 15, 2022 from Midget Momma
1 14-ounce can sweetened condensed milk
1 teaspoon vanilla extract
8 ounces high quality bittersweet chocolate, 60% cacao
1 cup Nutella
3 tablespoons unsalted butter, cut into tablespoons
1 cup whole almonds, lightly toasted
  1. Line an 8 x 8-inch pan with foil and lightly butter.
  2. In the top half of a double boiler set over hot water, combine sweetened condensed milk, vanilla, chocolate chips, Nutella and butter.
  3. Stir until mixture is melted and combined. Stir in toasted almonds.
  4. Pour mixture into an even layer into prepared pan. Refrigerate until fudge is firm, at least 2 hours.
  5. Lift chilled fudge out of pan using foil overhang. Run a knife through hot water to make clean cuts and cut fudge into small squares.
 
Easy fudge recipe alert - melt the first 5 ingredients together, add the toasted almonds (optional), spread, chill, cut and eat.
This has a smooth texture and is easy to work with. I know true fudge aficionados might prefer the boiling sugar and chocolate together to get to soft boil stage and so on but I tried that once and was a complete failure at it so now I just do fudge the easy way. 
I like this version than the ones that use marshmallow fluff as I find it less cloyingly sweet. Plus sweetened condensed milk is easier to work with than marshmallow fluff so that was an added bonus. This is still plenty sweet though which is why I always add the toasted almonds to cut through some of that sweetness. You can use any nuts of your choice but I recommend toasting them lightly first before adding to the fudge to bring out their flavor.

Thursday, December 29, 2022

Soft and Chewy Oatmeal Raisin Cookies from Sally's Baking Addiction

1 cup unsalted butter, room temperature
1 cup (200 grams) brown sugar
1/4 cup granulated sugar
2 large eggs
1 tablespoon pure vanilla extract
1 tablespoon molasses
1 1/2 cups (188 grams) all-purpose flour
1 teaspoon baking soda
1 1/2 teaspoons ground cinnamon
1/2 teaspoon salt
3 cups old-fashioned whole rolled oats
1 cup raisins
  1. In the bowl of a stand mixer fitted with the paddle attachment, cream together butter, brown sugar and granulated sugar on medium speed until smooth and creamy, about 2 minutes.
  2. Add eggs and mix until combined, about 1 minute. Scrape down the bottom and sides of bowl to keep mixture even textured. Add vanilla and molasses; mix until combined.
  3. In a separate bowl, whisk together flour, baking soda, cinnamon and salt. Add to the butter mixture and mix on low speed until just combined. Beat in the oats and raisins. Dough will be thick yet sticky. Cover and chill dough in refrigerator for 30-60 minutes.
  4. Portion into golf-ball-sized dough balls, cover and chill or freeze for several hours or overnight.
  5. When ready to bake, preheat oven to 350 degrees F. Line baking sheets with parchment paper and evenly space dough balls, 2 inches apart.
  6. Bake for 12-14 minutes or until edges are lightly browned and middles no longer look raw. Remove from oven and let rest on baking sheets for 5 minutes before removing to wire rack to cool completely.
Anyone who knows me knows how I feel about raisins in oatmeal cookies. Or any other kind of cookies for that matter. The only time I ever put raisins in oatmeal cookies is when I make them for my nephew-in-law, Zack. In fact, I decided to try this recipe in case it was something I wanted to make for Zack next time I saw him and my niece.

Plus, to be honest, I still had a container of raisins from the last time I made oatmeal raisin cookies for Zack and I didn't want to waste them (I'm a first generation immigrant; we don't throw food away). So I put them in this recipe from Sally's Baking Addiction instead of doing my usual substitution of chocolate chips.
With the exception being the taste test cookie, of course. When I made the oatmeal cookie dough and before I added the raisins, I portioned off a cookie-size portion of dough and studded it with milk chocolate chunks instead. That was my taste test cookie. I used up the rest of the raisins with the remaining dough.
Let me tell you, the taste test cookie was fabulous. Crisp edges, chewy middle, delicious caramelized brown sugar flavor and great texture from the oats. In fact, I'm not exaggerating when I say this was so good that I don't think I'll be testing new oatmeal cookie recipes for awhile. This one is good enough to be my go-to recipe for oatmeal cookies, at least for the foreseeable future. 

And in case you wondered what I did with the rest of the batch with raisins in it, since Zack wasn't around, I shipped them off in military care packages for Soldiers Angels. Hopefully there are military service members who won't mind raisins in their oatmeal cookies when the packages arrive at their destinations.


Wednesday, December 28, 2022

Cinnamon Crinkle Cookies from Mama Needs Cake

Cinnamon Crinkle Cookies - made dough December 18, 2022 from Mama Needs Cake 
1/2 cup butter, softened
1/2 cup shortening
1 cup granulated sugar
1/2 cup brown sugar, packed
1 large egg
1 teaspoon vanilla extract
2 1/2 cups all-purpose flour
1 tablespoon ground cinnamon
2 teaspoons baking soda
2 teaspoons cream of tartar
2 teaspoons ground nutmeg
1/4 teaspoon ground cloves
1/2 teaspoon salt

For rolling
1/4 cup granulated sugar
1/2 teaspoon cinnamon
  1. Preheat oven to 350 degrees F. Line baking sheets with parchment paper.
  2. In the bowl of a stand mixer fitted with the paddle attachment, beat together butter and shortening until light and fluffy, 2-3 minutes.
  3. Beat in the granulated sugar and brown sugar until well combined, 1-2 minutes.
  4. Beat in egg and vanilla extract until just combined.
  5. In a separate bowl, whisk together flour, cinnamon, baking soda, cream of tartar, nutmeg, cloves and salt.
  6. Add dry ingredients to butter mixture in 3 additions, mixing on low speed until just combined after each addition.
  7. In a shallow bowl, mix together granulated sugar and cinnamon. Form dough into balls and roll in cinnamon sugar mixture. Evenly space on prepared baking sheets.
  8. Bake 12-14 minutes or until edges are set and middles no longer look raw. Remove from oven and let cookies rest on baking sheet for 5 minutes before removing to wire rack to cool completely.
This is not quite a snickerdoodle (despite the cream of tartar and cinnamon-sugar coating) and not quite a ginger molasses cookie (no ginger or molasses) but if both got together and had a cookie offspring, it seems like this would be it.
I think it's because of the spices, particularly the nutmeg and cloves. This has a crisp-chewy texture with an airy lightness that leans more towards the crisp without being hard or difficult to eat. If you're not one for spices in your cookies, this may not be for you. It's also not "just" a cinnamon cookie, despite the title, since the nutmeg and cloves do add to the flavor.

Surprisingly, I think I liked this cookie. I'm not one for nutmeg or cloves but the flavors worked well with the cinnamon and made for a good cookie. So if you want something a little different than the standard snickerdoodle and want a more crisp version of a soft ginger molasses cookie, this is a good one to try.


Tuesday, December 27, 2022

Caramel Crunch-Chocolate Chunklet Cookies by Dorie Greenspan

Caramel Crunch-Chocolate Chunklet Cookies - made December 20, 2022 from Baking with Dorie by Dorie Greenspan
2 sticks (8 ounces) unsalted butter, cut into chunks
1/2 cup (100 grams) granulated sugar
1/2 cup (60 grams) confectioners' sugar
1/2 teaspoon fine sea salt
1 teaspoon pure vanilla extract
2 cups (272 grams) all-purpose flour
3 ounces dark or milk chocolate, chopped into small chunks (I recommend mini chocolate chips)
1/2 cup (60 grams) walnuts, coarsely chopped, toasted, optional (substitute more chocolate chunks if not using)
  1. In the bowl of a stand mixer fitted with the paddle attachment, beat together butter, granulated sugar, confectioners' sugar and salt until light and creamy, 1-2 minutes. Beat in vanilla.
  2. On low speed, mix in flour, beating until just combined. Add in chocolate and nuts, if using.
  3. Turn dough onto clean workspace and knead to bring it together. Divide dough in half and roll into 6-inch logs, slightly less than 2 inches in diameter. Wrap both logs and refrigerate for at least two hours.
  4. When ready to bake, preheat oven to 350 degrees F and butter two 12-cavity muffin tins. Cut each log into 1/2-inch thick rounds and place each round in a muffin cavity. Bake 20-22 minutes or until tops are golden brown at the edges and tops are softly set. Let cool for 3 minutes then remove gently with small spatula.
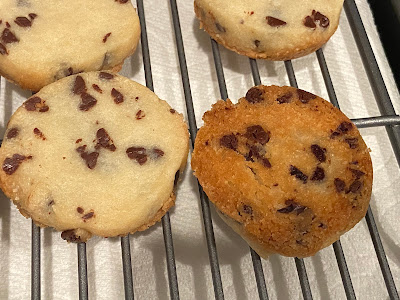
I thought these would be like caramelized brown-sugar chocolate chip cookies but they were more like chocolate chip shortbread. Really good chocolate chip shortbread. I advise doing as Dorie Greenspan suggests and baking these in muffin tins. That's what allows for the browning and caramelization of the cookies and gives them flavor and a little crunch.
For once, I don't advocate underbaking. The above shows what the bottom of the cookie should look like. It won't really spread in the muffin cavity but the darker muffin tin browned the bottoms of the cookies nicely. If you don't bake them long enough, you will only get a pale, anemic version of the cookie. It tastes better when it's baked to the golden brown color on the bottoms.
I omitted the nuts in this (of course) but increased the amount of mini chocolate chips. The dough was firm enough that I only chilled it in the refrigerator and didn't freeze it. That made slicing easier before baking. I really liked these and they look dainty and pretty. Cut them thickly as they're not meant to be thin snappy cookies but, when properly browned on the bottom, you'll still get a nice crunch but also some chewiness.