Sunday, November 4, 2012

Deep Dark Chocolate Cake

Deep Dark Chocolate Cake - made October 24, 2012 from Favorite Brand Name Best-Loved Chocolate Recipes


This is the third thing I made for my nephew's bake sale and the only one I had time to make the night before my cousin picked up the baked goods and previously blogged cookie doughs.  This is a perfect cake for a bake sale.  It's quick and easy to put together and because of how liquid the batter is, the baked cake is moist and stays moist for a few days.  I did make one mistake and took the cake out too soon.  You can tell it's underbaked by how dark the top half looks beneath the frosting.  I ended up slicing the edge pieces but held back the two middle pieces as being a little too underbaked to sell (darn, had to eat those myself).  To dress it up a little and make it more visually eye catching, I sprinkled toffee pieces on top of the frosted cake.  It added a bit of crunch and paired nicely with the dark chocolate of the cake and the sweetness of the frosting.

The only caveat is this cake has a pretty soft texture so you don't want to stack it on top of each other or place anything on top of the wrapped cake.  You'll crush the cakiness of the texture into something inadvertently more dense.  For people who like boxed cake mixes (shudder), this has the fluffy texture of a boxed cake mix but infinitely superior flavor.


2 cups sugar
1 ¾ cups all-purpose flour
¾ cup unsweetened cocoa powder
1 ½ teaspoons baking powder
1 ½ teaspoons baking soda
1 teaspoon salt
2 large eggs
1 cup milk
½ cup vegetable oil
2 teaspoons vanilla extract
1 cup boiling water

1.     Preheat the oven to 350˚F.  Line a 9 x 13 pan with aluminum foil and spray lightly with nonstick cooking spray.
2.     In a large mixer bowl, stir together sugar, flour, cocoa, baking powder, baking soda, and salt.  Add eggs, milk, oil and vanilla; beat on medium speed of electric mixer 2 minutes.  Stir in water.  Batter will be thin.
3.     Pour batter into prepared pan.  Bake 30 to 35 minutes or until wooden pick inserted in center comes out clean.  Cool completely.
4.     Frost with Chocolate Buttercream Frosting.  Sprinkle with toffee pieces if desired.

Chocolate Buttercream Frosting
6 tablespoons butter, softened
2 2/3 cups powdered sugar
½ cup cocoa powder
1/3 cup milk
1 teaspoon vanilla extract
1/2 cup - 1 cup toffee pieces, optional

1.     In a small mixer bowl, beat butter.  Blend in powdered sugar and cocoa alternately with milk, beating well after each addition until smooth and of spreading consistency.  Blend in vanilla.  Add additional milk, if needed.  Spread over cooled cake and sprinkle with toffee pieces if using.

  Inside BruCrew Life  Chef In Training

Saturday, November 3, 2012

Milk Chocolate Chip Nutella Swirl Cookies

Milk Chocolate Chip Nutella Swirl Cookies - made October 23, 2012, recipe adapted from The Good Cookie by Tish Boyle
This is the other cookie dough I made for my nephew's bake sale that my cousin Christine picked up to bake on her own.  The original recipe was essentially for a milk chocolate macadamia nut cookie but I modified it to leave off the macadamia nuts and instead I dolloped nutella in the dough as I scooped it out so I could have swirls running through the cookie, similar to the Almond Butter and Nutella Swirl cookies.  I was trying to make a chocolate chip cookie that had generous swirls of nutella running through it but I was only partially successful.  The cookies spread a bit more than I wanted and the nutella spread with it so instead of moist, melt-y dollops through the cookie, it was more like a marbling of nutella in it.  Still tasted good but I think it would work better with a cookie that didn't spread as much.


2 1/2 cups all-purpose flour
1 teaspoon baking soda
½ teaspoon salt
1 cup (2 sticks) unsalted butter
1 cup firmly packed dark brown sugar
½ cup granulated sugar
2 large eggs
1 tablespoon vanilla extract
6 ounces Swiss milk bar chocolate, cut into 1/3-inch chunks
6 ounces bittersweet chocolate, cut into 1/3-inch chunks
3/4 cup to 1 cup nutella

1.     Position a rack in the upper third of the oven and preheat the oven to 350˚F.  Spray two baking sheets with nonstick cooking spray.
2.     In a medium bowl, whisk together the flour, baking soda, and salt.  Set aside.
3.     In the bowl of an electric mixer, using the paddle attachment, beat the butter and brown and granulated sugars at medium speed until well blended.  Add the eggs one at a time, beating well after each addition.  Scrape down the sides of the bowl and beat in the vanilla extract.  At low speed, beat in the dry ingredients.  Using a wooden spoon, stir in the milk chocolate and bittersweet chocolate.  Cover the bowl and let the dough stand for 10 minutes.  (The dough can be wrapped in plastic and stored in an airtight container in the refrigerator for up to 3 days or frozen, well wrapped, for up to a month.)
4.     Drop dollops of nutella in teaspoonfuls over the top of the dough as you scoop it out, leaving the nutella dollops intact (don't marble into the dough).  Drop the dough by 2-tablespoon mounds onto the prepared baking sheets, spacing them at least 2 inches apart.  Bake the cookies, one sheet at a time, for 11 to 13 minutes, until golden around the edges.  Cool the cookies on the baking sheet for 5 minutes, then transfer them to a wire rack and cool completely.

Store in an airtight container at room temperature up to a week.  Makes about 40 cookies.

HungryLittleGirl

Friday, November 2, 2012

Peanut Butter Cup & Snickers Crunch Brownies

Peanut Butter Cup  & Snickers Crunch Brownies - made November 1, 2012, recipe adapted from Sally's Baking Addiction

I've got more than a week's worth of blog posts to put up but I'm going out of order to address the all-important issue of what to do with leftover Halloween candy.  Besides the obvious of sneaking in a piece here and there until suddenly it's December (or earlier) and you've consumed them all without any conscious memory of tearing open those wrappers and having "just one small piece".  Don't do it.  Instead, sift through those bags you optimistically bought but ended up with less trick or treaters this year than last year or else go through that hard-earned pile your kids gathered traipsing through the neighborhood.  Pull out the Snickers and the Reese's peanut butter cups and use them for this recipe.

You make the brownie layer and right before it's done, you sprinkle it with chopped toasted peanuts and chopped peanut butter cups and Snickers, return it to the oven for a few minutes, just long enough for the candy to begin to melt, then you take it out and top it with a rice krispie peanut butter chocolate mixture that will make you salivate.  It's similar in concept to my nutella crunch topping but uses peanut butter instead of nutella.  You can't see the middle layer very well in the picture since it's smothered by the rice krispie peanut butter chocolate topping but rest assured, every bite of this brownie will give you the full impact of how much goodness you can turn that candy into.  If you're a peanut butter and chocolate lover, this is a brownie must-make and have-to-consume.  After it cools completely, it's easy to cut and share with others so not only are you not the only one eating all that leftover Halloween candy but you (and your friends and family) are also consuming it in a much loftier fashion.  These also freeze well for future consumption.

Brownie Layer
1/2 cup butter
8 ounces coarsely chopped bittersweet chocolate
1 1/4 cups sugar
3 large eggs
1 tsp vanilla extract
3/4 cup all-purpose flour
1/2 teaspoon salt
Middle Layer
1/2 cup peanuts, toasted
1/2 cup peanut butter cups, chopped
1/2 cup Snickers, chopped
Top Layer
1 1/2 cups semi-sweet chocolate chips
1 1/2 cups creamy peanut butter
1 tablespoon unsalted butter
1 1/2 cups Rice Krispies cereal
  1. Preheat oven to 350 degrees. Line a 9 x 9 inch baking pan with foil and lightly spray with nonstick cooking spray. Set aside. 
  2. Melt butter and chocolate in the top half of a double boiler set over hot water on medium heat, stirring constantly until melted and smooth. Remove from heat and stir in sugar. 
  3. Add in the eggs one at a time, whisking until smooth after each addition. Whisk in the vanilla. Gently fold in the flour and salt.  By hand, stir enough to emulsify the batter and bring it together but do not overbeat or your brownies will be cakey rather than fudgy if too much air is whipped into them.
  4. Pour batter into prepared pan, smoothing the top with a knife. Bake for 25-30 minutes or until a toothpick inserted in the center comes out with moist crumbs.
  5. Remove brownies from the oven and sprinkle the top with the peanuts, chopped peanut butter cups and chopped Snickers. Return to the oven and bake for 3-5 additional minutes.
  6. While the brownies are finishing up in the oven, melt the chocolate chips, peanut butter and butter in a medium saucepan over medium-low heat. Stir in the Rice Krispies until evenly coated. Remove the brownies from the oven and pour the chocolate and peanut butter mixture over top.  Spread to cover evenly. Refrigerate for 2 hours before cutting into 24 squares. Share.
Linked to Something Swanky's Sweet Treats Saturday


Thursday, November 1, 2012

Jumbo Candy & Nut Cookies

Jumbo Candy & Nut Cookies - made October 21, 2012 from Land O Lakes Cookies

Here's a recipe to use up any leftover M&Ms from Halloween.  My cousin Christine asked if I wanted to bake something for her son's school bake sale and of course, I'm always happy to test out new recipes support school fundraisers.  Unfortunately the bake sale was on a Friday and I didn't find out about it until Sunday so I wasn't able to stock up on baked goods to freeze until then while I had weekend time to bake. And she would have to pick up the baked goods from me on Thursday night.  Which meant I couldn't really bake much ahead of time during the week since they wouldn't be fresh by Friday and I work all day during the week so my only real baking night would be Wednesday night.  Past experience tells me I am likely to only have enough time to bake 1 thing on Wednesday.  I solved the issue by making cookie dough ahead of time and gave Christine the option that she could either come by late on Thursday night to give me time to bake off all the cookies or she could come by right when I got home from work and pick up the cookie dough from me but she would have to be the one doing the baking.  She opted for the earlier pickup time and baking the cookies herself.

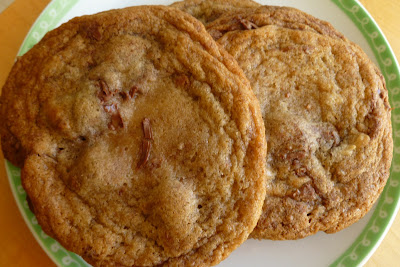
I did manage to get home early enough to bake off 1 batch of these cookies while I waited for Christine to come by (bad traffic on her way home also helped buy me enough time to get these baked).  I had never made these cookies before but had the recipe in my "still need to make" file on my computer.  I did want to bake off a test batch though so I could see and taste how they turned out and be able to show Christine "here's what they're supposed to look like".  Unfortunately these spread more than I expected and they didn't really look like the picture in the Land O Lakes cookie book where I got the recipe from.  They were supposed to be monster-sized cookies with uniform thickness throughout.  Instead, because of the spread, the edges were thinner and baked more quickly while the middles took awhile.  I baked the test batch from frozen dough on my oven's convection setting and I know my butter wasn't even at room temp or warm when I mixed the dough so that wasn't the problem.  They just spread.

Watch the baking time on these.  If you do make them monster-sized, the challenge is the edges will get brown before the middles are done so you risk the outer edges burning while the center may still look raw.  I don't like burnt cookies so I took them out at almost 20 minutes and even then the middles were still a bit underbaked.  But I didn't want the edges to get further brown and burn.  The good news is the cookies were pretty tasty.  The brown sugar caramelized nicely in the dough and the oatmeal gives it a good crunchy and chewy texture.  I would probably either add a bit more flour or else grind up a little oatmeal to thicken the dough and hopefully minimize the spread.  Alternatively, you can do a combination of shortening and butter to make the original 1 cup butter called for in the dough if you want less spread but beware you sacrifice some of the yummy buttery flavor.


1 cup sugar
1 cup firmly packed brown sugar
1 cup butter, softened
2 eggs
1 tablespoon vanilla
2 cups all-purpose flour
1 ½ cups quick-cooking oats
1 teaspoon baking soda
½ teaspoon salt
1 (16-ounce) bag (2 cups) candy coated milk chocolate pieces (I used chocolate chips)
1 cup coarsely chopped peanuts (I substituted Candy Corn M&Ms)

1.     Heat oven to 350˚F.  In large mixer bowl combine sugar, brown sugar, butter, eggs and vanilla.  Beat at medium speed, scraping bowl often until creamy (2 to 3 minutes).  Reduce speed to low.  Add all remaining ingredients except candy and peanuts (or chocolate chips).
2.     Continue beating, scraping bowl often, until well mixed (2 to 3 minutes).  By hand, stir in candy and peanuts.  Drop dough by scant ¼ cupfuls 2 inches apart onto greased cookie sheets.  Bake for 13 to 16 minutes or until light golden brown.

Yield: 2 dozen cookies