Monday, October 16, 2023

Loaded Butterscotch Toffee Pecan Cookies from Melissa's Southern Style Kitchen

2 1/2 cups all-purpose flour
1 teaspoon baking powder
1/2 teaspoon baking soda
1/2 teaspoon salt
1 cup butter, softened
1 cup light brown sugar, packed
1/2 cup granulated sugar
2 teaspoons pure vanilla extract
2 large eggs
1 10-ounce package butterscotch chips
2 cups pecans, lightly toasted, roughly chopped
2/3 cup English toffee bits
  1. In a medium bowl, whisk together the flour, baking powder, baking soda and salt; set aside.
  2. In the bowl of a stand mixer fitted with the paddle attachment, cream together the butter, brown sugar, granulated sugar and vanilla extract until light and fluffy, 2-3 minutes.
  3. Add eggs, one at a time, beating after each addition until just combined.
  4. Add the flour mixture in 2 additions, mixing on low speed after each addition until just combined.
  5. Add the butterscotch chips, pecans and toffee bits, mixing on low speed until disbursed.
  6. Portion into golf-ball size dough balls, cover and chill for at least 1 hour or overnight.
  7. When ready to bake, preheat oven to 350 degrees F. Line baking sheets with parchment paper and evenly space chilled dough balls. 
  8. Bake 12-15 minutes or until edges are set and middles no longer look raw. Do not overbake. Remove from oven and let rest on baking sheet for 5 minutes then transfer to wire rack to cool completely.
I'm trying to be more open-minded about putting nuts in cookies. Of course, that open-mindedness is immeasurably helped by the fact that I only have to eat 1 taste test cookie and I give the rest away in care packages for deployed military service members for Soldiers Angels.

I've also discovered I'm okay with nuts in cookies as long as it has other add-ins. In this case, those were butterscotch chips and toffee bits. Plus the cookies baked to a reasonable thickness so I liked the texture with all three add-ins.

Butterscotch chips, when baked, smell amazing. Almost nothing beats that smell. I just wish I didn't find butterscotch so sweet to eat. Probably the only thing I would change in this recipe is to cut back on the butterscotch chips and increase the amount of toffee bits. Otherwise, this is a nice solid cookie, especially for mailing.


Saturday, October 14, 2023

White Chocolate Macadamia Nut Bars from Lovely Little Kitchen

1/2 cup (1 stick) butter, softened
3/4 cup granulated sugar
2 large eggs
1/4 teaspoon almond extract
1 cup all-purpose flour 
1/4 teaspoon salt
3/4 cup chopped macadamia nuts, divided
3/4 cup white chocolate chips, divided
  1. Preheat oven to 350 degrees F. Line an 8 x 8" pan with foil and lightly spray with nonstick cooking spray.
  2. In the bowl of a stand mixer fitted with the paddle attachment, cream together butter and sugar until light and fluffy, 1-2 minutes. Add eggs, one at a time, and almond extract, mixing to combine.
  3. Add flour and salt and beat on low speed until just combined. Do not overmix.
  4. Fold in 1/2 cup of the macadamia nuts and 1/2 cup of the white chocolate chips to incorporate. Spread batter evenly in pan. Sprinkle remaining macadamia nuts on top.
  5. Bake for 20-25 minutes or until toothpick inserted near the center comes out with a few moist crumbs. Remove from oven and gently press remaining white chocolate chips over top. Let cool completely before cutting and serving.
The tl:dr on this one? Freaking delicious. I typically like a white chocolate and macadamia combination anyway but for this blondie, it was the blondie itself I enjoyed the most. Chewy texture and the perfect sweetness complemented by the white chocolate and flanked by the macadamia nuts.

Pro tip if you want your white chocolate chips to remain white: reserve a handful of the chips and as soon as you take the blondie out of the oven, press the chips gently on top. Otherwise if you have them on top of the blondie before baking, the white chocolate will turn brown before the blondie is done.

I liked this blondie and how easy it was to make. It's not too early for it to go on my Christmas baking list and will provide a nice change from white chocolate macadamia cookies. Plus it's faster to make since they're bar cookies.


Thursday, October 12, 2023

1920 Famous Ritz Carlton Lemon Pound Cake from Kelsey's Food Reviews

3 cups all-purpose flour
1 tablespoon baking powder
1/4 teaspoon salt
3 cups granulated sugar
1 cup salted butter, room temperature
1/2 cup shortening
5 eggs, room temperature
1 cup whole milk
6 tablespoons fresh lemon juice
zest of 1 lemon
  1. Preheat oven to 350 degrees F. Spray and flour a Bundt pan,
  2. In a medium bowl, whisk together flour, baking powder and salt.
  3. In the bowl of a stand mixer fitted with the paddle attachment, cream together granulated sugar, butter and shortening until well combined, 5 minutes.
  4. Add eggs, one at a time, beating after each addition until just combined. Scrape down the sides and bottom of bowl to keep mixture even textured.
  5. Add dry ingredients in three additions, alternating with the milk in two additions, beating on low speed until just combined.
  6. Beat in lemon juice and zest, keeping batter even textured. Pour into prepared pan.
  7. Bake cake 55-70 minutes or until a toothpick inserted in the thickest part of the cake comes out clean. Avoid opening the oven door for the first 45 minutes to prevent cake from falling. Remove from oven and let cool for 5 minutes. Run a thin spatula along sides of cake and middle of tube to loosen. Invert onto cake plate and let cool completely.
If your first instinct is to laugh or cringe when you look at these pictures, I don't blame you. I'm in the cringe camp. As you can clearly see, this cake did not come out of the Bundt pan cleanly. And this is the good looking one. The recipe made so much batter that I split it into 2 bundt pans or it would've overflowed if I'd baked it in just one. I won't even show you the disaster of the second one that only half came out of the pan. The other half decided to part ways with the rest of the cake and cling to the pan when I turned it over. Yeah, super fail. And yes, I did spray and coat the pans well. It just didn't matter.
Which is a shame as this cake tasted great and had the perfect pound cake texture. I enjoyed it so much I need to try it again and (hopefully) do a better job with the greasing and flouring of the bundt pan. I also want to amp up the lemon flavor and add more zest next time. Normally I wouldn't serve something that looked so lame but since it tasted good, I included it in my baking meetup and to donate to Reno Initiative. Hopefully no one will care what it looks like as long as it tastes good.

Tuesday, October 10, 2023

Sour Cream Coffee Cake from Perfect Cakes by Nick Malgieri

Sour Cream Coffee Cake - made September 28, 2023 from Perfect Cakes by Nick Malgieri
Cake
2 cups all-purpose flour
1 teaspoon baking powder
1/2 teaspoon baking soda
1/2 pound (2 sticks or 16 tablespoons) unsalted butter, softened
1 1/2 cups granulated sugar
2 large eggs
One 8-ounce container sour cream

Topping
1 cup (about 4 ounces) walnuts or pecans, lightly toasted, coarsely chopped
1/4 cup granulated sugar
2 teaspoons ground cinnamon

Glaze (optional)
1 cup powdered sugar
2-3 tablespoons milk or enough to desired consistency
  1. Preheat oven to 350 degrees. Line a 9 x 9-inch baking pan with foil and lightly spray with nonstick cooking spray.
  2. Stir together the flour, baking powder and baking soda in a bowl; set aside.
  3. In the bowl of a stand mixer fitted with the paddle attachment, beat the butter and sugar on medium speed until soft and light, about 5 minutes. Beat in the eggs, one at a time, beating until smooth after each addition.
  4. On low speed, beat in one-third of the flour mixture, followed by half the sour cream. Stop the mixer and scrape down the sides of the bowl. Beat in another third of the flour mixture then the remaining sour cream. Stop and scrape down the sides of the bowl again. Beat in the remaining flour mixture until just combined. Do not overmix.
  5. Make the topping: in a separate bowl, stir together the ingredients until evenly mixed.
  6. Scrape half the batter into the prepared pan and sprinkle with half the topping. Cover with the remaining batter and smooth the top. Sprinkle with the remaining topping.
  7. Bake for 50-55 minutes or until the cake is risen and deep gold and a toothpick inserted near the center comes out clean or a few moist crumbs.
  8. Cool in the pan on a rack for 30 minutes then invert onto a plate and lift off the pan. Invert the cake onto a rack to cool completely.
  9. Optional glaze: in a small bowl, whisk together powdered sugar and enough milk to achieve desired consistency (add 1 tablespoon at a time). Drizzle over cooled cake.
I have been meaning to try this recipe forever. And by forever I mean, back in my 20s when I worked for a public utility company, the only perk I clearly remember is when we had staff meetings, we'd get this coffee cake ordered in. It was amazing. I always wanted to find a copycat recipe for it so off and on (mostly off) through the years, I'd try out various coffee cake recipes in the hopes of trying to replicate it. 
I don't particularly love nuts in my baked goods but on top as part of the topping is okay. This one incorporated half the topping into the cake itself so that may be why I didn't prioritize trying it sooner until I had the baking meetup at my house last month and could share it with the others plus donate it to Reno Initiative.
The original recipe didn't call for glaze but I glazed it anyway just for a nicer look. During the meetup itself, I was trying out other desserts so I didn't get to this one. Instead, I reserved a piece for me to try the next day and gave the rest away.
After trying the taste test piece the next morning, I'm only sorry I hadn't tried this recipe sooner. It was excellent, both in flavor and texture. It actually does come close to the coffee cake of days gone by from my first job out of college. I didn't even mind the nut filling in the middle. Although I will probably skip that next time, make half the topping mixture and only use it for the topping.
Still, this was pretty good, especially the cake part. This is perfect to serve at a brunch or afternoon tea party. It may look a little humble but don't let that fool you; this is a great cake.

Sunday, October 8, 2023

Soft-Glazed Gingerbread Cookies from The View from Great Island

Soft-Glazed Gingerbread Cookies - made dough September 26, 2023 from The View from Great Island 
6 tablespoons unsalted butter, room temperature
1/3 cup plus 2 tablespoons dark brown sugar, packed
1/3 cup molasses (not blackstrap)
1 large egg yolk
1 3/4 cups plus 2 tablespoons all-purpose flour
1 tablespoon Dutch process cocoa powder
1/2 teaspoon baking soda
1 teaspoon ground ginger
1/2 teaspoon ground cinnamon
1/8 teaspoon ground cloves
1/4 teaspoon salt
1/4 teaspoon freshly ground black pepper

Glaze
1 cup sifted confectioners' sugar
1 tablespoon unsalted butter, meted
1/2 teaspoon vanilla extract
1 tablespoon plus 1 teaspoon warm water
  1. Place your cookie stamps in the freezer to chill while you mix the dough.
  2. In the bowl of a stand mixer fitted with the paddle attachment, cream together the butter, brown sugar and molasses until combined. Beat in egg yolk until just combined.
  3. In a separate bowl, sift together the flour, cocoa powder, baking soda, ground ginger, ground cinnamon, ground cloves, salt and pepper. Add to the butter mixture in two additions, mixing on low speed after each addition just until dough comes together. 
  4. Scrape onto a large piece of parchment paper and squeeze together if necessary. IF dough is too warm or soft, briefly place in the refrigerator to chill until easier to handle.
  5. Portion dough into balls and roll each ball in granulated sugar before pressing with cookie stamp. Cut out stamped cookies with a round cookie cutter to trim the edges. Cover and chill or freeze for 20 minutes or several hours. 
  6. When ready to bake, preheat oven to 375 degrees F and line baking sheets with parchment paper. Evenly space stamped cookies and bake for 8-10 minutes. Do not overbake. Let cookies rest on pan for 5 minutes then transfer to wire rack to cool completely.
  7. In a small mixing bowl, whisk together the glaze ingredients until smooth and thin. Add more water if glaze is too thick. Brush the cooled cookies with the glaze. Let set before serving.
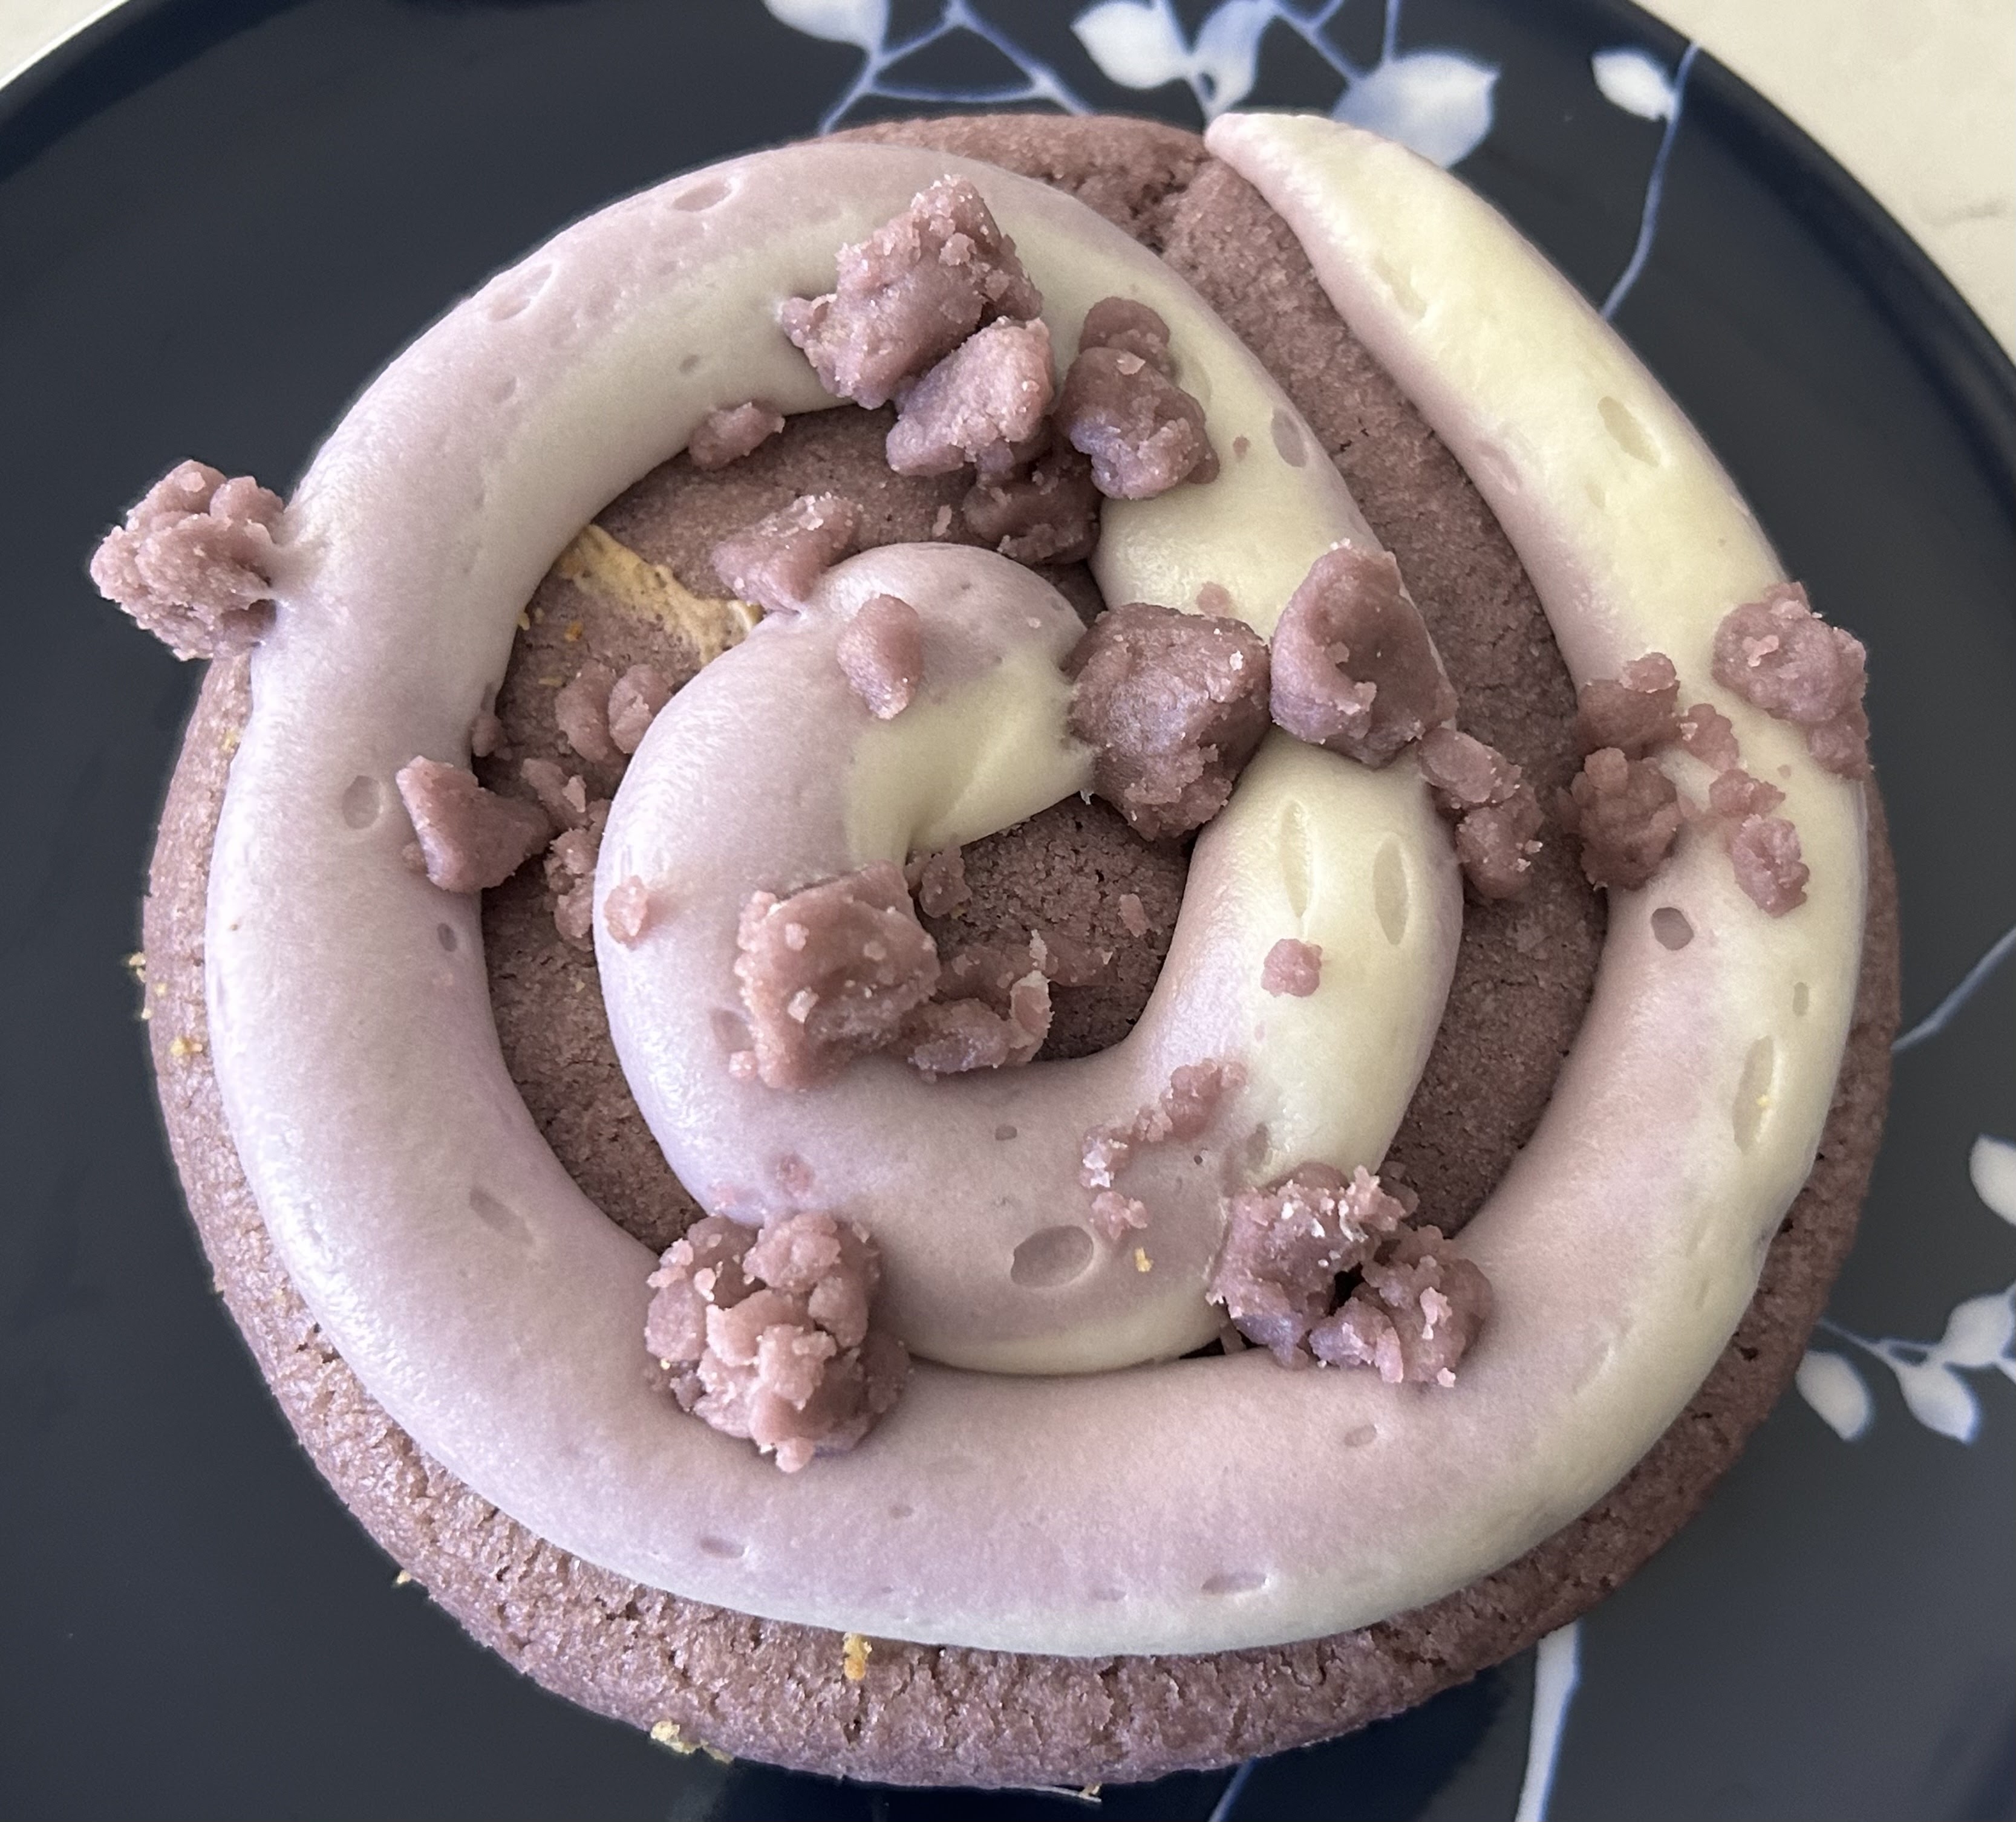
I'm back to my cookie stamping craze and trying out new recipes that can hold the impressions well. And given the Christmas baking season is coming up, I'm trying out some seasonal flavors now rather than later.
I'm not the world's biggest gingerbread fan. Nothing wrong with gingerbread; it just isn't my thing. Often I find it overly spiced or too hard/crisp to eat or both. 
But 'tis the season and all so I tried this recipe. As you can see from the ingredient list, yes, it has a bunch of spices. I'm used to baking with cinnamon and ginger, even nutmeg and ground cloves. Pepper is not something I typically put in my baked goods but that's what the recipe called for so I did it.

Ultimately I'm glad I did. I actually liked these cookies. They weren't too hard (don't overbake) and they tasted like how gingerbread is supposed to taste, with an added bite, presumably from the pepper. Plus, they held the impressions quite nicely. 

I ended up only glazing one cookie for the taste test and shipped off the rest. The glaze worked well with this cookie, adding a light sweetness to the cookie to cut some of the spice. I think I've found a good recipe for this season's Christmas baking.


Friday, October 6, 2023

Crumbl Cookies review #55 - Pumpkin Cheesecake and Purple Velvet (test cookie)

Crumbl Cookies review #55 - Pumpkin Cheesecake and Purple Velvet (test cookie), visited September 27, 2023
Yes, it was a 6-pack week when these came out. But only because Crumbl ran a promotion for their 6th birthday and you could get a 6-pack for the price of a 4-pack. You think I'm passing that up? Nope.
Okay, it also helped that this particular week, two of my favorite flavors were on the menu: banana cream pie and pink velvet. Yum. I had to get two each of those to fill out my 6-pack (the box, definitely not my abs).

Banana Cream Pie

Pink Velvet

Pumpkin Cheesecake
The new flavor for the week was Pumpkin Cheesecake so I got one to try. I don't mind pumpkin in most things (don't like pumpkin pie though) since it's a mild flavor. I'm not big on cheesecakes but Crumbl usually sugars their "cheesecake" cookies enough to take the tang out so I normally don't mind it in their cookies.

This one was okay. I think if you're a pumpkin or a cheesecake lover, you'd like this cookie. I liked the base cookie well enough as I generally do but if I had to have a cheesecake cookie, I prefer the salted caramel cheesecake one.
This goes into the category of "it was good, glad I tried it, don't need to get again".

The test cookie for this particular week was purple velvet. It got a lot of negative reactions online, seemingly mostly from people who reacted to the appearance rather than the taste as many hadn't tried it but saw pictures online or in the Crumbl app.

I absolutely get the reaction to the appearance. Usually when I see something edible that's purple, I think of ube. This is not ube flavored. To be honest, this is like the pink velvet cookie but dyed purple. I actually liked it because I like the pink velvet but I wasn't crazy about the purple color.

But the texture was good - I'm a big fan of the texture on most Crumbl cookies. Not a fan of the fat swirl of frosting but I expected not to be. Ultimately though, in a blind taste test, I'm not sure I could tell the difference between the pink velvet and the purple velvet. If I were Crumbl, I wouldn't make this a regular cookie. There's no need to; it isn't different enough from their pink velvet cookie other than the dyed color.