Saturday, July 30, 2016

Boston Bakery Crawl - Flour

Boston: Flour Bakery - visited July 9, 2016
Earlier this month, I flew to Boston to attend a good friend’s wedding. It had to be a quick trip as it was a busy time at work but I wouldn’t have missed seeing my friend Kendra get married. I took the redeye on Thursday night (note to self, “first class” on United does not mean the seats recline flat nor does it even provide access to the airport lounge so it was a total ripoff; #neveragain), arrived in Boston Friday morning, the wedding was on Friday night, there was a post-wedding brunch on Saturday morning, I hung out with my friend Rebecca afterwards then I took the “T” (Boston’s subway) to my hotel in Back Bay to spend Saturday afternoon through Sunday afternoon in Boston.
I love Boston. I haven’t been back in almost 7 years but I love Boston. As a tourist, I love the ease of getting around the city, I love the history and, being me, I love exploring the places to eat, namely the new-to-me bakeries.
Like any good foodie, I did my homework ahead of time to see which places I wanted to visit that were in walking distance of my hotel. From mid-afternoon Saturday to early afternoon Sunday, I had time to hit 4 bakeries and the Shake Shack, all fortunately within a few miles each way or less from my hotel. 
First stop was Flour. It was listed as one of the Top 10 Bakeries in Boston on the lists I’d checked. Thanks to comfy sandals and GPS on my phone, I reached Flour without incident and found it pretty bustling for a Saturday afternoon. I’m used to most bakeries doing the height of their business in the mornings (for the fresh baked bread) and running out of baked goods in the late afternoon.
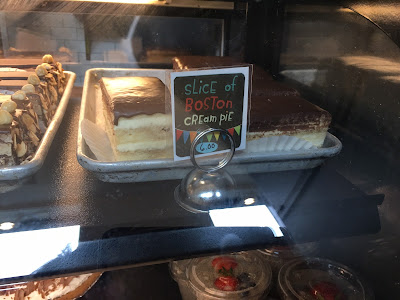
Flour was still pretty well stocked and doing brisk business. It had the added advantage of offering sandwiches, salads and soups and a large enough area to accommodate tables and counter height seating so it was more like a café than a bakery. As clichéd as it was, I couldn’t resist buying a slice of Boston cream pie (when in Boston….) as well as a milk chocolate hazelnut cookie. As a rule, I don’t buy cookies at bakeries unless they look really compelling. This cookie ($2 price tag) was more modest but I’d tried Flour’s chocolate chip cookie recipe from their baking book and wanted a taste of it from their bakery.

It was okay. See, this is why I rarely buy bakery cookies because I’m such an awful cookie snob. There was nothing wrong with the cookie but it was also something I could easily make and I would probably have enjoyed it better if I had eaten it within 10 minutes of it coming out of my oven when it was still warm.


The Boston Cream Pie was more promising. Y’all know a Boston cream pie isn’t actually a pie but a cake, right? I know, it’s confusing. But true. Boston cream pie is layers of yellow cake filled with vanilla custard and topped with chocolate icing. Not a thin glaze, not a thick frosting but an icing that covers the top completely but only dribbles down the sides. I am not fond of custard-y filling unless it’s the pastry cream I make so Boston cream pie isn’t one of my favorite desserts. This one was pretty good though. I couldn’t eat very much of it because I’d already had (more than) my share of desserts by the time I tried it but for $6, they gave me a fairly good-sized piece and the cake was done well. The custard filling kept the cake moist and the fudge icing nicely complemented the yellow cake.
Stay tuned for the rest of my bakery crawl/visit.

Thursday, July 28, 2016

Nutella No-Bake Cookies

Nutella No-Bake Cookies - made June 24, 2016 from Inside Bru Crew Life
I’ve mentioned often enough that I don’t do well in heat. So it’s a good thing I live in a moderate climate. But we do get our heat waves and when that happens, the last thing I want to do is turn on my oven. Yet oddly enough, I don’t really do a lot of no-bake cookies or desserts. I’m a baker, I like to bake. That means putting stuff in the oven and having them come out better than when they went in. “No bake” defies all that and I had a certain amount of prejudice against it.

I say “had” because, as mentioned in an earlier post, I am teachable and willing to change my mind with the right recipe. Which this proved to be. This cookie couldn’t have been easier to put together – you boil some ingredients, stir until smooth, add oats and coconut then shape into cookies. Let set and there you go. But it wasn’t just the ease of making it over my stovetop and not having to turn on the oven. It was that these had the consistency of fudge. Yes, fudge, the bane of my dessert-making existence because I can never get it to come out right.

Turns out I should’ve just been making no-bake cookies and substituting them for fudge. Who knew? And why didn’t they tell me? Okay, these aren’t exactly like fudge, unless you make your fudge with oats. But still, they’ll do in a pinch if you want something rich, chocolaty and super easy to make. Even if you’re not a coconut lover, you actually can’t taste the coconut in this cookie; the flavor gets drowned out by the chocolate and Nutella. I suspect the coconut is just there for filling and to give the cookie some structure and texture.

The only issue I had is I used whole oats and they were a tougher, chewier texture than creamy, dreamy fudge would allow. It wasn’t too bad but next time I would probably add the oats while the mixture was in its final boil and give it a chance to soften up a tad. Otherwise, this is a good cookie in the no-bake category. A category that before this only held Rice Krispie Treats in my dessert repertoire. I just doubled my no-bake assets, ha.

8 tablespoons butter
2 cups sugar
1/4 cup cocoa powder
1/2 cup milk
1/2 teaspoon salt
1 tablespoon vanilla
1 cup nutella
2 cups quick oats
3 cups sweetened shredded coconut
  1. Place the butter, sugar, cocoa, milk, salt and vanilla in a saucepan over medium heat and stir until melted and smooth. Bring to a boil; boil 1 minute while stirring constantly.
  2. Remove pan from heat and stir in nutella until smooth and creamy. Add the oats and coconut and stir until combined and coated.
  3. Drop by large spoonfuls onto parchment paper. Flatten and shape, if desired. Let set until completely cooled. Store in a sealed container.

Sunday, July 24, 2016

Cookie Butter Not-Quite-So-Lava Cake

Cookie Butter Not-Quite-So-Lava Cake - made June 18, 2016, adapted from Chocolate & Vanilla by Gale Gand
After making the Nutella Molten Lava Cakes and still on an obsessive kick to use my new 4th of July ramekins (hang in there, it usually takes me at least a month (or more) to work through obsessive use of my new toys), I was struck with the brilliant idea of doing a cookie butter version of lava cake. It seemed like such an amazing idea, I don’t know why other people hadn’t thought of it before. I combed through pinterest, figuring someone must’ve stumbled onto this piece of sheer baking brilliance and would have a recipe I could try.
Alas, no. I seemed to be alone in my mind on this one. There were lava cakes for chocolate, peanut butter, even lemon. But not cookie butter. I didn’t want to make a chocolate lava cake and just drop cookie butter in the middle because I don’t like chocolate with cookie butter. But I do like it with vanilla so I thought I could make a vanilla cake with cookie butter “lava” flowing out of it. Come on, how hard could it be? Take a light vanilla cake recipe, bake in ramekins at a high temp to set the sides with a center of cookie butter. The concept was supposed to be the same so that when you upended the vanilla cake onto a plate, forked into it while it was still warm, all this wonderful cookie butter deliciousness would come flowing out.
Welp. Once again, it was a brilliant idea in my mind but when it came to actual execution, it fell a bit flat. I found this recipe for a lemon-vanilla cake in one of my baking books and I modified it to omit the lemon and just be a plain vanilla cake. But then I ended up not baking at such a high temp because I was afraid of burning the top while the middle stayed raw. While “raw” oozing chocolate batter is equated with decadent goodness, I’m afraid raw vanilla cake batter is just….raw vanilla cake batter. So I ended up fully baking the vanilla cake.
My “lava” cookie butter filling? It decided to spread out, sink to the bottom because it was heavier than the cake batter and bake itself as a thin bottom layer of the cake. Yep, you guessed it. Fail. Not only was it not lava-like at all but it was more like a bottom-turned-over-top “crust” on top of the cake. It wasn’t hard or crusty but it wasn’t molten either. Okay, lesson from this failure is pure cookie butter doesn’t stay put, doesn’t stay molten and has a mind of its own to bake itself along with the cake. If I want it to stay molten, I will have to find something else to add to it to keep the cookie butter flavor intact but also to keep it liquid and prevent it from baking. Or freeze scoops of it and push it in the center halfway through baking. Back to the drawing board.
Fortunately, the experiment wasn’t entirely a failure as the cake itself turned out to be pretty delicious.
8 tablespoons (1 stick) unsalted butter
1 cup whole milk
4 large eggs
2 cups sugar
1 tablespoon vanilla extract
2 teaspoons vanilla bean paste (optional)
2 cups all-purpose flour
2 teaspoons baking powder
  1. Preheat oven to 350 degrees F. Generously butter and flour at least twelve 4 ounce-6 ounce ramekins.
  2. Combine butter and milk in medium saucepan over medium heat. Bring to a boil; set aside.
  3. In an electric mixer fitted with the whisk attachment, whip the eggs on medium-high speed until light and fluffy, 5 to 7 minutes. Reduce the speed to medium and stir in the sugar, vanilla and vanilla bean paste, if using.
  4. On low speed, gradually add the flour. Pour in the hot milk mixture then add the baking powder and stir until batter is thoroughly combined.
  5. Divide batter evenly amongst prepared ramekins. Drop a generous tablespoon of cookie butter in the center of each ramekin and cover completely with batter.
  6. Bake 20-25 minutes, depending on size of ramekins or until golden and toothpick inserted near the sides (avoid cookie butter filling) comes out with a few moist crumbs.
  7. Loosen sides with small spatula. After a few minutes, overturn ramekin onto plate. Leave overturned for 10 minutes before removing. Serve warm with vanilla ice cream.

Saturday, July 23, 2016

Maple Biscuits

Maple Biscuits - made June 25, 2016 from Just Add Salt

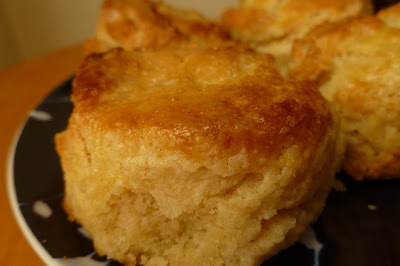
One of my favorite takeaways from our Just Add Salt event was their maple biscuits. Linda, the owner, made these for us to have with the dishes we had cooked for dinner and at the end of the event, she gave each of us a packet of recipes which included said biscuits. You can’t imagine how psyched I was because these biscuits were amazing. I have a weakness for good biscuits, in case you can’t tell.
I had to make these twice though as the first time, I followed the recipe instructions but there was a typo in them and I ended up not adding the right amount of maple syrup to the dough. A clarifying question posted to Just Add Salt’s Facebook page gave me the correct instructions so I made a second attempt. Although I have to say even the first attempt with only half of the maple syrup was pretty delicious too, especially warm and slathered with melting butter.

The texture of these is somewhere between a flaky biscuit and a good, moist cornbread without the grittiness of the corn. Try it and see what I mean. You won’t be sorry.
3 cups flour
2 tablespoons sugar
1 tablespoon baking powder
3/4 teaspoon baking soda
1 teaspoon salt
1/2 pound (2 sticks) butter, cut into cubes
1/2 cup plus 4 tablespoons maple syrup, divided
1/2 cup buttermilk
1 egg
Fleur de sel
  1. Up to 2 days ahead: in a large bowl, whisk together the flour, sugar, baking powder, baking soda and salt.
  2. Using a pastry cutter or stand mixer with paddle attachment, cut in the cubed butter until it resembles small peas. Stir in 1/2 cup of maple syrup and buttermilk until the dough just comes together (it will still be clumpy). Do not overwork the dough.
  3. On a lightly floured surface, gently press or roll the dough into 1 1/2-inch thickness. Cut the biscuits using a 2-inch round cutter; you should have 16 biscuits. Refrigerate biscuits for at least 2 hours or up to 2 days. You can also freeze the biscuits until ready to bake.
  4. When ready to bake: preheat oven to 425 degrees F. In a small bowl, whisk the egg and 1 tablespoon hot water. Brush the chilled biscuits with the egg wash and top each piece with a pinch of fleur de sel.
  5. Bake the biscuits until they just begin to brown, about 18-22 minutes. Remove from oven. Quickly drizzle 1 teaspoon of the remaining maple syrup over each biscuit, then place the biscuits back in the oven for 2 minutes more. Serve while still warm.


Wednesday, July 20, 2016

Molten Chocolate Nutella Lava Cakes

Molten Chocolate Nutella Lava Cakes - made June 16, 2016, adapted from Veggie and the Beast Feast
I rarely have true cravings. Sure, I’ll feel like having a particular food once in awhile (typically dessert) but not with that “I must have this and only this RIGHT now” feeling. I didn’t with this one either but every once in awhile, I’ll be surfing pictures and recipes on pinterest, something will catch my eye, I’ll think it looks good and I’ll simply make it then and there.
Such was the case with this recipe for molten chocolate Nutella cakes. And let’s be honest, I wanted to use my 4th of July ramekins again. They’re actually a bit big for lava cakes since molten chocolate cakes are typically very rich and best consumed warm so you don’t want too much in one serving. I went with them anyway because that’s what I wanted to use but I’d say these are best split with 3 other regular people or 1-2 chocoholics.
This is prepared like a typical lava cake – beat the eggs a lot to get the volume in the batter and airiness in baking, bake at a high temp and take out when the sides are done and middle is still jiggly for the molten chocolate part. The only change is adding the dollop of Nutella in the center before baking so there is guaranteed molten lava upon serving.
It looks burned but it actually isn't
Mine didn’t turn out as pretty as the original blog but that was probably because I released the cake from the ramekin too early and it broke apart while it was too hot and fragile. It didn’t affect the taste but if you don’t want your cake to break too soon,  let it cool a few minutes before turning over onto a plate then leave it overturned but with the ramekin still in place to hold it together while it cools for a few minutes more before you remove the ramekin.
I warned ahead of time but I’ll warn again – this is rich. The Nutella makes it so but there’s also still the chocolate batter in the middle that has enough time to heat up but not enough time to fully bake. The two together make for a formidable assault on your sweet tooth and tolerance of decadence. My tolerance is quite high but even I was almost defeated by half a serving of one ramekin. So arm yourself with vanilla ice cream when you take on this chocolate goodness, just to give yourself a fighting chance.
4 tablespoons (1/2 stick) unsalted butter
1/2 cup bittersweet chocolate chips
1 egg
1 egg yolk
3 tablespoons granulated sugar
1/8 teaspoon salt
1 tablespoon cocoa powder
2 tablespoons Nutella
2 teaspoons powdered sugar, optional, for garnish
  1. Preheat oven to 425 degrees F. Generously grease two 7-ounce ramekins.
  2. Combine the butter and chocolate in the top half of a double boiler over simmering water. Whisk until melted and smooth,
  3. In a separate bowl, beat the egg, egg yolk, sugar and salt on high until thickened and pale, 3-4 minutes. Scrape down the sides of bowl as needed.
  4. Whisk the cocoa powder into the melted chocolate then fold mixture into eggs just until incorporated. Do not overmix.
  5. Divide batter evenly between ramekins. Drop 1 tablespoon Nutella in the center of each ramekin.
  6. Bake for 10-12 minutes, until the sides are firm and the centers are still soft but not juggly.
  7. Let cakes cool for 1 minute in the ramekins then set a plate face-down on top of each ramekin. While wearing an oven mitt, carefully flip the ramekin and plate over. Let stand for 10 seconds then carefully lift the ramekin.
  8. Sift a little powdered sugar on top of each cake, garnish with a scoop of vanilla ice cream and serve warm,

Sunday, July 17, 2016

Just Add Salt

Just Add Salt - team event, June 21, 2016
The produce table
In June, we had a team event with Just Add Salt. They’re a company that hosts small groups for cooking “cook-offs”. I’m not sure how else to put it but however I describe it isn’t likely going to do it justice. There were 13 of us that were hosted at the owner’s lovely home (lovely is a meek, insipid word to describe their stunning home. I didn’t take pictures of the house from the inside to post publicly since it seems like a violation of privacy so you’ll have to take my word for it that the house was amazing).


The ingredients for our appetizer round
For the first round which was appetizers, we got divided into teams of two and 1 team of three. Each team got a mystery ingredient we had to use to make into appetizers for the group. We could also use any ingredients from the fresh produce table which Just Add Salt had sourced from local farmers’ markets. It was really high quality stuff and I (almost) wish I was a real chef on the savory side so I could’ve fully appreciated the care and thought that went into purchasing all the ingredients.
Caramelized scallops
Our scallops appetizer
My teammate and I ended up with scallops as our mystery ingredient for the appetizer round. Someone would probably have laughed had they captured the baffled looks on our faces as neither one of us cooks. Scallops? Okay then. The only way I thought to cook scallops was to pan fry them because I like that caramelized look. However, my limited experience with scallops also says I end up making them rubbery because I don’t know how to cook scallops. My teammate had similar bewilderment on her face of “what do we do with scallops?”


Fortunately, Just Add Salt anticipates there are people like us out there in the world and had several chefs on hand to assist the various team. Thanks to our helpful chef, I learned how to caramelize scallops so how they looked in my head is actually how they ended up looking in reality. First, you start with a stainless steel pan. I think that’s what they’re called – whatever isn’t nonstick and is light silver. Those are the kinds of pans I tend to avoid since they stick. Second, you use grapeseed oil to cover the bottom of the pan. Grapeseed because it has a higher smoking temperature and you want to heat the oil in the skillet until it’s just barely smoking. Third, pat your scallops dry with a paper towel. Fourth, place scallops in barely smoking, grapeseed oil-lined hot skillet in one layer, no scallops touching each other.
Getting ready to make our main course
Then, the part I found most fascinating that our chef schooled me on – you let the first side cook until the scallops are nicely caramelized with some browning then turn over ONCE. None of that flipping over business which I, as an anxious hoverer with the tongs, tend to do. Instead, she taught me to poke at the scallops with a finger. If the scallop is firm, it’s done. If it’s still squishy, it’s not cooked yet. Pretty cool, right? Thanks to her guidance, I had perfectly cooked scallops that were tender and not rubbery, yay.
Our prize-winning scallops with jalapeno-mango salsa
In the meantime, my teammate was working on the jalapeno-mango salsa we had decided to serve to go with the scallops. Our chef helped her as well and together we plated what I thought were some pretty nice-looking scallops. The other appetizer teams also had their offerings but – ahem – I’m happy to say we won the prize for “First to be done” and “Best-Looking”. I’d offer a recipe but we just made stuff up so, sorry, all I have is food porn.

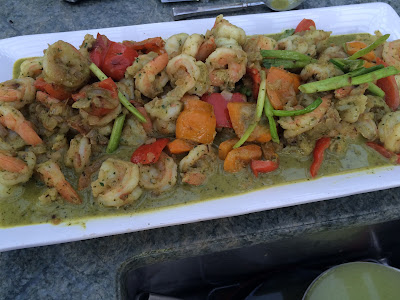
Green Curry Shrimp
Rack of Lamb served on wild rice pilaf
After the appetizer round, we got divided into 2 teams to work on the main courses. I can’t speak much to it since all I did was chop herbs while the more culinary-capable amongst my team, as well as our chef, did most of the heavy lifting. But here’s what the two teams collectively came up with. We got prizes for our collective efforts but the best part was we got to eat our efforts as well.

Major props to Just Add Salt for providing such an amazing experience. There was just the right balance between having ownership of what we cooked but also have expert guidance so we could come up with not only edible dishes (my personal standards when I cook for myself) but that they were seriously delicious. Our hosts were also incredibly gracious and engaging and did everything possible to make us feel welcome and relaxed in their home. Check out their Facebook page if you’re local and want to try them out.
Really excellent filet mignon
Fingerling Potatoes
Plum Tart with ice cream