Friday, August 28, 2020

Brown Sugar Bread

Brown Sugar Bread - made August 3, 2020 from Julie Blanner
I blinked and August is nearly gone. The time warp was helped in part because I went back to work 2 weeks ago and I've been running back on the hamster wheel ever since. I can't complain though as I negotiated to work Monday - Thursday and despite the fact that it just means I squeeze a full work week into 4 days instead of 5, it's really nice to have Fridays off to catch up on the rest of my life again. I wrote this post before I went back to work and now I need to spend the weekend catching up on the other posts I'm behind on.

I was trying to use up some milk so I made a half recipe of this (full recipe is listed as is below). A half recipe made 3 mini loaves and baked for 35 minutes in my oven. This is more accurately called a quick bread, similar to my favorite banana bread recipe, since it doesn't use yeast and relies on chemical leavening (baking powder) for the rise.

How long your quick bread takes to bake will depend on the size(s) of the pan(s) you use and your oven. My oven tends to run cool so I have to preheat to a higher temperature for a longer time before I get to the desired temp according to my $6 oven thermometer. Just use the toothpick test to test for doneness. In the case of quick breads, the toothpick should come out clean or with a few moist crumbs, just not raw batter.
The nice thing about this quick bread is it came easily and intact out of the mini loaf pan, always a good sign. It was good while warm as well. But I have to admit I'm not a big quick bread fan, except for banana bread. This was good while warm but not sure I'd put it in on the regular baking roster. Nothing wrong with it, just a personal (non) preference for quick breads.

2 cups brown sugar
4 cups all-purpose flour
2 tablespoons baking powder
1 teaspoon salt
2 eggs
2 cups milk
2/3 cup vegetable oil
  1. Preheat oven to 350 degrees F. Lightly spray miniature loaf pans with nonstick cooking spray.
  2. In a medium mixing bowl, combine brown sugar, flour, baking powder and salt; set aside.
  3. In a large mixing bowl, beat eggs, milk and oil. 
  4. Gradually add dry ingredients to wet until just moist.
  5. Pour batter into prepared pans, filling to an inch below the rims. Sprinkle coarse sugar on top if desired. Bake 30-40 minutes or until toothpick inserted near the center comes out clean.

Monday, August 17, 2020

Pasta in Lime-Cilantro Alfredo Sauce

Pasta in Lime-Cilantro Alfredo Sauce - made July 31, 2020 from Julia's Album
This is another of those recipes that I had to make some adjustments to since I didn't have all the right ingredients. In these pandemic times, that's now the norm since, let's face it, I'm not enough of a cook to actually plan my "real food" cooking grocery list ahead of time. My style of cooking is to check my pinterest board, see what captures my fancy, evaluate whether I have most of the ingredients and go from there. In other words, unless I want to wait until I do my once-in-awhile grocery shopping, I cook from whatever's already in my pantry and refrigerator.

Case in point, the original recipe for this called for chicken breast, sliced, to make up the protein portion. I didn't have chicken breasts but I did have a couple of packs of ground turkey so I used one to substitute as the protein in this dish. I also was a little short on cilantro as I had used up most of it with the Lime-Cilantro Shrimp but you work with what you have.
One thing I wasn't short on was garlic. The recipe only called for 3 cloves but I had a bulb left that was drying out and I didn't know the next time the cooking muse would hit me with a recipe that required garlic so, yes, I used the whole thing. I'm sure a cooking expert would tell me something reasonable like I can freeze garlic but, oh well, too late now.
And while I'm confessing my cooking sins, I will also say, one squeezed lime didn't quite produce 2 tablespoons of lime juice so I squeezed another lime, ended up with more than 2 tablespoons and added all of it anyway. It's almost freeing to color outside the cooking lines since baking, as opposed to cooking, is much more exact. In retrospect, I support I could've used at least half of the second lime as garnish instead of squeezing it for the excess juice. I didn't think that far ahead.
Despite my cavalier cooking approach, this turned out fairly well. It's not as rich as a traditional Alfredo sauce but that made me like it more. The sauce does seem thin at first but I actually remembered in time (for once) that the sauce does thicken up and the noodles absorb the liquid so there's no need to try and thicken it. In fact, once the dish had cooled a bit, it almost seemed like there wasn't enough sauce. The excess garlic I used so freely took over the flavor profile but I could still taste the lime, if not the cilantro, as well. However, I don't recommend being me and using a whole bulb of garlic because it really is quite a lot of garlic. Oops.
2 tablespoons olive oil
1 pound ground turkey
salt and pepper
3 cloves garlic, minced
2 tablespoons lime juice, freshly squeezed
1/4 cup chicken broth
1 tablespoon fresh cilantro, chopped
2/3 cup heavy cream
2/3 cup milk
1/2 cup mozzarella or parmesan cheese, shredded
8 ounces spaghetti
reserved cooked pasta water
1 tablespoon fresh cilantro, chopped, for garnish
  1. Heat olive oil in a large skillet on medium-high heat. Generously season ground turkey with salt and pepper. Add to hot skillet and cook, stirring and breaking into large pieces, until done. Remove from skillet.
  2. To the same skillet, add minced garlic, lime juice and chicken broth. Deglaze the skillet over high heat, until liquid is reduced and garlic is browned. Mix in chopped cilantro.
  3. Add heavy cream and milk. Bring to a boil then immediately add cheese. Mix until melted while boiling. Remove from heat.
  4. Cook pasta according to package directions. Drain, reserving some cooked pasta water. Add pasta to the sauce, along with half the ground turkey. Mix, coating noodles and turkey completely. If necessary, thin sauce with a little of the cooked pasta water. Top with remaining ground turkey, additional parmesan cheese if desired and garnish with remaining cilantro. Serve warm.

Friday, August 14, 2020

No-Yeast Bread

No-Yeast Bread - made July 31, 2020 from CD Kitchen
Based on my most recent shopping excursions, it looks like the stores are able to restock most of the pandemic-rare items. I only really shop at three stores these days: Costco, Trader Joe's and Target. And during the worst of the shortages, yeast and sometimes flour were often missing but I was fortunate enough to find them a few times by lucky chance.
Nowadays, supplies seem to have gotten back to mostly normal. Wipes are still sometimes difficult to come across as I don't go out often enough to come upon them when they're first put on the shelves and they don't last long. But everything else, toilet paper included, is back in stock. More importantly for bread bakers, yeast and flour are once again plentiful.

During the days of shortage and the (somewhat baffling) rise - haha - of breadmaking, with the shortage of yeast, no-yeast breads rocketed to popularity on pinterest. Which is where I found this recipe from CD Kitchen. I meant to make it a couple of months ago but whenever I found yeast back then, I'd make the Honey Oatmeal Bread in my bread machine. I still have yeast but I'm finally getting around to trying out this recipe.
It's made like an Irish soda bread where you just mix the ingredients together, knead it a few times to make sure no flour spots remain, pat into a round loaf then bake it. I made it a taller/higher loaf than I was supposed to, standing higher than 1 1/2" recommended in the recipe but I like taller (read: bigger) pieces of bread. I baked it in my cast iron pan which I unfortunately forgot once and left soaking in the sink. Which, as any cast iron pan user knows, will lead to rust. I had to google how to get rid of the rust (equal parts water and vinegar then scrub within an inch of your life) before I used it again.
If you look at the picture of the bread loaf from CD Kitchen's blog, theirs looks professional. As you can see from my pictures, it's safe to call my attempt "rustic". I did brush it with milk halfway through the baking time as I don't like super-crusty bread. It still didn't brown evenly but never mind. Ironically, I think the crust was the best part. The bread was a bit heavy in texture, which I had expected, even with the chemical leavening, given it didn't have any yeast. Plus I don't think I baked it long enough. The recipe said to bake for 30-40 minutes and I erred on the side of 40 minutes. It wasn't raw but it was definitely dense. I don't know if it would've benefited from a longer bake. Taste-wise, this isn't very sweet since it contains very little sugar. Most no-sugar breads get their flavor from the development of the yeast with the flour, water and salt. But no yeast breads don't have that advantage. Overall, I think this is on par with a good Irish soda bread but if you want a more traditional bread, definitely go for one with yeast.
4 cups flour
1 tablespoon sugar
1/2 tablespoon baking powder
1/2 tablespoon baking soda
1 1/2 cups water
2 teaspoons vinegar
1 tablespoon butter, melted
  1. Preheat oven to 400 degrees F.
  2. In a bowl, stir together the flour, sugar, baking powder and baking soda. 
  3. In a 2-cup measuring cup, combine the water and vinegar. Add the water to the flour. Stir in the mixture until a dough forms.
  4. Turn the dough out onto a floured surface. Knead for 2-3 minutes to make sure all the ingredients are incorporated.
  5. Shape the dough into a flat, round disk no more than 1 1/2 inches high. Place on a baking sheet or pizza stone or cast iron skillet. Dip a sharp knife into flour then cut an "X" on top of the loaf.
  6. Bake for 30-40 minutes or until golden brown and the crust is firm. If desired, brush the top of the loaf with milk halfway through the baking time for a softer crust.
  7. When bread is done, remove from oven and brush with melted butter for flavor and to soften the crust.

Tuesday, August 11, 2020

Instant Pot Honey Garlic Pork Tenderloin

Instant Pot Honey Garlic Pork Tenderloin - made July 24, 2020 from Simply Happy Foodie
With all the concerns in the last few months about a meat shortage, there was a time when Costco was limiting purchases of beef, pork, chicken, etc to 3 per customer. That never bothered me since it takes me awhile to get through even one Costco-sized pack of anything so I never buy three things in the first place. Chances are the second and third items would get freezer burn before I could get to them.
When I bought this pork tenderloin, even though it was the smallest I could find at Costco, I still had to cut it in half to even fit into my freezer. I cooked the first half in some random cooking experiment that I didn't document and tasted well enough but wasn't anything memorable. I used the second half for this recipe.
Out came the Instant Pot, of course. Sear the pork first then add the rest of the ingredients. I didn't have a meat thermometer to check the internal temperature and I was a little queasy at the thought of only putting this on 0 or 1 minute to cook after the instant pot comes to pressure. Especially since my Instant Pot doesn't have a low or high pressure setting. It's just pressure. And pork is not something I want to eat undercooked.
So I set it for 4 minutes then let it rest to naturally release for 25 minutes. If you have a meat thermometer, you can be more scientific but my adjustments worked well enough. The pork was tender but still had a good chewy texture. The sauce was tasty but I would recommend cutting back on the cornstarch slurry by 1/3 to 1/2 as it thickened just a little too much. Otherwise, this was a great recipe and easy to make.
1 pound pork tenderloin (not pork loin roast)

Dry Rub
1/2 teaspoon salt
1/2 teaspoon onion powder
1/2 teaspoon chili powder
1/2 teaspoon thyme
1 teaspoon rosemary

Sauce
1/2 cup orange juice
1 1/2 tablespoons garlic, minced
1/2 cup soy sauce
3 tablespoons brown sugar
1 teaspoon ginger
1/2 cup honey

For browning the pork
1 teaspoon olive oil
3 tablespoons butter

To thicken
3 tablespoons cornstarch (try using half this amount if you don't want the sauce to be too thick)
4 tablespoons cold water (cut in half if you're cutting the cornstarch in half)
  1. Prepare the pork: mix the dry rub ingredients together and coat the pork tenderloin on all sides. Set aside.
  2. Make the sauce and slurry: In a bowl, whisk together the sauce ingredients until the honey is fully dissolved; set aside.
  3. Mix together the cornstarch and water in a small bowl, stirring until the cornstarch is dissolved; set aside.
  4. Brown the pork: turn the instant pot onto the saute mode. When hot, add the olive oil and butter. Add tenderloin and sear the pork on all sides, 2-3 minutes per side. Remove to a plate.
  5. Add the sauce to the instant pot and stir, deglazing the brown bits from the bottom. Turn off the pot and place the pork inside. Coat with the sauce.
  6. Close the lid and set the lid to the Sealing position. Set on High Pressure for 1 minute. If you don't have a high pressure setting, set on Manual for 4 minutes. When cook cycle has finished, let natural release for 15 minutes (20-25 minutes for larger tenderloin). Vent any remaining steam and remove lid.
  7. Check temperature of pork. It should be 145 degrees to be done. If less than 145 degrees, replace lid and let rest for a few more minutes. Remove tenderloin to a baking pan and cover loosely with foil. 
  8. Turn oven to Broil setting.
  9. Turn the Instant Pot to Saute mode. When the sauce begins to simmer, add the cornstarch slurry, stirring until sauce thickens. Turn off instant pot.
  10. Remove foil from tenderloin and spoon some of the sauce over it. Broil for several minutes until sauce is caramelized. Serve hot.


Saturday, August 8, 2020

Nutella-Filled Nutella Cookies

Nutella-Filled Nutella Cookies - made dough July 22, 2020, modified from Will Cook for Smiles
I modified this recipe from Will Cook for Smiles as I had a certain vision I wanted to execute for them. The original recipe called for making a Nutella-based cookie, rolled in chopped hazelnuts. I didn't have hazelnuts and popping over to Trader Joe's on a whim to get one baking ingredient is so pre-Covid.
But I did have toffee bits so I decided to experiment and roll one taste test cookie in them. You can see from the picture above that the unbaked cookie dough ball rolled in toffee bits looks almost like a Ferrero Rocher. Cookie dough lovers might even prefer to eat it this way before it's baked.
But wait, there's more. I also decided to up the Nutella ante by stuffing a dollop of Nutella inside the Nutella cookie. I know, right? I wanted that flowy Nutella lava when you bite into the cookie. See first picture and judge success for yourself.
However, before I get too big for my baking britches, I have to confess that, like many of my baking visionary experiments, this was only partially successful.
For one thing, since I always freeze cookie dough before baking, it was hard to get the toffee bits to adhere to the frozen dough ball. In hindsight, I should have rolled them in the toffee bits right after shaping the cookie dough around the ball of Nutella then frozen them. Live and learn.
Interestingly, the cookie rolled in toffee bits spread more and turned out less uniformly round than the non-toffee one. Which probably isn't surprising since the toffee partially melts and takes the dough with it as it bakes.
Taste-wise, I thought they were a little too sweet for me. And this is where my vision went awry. Stuffing Nutella inside a cookie that's already flavored with Nutella sounds brilliantly decadent on paper. But in reality, instead of having Nutella as the superstar diva, it turned into two supporting actors who put in a good-but-could-be-better performance.
Think of it this way: if you wanted something to pop, you put it against a contrast. Want to show off a blazing red top? You wear white jeans. Not red ones, not pinky-red ones, not same shade red ones or - bless your heart - definitely not with orangey-red jeans.
I clearly did not stuff enough Nutella in this one
Before I go too far afield with that analogy and make my mind's eye cringe, let's stick with cookies. The whole Nutella-stuffing thing would've been better with a pure chocolate cookie, a chocolate chip cookie or a sugar cookie. Something that contrasts with the Nutella and offers a different flavor profile. Nutella-on-Nutella made it a little one-note for me. Now, Nutella lovers will probably give me the side-eye of "what's wrong with that??" so they might like it this way. And it is good but I think more of a flavor contrast would be better. Or you can make the cookie as Will Cook for Smiles intended with the Nutella swirled in the dough rather than as a filling and they'd be just fine too.
1/2 cup butter
1/2 cup brown sugar
2/3 cup granulated sugar
2 eggs
1 cup Nutella
1 teaspoon vanilla extract
2 cups all-purpose flour
1/4 cup cocoa powder
1/2 teaspoon baking soda
1/4 teaspoon salt
1 cup toasted hazelnuts, finely chopped or toffee bits (I used toffee bits)
Additional Nutella for filling, chilled
  1. Sift together flour, cocoa powder, baking soda and salt; set aside.
  2. Beat butter with an electric mixer on medium speed until creamy, about 2 minutes. Add sugar and cream together until combined, about 2 minutes.
  3. Add eggs, one at a time, mixing briefly after each addition. Beat in Nutella and vanilla extract, mixing until just combined. Scrape down sides of bowl to keep mixture even textured.
  4. Add dry ingredients in two additions, on low speed, mixing until just combined. Do not overmix.
  5. Cover bowl and refrigerate cookie dough until firm. When firm enough to portion into dough balls, roll into golf-ball-size balls, flatten each ball into a disc and place a small scoop of chilled Nutella in the center. Form the dough around the Nutella, encasing completely and pinching the dough to seal with seams. Roll dough balls in toffee bits, pressing toffee into dough until each ball is completely covered. Cover and refrigerate or freeze for several hours.
  6. When ready to bake, preheat oven to 350 degrees F. Line baking sheets with parchment paper. Evenly space on baking sheets, about 2 inches apart. Bake for 12-14 minutes or until edges have set and middles no longer look raw. Do not overbake.

Wednesday, August 5, 2020

Lime-Cilantro Shrimp (keto and low carb)

Lime-Cilantro Shrimp - made July 15, 2020 from Keto Cooking Christian
My uncle is an avid fisherman and at many a family gathering, he would grill his freshly-caught catch for our barbecues. It was from him that I discovered the amazing and delicious combination of lime and cilantro. It was some years ago (add a decade to mark these past few Covid months) but to this day, I remember how he stuffed a huge trout with a lime cilantro stuffing that I have a Pavlovian response to whenever I think about it.

Since then, I make a point of using a lime-cilantro combination whenever I want some guaranteed deliciousness, especially with seafood and notably, with shrimp.
Technically, this is a keto and low carb recipe. At least until you do what I did and add ramen noodles. But you can omit the noodles and still enjoy a tasty shrimp dish.


1 1/2 pounds large shrimp, raw, peeled and deveined
1 teaspoon smoked paprika
1/4 teaspoon ground cumin
2 garlic cloves, minced
2 tablespoons fresh cilantro, chopped
juice and zest of 1 lime
1/2 teaspoon salt
1/4 teaspoon cayenne pepper
1/4 cup olive oil
  1. Combine all ingredients except shrimp in a mixing bowl and whisk until combined. Place shrimp in a ziploc baggie and pour marinade ingredients over it, zipping bag tightly shut. Marinate for 20-30 minutes.
  2. Heat saucepan over medium high heat with a light coating of nonstick cooking spray. When hot, add shrimp mixture including marinade. Stir fry until shrimp is pink. Serve warm.
  3. If you don't want the keto or low carb version, serve with noodles.

Sunday, August 2, 2020

Air Fryer KFC Copycat Fried Chicken

Air Fryer KFC Copycat Fried Chicken - made July 13, 2020 from Dine Dream Discover
From the pictures, you can easily see that this doesn't look much like a KFC copycat. And you would be right because I took some liberties with the recipe, thereby foiling the copycat aspirations.
For one thing I don't like dried mustard or mustard in any form so I left it out. And after dredging the chicken in flour and egg, I gave it a final coating of panko crumbs. I love the crunch from panko crumbs and since I wasn't deep frying these, I wanted to give it a fair chance that it would actually be crunchy, hence the assist from the panko crumbs.
While this didn't meet the KFC copycat status with any accuracy, as air fried chicken goes, it was pretty good. The outside did get somewhat crispy (thanks, panko crumbs) and, more importantly, the inside was moist. It's a great way to enjoy "fried" chicken.
10 chicken drumsticks or thighs
1 cup buttermilk
2 eggs
2 cups flour
2/3 teaspoon salt
1/2 teaspoon thyme
1/2 teaspoon basil
1/3 teaspoon oregano
1 teaspoon celery salt
1 teaspoon black pepper
1 teaspoon dried mustard (omitted)
4 teaspoons paprika
2 teaspoons garlic salt
1 teaspoon ground ginger
3 teaspoons white pepper
  1. Soak the chicken in buttermilk for up to 24 hours.
  2. When ready to cook chicken, beat the eggs in one bowl and combine the flour and spices in another shallow bowl.
  3. Preheat air fryer to 390 degrees F.
  4. Place a wire rack inside a baking sheet. Remove the chicken one piece at a time from the buttermilk. Dredge each piece in the flour, then the eggs, then the flour once again (I dredged in panko crumbs for the final coating), placing on the wire rack as you complete each piece.
  5. Lightly spray bottom of air fryer rack with nonstick cooking spray. Lay chicken in a single layer in air fryer basket. Air fry for 13 minutes. Flip over. Spritz with olive oil if any dry flour is showing. Air fry for another 13 minutes or until internal temperature is 165 degrees F and outside is crisp. Serve immediately.

Friday, July 31, 2020

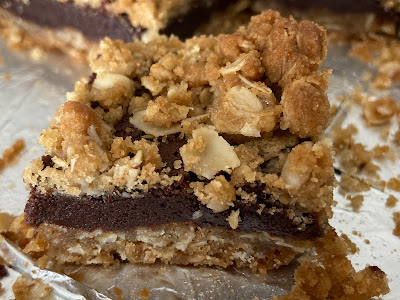
Oatmeal Fudge Bars

Oatmeal Fudge Bars - made July 12, 2020 from Everything Chocolate by America's Test Kitchen
Another name for these could be Oatmeal Revel Bars. The mark of a revel bar is the same oatmeal-based dough is used for the base layer as well as clumps of it crumbled on top. The filling in between is typically chocolate.
Some recipes combine melted chocolate and sweetened condensed milk but this particular one uses butter and egg as the liquids. It also uses espresso powder which I added as coffee or espresso also seems to be popular flavors for military care packages.
This is a good bar to send in hot weather. It's sturdy and ships well. You could try substituting shortening for the butter as a further guard against the heat. I didn't with this batch since I was trying the recipe for the first time and wanted to see how it would turn out as America's Test Kitchen intended it to.

From the sliver I tried, this is another good bar cookie. The chocolate espresso filling is a perfect foil against the oatmeal layer and crumble which isn't too sweet.
Crust and Topping
1 cup (3 ounces) quick-cooking oats (I used old-fashioned)
1 cup packed (7 ounces) light brown sugar
3/4 cup (3 3/4 ounces) all-purpose flour
1/4 teaspoon baking powder
1/4 teaspoon baking soda
1/8 teaspoon salt
8 tablespoons unsalted butter, melted and cooled

Filling
1/4 cup (1 1/4 ounces) all-purpose flour
1/4 cup packed (1 3/4 ounces) light brown sugar
2 teaspoons instant espresso powder or instant coffee powder
1/4 teaspoon salt
1 1/2 cups (9 ounces) semisweet chocolate chips
2 tablespoons unsalted butter
1 large egg

  1. Preheat oven to 325 degrees F. Line an 8 x 8 baking pan with foil and lightly spray with nonstick cooking spray.
  2. Crust and Topping: whisk together oats, brown sugar, flour, baking powder, baking soda and salt in a large bowl. Stir in melted butter until combined. Reserve 3/4 cup oat mixture for the topping. Spread the remaining oat mixture into prepared pan and pat into an even layer. Bake until light golden brown, about 8 minutes. Let crust cool completely on wire rack, about 1 hour.
  3. Filling: whisk together flour, brown sugar, espresso powder and salt in bowl.
  4. In the top half of a double boiler over hot water, melt chocolate chips and butter, stirring together until melted and combined. Cool slightly for several minutes. Whisk in egg until combined. Stir in flour mixture until just incorporated.
  5. Pour filling in an even layer over cooled crust. Sprinkle evenly with reserved oat topping. Bake until toothpick inserted in the center comes out with a few moist crumbs, 25 to 30 minutes, rotating pan halfway through baking.
  6. Let bars cool completely in pan on wire rack before cutting and serving.