Friday, August 20, 2021

Cinnamon Roll Blondies

Cinnamon Roll Blondies - made August 4, 2021 from A Latte Food 
Back to bar cookies for military care package mailings. And what a return to bar cookie baking. This is exactly what it says it is; it really does evoke similarities to a cinnamon roll.
That of course is due to the cinnamon filling which is similar to the filling in actual cinnamon rolls. If you don't have time or inclination to make cinnamon roll dough and roll out real cinnamon rolls, these bar cookies will do in a pinch.

It's a great brown sugar blondie with a cinnamon filling layered inside - easy and quick to make, even easier to package and eat. Plus. since it's a blondie, there's no chocolate to worry about melting in the summer heat.
This does have butter rather than shortening which always makes long mailing times to desert temp locations a little worrisome. I vacuum sealed the ones I sent but I also included packaged store bought snacks just in case these don't make it in edible shape. But I hope they did as these were delicious.
2 cups all-purpose flour
1 teaspoon baking powder
1/2 teaspoon salt
1/2 teaspoon cinnamon
3/4 cup butter, softened
1/2 cup granulated sugar
1 cup dark brown sugar
2 large eggs
2 teaspoons vanilla

Cinnamon Roll Filling
1/4 cup butter, melted
1/2 cup dark brown sugar
1/2 teaspoon vanilla
3/4 teaspoon cinnamon
  1. Preheat oven to 350 degrees F. Line a 11 x 7" or 8 x 8" pan with foil and lightly spray with nonstick cooking spray.
  2. In a small bowl, whisk together the flour, baking powder, salt and cinnamon; set aside.
  3. In the bowl of a stand mixer fitted with the paddle attachment, cream together butter, granulated sugar and brown sugar until well combined and fluffy, 2-3 minutes.
  4. Add eggs and vanilla, one at a time, mixing briefly after each addition.
  5. Add dry ingredients in two additions, mixing until just combined after each addition, scraping sides and bottom of bowl to keep mixture even textured.
  6. Filling: in a small bowl, whisk together melted butter, brown sugar, vanilla and cinnamon until smooth. 
  7. Spread half of the batter in an even layer in the prepared pan. Spread filling evenly over batter. Top with remaining batter, covering filling completely, and smooth top.
  8. Bake for 25-30 minutes or until toothpick inserted near the middle comes out clean. Cool completely before cutting.

Wednesday, August 18, 2021

Soft Batch Double Chocolate Fudge Cookies

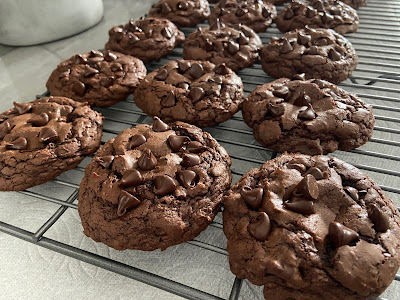
Want a shot of chocolate? Here's exactly what the title of these cookies say they are: soft, chocolate and fudgy.

The dough was a bit soft when first mixed so I had to chill in the refrigerator for about 15 minutes. Don't chill for too long or they'll be too difficult to portion as the chocolate in them sets. I would only chill long enough to form dough balls easily. Then once you've made them into dough balls, cover and chill or freeze until you're ready to bake.


You can guess from the proliferation of near-pristine chocolate chips on the tops of the cookies that I pressed them into each cookie as soon as I took them out of the oven. That's my trick with chocolate and chocolate chip cookies whenever I want them to be loaded with chips.


These were definitely fudgy and soft. As always, bake just until the edges are set and the middle no longer looks raw. The chocolate will set as it cools so you don't want to eat them too warm or they'll be mushy more than fudgy. Also as always, the quality of the flavor of the cookie will be highly dependent on the quality of your ingredients, especially the cocoa powder and chocolate chips. You don't have to go super high end (I used fair trade cocoa powder and chocolate chips from Costco) but don't go too low either.

1 cup plus 2 tablespoons all-purpose flour
3 tablespoons unsweetened cocoa powder
1 teaspoon baking powder
1/2 teaspoon salt
2 cups semisweet chocolate chips, divided, plus more reserved for pressing into baked cookies, if desired
2 1/2 tablespoons unsalted butter, cut into small cubes
1/2 cup granulated sugar
1/4 cup light brown sugar, packed
2 large eggs
2 tablespoons whole milk
  1. In a small bowl, whisk together flour, cocoa powder, baking powder and salt; set aside.
  2. In the top half of a double boiler set over hot water, melt together 1 cup semisweet chocolate chips and butter, whisking until combined and completely melted. Remove from heat.
  3. In the bowl of a stand mixer fitted with the paddle attachment, beat together eggs, granulated sugar and brown sugar until combined. Beat in milk and vanilla until combined. Add melted chocolate-butter mixture and stir until evenly combined.
  4. Add dry ingredients and mix until just combined. Fold in remaining 1 cup chocolate chips. Dough will be soft. Chill until firm enough to portion into dough balls (10-15 minutes). Don't chill for too long or dough will become too stiff to portion easily.
  5. Cover and chill or freeze dough balls for several hours or overnight.
  6. When ready to bake, preheat oven to 350 degrees F. Line baking sheets with parchment paper and evenly space chilled dough balls. Bake for 10-13 minutes or until edges are set and middle no longer looks raw. Do not overbake. Remove from oven and press additional chocolate chips into tops of hot cookies if desired. Let cookies rest on baking sheets for several minutes before transferring with a small metal spatula to wire rack to cool completely.

Monday, August 16, 2021

Super Lemon Bundt Cake

Super Lemon Bundt Cake - made August 1, 2021 from Sprinkle Some Sugar 
You know how a lot of food blogs have picture perfect baked goods that always turn out beautifully? And you sometimes think those bloggers just have the magic touch and everything comes out of their kitchen camera ready? Yeah, this isn't one of those blogs.
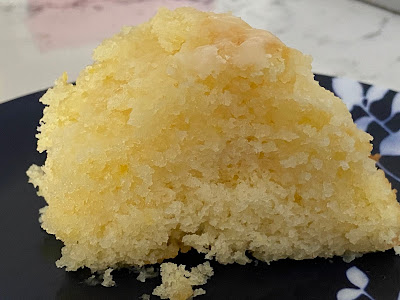
But you will get total honesty from me, whether something turns out the way I wanted it to or not. Clearly this goes in the "not" pile. As you can easily see from the pictures, the cake stuck stubbornly to the sides of the pan and refused to let go. I knew I was going to have trouble when I took the cake out of the oven and had a hard time getting the sides of the cake to loosen from the pan with a rubber spatula. 
This unfortunate scenario could be blamed on one, two or both factors: one, I didn't flour the pan after I sprayed it with nonstick (ha, what a misnomer) cooking spray. Normally I can skip that step and I don't like to flour a pan too much as I invariably have a heavy hand with the flour and patches of flour tend to show up in the baked cake. But then you can literally see the down side of not oiling and flouring the pan properly.
Two, I misread the directions and didn't beat the eggs enough before adding the sugar. I added the sugar too soon and beat both eggs and sugar together for the time I was supposed to just beat the eggs alone. That created more of a meringue texture when baked which always leads to stick-to-the-sides-of-the-pan trouble. 
It's really unfortunate that this cake only half came out of the Bundt pan as what did come out and what I managed to salvage was actually quite tasty. Good texture, good lemon flavor. Just a sad appearance.

This recipe makes a lot of batter so I ended up putting the overflow batter into smaller tart pans and muffin cups. Which thankfully yielded the mini cakes more or less in whole shape, unlike its poor Bundt cake brethen.

Cake
2 1/4 cups all-purpose flour
2 1/4 teaspoons baking powder
1/2 teaspoon salt
4 eggs
2 cups sugar
1 teaspoon vanilla extract
2 tablespoons lemon zest
2 tablespoons plus 2 teaspoons lemon juice
1 1/4 cups whole milk
10 tablespoons unsalted butter, cubed

Lemon Glaze
1 1/2 cups powdered sugar
3-5 tablespoons lemon juice

Lemon Sugar Topping
1 tablespoon lemon zest
1 tablespoon granulated sugar
  1. Preheat oven to 350 degrees. Grease a bundt pan liberally with nonstick cooking spray then lightly flour.
  2. In a small bowl, whisk together flour, baking power and salt; set aside.
  3. In the bowl of a stand mixer fitted with the paddle attachment, beat eggs on low speed until thickened and very pale yellow in color. Slowly add sugar to running mixer and increase speed to medium high until mixture is light and fluffy. Stir in vanilla, lemon juice and lemon zest.
  4. Slowly add dry ingredients and mix  on low speed until combined.
  5. In a small saucepan, heat milk and cubed butter until milk is very hot and butter is just melted. Do not boil; Whisk mixture to combine. Pour into batter and mix until smooth. Batter will be very thin.
  6. Pour batter into prepared pan and bake for 27-35 minutes or until a toothpick inserted near the center comes out with a few moist crumbs. Remove cake from oven and let cool for 5 minutes in pan. Loosen sides with a small spatula and turn over onto a cake platter to release. Cool cake until just warm to the touch.
  7. Meanwhile, prepare glaze: whisk powdered sugar and lemon juice, using enough lemon juice to achieve desired consistent. Drizzle glaze over warm cake.
  8. Lemon Sugar topping: thoroughly mix lemon zest and sugar together and let sit for 5 minutes. Sprinkle over top of glazed cake just before glaze sets.

Thursday, August 12, 2021

Banana Blondies

Banana Blondies - made July 31, 2021 from Cookies and Cups 
I'm one of those people who buy a bunch of bananas in amounts that are more than I can eat before the remaining ones turn brown/black/overripe. Yes, I don't just see bananas as a fruit snack but as future banana baked goods. I don't always bake with them as soon as they're overripe and ready but once they are, I peel them, put the bananas in a ziploc bag and put the bag in the freezer. Over time I tend to amass a bunch of overripe mushy bananas in the freezer. Then once I find some good recipes beyond the banana bread everyone keeps asking me for, I thaw the bananas and bake away. 
I'd already used some for the banana cake recipe #17 and I was still baking for the food donation. This seemed like a good one to try.
You can tell from the pictures that I underbaked this. I was fooled by the "clean" toothpick test and should've timed it better. If this had been chocolate, it would've been fudge. It could've used a few more minutes in the oven for a less dense texture but my underbaking tendencies didn't hurt the blondie at all. The texture was dense but I liked that. The flavor was also great and the brown sugar frosting was a perfect touch. Definitely a keeper and a good use of overripe bananas.
Blondies
1/2 cup butter, melted and, if desired, browned
1 cup light brown sugar
1 egg
1 1/2 teaspoons vanilla
1/4 teaspoon salt
1 cup all-purpose flour
1/2 cup mashed banana

Brown Sugar Frosting
1/4 cup butter
1/2 cup light brown sugar
2 tablespoons milk
1 cup confectioners' sugar
  1. Preheat oven to 350 degrees F. Line an 8 x 8" baking pan with foil and lightly spray with nonstick cooking spray.
  2. In the bowl of a stand mixer, combine melted butter and brown sugar, mixing until well combined. Add egg and vanilla; mix until incorporated.
  3. Stir in salt, flour and banana, mixing until batter is smooth and even textured. Spread evenly in prepared pan. Bake for 25-30 minutes or until toothpick inserted in center comes out clean. Cool in pan on wire rack.
  4. Brown Sugar Frosting: in a medium saucepan, melt butter. Add brown sugar and milk; stir until mixture comes just to a boil. Remove from heat and let cool for 5 minutes. Stir in powdered sugar with a whisk. Spread over blondies and allow frosting to set. Cool completely before cutting and serving.

Monday, August 9, 2021

A (mostly) dairy-free version of a chocolate chip cookie

Vegan Butter Chocolate Chip Cookies - made July 24, 2021, recipe modified from Cooking with Karli
I visited my niece and her husband last month and one of the things they asked me to do was bake some cookies, some for my niece to send to a friend and some for my nephew-in-law to give to some of his customers at work. My niece isn't strictly lactose intolerant but she does minimize eating dairy as much as possible. 
Cookie dough made with vegan butter
I have a long-standing love affair with dairy butter so the world of vegan baking and vegan butter is quite alien to me. But I'm always willing to learn and try new things in baking (most of the time) and I was intrigued on how this whole vegan butter thing would work. After doing some googling on the subject, it appears not all vegan butters are created equal. This article from King Arthur Flour was useful but what was even more useful is my niece has been baking with vegan butter long enough to have personal knowledge of "the good kind" and, most importantly, had some Miyoko's vegan butter on hand for me to work with. 
Cookie dough made with dairy butter
I used the Crumbl copycat recipe I posted earlier from Cooking with Karli since I already knew the dairy butter version was fantastic. I wanted to see how it would hold up using vegan butter so I made a half recipe using dairy butter and a half recipe using the Miyoko's vegan butter to test whether they would be a noticeable difference in taste or texture. I've captioned which was which in the pictures so you can tell the difference.
Dough balls with vegan butter
The dairy butter version was slightly more moist than the vegan butter version. I had some dry bits with the vegan butter dough but it wasn't too bad and I simply used the warmth from my hands when shaping the dough balls to help the dough stick together.
Dough balls with dairy butter
This is not a vegan cookie since it still has eggs nor is it completely dairy free since the chocolate chips also have dairy in them. But we went with dark chocolate chips for my niece's batch to minimize the milk in the chips. And please note vegan butter is usually made up of nut butters so this is not for anyone with a nut allergy.
Cookie made with vegan butter
So I guess I should call it "minimal dairy cookie" or "cookie made with vegan butter" to be accurate. I was pleasantly surprised that this was pretty good, both in flavor but also in texture. Moist, "fudgy", chewy, not dry or crumbly at all. I have the privilege of not being allergic to anything so I have very limited experience with having to limit my food choices because I need to avoid dairy, nuts, gluten, etc. But it's nice to know viable options are out there for a variety of tastes, whether it be for physiological reasons or more climate conscientiousness or for any other reason.
Cookie made with dairy butter
Now that I've had my first successful foray with vegan butter, I'm now inspired to see if I can make the complete plunge into vegan baking and tinker with this recipe to accommodate an egg replacement and vegan chocolate chips. More to come.
Vegan butter

Inside the vegan butter chocolate chip cookie

1 cup vegan butter (I used Miyoko's brand)
3/4 cup granulated sugar
1 cup brown sugar, packed
2 eggs
1 teaspoon vanilla
3 cups flour
3/4 teaspoon salt
3/4 teaspoon baking soda
2 cups dark chocolate chips
  1. Preheat oven to 350 degrees F (if chilling the dough, do not do this step until you're ready to bake).
  2. Cream together vegan butter, granulated sugar and brown sugar until well combined. Add eggs, one at a time, mixing after each addition to combine. Add vanilla and mix to combine.
  3. In a separate bowl, whisk together flour, salt and baking soda. Add in two additions to butter mixture, mixing after each addition until just combined. If dough is a little dry, mix by hand to incorporate the dry bits. Add a drop or two of vanilla extract if you still have dry bits.
  4. Portion dough into golf-ball-size dough balls and flatten slightly; these cookies don't spread very much. Line baking sheets with parchment paper and evenly space dough balls. Bake 12-15 minutes or until edges are set and middles no longer look raw.
  5. Remove from oven and let rest on baking sheets for several minutes then remove to wire rack to cool completely.

Saturday, August 7, 2021

Popcorn for the People

Popcorn for the People - ordered February 10, 2021, received February 17, 2021
This is another shamefully late post of something I ordered months ago and am only posting about now. No excuse other than I feel like I've been in a time warp since March 2020. The hours either drag minute by minute or months go by in a blink of an eye. Nothing in between. But I'm finally doing it now in the spirit of better late than never.
I like popcorn as much as the next person, usually kettle corn in a movie theater (and the number of times I've gone to a theater in the past year and a half can be counted on two fingers) or caramel corn in a rare moment of indulgence.
But an ad for Popcorn for the People caught my eye because it's also a business that employs and supports people along the autism spectrum. In case you haven't figured it out by now, I'm a consumer activist. Meaning, it isn't just about buying something but who I buy it from and what they support are often the catalyst for a purchasing decision. I've been especially mindful of it with the pandemic throwing so many people out of work while at the same time, I got an opportunity to come out of early retirement and got a job and a paycheck. So I spend that paycheck with more mindfulness to try and do some good with it.
One other thing I've been doing during the pandemic is sending care packages or gifts at random intervals to various friends. Just a "no special occasion but I'm thinking of you today and hope you're well" sort of care package. A side effect of Covid not to take friends or family for granted because you just never know what'll happen.
In the spirit of having every purchase I make mean something, I also think of what would matter to the recipient. In this case, I have a friend with a young adolescent son with autism. So placing an order with Popcorn for the People who employs people with autism seemed like exactly what I needed to do. 
Now, I also had to try it for myself, right? Before I send it to someone else, I have to put in some quality control. That's my view anyway. The order took only a week to arrive. Each bag I bought was $7 each. I ordered 5 bags and paid $39.50 total so shipping was pretty reasonable at $4.50 for the 5 bags.
Popcorn for the People offers a variety of flavors but my favorites are always going to be kettle corn and caramel corn. I'm not a fan of chocolate on my popcorn so I skipped that. I did get the white cheddar though as the third flavor (I got 2 each of the kettle corn and caramel corn) because I generally like white cheddar popcorn.
All of the popcorn was good but my favorite from this order was the caramel corn. Could I say Popcorn for the People popcorn was head and shoulders above all the popcorn I've ever tried? Well, I'm honestly not enough of a popcorn gourmand to say yay or nay. But I can say it was good popcorn, reasonably priced and supports a good cause so you can't really go wrong with it either. I sent my friend an order after I tried mine and when she got it, she told me it came at just the right time as her young son was having a bad day and, young as he was, was already wondering what he would do for a job when he grew up. While he may not specifically go to work for Popcorn for the People, I hope it helped him realize there are businesses out there who employ people with autism and even more people who support them.

Friday, August 6, 2021

Banana Cake with Cream Cheese Icing (recipe 17)

I'm deviating from the usual baked goods I put up on my blog that are good for care package mailings as that's where most of my baking goes. I'm back to trying to replicate my favorite banana cake from Icing on the Cake with recipe #17.
The reason for the change in pace is I'm also volunteering to bake for the local houseless population in my area. In the mutual aid group I belong to, I've discovered people who distribute food to them every week and I offered to make baked goods as part of that distribution. The first time I baked 5 different kinds of cookies (no pictures as they were recipes I'd already tried out and blogged about) and made maybe almost 100? I didn't count up everything.

I've made cookies and brownies before to be distributed to local people in need of food assistance and who probably rarely get homemade baked goods. This time around, I decided to mix up what they usually get and made cakes. This is one of them. I know from my experience doing food distributions for the food bank, before we switched to packaged bundles of food for mobile distribution (thanks to the pandemic) and the food bank clients could choose from certain categories of food, when it came to desserts the donated cakes from the local grocery stores were always popular. So I wanted to make cakes.
I've seen versions of this recipe around before and this one has been on my pinterest board for ages. It differs from the usual banana cake in how it's made. The two things that set it apart from the traditional bake, is first you bake the cake at a really low temperature (275 degrees vs the typical 350 degrees) then once you take the cake out of the oven, you immediately put it in the freezer for 45 minutes. That's meant to ensure the cake is moist.
It's a novel approach and it worked well in that this is a very moist cake. But most banana cakes are moist since the mashed banana adds so much moisture to the batter. This wasn't as fluffy as the Icing on the Cake banana cake but I already knew ahead of time it wouldn't be given the denseness of the texture, added by the freezer step. Still, the flavor was good. Just be warned that you do have to clear the space in your freezer and make sure the cake pan has plenty of room since you don't want your freezer items too close to the hot cake pan or they'll melt. In other words, keep your ice cream far, far away.
1 1/2 cups ripe bananas, mashed
2 teaspoons lemon juice
3 cups all-purpose flour
1 1/2 teaspoons baking soda
1/4 teaspoon salt
3/4 cup butter, softened
2 1/8 cups sugar
3 large eggs
2 teaspoons vanilla
1 1/2 cups buttermilk

Frosting
1/2 cup butter, softened
1 8-ounce package cream cheese, softened
1 teaspoon vanilla
3 1/2 cups confectioners' sugar
  1. Preheat oven to 275 degrees F. Line a 9 x 13 pan with foil and lightly spray with nonstick cooking spray.
  2. In a small bowl, combined mashed bananas with lemon juice; set aside.
  3. In a medium bowl, whisk together flour, baking soda and salt; set aside.
  4. In a large bowl, cream together butter and granulated sugar until light and fluffy. Beat in eggs, one at a time, then stir in vanilla.
  5. Beat in flour mixture alternately with buttermilk, mixing until just combined after each addition. Stir in banana mixture.
  6. Pour batter into prepared pan and bake for 60 minutes or until a toothpick inserted near the center comes out clean. Remove from oven and place directly into the freezer for 45 minutes.
  7. Frosting: cream together butter and cream cheese until smooth and well combined. Beat in vanilla. Add confectioners' sugar, one cup at a time, and beat on low speed until combined then on high speed until frosting is smooth. Spread over cooled cake.