Saturday, May 30, 2020

Bakery-Style Chocolate Chip Muffins

Bakery-Style Chocolate Chip Muffins - made May 6, 2020 from Little Sweet Baker
I don't have the talent to make really good muffins. You know the kind I'm talking about: crunchy muffin top, fluffy interior, good mouthfeel. And good flavor, of course. Unfortunately I don't remember that I don't possess this talent until after I've made muffins. Then it comes back to me.
Not that these muffins were bad, per se. But I have high standards for muffins and these didn't reach those heights. I mean, they were okay. But they didn't look as good as the one from the original blog (so make sure you click on the post title to take you there and you can see what I mean).
They're best fresh as the muffin top does have a little "crunch" (in a good muffin-top-ish way) but that top softens over time. Like in less than a day.
The insides weren't quite fluffy either and had a slightly dry mouthfeel. And I didn't overbake them, I swear. But if I stack them against an actual bakery muffin or a Costco muffin (I love those poppyseed Costco muffins), this didn't do it for me. User error? Maybe. I may have a heavy hand with muffin batter. This is a known issue. Which I'm sure I'll forget the next time I want to try a new muffin recipe.

2 1/2 cups all-purpose flour
1 tablespoon baking powder
1 teaspoon baking soda
1/2 teaspoon salt
1/2 cup unsalted butter, melted and cooled
1 cup granulated sugar
2 large eggs
1 cup buttemrilk
1 tablespoon vanilla extract
1 1/2 cups chocolate chips
  1. Preheat oven to 425 degrees F. Line a 12-cup muffin tin with paper liners.
  2. In a large bowl, toss together the flour, baking powder, baking soda, salt and chocolate chips. Set aside.
  3. In a medium bowl, whisk together the melted butter, eggs, buttermilk and vanilla. Slowly add to the dry ingredients. Gently fold together until just combined. Do not overmix.
  4. Divide the batter into the 12 muffin cups and bake for 5 minutes at 425 degrees F. Reduce the oven temperature to 375 degrees F and bake for another 12-15 minutes or until a toothpick inserted in the centers comes out clean. Do not overbake. Serve warm.

Wednesday, May 27, 2020

Cast Iron Flank Steak

Cast Iron Flank Steak - made April 21, 2020, adapted from Our Life Tastes Good
I think this is the first real-food recipe I've posted in awhile that didn't involve my Instant Pot. But I also love my cast iron skillet (Lodge pan, made in the USA).
In a perfect world, this would be easy to make. Marinate it first then sear the meat over high heat to lock the juices in, let rest, then cut and serve. But....this is me we're talking about. For some reason, I'm incapable of successfully searing meat. I know how to do it and I understand the concept. But I suck at it. I think it's because I've set off the smoke alarm too many times while cooking. So I'm always leery about searing the meat for too long and risking the smoke alarm outing my efforts. Which means I never sear the meat for long enough and I'll end up with somewhat browned outsides and a completely raw inside.
I'm not even talking "medium rare" or "rare". More like "raw". I'm Filipino. We don't do "raw". So I do what every non-cook does when the meat isn't cooking well. I cut the steak pieces smaller and cook them that way. Don't judge - it works! More or less. The marinade on this was pretty good although cumin is not my favorite flavor. If it's yours, then this is a great marinade. Especially if you know how to sear meat properly.
1/2 cup olive oil
3 tablespoons Worcestershire sauce
1/4 cup fresh lemon juice
1 tablespoon garlic, minced
1 teaspoon ground cumin
1/2 tablespoon chili powder
1/2 teaspoon red pepper flakes
1 tablespoon sugar
1 teaspoon salt
1/2 teaspoon black pepper
2 pounds flank steak, cut into strips if desired
  1. Combine marinade ingredients except for flank steak in small mixing bowl. Whisk to combine. 
  2. Place flank steak into gallon-size ziptop bag and pour marinade into bag. Zip to close tightly. Refrigerate for at least 30 minutes and up to 8 hours.
  3. Heat 12-15" cast iron skillet over medium high heat. Remove flank steak from marinade and discard marinade. Place steak in hot skillet and sear for about 5 minutes or until a crust forms on one side. Using tongs, turn steak over. Sear on other side for another 5 minutes or until cooked to 120 degrees F. Remove from skillet and rest for 5-10 minutes. Slice thinly across grain before serving.

Sunday, May 24, 2020

One Bowl Chocolate Cake

One Bowl Chocolate Cake - made May 4, 2020 from Crunchy Creamy Sweet
My pictures aren't very good as I wasn't paying a lot of attention or putting in much effort to take them but don't be put off by that. This is a delicious chocolate cake recipe.
Bonus points that it's also easy to make. As in one-bowl easy where you put all the ingredients in a bowl, mix, pour into pan and bake.
The texture is a perfect cakey texture, meaning not too heavy or dense (like a pound cake) and not too light or airy (like a chiffon). I always liken it to the texture of a box cake mix but better with more genuine chocolate flavor. The batter is thin because it has so much liquid in it but that's what contributes to the soft cakey texture when it's baked.
Pouring the frosting on top of the warm cake when it comes out of the oven is also reminiscent of a Texas sheet cake and is also equally delicious. If you want a simple, easy-to-make, delicious chocolate cake, you can't go wrong with this one.

1 cup all-purpose flour
1 cup granulated sugar
1/4 unsweetened cocoa powder
1 teaspoon baking soda
1/2 teaspoon baking powder
1/4 teaspoon salt
1 large egg
1/2 cup vegetable oil
1/2 cup buttermilk
1/2 cup hot water

Frosting
5 tablespoons unsalted butter
1/4 cup unsweetened cocoa powder
1 1/4 cups powdered sugar
2 to 3 tablespoons milk
1/2 teaspoon vanilla extract
  1. Preheat oven to 350 degrees F. Line an 8-inch square baking pan with foil and lightly spray with nonstick cooking spray.
  2. In a large bowl, whisk together flour, sugar, cocoa, baking soda, baking powder and salt. 
  3. Add egg, oil, and buttermilk; whisk well. Add hot water and whisk until batter is smooth. Pour into prepared pan.
  4. Bake for 25-30 minutes or until a toothpick inserted near the center comes out clean or with a few moist crumbs.
  5. Make frosting: melt butter in a saucepan over medium-low heat. Add cocoa powder and whisk in. Cook for 2 minutes; do not boil. Remove saucepan from heat and whisk in powdered sugar. Add vanilla and milk, one tablespoon at a time. Pour over warm cake and spread evenly with a spatula. Let cool before cutting.

Saturday, May 23, 2020

Sweet Potato Biscuits

Sweet Potato Biscuits - made April 16, 2020 from The Free Range Life
Here's a simple biscuit recipe if you have some extra sweet potatoes on hand and are looking for something to do with them. Like if you happened to buy a bag at Costco, let's say, and there are only so many sweet potatoes you can eat. Just me?
Anyway, I'm not a good biscuit maker. Too heavy a hand, can't resist the temptation to mix too much and keep trying-not-trying to mix in the flour enough. As you can tell by the pictures, I wasn't successful.
Still, this recipe survived my heavy-handed biscuit mixing technique. Or lack of. It's pretty dense (once again, just me?) but it's crunchy when first baked and when you slather a warm biscuit with butter, it's hard to go wrong.
This does soften later due to the moisture from the sweet potatoes so I recommend eating warm out of the oven. It has good sweet potato flavor even if I wouldn't describe this as "flaky".
2 cups flour
1/2 teaspoon salt
3 teaspoons baking powder
4 tablespoons butter
1 1/2 cups cooked, mashed sweet potatoes
1-3 tablespoons milk if dough is too dry
  1. Preheat oven to 425 degrees F.
  2. Combine flour, salt and baking powder in large bowl. Cut in butter until mixture resembles coarse meal.
  3. Add sweet potatoes and mix. If dough is too dry, add milk, 1 tablespoon at a time.
  4. Pat into a thick, round disc on a floured surface. Cut out rounds with a biscuit cutter and line in a lightly greased cast iron skillet or baking sheet.
  5. Bake for 10-15 minutes or until lightly browned. Serve warm.

Tuesday, May 19, 2020

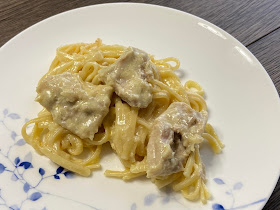
Instant Pot Chicken Alfredo

Instant Pot Chicken Alfredo - made April 28, 2020 from Shugary Sweets
I would say this recipe couldn't be easier to make but apparently, there is a way for it to fail. And you can trust me to find that way. The original recipe said using frozen chicken breasts is fine. I tried it with frozen boneless, skinless chicken thighs. Uh, I don't recommend frozen chicken at all. By the time the 8 minutes pressure cooking time plus the 8 minutes of natural release time was up, the chicken was still raw in parts. Ugh.
I took the chicken out, sliced it into smaller pieces, put back in the pot, set the pot to Saute mode and finished cooking the chicken that way. The noodles were pretty soft by then but at least I'm not going to kill myself with salmonella poisoning. And you don't have to either.

Taste-wise, this is good, although usual disclaimer that Alfredo sauce is pretty rich, thanks to the heavy cream and Parmesan cheese and the oil separated from the cheese after it cooled and was reheated the next day. Which wasn't very appetizing, truth be told. So a little will go a long way.

1 1/2 cups chicken broth
1 1/2 cups heavy whipping cream
1 teaspoon garlic, minced
8 ounces fettuccine noodles, broken in half
1 pound chicken breasts (I used boneless, skinless chicken thighs)
1 cup Parmesan cheese, shredded
salt and pepper to taste
  1. Layer in ingredients in order listed in Instant Pot: chicken broth, heavy whipping cream, garlic and noodles, covering noodles completely in liquid. Do not stir. Top with chicken.
  2. Secure lid and, with vent in sealed position, set on Manual for 8 minutes. Once completed, allow to naturally release for another 8 minutes then do a quick release. 
  3. Open carefully, remove chicken and add Parmesan cheese. Stir to combine. Slice chicken and add back to pot. Salt and pepper to taste. Stir and allow dish to sit for a few minutes for sauce to thicken. Serve warm.

Tuesday, May 12, 2020

Brown Sugar Butter Cookies

Brown Sugar Butter Cookies - made April 19, 2020 from Tastes of Lizzy T
 I already have a favorite sugar cookie recipe and now it turns out I have a favorite brown sugar cookie recipe. Yup, this one.

Everything I liked about my favorite sugar cookie recipe are the same things I like about this brown sugar cookie recipe, mainly the taste and the soft, dense texture. In fact, I might like this one even a tad bit better because the brown sugar gives it that little extra punch in the flavor department.

For something simple and straightforward, this is a good cookie to make, no muss, no fuss. It doesn't spread much and stays thick. As always, I make the dough, portion into dough balls then freeze until I'm ready to bake them.
I made these to send in a care package to a friend (in the US) and they also held up well in the domestic mail.

1 cup unsalted butter
3/4 cup brown sugar (5 ounces)
1 large egg
1 teaspoon vanilla extract
2 1/4 cups all-purpose flour (10 ounces)
1/2 teaspoon baking powder
1/2 teaspoon salt
1/2 cup granulated sugar for rolling, optional
  1. Cream butter and brown sugar together in a stand mixer fitted with the paddle attachment, scraping down the sides of the bowl as needed. Add egg and vanilla extract; mix to combine.
  2. In a separate bowl, whisk together flour, baking powder and salt. Add dry ingredients to butter-sugar mixture and mix until just combined. Do not overmix.
  3. Portion dough into golf-ball size dough balls and flatten slightly into thick discs. Cover and chill or freeze several hours or overnight.
  4. When ready to bake, preheat oven to 350 degrees F. Line baking sheets with parchment paper. Roll dough balls/discs in granulated sugar if desired. Evenly space on prepared baking sheets and bake for 10-12 minutes until the edges are set and the middles no longer look raw. Cool on baking sheets for 3-4 minutes then transfer cookies to wire rack to cool completely.