Saturday, August 13, 2016

Molten Lava Cakes - again

Molten Lava Cakes - made July 2, 2016, recipe from Christine Byrne, Buzz Feed staff
Don’t ask me why I made molten lava cakes with Nutella in the middle again. I don’t know. Because I can, I suppose. Or I wanted to rectify the mistake I made last time in taking them out of the ramekin too soon while they were still hot and fragile and wanted to see if I could do it better the next time. So I tried a different recipe and corrected my mistake from the first one.

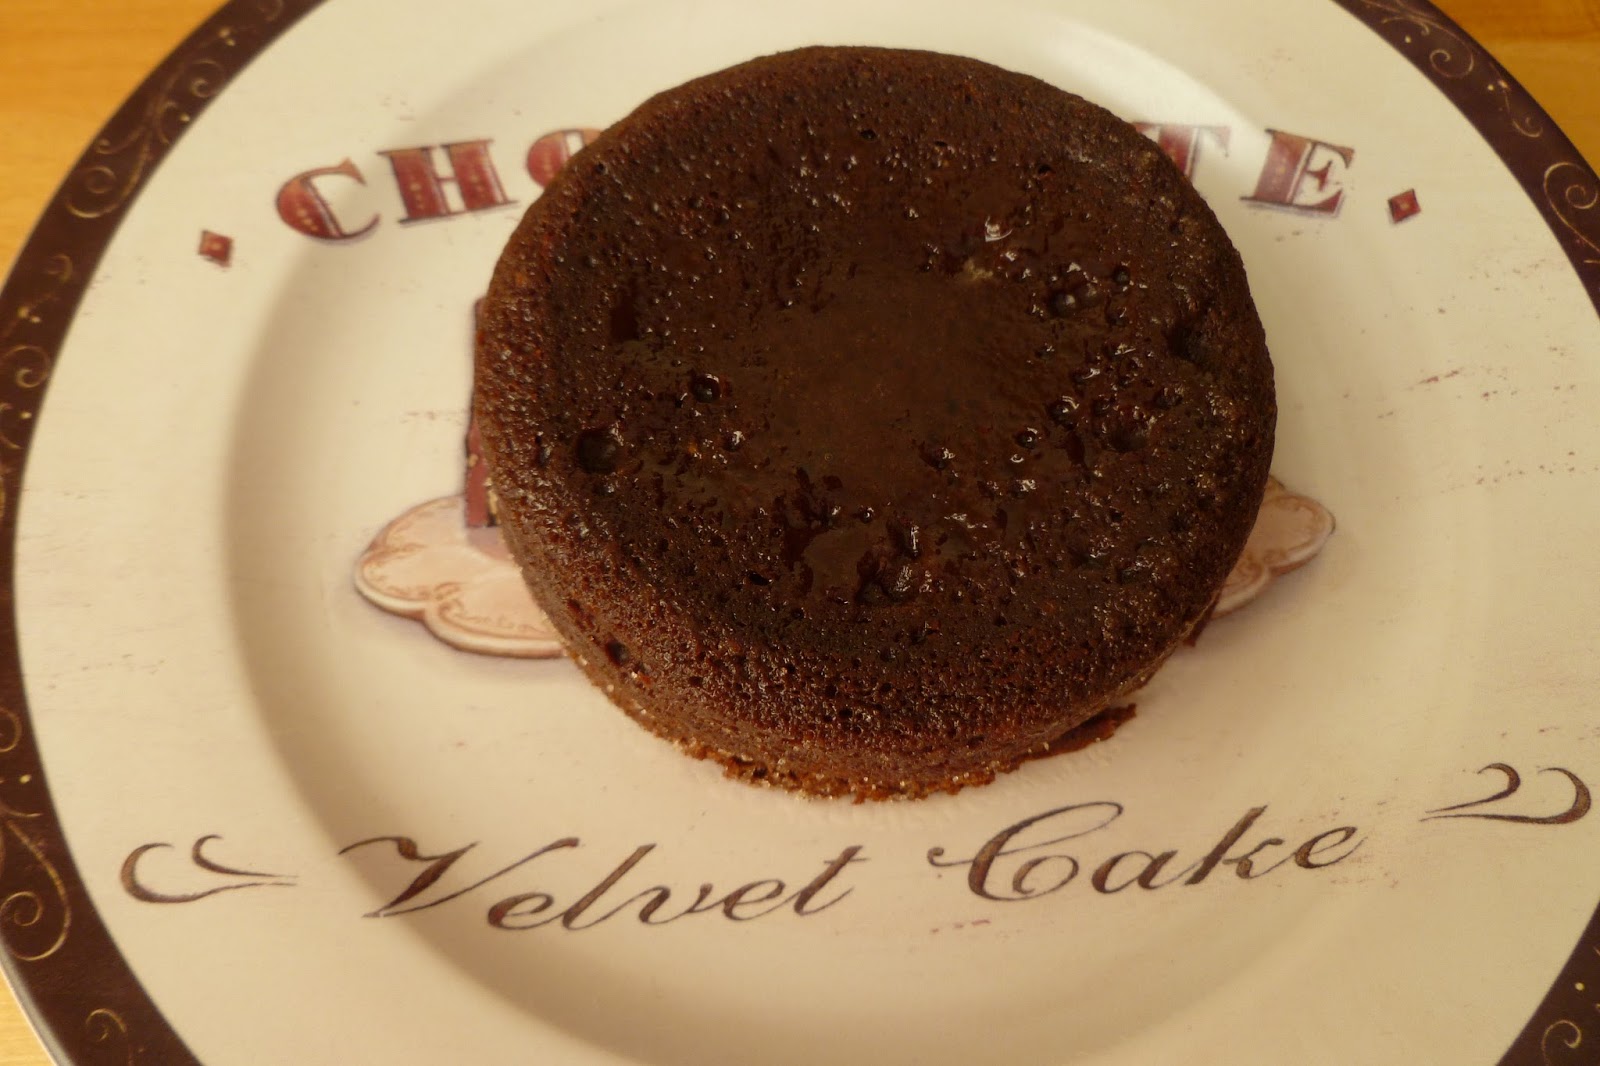
It actually worked (it doesn’t always). Instead of buttering and flouring the ramekins, I sprayed them with nonstick cooking spray and sugared the insides by dropping a little granulated sugar and tapping them around to cover most of the inside. After I took the cakes out of the oven, I did manage to let them sit in the ramekins undisturbed for 5 minutes. Then I loosed the sides with a small spatula, upended them onto a dessert plate and kept the ramekin in place for another 5 minutes. Take off and tada – whole cake with the molten chocolate still on the inside. 
Similar to the last molten chocolate cake I made, this one was incredibly rich and chocolaty. The cake part was a bit more dense than the other recipe I tried, almost like a flourless chocolate cake and the middle part incredibly gooey, helped along by the warm Nutella. You definitely want to have some chocoholics with you when you make this. Half a ramekin was my limit. In one sitting.

4 ounces semisweet baking chocolate, chopped
2 tablespoons unsalted butter, at room temperature, plus more for greasing custard cups
2 tablespoons sugar, plus more for the custard cups
2 large eggs
2 tablespoons all-purpose flour
1/8 teaspoon kosher salt
PREPARATION
1. Preheat oven to 425°F, and grease two 6 to 8-ounce custard cups or ramekins generously with butter. Put a small spoonful of sugar in each cup, then turn the cup sideways and rotate it so that the sugar is coating the butter all around. Dump out any excess sugar. Place the greased cups on a baking sheet or oven safe dish.
2. Put the chopped chocolate in a microwave-safe bowl. Microwave it on high for 30 seconds, take it out and stir it, then microwave it for another 30 seconds and stir it again. It should be completely melted. If there are still chunks of unmelted chocolate, microwave for another 20 seconds and stir.
3. In a medium mixing bowl, cream the room temperature butter and the sugar with an electric mixer or a rubber spatula. The mixture should be thoroughly combined, smooth, and paste-like, not lumpy.
4. Add the two eggs to the creamed butter and sugar, and beat it with the electric mixer or a whisk until everything is combined and the mixture is starting to foam, about a minute. Add the flour and salt, and again beat everything with the mixer until it’s thoroughly mixed.
5. Add about 1/3 of the melted chocolate to the mixture in the mixing bowl, then use a rubber spatula to gently fold it in. Add the rest of the chocolate mixture, and fold together until you have a uniform batter with no streaks.
6. Divide the batter evenly between the two greased custard cups, then bake the cakes in the preheated oven until the tops are just set but the cakes still jiggle slightly when you shake them, about 11 minutes.
7. Let the finished cakes sit in cups for five minutes when they’re finished baking. Then, flip each cup over on a dessert plate, and tap the bottoms of the cups so that the cakes fall out.
8. Serve immediately. If you want, you can garnish them with powdered sugar, whipped cream, and berries.

Friday, August 12, 2016

"Perfect" Snickerdoodles

"Perfect" Snickerdoodles - made dough July 4, 2016 from Cookies and Cups
Along with the crème brulee, one of my guests also asked for snickerdoodles. Did I go with my tried and true recipe? Of course not! I wanted to try a new recipe so I did.

This was actually pretty good. I think I underbaked it just a tad too much though or else ate it too soon after I took it out of the oven as it was a little gummy in the middle. But if I had eaten it the next day, I think it would’ve been perfect because that slight gumminess would’ve been more like a moist cookie.

Snickerdoodles are easy to overbake and when you bake them too long, they’ll be cakey and dry then cakey and crunchy. I abhor dry and crunchy so I’m paranoid about overbaking and err on the side of underbaking. This stayed pretty thick and didn’t spread too much so that was another point in its favor. 
1 cup butter
3/4 cup granulated sugar
1/2 cup brown sugar
1 egg plus 1 egg yolk
1 tablespoon vanilla
1 teaspoon baking soda
1 teaspoon cream of tartar
1/2 teaspoon salt
1 teaspoon cinnamon
2 3/4 cups flour

Cinnamon Sugar
1/4 cup granulated sugar
1 tablespoon cinnamon
  1. In bowl of a stand mixer, beat butter and both sugars until light and fluffy, 2-3 minutes. With mixer on medium speed, add egg, yolk and vanilla; beat for another minute, scraping down the sides of the bowl as needed.
  2. With mixer on medium low, mix in baking soda, cream of tartar, 1 teaspoon cinnamon and 1 cup flour. Turn mixer on low and add remaining flour. Mix until just combined. Do not overbeat.
  3.  Portion into golf-ball-size dough balls, cover and chill or freeze for several hours or overnight.
  4. When ready to bake, preheat oven to 325 degrees F. Line baking sheets with parchment paper.
  5. Combine 1/4 cup sugar and 1 tablespoon cinnamon in a small bowl. Roll dough balls in mixture and evenly space on baking sheets. Bake 10-12 minutes. Remove from oven, let set for several minutes then transfer cookies to wire racks to cool completely.

Wednesday, August 10, 2016

Restaurant Review: Sara's Kitchen

Sara's Kitchen - brunch on July 23, 2016
I haven’t done restaurant reviews in awhile but I still like to plug small business owners and mom & pop places for people to try. Even if you don’t live where I live and have access to the places I write about, my hope is it prompts you to consider “eating local” at a small business in your area. Eating local to me doesn’t have to be the super uppity gourmand places with high prices, large plates and small portions. And it doesn’t have to be the dive-y greasy spoon where you risk ptomaine poisoning. C’mon, there’s a lot of middle in between there.
Berry Shortcakes
Sara’s Kitchen is the kind of place I’m talking about. It’s small, seems like it’s been there awhile and they don’t have a super glitzy website or marketing gimmicks. They just serve good breakfast and brunch food. I love breakfast and brunch so my biggest problem is narrowing down what I’m going to eat. Because there were lots of good choices on the menu, many of them the traditional breakfast fare that I love. I just can’t eat them all at once.
Extra Crispy Bacon, Scrambled Eggs and Hash Browns

Short Stack (2) Pancakes
This time around, I compromised and got the chicken fried steak with eggs and hash browns with a side order of 2 pancakes. Why, yes, that is a lot of food. I ate the pancakes, a bite of the steak, two bites of eggs, 1 bite of hash browns and took the rest home to eat later that day. Win-win. My friend Shawn got the French Toast combo which came with bacon, eggs and hashbrowns. Both of us liked our respective orders. Was it gourmet? No. Was it good? Yes. All served by some very nice ladies so it was a good experience and one I would recommend.
Chicken Fried Steak, Scrambled Eggs and Hash Browns

Sunday, August 7, 2016

Poke Turtle Brownies

Poke Turtle Brownies - made June 25, 2016 from Carlsbad Cravings
I took a brief break from cookies to make brownies. Brownies have long been my go-to desserts but lately it’s been easier to make cookie dough to freeze and bake later. Whereas brownies I usually bake right before I need them to bring into work or a party so they require a trifle more timing and planning.
Turtle brownies are always a favorite since they involve chocolate and caramel. I’m not a fan of nuts in my brownies but on top of them is okay. This version had the added decadence of poking holes into the top of the baked brownie so there was room for the caramel layer to dribble inside the brownie itself. I loved that concept and poked with abandon (and a wooden chopstick) when the brownie came out of the oven.

I cheated and used a jar of salted caramel sauce from Trader Joe’s rather than making my own caramel. I don’t have good experience with making my own caramel so I don’t even bother to try anymore, not when Trader Joe’s is right there and they make a spankin’ good caramel. I warmed up the jar a bit so that the caramel would pour more easily. I used about half of the jar to fill in the holes and saved the other half for the final topping.
Surprisingly, I even liked the frosting in this recipe and you know I’m not a frosting person. Let the caramel set before you frost the brownie or else they’ll intermingle. Not that that’s a bad thing but it’s easier to frost without sticky caramel getting in the way. Toast the nuts (always) to bring out the flavor and add some crunch. I used mini chocolate chips for looks and to get more chips on there but you can also use the regular size. Once you’ve sprinkled enough nuts and chocolate chips to your satisfaction, drizzle the remaining caramel over the brownies and there you have decadence personified.
I haven’t met a turtle brownie yet that I didn’t like and this was no exception. Cut the pieces small as they are rich. The caramel didn’t drip as much as I expected into the brownie itself although it certainly added to the moistness and richness. Next time I think I’ll use 2/3 of the jar to fill in the holes instead of just half a jar.
1 cup butter (2 sticks), melted
2 cups granulated sugar
3/4 cup unsweetened cocoa powder
4 large eggs
2 teaspoons vanilla extract
1 cup flour
1/2 teaspoon baking powder
1/2 teaspoon salt
1/4 - 1/2 teaspoon cinnamon, optional
1 cup semisweet chocolate chips
1 1/4 cups pecans, roughly chopped
3/4 cup caramel sauce (I used salted caramel from Trader Joe's)
1/4 cup mini semisweet chocolate chips

Chocolate Frosting
6 tablespoons butter, softened
1/4 cup + 2 tablespoons cocoa powder
2 tablespoons light corn syrup
1 teaspoon vanilla extract
1 1/2 cups powdered sugar, sifted
2-3 tablespoons milk
  1. Preheat oven to 350 degrees F. Line a 9 x 13" pan with foil and lightly spray with nonstick cooking spray; set aside.
  2. Cream together butter, sugar and cocoa powder in the bowl of a stand mixer with the paddle attachment. Beat at medium speed for 2 minutes. Add eggs to the batter, one at a time, beating after each addition just until incorporated. Beat in vanilla.
  3. In a separate bowl, mix together flour, baking powder, salt and cinnamon if using then beat into batter just until combined. Add 1 cup semisweet chocolate chips and stir until just combined. Pour batter evenly into pan. 
  4. Bake for 30-35 minutes or until toothpick inserted near the middle comes out with moist crumbs. Let pan cool on a wire rack for 5 minutes then poke holes all over with the handle of a wooden spoon or a chopstick. Pour 1/2 cup caramel over brownies and spread into holes with a spatula. Refrigerate brownies for one hour or freeze for 30 minutes to let the caramel set. 
  5. Meanwhile prepare the chocolate frosting: beat butter, cocoa, corn syrup and vanilla in a small bowl until blended. Add powdered sugar and 2 tablespoons milk; beat until smooth, adding additional milk if needed to reach spreading consistency.
  6. Once caramel has set, frost brownies. Sprinkle evenly with 1/2 cup chopped pecans, 1/4 cup mini chocolate chips and drizzle with 1/4 cup caramel.

Saturday, August 6, 2016

Creme Brulee from Cooking Classy

Creme Brulee - made July 3, 2016 from Cooking Classy
I rarely make crème brulee. For one thing, it’s hard to make for just one person unless you’re going to take just a fraction of all of the ingredients to make one serving. Do you know how hard it is to gauge half an egg yolk? And I would only want to make one serving if it was just for me because no one person should eat double servings of crème brulee. Not if she wants to fit into her clothes the next day.
But I was having friends over for dinner and one of the requested desserts was crème brulee. Since I hadn’t made it in so long, I thought I’d better do a trial run of a recipe the week before the dinner to make sure I could do it right.  How embarrassing would it have been if I screwed up dessert?

Most crème brulee recipes are pretty simple. Heat the cream, steep with the vanilla bean pod, whisk the egg yolks with sugar, temper in the hot cream, pour mixture into ramekins, bake in a water bath. Seriously, it’s that easy.
What is not easy, however, is gauging when it’s done. If you overcook crème brulee, it’ll be scrambled eggs. If you undercook it, instead of smooth custard, it’ll be liquidy and drippy that will be no fun to eat. To tell if it’s done, you’re supposed to shake it and see if the middle is still jiggly but not too jiggly. But remember that water bath? It’s not like you can shake the whole pan without risking some of your water spilling into your crème brulee. And unless you have fingers of steel, you can’t dip in your bare hand to jiggle the ramekin itself. Using a potholder potentially hides the custard you’re trying to tell if done.
Some recipes advocate putting a knife through it and if it comes out with custard (instead of liquidy cream), it’s done. I have never conducted the knife test successfully. For one thing, I don’t like making the knife slit into my custard; it ruins the smooth surface of the top to make a cavity in it. For another, it’s still hard for me to tell if it’s done or not based on the custard smear on the knife. So I do the jiggly test very carefully, making sure the water doesn’t spill over into the ramekins. Even then, I’m not always sure whether it’s still too jiggly or not jiggly enough. Remember, the custard will also “set” once it cools. So you won’t know how done (or not) the crème brulee is until after you’ve taken it out and chilled it thoroughly.
This one turned out okay, once I stopped second guessing myself. It still had a bit of a jiggle in the middle when I took it out but once I had chilled it overnight and then bruleed the top, it turned out pretty well. If you do happen to undercook your crème brulee, after you brulee the sugar on top, put it back in the fridge for a few minutes to firm it back up.

The taste was smooth vanilla creaminess. The only thing I wish had worked better is all the vanilla bean seeds from the vanilla bean pod I used sank to the bottom. Other than that, I thought this was a pretty good crème brulee. 
4 cups heavy cream
1 1/4 cups granulated sugar, divided
1 pinch salt
8 large egg yolks
1 vanilla bean
1/2 teaspoon vanilla extract
hot water for water bath
  1. Preheat oven to 325 degrees F. Pour cream into medium saucepan. Scrape seeds from vanilla bean and add to saucepan along with vanilla bean pod. Heat mixture over medium-high heat, stirring occasional, until it reaches a light boil. Remove from heat and let rest 15 minutes.
  2. In a mixing bowl, whisk together 3/4 cup granulated sugar and salt with egg yolks until mixture becomes slightly pale. Remove vanilla bean pod from cream. 
  3. While whisking, pour cream mixture into egg yolk mixture. Stir in vanilla extract.
  4. Place ramekins in baking pans. Divide cream mixture among ramekins, filling each nearly full. Pour hot water into pan and fill water level to about halfway up the sides of the ramekins. Bake for 30-45 minutes, depending on size of ramekins until set but centers still jiggle slightly. Cool at room temperature for 30 minutes then transfer to refrigerator to chill 3 hours.
  5. Remove from refrigerator and let rest 20 minutes, then sprinkle tops evenly with remaining sugar. Holding a hand-held kitchen torch, about 4 inches from sugar, evenly brown sugar. Remove flame just before desired shade is reached. Return to refrigerator and chill 20 minutes. Serve cold.

Thursday, August 4, 2016

Boston Bakery Crawl - Shake Shack and Clear Flour Bread

Shake Shack and Clear Flour Bread - visited July 10, 2016
Before I left for the airport on my last day in Boston, I had a clear mission. The first part was to have lunch at the Shake Shack which I saw on Newbury Street during my walks the day before. You can’t imagine how thrilled – yes, thrilled – I was to realize there was one in Boston that was in easy walking distance of my hotel. I love Shake Shack burgers. I’d only had it once when I was in Manhattan many years ago and I still remember it. That’s how good I thought their burgers were. 

I went right after church service when they had just opened so there were no crowds to worry about. I ordered a single cheeseburger, fries and, of course, a chocolate shake. Their prices for burgers and fries were quite reasonable, especially for a metropolitan city like Boston. $5.29 for the single cheeseburger and a couple of bucks for the crinkle cut fries. It was the shake that took me aback, also at $5.29, the same price for the cheeseburger. Huh. I know that’s what they’re known for but that seemed like a lot for a shake. Don’t get me wrong; it was a great shake but $5.29? Yes, I’m kinda cheap. Still, no regrets. The burger was as good as I remember, the fries were good and the shake was delicious.
More importantly, it fueled me properly for the second part of my mission and that was a 3-mile walk to Clear Flour Bread. I had time before I had to leave for the airport and I wanted the exercise so I could justify buying whatever caught my fancy for the plane ride home. Forget the joke about airplane food – truth is they don’t feed you anymore, even for a cross-country flight, so I was bringing my own snacks. And I wanted those snacks to come from another bakery I’d heard about and had been recommended to me by another foodie.
I walk as much as possible when I’m on vacation. It’s a great way to explore wherever I’m at and there’s less likelihood of missing anything by taking the subway. 3-5 miles one way is my typical walking range in a day. I enjoyed the walk to Clear Flour Bread, passing Boston University along the way. It was somewhat drizzly during my walk but it didn’t rain hard enough to detain me from my purpose. When it comes to bread bakeries, short of a typhoon, not much can deter me.
Clear Flour Bread is tiny. As in, tiny. Most of the space is taken up by the bakery in the back, the baking racks and a counter where they take your order and conduct the payment transactions. Beyond that, if you have to leave room for the bakery door to open and close to let customers in and out, the remaining space can fit about 4-5 people in line. Small people or skinny people. No joke. But that shouldn’t deter anyone from going because you can always form a line outside as well and, having stepped in as the 4th customer in the shop, the smell of freshly baked and baking bread was enough to bring me to my knees. Seriously, nothing smells as good as bread baking. I didn’t mind waiting in line because I was just happy to be in that heavenly smelling shop. Just happy.
I really wanted to try their croissant as yelp reviews called it top notch. Unfortunately they didn’t have any left when I got there so I had to settle for the pretzel croissant. I’ve never had a pretzel croissant and had no idea what the counter person was talking about when she described it “like a pretzel but a croissant”. But I stepped out on a limb of faith (it doesn’t take much) and got one.
Pretzel Croissant
And since I don’t walk 3 miles one way and 3 miles back for one croissant, I also bought a chocolate croissant. I would’ve like the more traditional pain au chocolat but the chocolate croissant was close enough.
Chocolate Croissant
I had both croissants later in the day. One when I was at the airport waiting for my flight to board and the other one during the 6 ½ hour flight back home. It was a bit of a shame that I hadn’t eaten at least one of them when I bought them but I wasn’t hungry then since I was still fueled up from Shake Shack. I say it’s a shame because I think I could have raved more about the croissants. They were good at room temperature but I think I would have found them far more amazing had I had them fresh out of the oven and somewhat warm. As it was, they didn’t stand out for me as much as I could’ve wished. Don’t get me wrong, they were good. The pretzel croissant really did taste like a pretzel but had the texture of a flaky croissant. The chocolate croissant was as good as a pain au chocolat (at room temp). Next time I go back, I’m going hungry and will consume on premises. Or just outside since there’s no room inside.

Tuesday, August 2, 2016

Boston Bakery Crawl - Sweet Bakery and Georgetown Cupcakes

Sweet Cupcakes and Georgetown Cupcake - visited July 10, 2016
After Flour, I hit two cupcakeries on my walk. One was Sweet Bakery which was (almost surprisingly) empty when I walked in. In fact, it looked so deserted, I thought it was closed. But I walked in and someone came in from the back. I wonder if the quiet was due to their location as it wasn’t on a very busy part of Massachusetts Avenue. Their flavors seemed like the typical chocolate, vanilla, red velvet but there were also less typical flavors such as Cappuccino and Root Beer Float.  I myself scored a caramel macchiato cupcake (it was the last one left).


I thought it was pretty delicious. The cupcake was a bit on the small side, similar to the “normal” size that Kara’s Cupcakes does and smaller than Sprinkles. Too much frosting for me but the cupcake itself had a really nice crumb and the perfect moist cakey texture. The flavor wasn’t too strong and I had been hoping for a caramel filling but alas, it was just cupcake with a mound of frosting. I liked the frosting for the flavor but there was just too much of it for this non-frosting person. That’s the downside of cupcakes. With the exception of Sibby’s, almost all of the cupcakeries I’ve tried top the cupcakes with a ton of frosting. Some people love that. Unfortunately I’m not one of them. Still, I thought it was a good cupcake and not at all representative of the empty shop I walked into.


On the opposite end of the spectrum in terms of patronage was Georgetown Cupcake. I went to the one on Newbury Street and there was a small line out the door when I arrived and the shop was full. I had ample time to take pictures of the cupcakes arranged behind the glass cases and make my cupcake selections of Salted Caramel and Vanilla. Normally I get red velvet or chocolate when trying a new place for the first time but I’ve learned to also judge a bakery by its vanilla products. Why? It’s not hard to make a really great chocolate cupcake and most people love chocolate. Vanilla, in my mind, is so simple and sometimes the simple flavors are the hardest to do really well. So I thought I’d test out Georgetown on the vanilla flavor spectrum.


Both cupcakes were good. Once again too much frosting for me but that’s par for the course. I wished for more salted caramel in the salted caramel cupcake as most of it came from the dollop on top of the frosting. This is another case where I wished they had put it in as a filling like Kara’s does. 


The vanilla was also good. I have to confess though – maybe it was because I ate the cupcakes the day after I bought them and not right when I walked out of the shop but I thought they were just good, not spectacular. Given the crowd at the shop, I had expected spectacular. Glad I got to try them though but between Georgetown and Sweet, I’d say the cupcake from Sweet was a tad more moist and more fluffy.