Monday, November 9, 2015

New Classic Brownies

New Classic Brownies - made October 18 from Cookies and Brownies by Alice Medrich
I love Alice Medrich’s brownie recipes. They’ve always (or almost always) turned out for me. Not to mention her other recipes. So it was a surprise to me that I found one of her recipes in one of her cookbooks on my shelves that I hadn’t tried yet. In flipping through the recipe, I realized why. Mostly because it involved baking brownies then dunking the pan in an ice bath which probably seemed like a lot of trouble when I first read the recipe and I tried something simpler and more commonplace.
Some months/years later, I was in the mood for a new brownie recipe and, instead of being daunted by something new, I wanted to do something different to cut through my jaded brownie tastes. And trying a new way to make something I’ve made for years was appealing. Not to mention not a big deal at all. This basically calls for baking the brownies at a high temperature for a short period of time then dunking it immediately into an ice bath (in a larger baking pan filled with ice water; careful not to get the brownies wet) to let it cool abruptly.
The purpose of this method is to create brownies with a “crunch” on the outside but to have a moist, creamy, fudgy inside. Lo and behold, it actually worked too. The fudgy interior wasn’t new to me since that’s how I’ve always tried to make my brownies but the “shell” outside was new. It wasn’t tough or super crunchy but it did have more of a shell than the usual brownies and this contrasted nicely with the creamy fudgy goodness on the inside. 
Monitor the baking time carefully though. My oven tends to run a little too hot at 400 degrees and I left the brownies in there for the full 20 minutes that the recipe called for. At first I was afraid I had overbaked the brownies (OMG, overbaked! Crisis!) but the ice bath saved it and kept the brownies moist. Still, next time I’d probably shave a couple minutes off the high baking temp just in case.
4 ounces (1 stick, 1/2 cup) unsalted butter
4 ounces unsweetened chocolate
1 1/4 cups sugar
1 teaspoon vanilla extract
1/4 teaspoon salt
2 eggs
1/2 cup all-purpose flour
  1. Preheat oven to 400 degrees. Line an 8 x 8" baking pan with foil and lightly spray with nonstick cooking spray.
  2. Melt butter and chocolate together in the top half of a double boiler over barely simmering water; whisk until smooth and completely melted. Remove from heat.
  3. Stir in sugar, vanilla and salt. Add eggs, one at a time, stirring until incorporated.
  4. Stir in the flour, beating with a wooden spoon until incorporated and batter is smooth and glossy.
  5. Pour batter into prepared pan. Bake for 20 minutes.
  6. While the brownies are baking, prepare an ice bath in a pan large enough to hold the brownie pan. Remove brownies from oven and immediately place in ice bath, taking care not to splash water onto the brownies.

Friday, November 6, 2015

Restaurant Review: Cucina Venti

Cucina Venti - dinner on October 15, 2015
Quick write up on Cucina Venti, an Italian restaurant my almost-monthly dinner club group tried out last month. It’s in a somewhat weird location, not only in a strip mall but in a strip mall surrounded by business parks. Meaning there’s not much else going on in that area other than office space.

There was some sort of large group gathering or party inside the restaurant so my friends and I opted to eat outside and had almost the entire patio area to ourselves. Which was kinda nice as we’re not known for quiet murmurings as we caught up on everyone’s news and freely exchanged (strong) opinions and (pithy) observations about mutual acquaintances. Okay, okay, we gossiped. And we weren’t that quiet about it, ha.

We carb’d up first with bread – a round, scone-like serving cut into triangles. Nothing scone-like about it though, just garlicky bready goodness. For a little protein, we had an appetizer of meatballs in a crust served with marinara sauce. In other words, totally bad for you and totally good. Isn’t that how it always is?

My memory fails me on what everyone got but at least I took a picture of each entrĂ©e to document for posterity. I can’t even remember what my own order was called but I do remember it was pretty good. The broth wasn’t as rich as an alfredo sauce (which I didn’t want) but was tangy with tomatoes and quite flavorful. While nothing quite sticks out in my memory, I did think Cucina Venti was a solid place to go for good Italian-American food. Service was great and we had very nice wait staff who wisely left us alone to our gossip, er, pithy observations and exchange of dialog.


The only disappointment I would have to log is I didn’t think their dessert choices were that compelling. I’m unmoved by tiramisu as a dessert since I’m not fond of most custard-based desserts and I thought the chocolate cake we got needed some more chocolate flavor.  It was appealingly presented though so points for the creativity on the starbursts. Or “spider webs” as one of my friends called them. 

Wednesday, November 4, 2015

Pancakes - the weekend breakfast

Pancakes - made October 17, 2015 from The Baker Upstairs
I meant to blog this a week and a half ago when it actually was the weekend but alas, clearly that didn't happen. But hey, here you go for this coming weekend. Although, really, pancakes are good anytime. There's no faster or easier way to use up milk in case that was your situation as well as mine.
My only "complaint" about pancakes (and yes, we're in First World territory here) is I can never make mine look like those picture perfect golden brown fluffy cakes like everyone else's blog seems to show. With a perfectly uniform golden color all around rather than a pattern of swirls and "veins". Nope, nothing like that here. I honestly don't know why. I do fry them in an ordinary frying pan, not a griddle, but I don't know why that would make a difference.
Fortunately, I'm more about taste than appearances and these tasted perfectly fine. Not quite as fluffy as the Alton Brown pancakes but good nonetheless. Oh, and if you make aesthetically pleasing pancakes, please feel free to share your how-to secrets of success.
2 cups flour
5 teaspoons baking powder
4 tablespoons sugar
1 teaspoon salt
2 eggs
1/2 cup oil
2 cups milk
  1. Preheat a griddle or large skillet over medium heat,
  2. Combine dry ingredients in a medium bowl and whisk with a fork to combine.
  3. In a separate bowl, mix eggs, oil, and milk together until well combined. Add to dry ingredients and mix with a fork until mostly combined. Do not overmix.
  4. Lightly butter the preheated griddle and pour the batter by 1/4 cup scoops onto the griddle. Cook 3-4 minutes or until there are bubbles throughout the top of the pancakes and the edges look dry. Flip over and cook for another minute or until lightly browned on the bottom.
  5. Serve warm with butter or syrup. Makes 20-24 pancakes.

Sunday, November 1, 2015

Restaurant Review: Mo's, the Breakfast + Burger Joint

Mo's - brunch on October 10, 2015
I love breakfast food. I could eat it for any meal. And when I meet friends over the weekend, I try to engineer some kind of reason to meet for breakfast or brunch if the timing was right. Fortunately, it was when my friend Shawn and I met for brunch at Mo's, a place we'd wanted to try since we saw it when we had burgers at Brown Chicken Brown Cow.
Benedict Angelo: Canadian bacon, poached eggs, Hollandaise sauce served over homemade buttermilk biscuits $13
We had the choice of sitting outside (with heat lamps if it got chilly) or inside. It was an overcast day but the perfect temp to sit outside so we chose outdoor dining. We got there early enough that we were able to be seated right away. I pretty much salivated over the whole menu, a sure sign I would likely come back so I could try other dishes. For this inaugural visit, I went with the chicken and waffles. Or "The Cluckin' Waffle" as Mo's calls it. Loved it. I couldn't finish all of the chicken but lest you think my appetite was too dainty, that was mostly to leave room for dessert.
The Cluckin' Waffle: Mo's waffle topped with fried chicken tenders and drizzled with maple syrup $13
Mo's didn't actually have a dessert menu, at least none that we saw but we were unfazed because they did have The Nutty Waffle: a dessert waffle. What more could we ask for? Uh, although I think we threw our very nice wait server when, despite the generous portions she'd already served us, here we were asking for dessert, especially since we were both already full from our entrees. But that was okay since we asked her to leave off the whipped cream - less calories that way, you know. HAHAHAHAHA. Yes, we were pigs. But it was worth it.
The Nutty Waffle: Mo's waffle topped with nutella, roasted pecans, and powdered sugar $10.50 (we skipped the whipped cream)
Both my waffles in my savory entree and in the dessert waffle were excellent. It was lighter than most waffles I've had or made myself, crisp on the outside, airy on the inside. So waffles are an excellent choice if you ever go to Mo's, whether you want a savory dish or a sweet one. I was also giving the very obvious stare to the entrees coming out for other diners and after seeing plate and plate of different French toast dishes come out, I know what I'm ordering at my next visit. And rest assured, there will be a next visit.

Saturday, October 24, 2015

Thumbprint Butter Cookies with Cookie Butter Filling

Thumbprint Butter Cookies - made dough October 4, 2015 from Sugar Butter Flour Eggs by Gale Gand
Oy, it’s been really busy lately and I’ve been running in place on the hamster wheel. Or the treadmill if you want to get literal about it. The hamster wheel is for work and the treadmill for my half marathon training. Which has been leaving me with very little baking time and even less blogging time. But I’m stubborn and, despite my efforts at a new direction for my blog and cutting back on baking, I’m still drawn back to it like a rubber necker at an accident.

So much of my identity is caught up in baking, desserts, baking, sweets, and you know, baking. I don’t come with a switch so it’s hard to turn that off. Not that I expected to and I’m still baking drastically less than I used to. I mean, I even almost ran out of butter if that tells you how far off the baking cliff I fell. “Fully stocked” used to mean two or three 4-lb blocks of butter in my fridge, ready for the baking marathon I could have at the first possible opportunity.
But for these butter cookies, I had to plan a trip to Costco and buy butter in real-time because I was out. Unheard of. Though it’s probably just as well I had cut back because you could’ve felled me with cheesecloth and a butter knife when I discovered the price of butter had shot up. $12 for a 4-lb pack? What madness is this? Not that it stopped me from buying it but my thrifty soul cringed.
So the bar is a bit higher that I should only use my preciously expensive butter on recipes that have a high chance of success. I’ve been going through all the recipes I’d been collecting for years promising myself I would try them someday and have had my beady eye on this one for awhile. I did alter the recipe because it was supposed to be filled with jam. But I don’t jam or jelly. However, I do cookie butter. Yup, that’s my crack of choice when filling thumbprint cookies.

My ideal thumbprint cookie wouldn’t spread much, would keep the indentation left in the dough before baking so there would be a good-sized well in the center for me to fill with cookie butter. Sadly, this didn’t meet my ideal. The cookie dough I so nicely shaped baked itself flat so the indent looked more like I had flattened the cookie dough ball with a glass instead of making a well. Fortunately, that didn’t affect the taste and, undaunted by all things cookie butter, I still dolloped some speculoos in the center of the cookie and ate it. And it was good. Butter cookie meets cookie butter. All’s right with my world.
8 ounces (2 sticks) unsalted butter, slightly softened
2/3 cup sugar
¼ vanilla bean, halved lengthwise, soft insides scraped out
1/8 teaspoon salt
2 cups plus 2 tablespoons all-purpose flour
¼ cup cookie butter
  1. Cream the butter and sugar in a mixer fitted with a paddle attachment until fluffy. Add the vanilla scrapings and salt and mix until incorporated.
  2. Portion the dough into golf-ball-sized dough balls, flatten slightly then, using your thumb, press the top of each cookie center to make a shallow well. Cover and chill or freeze for several hours or overnight.
  3. Heat the oven to 350 degrees F. Line several sheet pans with parchment paper.
  4. Fill the wells with cookie butter. Bake until very lightly browned around the edges, 25 to 30 minutes. Let cool slightly on the pans then transfer to wire rack to cool completely. Store in an airtight container.

Saturday, October 17, 2015

Sweet Potato Tarte Tatin

Sweet Potato Tarte Tatin - made October 3, 2015 from Dam Good Sweet by David Guas and Raquel Pelzel
You remember my grand decluttering effort which included paring down my collection of baking books? Which also involved my going through them first in case there are any recipes I wanted to get out of the books before I gave them away? Of course it’s been slow going but it has been going. Case in point, I leafed through this baking book and really only found 1 recipe I wanted to make out of it so it seemed like a good idea to try out that one recipe then donate the near-pristine, good-as-new book to my local library for their next book sale. Win-win.
Astonishingly, I had all the ingredients for this recipe on hand when I went to make it. Including a random sweet potato I had bought for another recipe but hadn’t gotten around to using yet and a forlorn sheet of frozen puff pastry sitting in my freezer from my last foray into puff pastry baking. 

I had made a more traditional tarte tatin when I was in culinary school although that was with apples, not sweet potatoes. But I love all things sweet potato so I was intrigued enough to try this one. However, I will admit, I do not have fond memories of making tarte tatin at the Culinary Institute. Mostly because the biggest pain in the right butt cheek with tarte tatin is flipping it over when it was done without burning yourself on the boiling hot caramel at the bottom-then-top of the tart. Which has a distressing tendency to splash over your hand(s) when being flipped over. It’s like caramel’s revenge for the indignity of being flipped over.
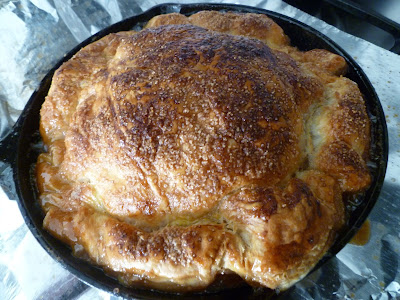
Nevertheless, I took it on because that’s what makes a tarte tatin – you prepare caramel from scratch (from scratch, people – you know I almost never do that), pour it on the bottom of the pan, place the slices of sweet potatoes over the caramel (ideally in a pretty pattern but this is me so let’s not kid ourselves), cover it with the puff pastry then bake until pastry is golden brown and, well, puffy.  When you take it out, you immediately flip it over onto a waiting serving plate and in an ideal world, you have a beautifully caramelized tarte.
When you leave that ideal world and come into my world, you have a caramel I didn’t cook long enough to get caramel-y. Meaning the recipe instructions say to boil the sugar-water mixture until the caramel registers 350 degrees on a digital thermometer. Yeah, did that and the caramel was pasty and anemic-looking. Against my better judgment and baking instincts, I took it off the heat once the thermometer pronounced 350 degrees and poured it into my cast-iron pan. Arranged the not-quite-evenly-sliced sweet potatoes over the caramel (my knife skills are nothing to brag about, hence the unevenness) and covered the whole thing with the thawed sheet of puff pastry. I think the only thing I did right was to bake it the right amount of time, until the pastry was nicely golden brown but not too light.
Then the litmus test that all pastry chefs who make tarte tatin need to pass – flipping the cast iron pan over and getting the tarte tatin right side up without incurring third-degree burns from the caramel. I sort of passed. If you didn’t count the hot caramel that coursed out of the pan onto my dishcloth prudently laid on my counter top (I know my weaknesses) and the inevitable-to-me splash of caramel onto my hand. Yeah, that hurt. So I didn’t really pass that test.
After doing myself bodily harm making this, I would like to tell you this was the best thing I ever ate and worth the burn marks. Unfortunately that would be a lie. Because I didn’t cook the caramel long enough to actually caramelize, it was more sweet, anemic, liquid sugar than real caramel. The sweet potatoes were cooked perfectly, likely more by accident than anything I did, but they were just sweet potatoes with a thin covering of “caramel”. I like all things puff pastry but it didn’t work well here since the caramel soaked into it and took away the flaky crispness of a good puff pastry. So much for my foray into the world of something different. Next time, if I’m crazy enough for a next time (once my burn wounds heal), I think I’ll stick with a more traditional apple tarte tatin. 
One sheet all-butter puff pastry, thawed
¾ cup sugar plus 1 tablespoon for pastry
1 stick unsalted butter, cut into 16 pieces
2 teaspoons vanilla extract
1/8 teaspoon salt
1 ½ pounds sweet potatoes, peeled, ends removed and sliced into 1/8-inch thick rounds
1 large egg
1 tablespoon milk
  1. Heat the oven to 375 degrees F. Line a baking sheet with parchment paper. Place the puff pastry sheet on your work surface and cut out a 10-inch circle. Set the circle on the prepared baking sheet. Prick the pastry all over with a fork and refrigerate.
  2. Place ¾ cup sugar in a small saucepan and cover with ¼ cup water. Gently stir with a spoon to make sure all of the sugar is wet. Place a cover on slightly askew, and bring to a boil over medium-high heat. Keep the mixture covered until the syrup is clear and producing syrupy-looking medium-size bubbles, 3 to 4 minutes. Remove the cover and continue cooking until the sugar is a light butterscotch color and the temperature reaches 320 degrees F. Turn off the heat. Once the sugar reaches 350 degrees, whisk in the butter, ½ tablespoon at a time, waiting until each addition is completely incorporated before adding the next. Stir in the vanilla and the salt, and pour the caramel into a 10-inch cast-iron skillet.
  3. Cover the caramel with the sliced potatoes, starting in the center and overlapping in a spiral outward circle as you go. Top with the puff pastry circle. Beat the egg and milk together and brush over the pastry, and then sprinkle with the remaining 1 tablespoon sugar. Bake until the edges are deep amber and the pastry is puffed and golden, 40 to 45 minutes. Remove from the oven and cool for 10 minutes before inverting onto a large plate. Slice into wedges and serve with or without ice cream.