Sunday, June 9, 2013

Caramelized Bananas and Nutella Crepes

Caramelized Bananas and Nutella Crepes - made June 1, 2013, crepe recipe from Martha Stewart
Banana Nutella Crepes from Frodo Joe's Petit Cafe
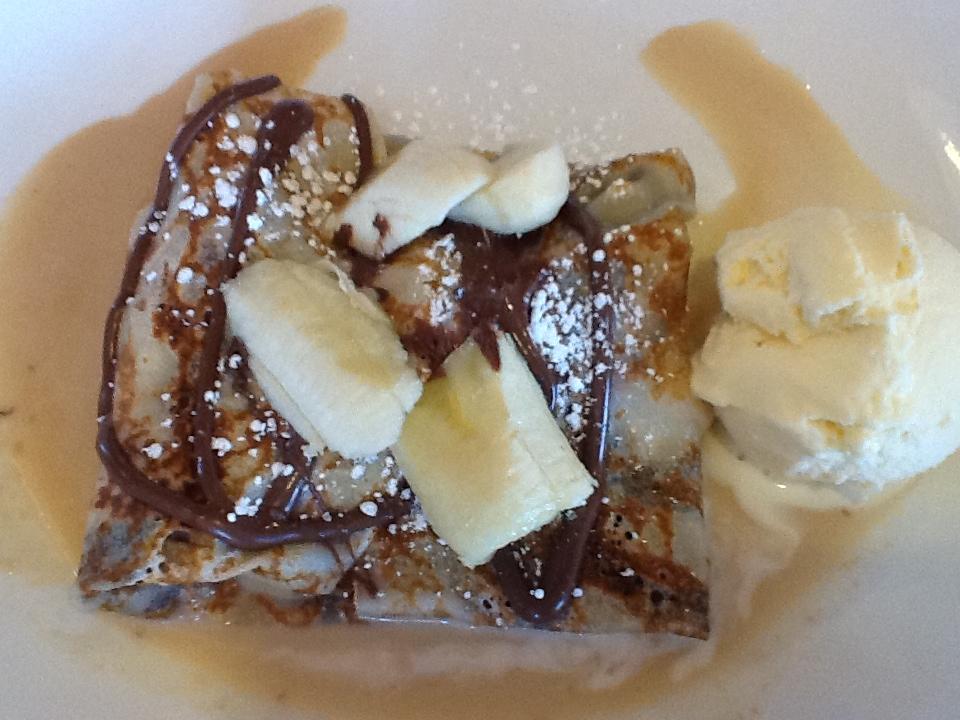
I recently discovered a cafe that serves both savory and dessert crepes.  My niece and I tried them out a few weeks ago and loved their Banana and Chocolate Crepes (pictured above).  It was a simple dessert but no less scrumptious for its simplicity.  So of course I had to try making my own.  For the filling I had already decided I wanted to caramelize the bananas first.  Which was easy enough to do: melt a little brown sugar with a bit of butter and add the bananas until they had softened but weren't too mushy.
I found the crepe recipe on marthastewart.com; it was simple and, with a blender, took mere seconds to make.  You do have to plan slightly ahead since the crepe batter has to rest for at least 15 minutes before using.  I'm not an expert on crepe making so I'm afraid mine weren't as thin as crepes were meant to be and it wasn't until I had already made a couple of crepes in a frying pan that I remembered I actually had a real crepe pan I could've used.  Duh.  Anyway, I spooned the caramelized bananas in the middle of the crepe, folded it up, placed sliced (non-caramelized) bananas on top and covered the whole thing with dollops of Nutella, warmed slightly for easier pouring (dolloping?).  My homemade version didn't look at neatly professional as the one from Frodo Joe's Petit Cafe but it was delicious all the same.  And, as summer heat kicks in, crepes are a good dessert option since you don't need to turn your oven on to make them and it's relatively a short amount of time at the stove to cook them.  Bonus if you serve them with ice cream and fresh fruit.

Crepes
1 cup all-purpose flour, spooned and leveled
1 tablespoon sugar
1/4 teaspoon salt
1 1/2 cups whole milk
4 large eggs
3 tablespoons unsalted butter, melted

Filling
1 large banana, sliced into rounds plus additional if desired
2 tablespoons butter
1/4 cup brown sugar
Nutella
  1. In a blender, combine flour, sugar, salt, milk, eggs and butter.
  2. Puree until mixture is smooth and bubbles form on top, about 30 seconds.  Let batter sit for at least 15 minutes at room temperature (or refrigerate in an airtight container up to 1 day; whisk before using).
  3. Heat a 12-inch nonstick skillet over medium heat.  Lightly coat with butter.  Add 1/3 cup batter and swirl to completely cover the bottom of the skillet.  Cook until underside of crepe is golden brown, 2 to 3 minutes.
  4. Loosen edge of crepe with a rubber spatula, then with your fingertips, quickly flip.  Cook 1 minute more. Slide crepe out of pan and repeat with remaining batter, coating pan with butter as needed.
  5. Melt butter and brown sugar in a small skillet over low heat.  Add banana slices of 1 banana and cook until banana is caramelized.
  6. Add caramelized banana into middle of one crepe and fold into a square bundle.  Turn over so the folded side is down.  Add slices of fresh banana on top if desired.  Warm up nutella until of pourable consistency and drizzle generously over crepe.  Serve immediately.

Saturday, June 8, 2013

Potato Buttermilk Bread

Potato Buttermilk Bread - made June 1, 2013 from Don't Waste the Crumbs
I'm still behind on posts but that just means I have a nice backlog in case I get too busy to bake.  That does happen once in awhile, usually because of work, social activities or (geek alert), I'm too busy reading or listening to an audio book. I've been caught up in Game of Thrones again for the past couple of weeks as the fifth book, Dance with Dragons, became available at my digital library so I've been listening to the audio version like a mad woman before it was due back yesterday.  That meant a lot of time on my treadmill.  I don't have HBO (lament) but according to my friends who freaked out on my facebook news feed last Sunday night, apparently, it was the episode of The Red Wedding.  Yeah, I didn't like that in book 3, Storm of Swords, either.  And as for book 5, don't even get me started on how it ended.  Bah.

Anyway, on to the baking.....

I'm a big fan of potato bread.  My mom used to make it all the time when I was a kid and it was my favorite thing she ever made (and my mom is a really good cook so that tells you something).  I couldn't even taste the potatoes but it was the dense chewiness of the bread that I really liked.  Eating it warm from the oven with melting butter didn't suck either.  Although I've made her recipe before, mine doesn't seem to turn out as well as hers as it wasn't as dense as I would've wanted.  Which is funny as most people probably like a lighter texture in their bread.  Not me.  I want something substantial to chew, not Wonder-Bread air.

I tried out this recipe from Don't Waste the Crumbs as the picture on her blog looked to be exactly the kind of texture I wanted for my bread.  I modified the recipe though by using instant mashed potatoes.  I don't know if that's why my bread came out lighter than I wanted or if I just let it rise too much.  It was good bread (my parents liked it when I brought a sample over to their house) but I'm still determined to re-create the denseness of the original potato bread I loved from my childhood and need to keep looking and/or try this one again with a shorter rise.

2 potatoes, peeled and quartered or 3/4 cup instant mashed potatoes
8 tbsp unsalted butter, room temperature
4 tsp active dry yeast
2 cups buttermilk, room temperature
2 large eggs, slightly beaten
2 tbsp sugar
1 1/2 tsp salt
6 to 6 1/2 cups of bread flour
1 egg, slightly beaten
  1. Have all ingredients ready at room temperature.  If using potatoes, bring a small to medium pot of water to a boil.  Boil potatoes until done.  Add hot potatoes and butter to a mixer and stir well.  If using instant mashed potatoes, prepare according to package directions to make 3/4 cup. Add yeast, buttermilk, 2 beaten eggs, sugar and salt and mix well.
  2. Gradually stir in bread flour until the dough is moist but not sticky.  Knead on low to medium speed until the dough is smooth and elastic.  Transfer to an oiled bowl and turn it over to coat with oil.  Cover with plastic wrap and let it rise at room temperature until it’s doubled in volume, 1 to 1 1/2 hours.  (If your kitchen is too cold, you can preheat the oven to the lowest setting, then turn it off and place the dough inside.)
  3. When the dough has doubled in size, grease two 9 x 5 inch loaf pans.  Punch the dough down, divide in half and form into two loaves, placing them seam-side down in the pan.  Cover with plastic wrap and let it rise again at room temperature until almost doubled in size, about 1 to 1 1/2 hours.  (If you don’t have loaf pans, you can free-form an artisan loaf on a cookie sheet).
  4. Preheat the oven to 375 degrees.  Brush the top of the loaves with the single beaten egg and bake the loaves until they are golden brown and the bottoms sound hollow when thumped, about 40-45 minutes.  Allow to cool for at least 30 minutes before serving.

Thursday, June 6, 2013

Oreo Rolo Magic Cookie Bars

Oreo Rolo Magic Cookie Bars - made May 31, 2013, original recipe

Magic Cookie Bars are like the stir-fry of desserts.  When you want to use up random ingredients in your fridge, you throw together a quick stir-fry: veggies before they spoil, the leftover chicken and/or beef from last weekend's barbecue, cubes of tofu before the use-by date.  Same with magic cookie bars.  I had some pecans I had already toasted from another recipe, Rolos I bought on sale after Christmas, Oreos I bought to bake with rather than eat straight out of the package, a few spoonfuls of salted caramel, and half a can of sweetened condensed milk from a prior recipe.  So voila, the Oreo Rolo Magic Cookie Bars were born.

As with a stir-fry, magic cookie bars are actually pretty forgiving and flexible with the add-ins.  The only "must haves" for me are a crust, coconut and sweetened condensed milk for the topping.  Everything else is whatever you want to use up.  In this case, I processed Oreos into crumbs and added melted butter to make a crust for the bottom layer.  Baked that for 10 minutes to firm it up a little so it wouldn't be too soggy (can't have a soggy crust) then layered on my add-ins: the last of the salted caramel so I could recycle the jar it came in, the chopped up Rolos for more caramel goodness, the toasted pecans for crunch, coconut (I love coconut and it wouldn't be a magic cookie bar without it), chocolate chips, and the last of the sweetened condensed milk.

End result was delicious goodness.  Double bonus that I used up some random ingredients and that this was super easy to make.  I know I say that a lot but seriously, they're the easiest things to make.  Very little mixing and it's hard to overbake these because the coconut signals when they're done - golden brown in spots but not uniformly brown all over. The measurements below are approximations.  Feel free to experiment on your own.  I was originally going to melt peanut butter into the caramel and add chopped up Snickers instead of Rolos but it turns out I was out of Snickers.  I must've used them all up in other recipes.  But it's not a bad idea for a future magic cookie bar creation.

1 cup crushed Oreos, finely processed into crumbs in a food processor
4 tablespoons unsalted butter, melted
2/3 cup Rolos, chopped
1/3 cup toasted pecans, roughly chopped
1 cup chocolate chips
1 cup coconut
1/2 can (7 ounces) sweetened condensed milk
  1. Preheat oven to 350 degrees F. Line an 8 x 8 baking pan with foil and spray lightly with nonstick cooking spray.
  2. Combine crushed Oreos and melted butter.  Press in an even layer in pan and bake for 10 minutes.
  3. Take pan out of oven and spread caramel evenly over hot crust.  Sprinkle with chopped Rolos, pecans, coconut and chocolate chips.  Cover evenly with sweetened condensed milk.  Bake for 25-30 minutes or until coconut is golden in patches and the edges of the bar cookies are brown.

Tuesday, June 4, 2013

Chocolate Sour Cream Bundt Cake

Chocolate Sour Cream Bundt Cake - made May 28, 2013 from Two Peas and Their Pod
I was disappointed in the Brown Butter Blondies so I felt I had to redeem myself with something else.  I still had frosting leftover from the Texas Vanilla Cake so I tried out this recipe from Two Peas and Their Pod.  Oh my.  I'm glad I did because this one definitely turned out and made up for the blondies several times over.
Considering there isn't that much cocoa in the recipe, this still made for a nice chocolate-y cake, not too dark but perfectly complemented by the sweetness of the icing.  The texture was also really good, nice and cakey, not too dense but not too light.  For once I didn't underbake it either....although don't think I didn't get twitchy to take it out 5 minutes before I actually did.  But I'm glad I waited because the texture was just cakey-moist chocolate goodness.


1 cup unsalted butter, plus more for the pan
1/3 cup cocoa powder (I used Scharffenberger unsweetened cocoa)
1 teaspoon salt
1 cup water
2 cups all-purpose flour, plus more for the pan
1 3/4 cups granulated sugar
1 1/2 teaspoons baking soda
2 large eggs
1/2 cup sour cream (or Greek yogurt)
1 teaspoon pure vanilla extract

For the chocolate glaze (I used the glaze from the Texas Vanilla Cake):
4 ounces bittersweet chocolate, finely chopped
1 1/2 tablespoons corn syrup (or agave nectar)
1/2 cup heavy cream
1 1/2 tablespoons granulated sugar
  1. Position a rack in the center of the oven and heat to 350 degrees F. Butter and flour a 10 or 12-cup Bundt pan and set aside.
  2. In a small saucepan, combine the butter, cocoa powder, salt, and water and place over medium heat. Cook, stirring, just until melted and combined. Remove from the heat and set aside.
  3. In a large bowl, whisk together the flour, sugar, and baking soda. Add half of the melted butter mixture and whisk until completely blended. The mixture will be thick. Add the remaining butter mixture and whisk until combined. Add the eggs, one at a time, whisking until completely blended. Whisk in the sour cream (or Greek yogurt) and the vanilla extract. Whisk until smooth.
  4. Scrape the batter into the prepared pan and bake until a toothpick inserted into the center of the cake comes out clean, 40 to 45 minutes. Let the cake cool in the pan for 15 minutes and then invert onto a rack. Let cool completely before glazing.
  5. While the cake is cooling, make the chocolate glaze. Place the chopped chocolate and corn syrup (or agave) in a medium bowl and set aside. Combine the heavy cream and sugar in a small saucepan and put over medium heat. Stir until the cream is hot and the sugar is dissolved. Pour the hot cream over the chocolate and whisk until smooth.
  6. Generously drizzle the glaze over the cooled cake, allowing it to drip down the sides. Cut into pieces and serve.

Sunday, June 2, 2013

Brown Butter Blondies

Brown Butter Blondies - made May 27, 2013, recipe adapted from Great Cookies by Carole Walter

I had tried this recipe before but I had made so many modifications to it that I really couldn't judge the original recipe by itself.  So it was time to make it for real.  Although I confess, I did make a couple of tiny modifications to it.  For one thing, I decided to brown 1/2 the butter instead of barely melting it like the original recipe called for.  And I omitted the nuts of course.  Plus I used milk chocolate chips instead of semisweet.  Oh and I made it in a 9 x 13 pan instead of a jelly roll pan.  But hey, other than that, it's the original recipe :).
I'd like to say all my modifications made for a fantastic result.  However, I proved my own theory that it isn't just about the ingredients or mixing it all together.  It's also about the baking time in the oven and unfortunately, I left these in there a trifle too long.  It's hard to tell from the pictures because they look moist enough.  But to my finicky taste buds, these would've been better if they had been more underbaked.  Truthfully, I hadn't expected them to bake so fast since I was putting them in a smaller pan than the original recipe had called for.  My mistake.  I brought them into work anyway although I was sorely tempted to leave them in the communal kitchen on a different floor so no one would know on my floor that I had made "sub-par" bar cookies.

My coworkers thought I was being silly ("no, don't give them to someone else!") and I got a couple of eye rolls as other people thought these were fine but no, sorry, these didn't live up to my standards.  I will have to make them again at some point and this time (under)bake them properly.


2 ½ cups all-purpose flour, spooned in and leveled
½ teaspoon baking soda
½ teaspoon salt
1 cup (2 sticks) unsalted butter, divided
¾ cup lightly packed light brown sugar
¾ cup granulated sugar
2 large eggs
1 ½ teaspoons pure vanilla extract
5 ounces high-quality bittersweet or semisweet chocolate, such as Lindt Bittersweet, cut into ¼-inch dice

1.     Position the shelf in the center of the oven.  Heat the oven to 350˚F.  Line a 9 x 13" baking pan with foil and spray lightly with nonstick cooking spray.
2.     Strain together the flour, baking soda and salt.  Set aside.
3.     In a heavy-bottomed saucepan, melt and brown ½ cup (1 stick) of the butter over medium-low heat, stirring constantly so it doesn't burn, until it emits a nutty fragrance and butter solids are golden brown.  Remove from the heat and add the brown sugar, mixing well.  Cool to tepid.
4.     In the bowl of an electric mixer fitted with the paddle attachment, beat the remaining ½ cup (1 stick) of butter on medium speed.  Add the granulated sugar in a steady stream and mix until lightened in color.  Add the eggs one at a time, mixing well after each addition.  Blend in the tepid melted butter and brown sugar.   Beat on medium speed until thick and creamy, about 1 minute, scraping down the side of the bowl as needed.  Beat in the vanilla.
5.     Reduce the mixer speed to low and add the dry ingredients in two additions, mixing only to combine.  Remove the bowl from the machine and, using a large wooden spoon or rubber spatula, fold in ¾ cup of the chopped walnuts and all of the diced chocolate.  Scrape the batter into the pan, using the back of a large spoon to spread it evenly.  Sprinkle with the remaining walnuts.
6.     Bake for 28 to 30 minutes (check them at 20 minutes!), or until the top is golden brown and the edges just begin to pull away from the sides of the pan.  Do not overbake.  Remove from the oven and place on a cooling rack.  Let stand 1 hour, then cut into 1 ¾” x 2 ½” bars.

Storage: Store in an airtight container layered between sheets of wax paper for up to 5 days.  The blondies may be frozen.

Saturday, June 1, 2013

Texas Vanilla Cake with Chocolate Frosting

Texas Vanilla Cake with Chocolate Frosting - made May 25, 2013 from Brown Sugar

Thanks to pinterest, the most viewed recipe on my blog by a wide margin is Texas Fudge Cake.  It must've struck some popular pinners and spread accordingly from there (ah, the power of social media).  And it IS a pretty good recipe.  But get your pinning fingers ready because if that was a good chocolate cake recipe, this is an excellent vanilla cake recipe.  In fact, I'll even go so far as to say it's the best vanilla cake I've made so far.  (Let's mull on that for a moment, considering how many cakes I've made over the baking years.) I loved everything about it: taste, texture and ease of preparation.  I don't know where either name came from but if there's any truth in the names' origins, then they really know how to make cake in Texas.

If you don't like chocolate, you can make a vanilla frosting for it or leave it unfrosted as it's good enough to stand on its own without frosting.  It might be a simple cake but that makes it even better because it doesn't rely on fancy add-ins to be a delicious cake.  Sometimes simple is best.

ETA: Forgot a  couple of baking notes. The frosting recipe makes a lot for a 9 x 13 pan as the original recipe called for baking in a jelly roll pan which has a larger surface area for the frosting to cover.  But I don't like my cakes to be too thin so I baked this in a smaller pan. I only used half the frosting for this recipe as I don't like a lot of frosting so you'll notice in the picture that it's a thinner frosting layer.  I reserved the remaining frosting for a different recipe (to go up in a few days).  So if you don't like a lot of frosting either, you might just want to make a half recipe.

1 cup milk
2 sticks butter (1 cup)
2 cups all-purpose flour 
2 cups sugar 
2 eggs, beaten 
1/2 cup sour cream
1 teaspoon salt
1 teaspoon baking powder
1/4 teaspoon baking soda
1 teaspoon vanilla extract 
1 teaspoon vanilla bean paste (optional)

Frosting 
1 cup sugar
1/2 cup unsweetened cocoa powder, sifted
1/2 cup milk
4 tablespoons butter, cut into chunks
2 tablespoons light corn syrup
4 cups powdered sugar, sifted
2 teaspoons vanilla
  1. Preheat oven to 375 degrees F.  Line a 9 x 13 pan with foil and spray lightly with nonstick cooking spray.
  2. In a large saucepan, bring butter and milk just to a boil. Set aside to cool slightly.
  3. Combine flour, sugar and eggs.  Temper in the milk mixture, adding slowly and whisking smooth. Add sour cream, salt, baking powder, baking soda, vanilla extract and vanilla bean paste is using.
  4. Pour into prepared pan and bake for 25-30 minutes or until golden brown and a toothpick inserted near the center comes out clean.
  5. For frosting, 10 minutes before the cake is done, in a large saucepan over medium heat,whisk the sugar and cocoa powder.  Whisk in the milk, butter and corn syrup.  Stir until well blended.  Remove from heat and add powdered sugar, one cup at a time.  Add vanilla extract and blend until smooth; spread over warm cake. Cool completely.

Thursday, May 30, 2013

Crockpot Chocolate Lava Cake

Crockpot Chocolate Lava Cake - made May 25, 2013 from My Recipe Roundup

Ever since I made the Crockpot French Toast, I've been intrigued by the idea of being able to make desserts in my slow cooker.  That opens up a whole new realm of possibilities. I went with this chocolate lava cake from My Recipe Roundup that I found on pinterest as I'm ever on the lookout for a good lava cake.  This was really more like the Black and White Pudding Cake I'd made before than the traditional lava cake that's usually baked in individual portions with a molten center.  The basic principles are the same as the pudding cake: cake batter, sprinkle sugar-cocoa over it, cover with boiling water and let bake.  Or slow cook.  I've also seen something like this called a chocolate cobbler.

Regardless of what you call it, this was pretty good.  The cake baked to rise to the top but when you spoon into it, the "chocolate lava" is lurking just beneath to make a very rich concoction.  It's not meant to be neatly served.  It's just meant to be homey decadence.  Spoon into (small) dessert dishes, be generous with pouring the chocolate lava on top of the cake, and serve warm with ice cream.  And yes, it IS possible to overcook this.  If you cook it too long, the cake portion won't be as fluffy and while there's enough "lava" to keep it from being dry, it'll have a more dense texture if left in the slow cooker for too long.  This makes a lot of servings so you may want to try it out when you have a large group of people over.  And plenty of ice cream.

2 cups brown sugar
2 cups all-purpose flour
6 tablespoons unsweetened cocoa powder
4 teaspoons baking powder
1 teaspoon salt
1 cup milk
4 tablespoons butter, melted
1 teaspoon vanilla extract

Fudge Topping
1 1/2 cups brown sugar
1/2 cup unsweetened cocoa powder
3 cups boiling water
  1. For the cake: Mix together the sugar, flour, cocoa, baking powder and salt in a large bowl. Stir in milk, melted butter and vanilla until combined. Spread the batter over the bottom of a large crock pot.
  2. For the fudge topping: Mix together the brown sugar and cocoa. Sprinkle mixture over the cake batter.
  3. Pour the boiling water over the top. DO NOT STIR! Cover and cook on High for 2 - 2 1/2 hours.
  4. Turn off heat, and remove lid. Let sit 20-30 minutes before serving, so its still warm but won't burn your mouth.